I was approached with this question from a student: “I’m about to graduate and I have a lot of student loan debt. Any advice on what I can do?”
Loans can be a pain in the ass especially right out of school. I remember times looking at my bank balance, cursing my loans, and regretting ever going to school. That changed as I got a handle on finances, had a payoff plan, and started to see loan balances go down.
Here’s some information and ideas to help tackle student loans (it’s specific to the US but the general idea is the same no matter where you’re at). If you’re considering a degree or are still in school, see the later sections about how to minimize what you need in loans.
You can get one free credit report a year from each of the three major credit companies. Your credit report will give you student loan information and credit cards, car loans, etc. Tip: Check your credit every four months (only check one company each time).
Make a list of each of your loans, when you have to start paying them (grace period end), subsidized/unsubsidized, the interest rate (and if it’s variable or fixed), monthly payment amount, and whether it’s federal or private. If you took out any government loans, you can find those here
When you see the total, it’s ok to curse, yell, or sigh in relief (if you’re lucky). Then remind yourself it’s an investment that you made in yourself intended over a long period of time. It also gets easier/more manageable with time.
Making a plan
Get in the mindset. Your income will likely grow as your student loan balances shrink. The beginning is the hardest. You may not have any spare money right now but in a few years you might have a lot extra to put towards loans. The important part is that your loan payments are manageable; if they’re not, contact your lenders to look at other options (like income-based repayment or deferment).
Make a system for bill paying. Make sure lenders have the correct mailing address (so you don’t fall behind by accident). Some lenders offer an interest rate discount if you use autopay. Setup reminders or use a service like Mint Bills (bills.mint.com), which can keep track of your loans, payment due dates, and send reminders (Disclosure: I use Mint/Mint Bills).
Look into consolidating or refinancing your loans to save money. You may be able to combine some of your loans into one payment and also lower your interest rate.
Refinancing: Get quotes from companies like Nelnet.com or SoFi.com (Disclosure: Nelnet has been my servicer for 10 years.)
Set a budget (to ensure you can pay your loans). You can use something as simple as thisor a budgeting website. Mint.com is a great free site to monitor spending and set a budget. “You Need a Budget”is another popular budgeting website (it has a yearly fee or is currently free for students).
Decide how you want to tackle your loans. There’s a lot of different techniques to pay down loans (especially if you have other types of debt like car loans and credit cards). The general rule with student loans is to prioritize private loans first, then variable-rate loans, then highest-interest rate. You may want to change the order depending if a loan is subsidized or unsubsidized. This article has a good breakdown of what order to pay off.
Find ways to make extra cash where the money can be dedicated to paying a loan. It’s a lot easier to take a crappy side gig or work overtime hours if you have a purpose. There’s a huge sense of accomplishment to get even one loan off your plate and that can keep you motivated to work towards the rest.
Remember there’s a tipping point. Not all debt is bad debt. Once you put out the fire on your most demanding loans, it might make sense to shift focus to other financial goals. If buying a computer or piece of gear will increase your workload (and salary), it might be worth investing in that before paying down a subsidized loan. Putting money in a retirement fund or saving for a house might benefit you more in the long run than paying off a low-interest loan. In time, you’ll have options.
If you’re not in school yet
If you’re considering audio school, here it is straight: You don’t need a degree to get a job in audio. Do your odds of getting a job go up with a degree? 95% of time – No (it takes just as much hard work as someone without a degree). Are there good reasons to get a degree or certificate? Absolutely (but that’s a whole other topic.) Life Lessons and Audio Education.
One very important detail that a lot of audio schools don’t advertise is that it can very realistically take one to two years after graduation to earn a paid position. That’s a year or more working for free likely followed by a minimum wage job (up to $15/hr). That’s a difficult wage to survive on – even more so with student loan payments. Most people pursue an audio degree to work in music, film/tv or video games but a lot of graduates end up working elsewhere – jobs like academics/research, sales, IT/tech, or not in the audio industry at all. When you see the bigger picture, is it worth spending $150k+ for a full-priced 4-year degree?
There’s value in an audio degree and there’s money-saving ways to getting one. For example, take as many classes as you can at the cheapest school possible (community college, in-state school, or somewhere you’re offered a good scholarship). There’s no reason to pay a music or film school $1,000/credit hour for a general ed class when a community college offers the same class for $50/credit hour (check first that it’ll transfer to your audio school). You can earn college credits without having to take the course by passing a CLEP exam, which is $80/exam, offered in a lot of topics, and accepted at thousands of colleges and universities.
Ask a lot of questions about the audio program you’re interested in: What percentage of graduates are employed in the field 5 years out of school? After 10 years? What kind of work are they doing? Where are they located? A school on the opposite side of the country (or out of the country) may not be the best choice if most of its graduates stay local and aren’t working in the field. If it’s affordable, pick a school where you might stay after graduation (this accelerates the process of meeting people, doing internships and low paid work, etc).
If you’re already in school
Look into community college classes and CLEP exams to save money on tuition.
Don’t take on student loans (or credit card debt) with the plan to “deal with it later”
Take a part time job – especially at your school’s studio, a local venue or media outlet (doing anything paid – you’ll learn just being in the environment)
Take professional projects so you can build up credits while in school
If you want to experiment, do it while you’re in school. Do an internship in something you might be interested in but aren’t sure about. Move for a summer to a city you might want to live after graduating. It’s better to find out what you like/don’t like while in school than when you’re in the field, broke, and harder to make a change.
Get in the mindset now of living frugally. It’ll make things a lot easier the first couple years out of school. Live with a roommate, eat cheaply, and don’t buy a lot of audio gear – yet.
Save, save, and save more before and during your senior year.
Consider taking a job that pays well (but may not be in the field) to build up your funds before jumping into the industry.
I recommend having 3-6 months minimum of living expenses saved up for post-graduation (a year is even better). The more money you have to cover expenses means the more time you can spend interning or working a low-paying job.
For everyone
Student loans, like any loans, can quickly become overwhelming if you don’t manage your money wisely. It’s unfortunate to see someone have to leave a job they love because he/she couldn’t pay the bills. The first couple years out of school can be really tough – which is why it’s even more important to be organized, diligent, and careful with your finances. The habits you form now can affect the rest of your life and career.
Seattle SoundGirls was started by Natalie Bayne and Brittany Cohen. Natalie taught at the California Recording Institute in the early 2000’s and considers it the best job she ever had. She loved teaching but sadly she never had any female students. Natalie remembers what it was like being the only woman in her audio courses, she found it to be very isolating. So, Natalie decided to start a program specifically geared toward teaching audio skills to girls. (more…)
In part one, we covered file transfer between a video workstation and DAW and how to prep these materials for a sound editor. In this part, we will cover some of the basics of sound editorial.
Different types of sound editing
Sound editing for picture can be broken into different elements (and job titles):
Dialog editing (dialog editor)
Music editing (music editor)
Sound FX editing/sound design (sound designer)
Foley editing (Foley editor)
These roles could be different people or it could be one person doing all of the above. In credits, if someone is listed as “Sound Editor” they likely worked on multiple elements.
Dialog Editing
As we saw in part one, the materials are brought into an audio workstation from a video workstation (through an AAF or OMF) and then “split” so that each element is placed on appropriate tracks. The dialog editor is responsible for going through all of the dialog tracks for the following:
Organizing files within each set of tracks
Sorting through tracks and removing regions so only usable or preferred mics are remaining.
Once the appropriate mics are in place: adjusting fade ins, outs, cross fades, and filling in holes as necessary.
Removing unwanted sounds such as pops, clicks, hums, thumps, or other noises that can’t be removed by real-time mixing. Sometimes the dialog editor can remove other non-desirable sounds like dogs barking, sirens, or an unneeded car drive-by.
Repairing sounds that can’t be fixed by real-time mixing (such as mic dropouts)
Editing ADR (actor’s lines that were re-recorded in the studio) and voice-over narration
The fundamentals of dialog editing
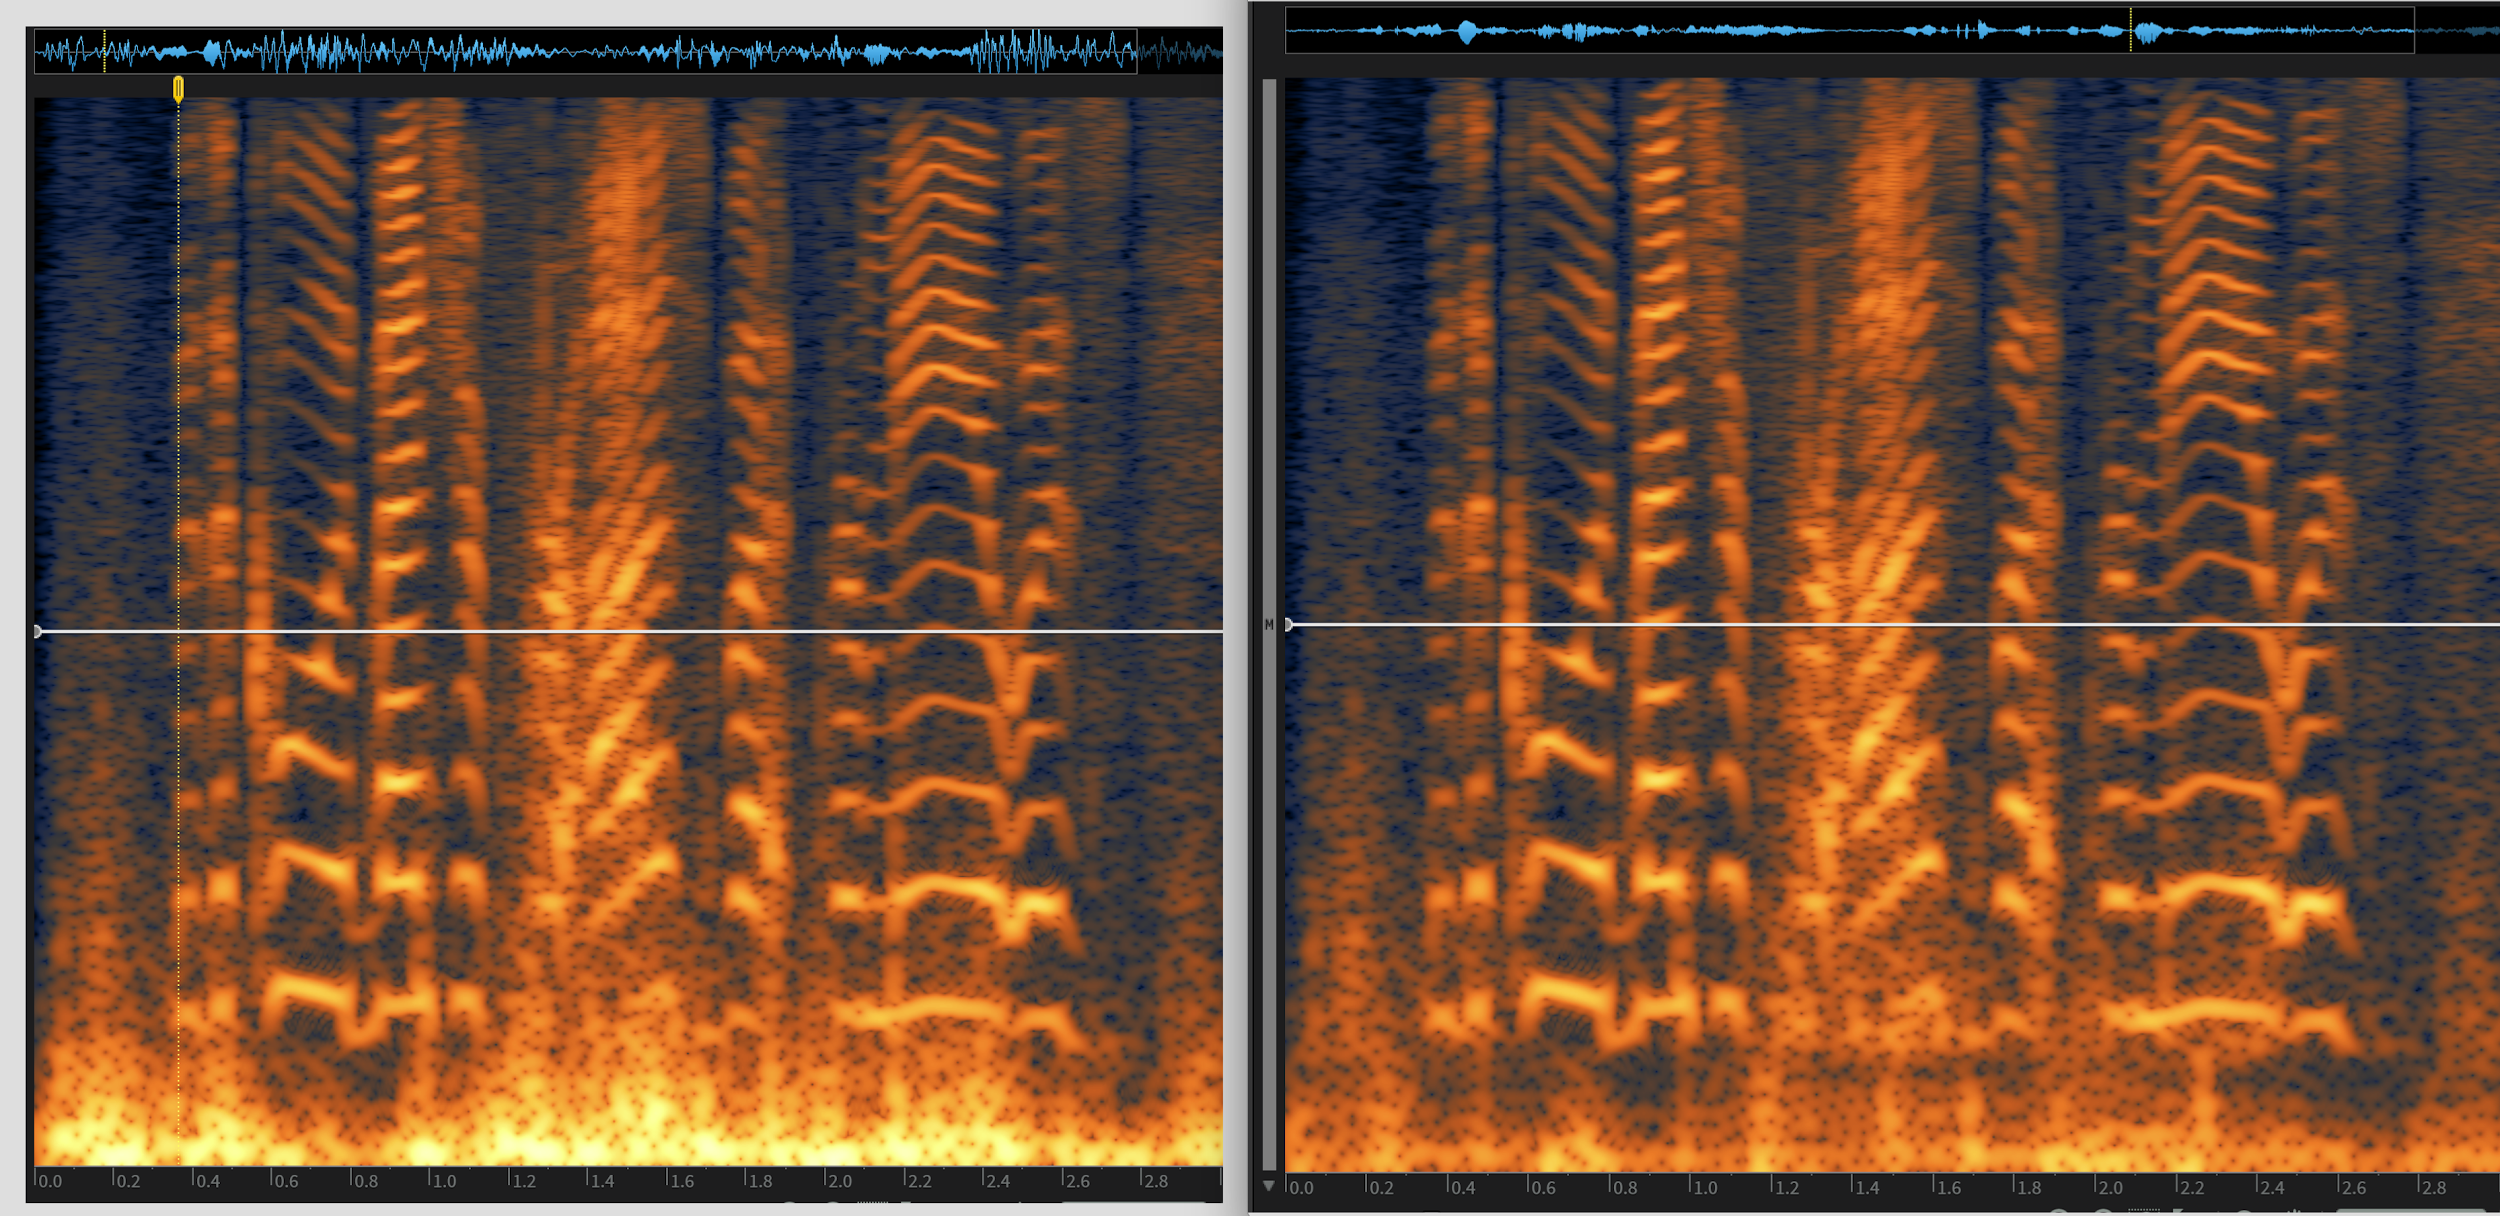
Here’s an example of a very basic dialog edit; The above track is edited while the grey track (lower) is how it was delivered by the picture editor.
Production dialog naturally has an audible noise floor (from background noise). For an exterior shot, this could be distant traffic or light wind; interior might be an air conditioner running or a refrigerator hum. Most dialog clips will need a fade in/fade out to make the ambience come in (or shift to another mic) more naturally. In the above example, there’s a small spot where a mic is missing. The dialog editor would need to “fill” that – in this case, the original audio in that area was fine so the region was extended to fill in the hole.
Towards the end of the clip (the 5th region), an edit was moved slightly to clean up a bad dialog edit in the middle of a word. At the very end, the original audio had something going on (a noise or start of a new word). That had to be edited to add a clean fade out using audio from earlier in the track.
Removing mics
This is a before and after look of two tracks of dialog. It’s two people with separate mics talking at close proximity. Even just looking at the regions (without listening) you can get a general idea of when one person (or both) are talking. Even though it looks obvious, it’s still a good idea to listen through each track to make sure you’re not removing anything important that’s hidden in the waveform (like a quiet word or laugh). In this example, the second region of dialog was fill added by a picture editor (or assistant) that came from another scene. That had to be replaced with fill that from this scene to match sonically. It may have sounded fine in the picture edit bay, but the ambience shift would have been really obvious to the mixer. Sometimes issues like that aren’t audible unless you’re listening with professional-quality headphones, studio monitors, or with a compressor on the dialog.
Dialog organization
There’s a lot of different ways to organize dialog and the style can change depending on a few factors (like the style of project or the mixer). For example, when working on reality tv shows (or documentary), I like working with two sets of tracks: interviews and in-scene dialog. A scene could switch many times between action (in-scene dialog) to an interview of someone talking about what’s happening. Here’s an example of that style:
Even though it’s the same person talking, it doesn’t make sense to have on the same track because it’s different locations, different mics (or mic placement), and the source mics probably have different levels.
That style of dialog editing may not work for a scripted film or tv show, though. It may make more sense to have 5-10 generic dialog tracks. Regardless of who’s mixing, you typically want to edit the same character/same mic on the same tracks through a scene. In this example, there’s 3 people (or three mics):
It’s possible that the character on DIA B will be on the track DIA C in the next scene.
There’s a lot of small details to dialog editing that will be specific to the mixer you are editing for; Below is the same audio but edited to another mixer’s preferences (no straight fades, longer fade ins/outs, switching between tracks A-B and C-D between scenes):
It’s always a good idea to speak with the mixer you’re editing for to get a sense for their preferences. Some mixers have 5 dialog tracks ready to go and others have 20. Some mixers only want a specific type of cross fade. It can help to see another project that was edited for that mixer, too. In essence, the dialog editor’s job is to make it easy and seamless for the mixer to import the dialog edit and start working as quickly as possible.
Removing sounds
It’s pretty much expected for a professional dialog editor to know how to do detailed audio clean up using corrective software or plugins (with functions like declick, decrackle, and hum removal). Detail work is the key; Broadband noise reduction (globally reducing noise) typically happens during the mix, not by the dialog editor.
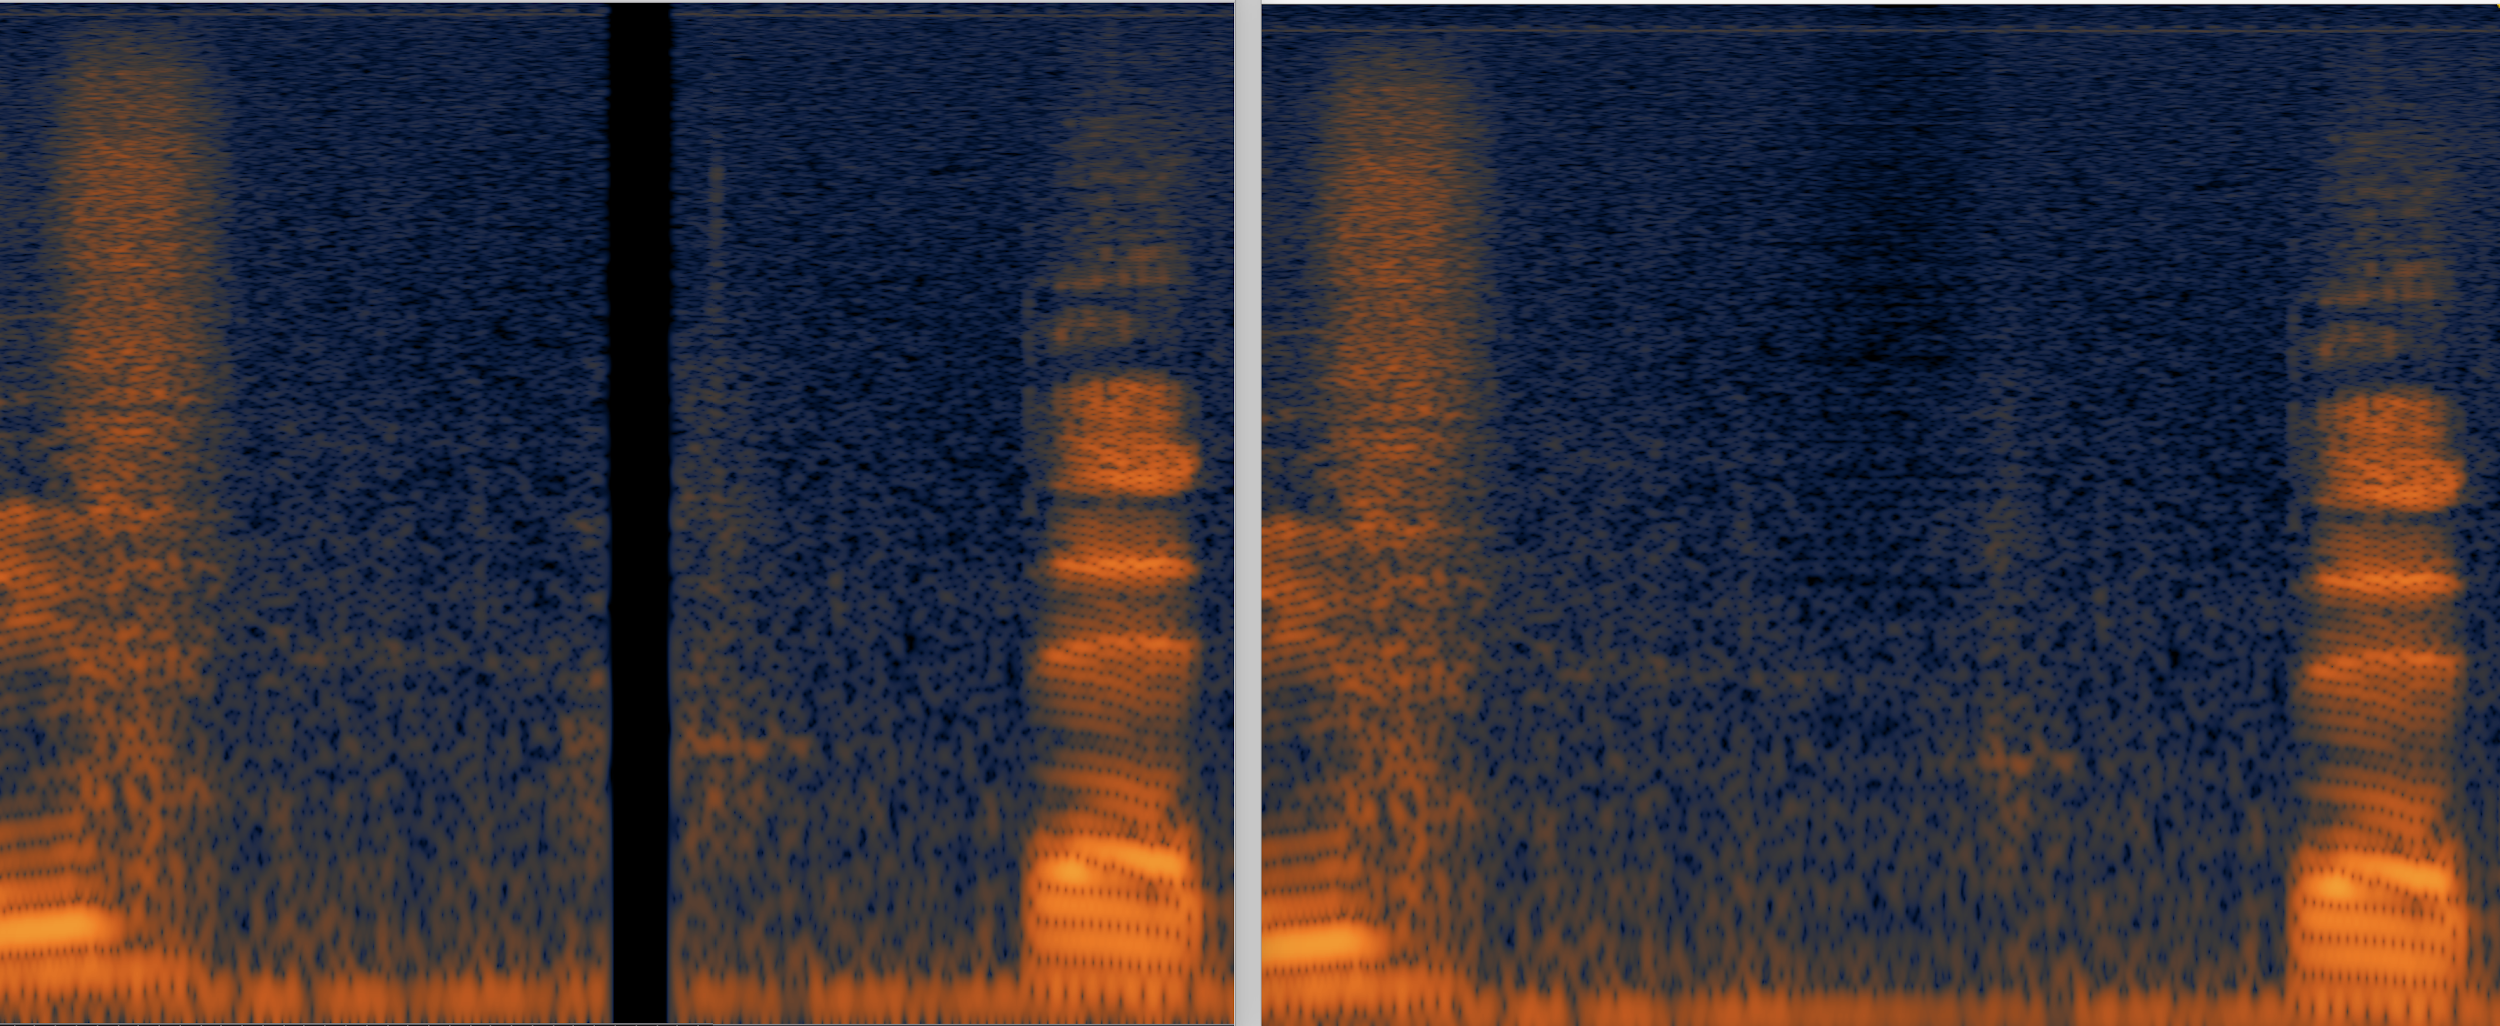
Izotope RX is commonly used software that dialog editors use to remove problem sounds. In the example below, there’s wind on the mic that’s causing rumble and clicks. The left side is the original audio; the right side is after it’s been treated by RX 5 (to remove low pops, de-plosives and declick):
The biggest change is in the low frequencies (seen as bright yellow in the left photo). What’s impressive is that it’s done without compromising the quality of the dialog. A mixer could achieve a similar result with a high pass filter but they would be completely losing low end information – which can cause a shift in ambience or negatively affect the sound of the voice.
Izotope can also repair mic dropouts, as seen in this before and after:
Tips for dialog editing
One trick that I use when dialog editing is to add EQ and compression (for my own reference) – basically to listen similarly to how the mixer will be. It may take some adjusting between scenes but the idea is to hear things that you may not catch otherwise. For example, some lavs sound very dull or boxy (especially if poorly placed). A lav might need 6 dB or more of a high end boost – significant enough to hear issues that went totally unnoticed before.
Sometimes it’s up to the dialog editor whether to cut a scene with lavs or booms (this is another discussion to have with your mixer; some people prefer one or to have both options in the cut). It can be hard to gauge which sounds better when one of the EQs is totally off (or levels are totally off). In addition to adding a temp EQ, it can help to adjust clip gain as you’re working. Ultimately this could help your mixer too (if they are using clip gain data when it comes time to mix).
Unused mics: There’s a couple ways to handle mics that aren’t needed. If there’s two mics on the same person and both sound pretty good, it’s ok to edit both and leave one unmuted and the other one muted. You could also make “X” tracks; “X1, X2, etc” and place any unused tracks on there. Your mixer may want these tracks or not (that’s another question to ask). It’s good to hang onto as much as possible in your own work session, either way. If a mixer later asks, “were there any other mics for this spot?” you can easily see how many mic options there were and can listen to the alts (so you can explain why you chose the way you did).
If you’re doing any processing (declicking, etc), it’s really important to keep a copy of the original somewhere accessible. Sometimes it’s muted on the track below or you can make a track labelled “unprocessed” (or something similar) so anyone can get back to the original, if needed. If it’s only a small portion of a region it may not be necessary to separate out. In general, you want to make it as quick and easy as possible for someone to hear the original (whether it’s on another track or pulling out a handle).
Headphones versus studio monitors: This is a personal preference, but I typically prefer headphones unless I’m working in a decent sounding room with monitors that I know and trust. It’s hard to hear rumble on a speaker that only has a 6 inch woofer, for example. If I’m working at a studio, I would rather edit on a mix stage than an edit bay (it’s not always possible but it’s really helpful if you have an option). Even better is to work in the mix room that the final mix will take place. The mic choices that you make in one room may sound very different in another – especially between a small edit room and a mix bay.
Advanced dialog editing
This has been a basic overview of dialog editing. There’s more advanced skills that come up such as:
Removing sound fx that naturally occur in production audio so they can be used in the M&E (foreign versions)
Creating fill that can be used for ADR, filling in holes, or used as transitions between mics
Adjusting mics for phase or sync issues
Conforming lav mics (from the source recording) when they aren’t included or cut by the editor
Who makes a good dialog editor?
Dialog editing is a good fit for people who like to work alone and is generally more independent and less stressful than mixing. You have to be detail-oriented and like problem-solving. It’s rewarding because it’s often a drastic change between where you started and what it sounds like when you’re done. It can be really challenging at times, too. As far as sound editing goes, it’s probably the most important job (because dialog is up front and center – literally).
A Little Dab’ll Do Ya… Bringing a Corporate Mindset to the Music World
Despite the fact that we are in a creative business, I have found that a little dash of “corporate” goes a long way.
My mother is an MBA, and a wiz in the corporate world. While I was growing up, she would come home from one networking event or another and would tell me about the discussion topic of the night, who she met, etc. When I was older, she took me along with her to a couple of these events. It is from these experiences that I picked up a few techniques that have served me surprisingly well as a youngin’ coming up in this industry.
The first of which is the use of LinkedIn. You’d be surprised how useful this social media platform has been! It’s fairly simple: you create a profile, post some pictures, fill in your resume, and voila! LinkedIn profile. A lot of the older industry corporate bigwigs are on this platform (which you can find by searching the company they work for), and you now have immediate access to them. Start looking for groups and conversations that they’re creating or commenting on, and start participating in the discussions. The more you talk, the more views your profile will receive, and the more connections you will gain. I myself have connected and chatted with studio owners and assistants, other musicians, and radio DJs. Also found on the site are interesting and fascinating articles regarding the state of various aspects of the music industry, from the SoundCloud changes to the debate on whether record labels are still relevant. Lots of interesting perspectives, and a wealth of knowledge and connections, all at your fingertips.
Secondly, prepare for and learn how to network, and always be in “networking mode.” I always keep a stock of business cards on hand, whether it’s in my wallet, a cardholder, or just my pocket. You never know who you’re going to meet in your day-to-day life! As soon as you do exchange cards with someone, keep in mind that this whole industry is based on connection, so be sure to follow up with them via either email or phone as soon as possible. And definitely FOLLOW UP! It’s a rare thing for people to keep in contact, let alone show up, and just the initiative of sending off that little thank you note for meeting with you says wonders.
The bottom line is this: CONNECTION. Keep meeting with, and talking to, as many people as you can, and build relationships. Every time you meet with someone, don’t necessarily expect to come out of it with a new job or opportunity. Hope to come out of it with a new friendship, mentorship, or connection. Ask them about their life, their career moves, what benefitted them, what didn’t, etc. People love to talk about themselves, and 9 times out of 10 they’ll be happy to answer and help you out.
If you’d like to go more in-depth in your reading about networking tips, I have found this article to be extremely helpful: 20 Tips on Networking in Music Industry
SoundGirls Invited to Feinstein’s/54 Below
Feinstein’s/54 Below, Broadway’s Supper Club, offers an unforgettable New York nightlife experience, combining performances by Broadway’s best with world class dining in an elegant setting. Steps from Times Square, the club is known as Broadway’s Living Room, a home away from home for Broadway professionals and audiences alike.
Amanda Raymond has invited SoundGirls.Org members visit and tour Feinstein’s/54 Below on the following dates.
If you are interested please RSVP to soundgirls@soundgirls.org with the following information:
Name
Contact -Email
Phone
Date Requested
Second Date Requested
Space is limited.
Dates/Schedule: (Folks can come for the whole day if they want, or any parts and pieces they would be interested in.)
10/4/16:
3pm – 5pm – Sound Check Show 1
7pm – Show 1
10/6/16:
2:30pm – 4pm – Sound Check Show 2
4pm – 5:30pm – Sound Check Show 1
7pm – Show 1
9:30pm – Show 2
11:30pm – Show 3
10/10/16:
3pm – 5pm – Sound Check Show 1
7pm – Show 1
10/11/16:
1pm – 3pm – Sound Check Show 2
3pm – 5pm – Sound Check Show 1
7pm – Show 1
9:30pm – Show 2
10/12/16:
1pm – 3pm – Sound Check Show 2
3pm – 5pm – Sound Check Show 1
7pm – Show 1
9:30pm – Show 2
10/14/16:
11am – 1pm – Sound Check Show 3
1pm – 3pm – Sound Check Show 2
3pm – 5pm – Sound Check Show 1
7pm – Show 1
9:30pm – Show 2
11:30pm – Show 3
10/17/16: 2pm – 5pm – Sound Check Show 1 & 2
7pm – Show 1
9:30pm – Show 2
10/20/16: 2pm – 4pm – Sound Check Show 2
4pm – 5pm – Sound Check Show 1
7pm – Show 1
9:30pm – Show 2
10/21/16: 11am – 1pm – Sound Check Show 3
1pm – 3pm – Sound Check Show 2
7pm – Show 1
9:30pm – Show 2
11:30pm – Show 3
10/25/16: 1pm – 3pm – Sound Check Show 2
3pm – 5pm – Sound Check Show 1
7pm – Show 1
9:30pm – Show 2
10/28/16: 12pm – 2pm – Sound Check Show 3
2pm – 4pm – Sound Check Show 2
7pm – Show 1
9:30pm – Show 2
11:30pm – Show 3
10/29/16: 2pm – 4pm – Sound Check Show 2
4pm – 5pm – Sound Check Show 1
7pm – Show 1
9:30pm – Show 2
In Search of the Perfect Whoosh: 5 Great Sound Effects Resources
As a sound designer, my sound effects library is one of my most significant resources. It is slightly insane how much time I devote to finding the perfect whoosh, drone, hit or random squishy sound for my sound design work. I can demo hundreds of versions of the same type of sound for hours, looking for one that’s got just a bit more HF or is half a second longer or is a touch more organic than electronic.
I’ve built up my sound effects library with love and care over the years and like most designers, I have my favourite places to find new sounds. Here’s a few:
There are two reasons I love ProSoundEffects. One, the single-downloads library is comprehensive, well-organised and the sounds are high-quality. Two, the PSE Hybrid Sound Effects Library is one of the best investments I have ever made as a sound designer and my starting point for creation or inspiration for almost every project. The number of sounds is staggering (tens of thousands), the audio quality is excellent, and it has a good range of more specific sounds not included in a lot of other libraries, underwater, subwoofer, and surround recordings in particular. The Hybrid Library isn’t cheap but you can get a significant discount through the Freelancer Program.
Sonniss is a great place to find more creative sound effects. I mainly use it to source sound design elements like hits, tones and rises and for interesting atmospheric ambiences and textures for gaming demos. You have to purchase sounds by collection, which can be a little annoying if you’re only after one or two files, but the prices are reasonable, and they do regular sales and giveaways.
A Sound Effect offers libraries from independent sound designers, which means their content is always pretty unique, even if it’s not as comprehensive as some of the other larger websites. It’s also great as a central resource for content that’s otherwise scattered across individual websites. Keep an eye on their social media feeds for sales and free stuff, in particular, the free downloads, which are great for discovering new designers and libraries that you can then explore in more detail.
Freesound is a hidden treasure trove of audio recordings and created sounds. Free to join, it describes itself as a “collaborative database” and as such, although the amount of content is vast, the quality is vastly variable. I use Freesound to find the everyday and the exotic, particularly location recordings of various countries. I’ve found great recordings of medieval battles, Antarctic penguin colonies, Japanese markets and African villages all on Freesound. All sounds are available under a Creative Commons License, so be mindful of this when using the sounds and always attribute as required.
Foley It Up!
When you can’t find what you’re looking for, record it yourself! It’s fun, free (once you have the kit) and you’re adding to your own FX library. Some of my favourite sounds are ones I created myself and after hours of robotically demo-ing hundreds of sounds, you’ll probably be glad of the fresh air, or at least the blood flowing back into your legs. I created the sound of a girl drowned in a bath with me, my partner, our bathroom, a Zoom H4 out of splash range and well-rehearsed safety signals. Who says sound design isn’t edgy?
There’s a great list of suggestions to get your Foley juices flowing here
There are tons of sound effects libraries out there, and I’m sure you have your own favourites to add to this list. Once you start building up a collection, the next step is organisation. It’s not as exciting as the sounds themselves, but just as important if you want to avoid hours of trawling to find a precise sound in your database. Expect a future blog post about my journey into audio asset management, but until then, happy whooshing.
SoundGirls Workshops – Rat Sound Systems
Soundgirls.Org Workshops – Dec. 2016 and Jan. 2017
All Seminars are held at
Rat Sound Systems
486 Constitution Ave
Camarillo, CA 93012
Seminars taught by Ivan Ortiz
10 am to 2 pm
Cost per seminar $40
20% discount for two or more seminars
Financial Assistance Available
Dec. 10 – Workshop on Best Practice for Throw and Go FOH and MONs
Seminar will cover:
Venue Limitations (Stage dims, proximity effect, House gear)
Priority in dialing a mix
Foldback mixing
Microphone selection and placement
File Storage
Digital console file management
What size USB, Virus protection
Festival file management for guest engineers (output patching, global, scenes, etc.)
Overview on different consoles – Hands on
Digico
Midas
Avid
Soundcraft
Dec. 17 – Power / Networking – Workshop on Best Practice for Power
Seminar will cover:
3 phase power vs. single phase
Clean power source
Isolating transformers
Battery backups
What you must know
Multi-meter
Dynamic Load
Generator power
Load Balancing
Networking
TCP/IP and the dot whatevers
Audio via Cat5 (Dante, AVB, etc.)
Jan 18th – What skills You Must Have
Seminar will include:
Listening/Mixing
Technical
Bring your many hats
People Skills
Communication
Know your place in a production
Working with Stage Crew
What are Sound Companies looking for in a technician
Qualities
Knowledge
Personality
Jan 14 – Understanding RF
Seminar will include
Transmission
Antennae
Cables and Impedance
FCC regulations
Active / Passive / Helical
Best Practice
Ideal and not so ideal scenarios
What not to do
Having a plan of action
Coordination
US Major cities
Tools / Software
Reality check
Limited Spectrum
Registration – Space is limited
If you would like to register for these seminars – please email soundgirls@soundgirls.org with the following info. We will send you an invoice to pay for the seminars. You will not be registered until payment is made. We will send you confirmation of registration.
Please include
Name:
Phone:
Email:
Seminars you would like to register for:
Dec. 10 – Workshop on Best Practice for Throw and Go FOH and MONs
Dec. 17 – Power / Networking – Workshop on Best Practice for Power
Jan 18 – What skills You Must Have
Jan 14 – Understanding RF
All seminars are $40, there is a 20% discount if you register for two or more seminars.
Financial Aid is available.
Good Foundations Part Two
Last month we looked at preparing for a monitor gig – all the planning that happens long before we make noise. This month we’ll look at how to run the initial soundcheck and dial the band’s mixes up in an efficient and stress-free style! Good Foundations Part One.
You may have heard the old adage about monitors being 50% technology, 50% psychology. Well, there’s a lot of truth in that, although I’d probably go with thirds each of technology, psychology and good organisation!
So let’s say we’re now in the rehearsal studio or setting up for soundcheck. Everything is neatly labeled and patched in – organisation – and it’s time to get busy with the technology.
My first task is always the RF, and the first part I address is the setting on each unit. I make sure all the sensitivities, hi-pass filters, volume boosts, limiters etc are set to where I want them, then I turn to the RF itself (I highly recommend getting a hand-held scanner). I make sure the frequencies are both clean (no outside interference) and intermodulation-free (not interfering with each other). Once tuned to the chosen frequencies, the easiest way to check this is to have all the transmitters switched on (including mics and guitar packs), then switch off one transmitter at a time and see if the relevant receiver goes ‘quiet’ (displays no RF). If that’s the case, happy days; if not then there’s work to do, which I’ll address in greater detail next month.
When that’s all clear, I send pink noise to each IEM in turn and listen to the packs – left then right so I know they’re patched correctly. I walk the performance space and listen to each pack, to check that there are no drop-outs. Then I follow the same pink noise process with any hardwired packs on stage (again, check any filter switches are where you want them), and then the wedges, including my PFL.
Now I know that my outputs are good, I turn to the vocals. I set the gains, then dial them into the relevant IEM packs along with a touch of reverb.
Then it’s time to EQ the wedges. Using the main vocal mic, I first reduce any frequencies that just don’t sound good; then I see how far I can push my send before feedback, and pull out anything troublesome on the output EQ. I copy that EQ to all the wedges as my baseline. For the wedges with a vocal mic in front of them, I like to have a good 6dB of spare headroom on my send so that I have someplace to go, and I’ll often make that change on the mic input EQ.
If you have a singer who uses both IEMs and wedges (I don’t encourage it, but sometimes people are set in their ways), then it’s a great idea to split the vocal mic across 2 channels – one for the IEM, one for the wedges – so you can have different EQs.
The final stage of tech-checks is the inputs – it’s time to get the backline techs and FOH engineer involved for a line check. Good communication speeds this up – make sure you and FOH can hear each other, and if you’re in a big space then put both your shout mics through the wedges, or give the techs an IEM pack each so they can hear you too.
Finally, you’re ready for the band – and the psychology! A common mistake amongst new engineers is to have the band all pile in and play at once. This is a bad move because you won’t have time to set your gains and dial mixes in before they all start telling you what they can’t hear! One at a time is the golden rule. Have the drummer hit each drum individually – around 30 secs per drum should be sufficient to gain it and set a rough EQ – you can fine-tune later. When you’re fairly happy with each drum, bring that up in the drummer’s mix and move on to the next. Then have them play sometime, so they can tell you what they need more or less of.
Next up is bass. Set the gain and then have bass and drums play together. When the rhythm section is happy, I dial a rough drum and bass mix, minus overheads, into the other IEM packs (but I don’t do this if the band are on wedges, because they’ll get a lot of what they need acoustically).
Then I have guitars, keys, and any remaining musicians play one at a time, set each gain and bring them up in their own mix. Now they can each hear themself and the rhythm section.
Next, I ask them all to play together (no hard drive tracks at this stage, just a jam) and dial whatever else they need to hear for their ‘starting point’ mixes.
I then add hard drives if they’re being used, and finally, I hear the vocals.
It’s time to run a song and see how it’s all sitting. You’ll still need to tweak as you go along, but this process gets you to a really good place with the minimum of fuss.
Newer bands, in particular, will sometimes do two things which you, as the monitor engineer, should take charge of. Firstly, they often get excited and all want to play at once when they get behind their instruments. Make sure they can hear you, explain that you’ll build their mixes methodically and ask them to play one at a time. Secondly, they’ll start apologising every time they ask for a change (although this may be because I’m English and we apologise for everything!) You need to offer reassurance that you are there for them, so they can ask for what they need without worrying about it.
There are different ways of working, and you’ll develop your own over time, but this is a process that has never let me down. It leads to a happy band. And a happy band equals a happy monitor engineer!
After all, our purpose is to give the band the best audio environment possible, so they can get on with their job – giving the audience a truly kick-ass performance!
X
We use cookies on our website to give you the most relevant experience by remembering your preferences and repeat visits. By clicking “Accept All”, you consent to the use of ALL the cookies. However, you may visit "Cookie Settings" to provide a controlled consent.
This website uses cookies to improve your experience while you navigate through the website. Out of these, the cookies that are categorized as necessary are stored on your browser as they are essential for the working of basic functionalities of the website. We also use third-party cookies that help us analyze and understand how you use this website. These cookies will be stored in your browser only with your consent. You also have the option to opt-out of these cookies. But opting out of some of these cookies may affect your browsing experience.
Necessary cookies are absolutely essential for the website to function properly. These cookies ensure basic functionalities and security features of the website, anonymously.
Cookie
Duration
Description
cookielawinfo-checkbox-analytics
11 months
This cookie is set by GDPR Cookie Consent plugin. The cookie is used to store the user consent for the cookies in the category "Analytics".
cookielawinfo-checkbox-functional
11 months
The cookie is set by GDPR cookie consent to record the user consent for the cookies in the category "Functional".
cookielawinfo-checkbox-functional
11 months
The cookie is set by GDPR cookie consent to record the user consent for the cookies in the category "Functional".
cookielawinfo-checkbox-necessary
11 months
This cookie is set by GDPR Cookie Consent plugin. The cookies is used to store the user consent for the cookies in the category "Necessary".
cookielawinfo-checkbox-others
11 months
This cookie is set by GDPR Cookie Consent plugin. The cookie is used to store the user consent for the cookies in the category "Other.
cookielawinfo-checkbox-performance
11 months
This cookie is set by GDPR Cookie Consent plugin. The cookie is used to store the user consent for the cookies in the category "Performance".
viewed_cookie_policy
11 months
The cookie is set by the GDPR Cookie Consent plugin and is used to store whether or not user has consented to the use of cookies. It does not store any personal data.
Functional cookies help to perform certain functionalities like sharing the content of the website on social media platforms, collect feedbacks, and other third-party features.
Performance cookies are used to understand and analyze the key performance indexes of the website which helps in delivering a better user experience for the visitors.
Analytical cookies are used to understand how visitors interact with the website. These cookies help provide information on metrics the number of visitors, bounce rate, traffic source, etc.
Advertisement cookies are used to provide visitors with relevant ads and marketing campaigns. These cookies track visitors across websites and collect information to provide customized ads.