Empowering the Next Generation of Women in Audio

Join Us

Missed this Week’s Top Stories? Read Our Quick Round-up!

It’s easy to miss the SoundGirls news and blogs, so we have put together a round-up of the blogs, articles, and news from the past week. You can keep up to date and read more at SoundGirls.org

September Feature Profile

https://soundgirls.org/foh-lisa-affenzeller-chasing-the-magic/

The Blogs

Lifting each other up – Interview with Naomi Larsson

Combatting Nerves

SoundGirls News


We just got some new merch in. Long Sleeves, Onesies, Toddlers, Gig Bags, and Canvas Totes. Check it out Here


Internet Round-Up


SoundGirl Jett Galindo will be joining Women In Vinyl’s Jenn D’Eugenio for an upcoming panel at the Making Vinyl Conference this October 15th at the W Hotel in Hollywood.

For more details, check out http://makingvinyl.com/


SoundGirls Events

Bay Area Chapter Monthly Meetings

Ableton Live for Anybody – 4 Session Online Course


SoundGirls Opportunities


SoundGirls and SoundGym

Sound Particles Licenses Available

Meyer Sound Supports SoundGirls


SoundGirls Resources


Spotify and SoundGirls Team Up – EQL Directory

SoundGirls – Gaston-Bird Travel Fund

Letter for Trades and Manufacturers


Women-Owned Businesses

SoundGirls Scholarships 2021 Now Open

Events

Sexual Harassment

https://soundgirls.org/about-us/soundgirls-chapters/

Jobs and Internships

Women in the Professional Audio

Member Benefits

Combatting Nerves

Being nervous happens to us all. Whether we like it or not, nerves are a very common part of life.

If you have a job in music, whether that be as a performer, live sound technician, etc. there can often be a lot of pressure for things to be right and to run smoothly. Therefore, creating a considerable amount of stress to get the job right.

So, as the feeling of being nervous is inevitable, I’ve compiled a few essential tips to help calm those nerves in a time of need.

Breathing

As a performer, it’s common to start second-guessing yourself moments before a gig. For example, I’ve stood many times at the side of the stage asking myself, ‘What on earth are my first few lyrics’!

What helps in these moments of sheer panic is to remember to Breathe.

Focus on taking long breaths in and out.

I watched a clip of Beyoncé warming up before a show where she and the crew all stood in a circle reciting ‘Breathe in positivity, exhale anxieties’ and just repeating it several times. So, if it’s good enough for Beyoncé, it’s good enough for me.

Make Sure you have Spares 

As a performer, producer, or live technician It’s always useful to carry spares of your essential kit.

I’ve worked many jobs where a microphone cable has stopped working, or a performer has forgotten to change the battery in their guitar.

To avoid unnecessary stress, I like to keep spares of almost every essential item I’ll be using on the job. This means extra leads, extra batteries, spare microphones you name it.

This leads me on to my next point…

Be prepared

No matter what your role is on the day. The best thing you can do is be prepared.

Whether that means practicing your set until you know it by heart or preparing all the equipment a few hours before the show and checking if everything is in working order.

This I find really helps with the nerves, as it removes the pressure of the unknown. When you trust your equipment and your preparation, you can trust yourself.

These are just a few tips I find to be very helpful when on different jobs and hopefully can be of some help no matter the job.


Missed this Week’s Top Stories? Read Our Quick Round-up!

It’s easy to miss the SoundGirls news and blogs, so we have put together a round-up of the blogs, articles, and news from the past week. You can keep up to date and read more at SoundGirls.org

August Feature Profile

https://soundgirls.org/rising-producer-engineer-lauren-deakin-davies/

Transitioning in the Music Industry


The Blogs

IEM Maintenance & Troubleshooting

Impulse Response Testing and Field Recording 

Moving to London to Pursue Media

Internet Round-Up


SoundGirls Events


An Evening with Lenise Bent


Bay Area Chapter Monthly Meetings

Ableton Live for Anybody – 4 Session Online Course


SoundGirls Opportunities


SoundGirls and SoundGym

Sound Particles Licenses Available

Meyer Sound Supports SoundGirls


SoundGirls Resources


Spotify and SoundGirls Team Up – EQL Directory

SoundGirls – Gaston-Bird Travel Fund

Letter for Trades and Manufacturers


Women-Owned Businesses

A More Inclusive Industry

Events

Sexual Harassment

https://soundgirls.org/about-us/soundgirls-chapters/

Jobs and Internships

Women in the Professional Audio

Member Benefits

Impulse Response Testing and Field Recording 

The Mine 

One of the things that piqued my interest with sound design was all of the magical tools and abilities sound designers have at their disposal. As a young sound designer, I am still surprised and excited by all of this.

I go to school in the Upper Peninsula of Michigan, at Michigan Technological University. The area is called the Keweenaw Peninsula and is at the very top of the Upper Peninsula. The northern woods and waterfalls are both beautiful and great for field recording, but one part of the Keweenaw that goes relatively unexplored by sound enthusiasts, are the mines. Mining was a large part of the economy during the 19th and early 20th century and was still at large into the 1970s and ’80s. Abandoned mines dot the Keweenaw peninsula, but one mine, in particular, has been reopened and repurposed.

The Adventure Mining Company of Greenland Michigan seemed to appreciate my enthusiasm for their mine. Through a connection formed by one of my professors, and the owner of the mine, I was able to go and see the mine for myself. Early last fall, I drove down to take a small tour of the mine and to see what sights, and more importantly, sounds could be found within. It was a fun-filled day, but I was eager to come back with recording equipment.

Before coming back, I established some goals for this recording session. The most important goal was to record impulse responses of the many different chambers of the mine. I knew this would take the majority of my time, but I also wanted to do some field recording inside and outside of the mine.

My second trip to The Adventure Mine was a bit wetter. Fortunately, I had been careful to not bring moisture-sensitive equipment as working in these kinds of environments can be both damp and rough. The company was also kind enough to lend me an old metal wagon that I stored most of my recording equipment into pull around the many chambers. The gear that I brought with me was a laptop running Logic, an RME Babyface Pro interface, and an Earthworks condenser microphone. I also included a Zoom H5 with a mid-side capsule for any ambient recording that I might have time for. To generate the impulses, I used balloons and a pin to pop them. I decided upon this method because the mine was so far from any power source, which meant I could not generate a sine sweep from a speaker for my impulses. I used the entire pack of 25 balloons, and the whole recording process took nearly five hours, but it was well worth the physical and mental exhaustion.

Processing the impulses was relatively simple in the end as I simply trimmed the tracks to the balloon pin strike and uploaded the files into Logic’s Space Designer reverb plugin. There are many helpful articles and videos for this process online. Audio Ease’s Altiverb is also capable of processing custom IR samples, and they have some useful information on their website as well.

Since this project, I have been intrigued by acoustics and the unique sound of spaces and rooms.  I live in a fairly isolated part of the world with many unusual spots, some that you can easily access. Some may ask, why bother? Not only is the experience of trekking into a dark mine for your job exciting and unique, but in many ways, that hard work translates into the work you do as a designer. I now have many impressive, and unique reverbs that I can use in my designs.

Safety for yourself and your equipment is imperative though, so keep that in mind. I would also like to share the fruits of my labor and invite all to my website, where you will be able to download two of my impulse responses from this project for free. It has been such a fantastic experience, and I hope to inspire other sound designers and recordists with my work.


IEM Maintenance & Troubleshooting

The Glamour Starts Here

Special thanks to Josh Thomas for all his help with writing this article.


A few years ago, I went to a talk about mixing for in-ear monitors (IEMs), given by one of the top monitor engineers in the UK, Mr. Justin Grealy. As someone who mainly worked in-house, but had to accommodate more and more acts turning up with their own IEM systems, I was intrigued to learn as many tips and tricks as possible to give artists great mixes. I was not expecting most of the hour to be taken up with all the different ways to get earwax out of an IEM. Some were admittedly genius – hairdryers were mentioned at one point – but I didn’t understand at the time just how important good IEM hygiene and maintenance is for a successful mix. No amount of volume, pretty effects or space-creating trickery will make up for the sound being muffled by a wall of wax, or cutting out because of dirty connections.

IEMs can be the biggest purchase you make in your early career, so it’s worth taking the time to find the right ones for you. If you need them to work with the same act regularly, try to get the same make and model as they use (or the main person uses if they all have different ones). The goal is to get as close as possible to what they hear. Discuss with management whether their budget will cover part or all of the cost.

If you need them for one-offs or working in-house, get the best quality that you can afford. It can make a massive difference to what you hear, and so how well you can react and make subtle adjustments in a mix. Generic IEMs are cheaper and quicker to buy than a custom moulded pair, but getting a custom fit will properly seal the IEMs against the ear canal, which helps with isolation from external noise and provides a better bass response. If possible, go to a local IEM dealer and demo a few different ones before you decide. Remember, you want the ones that will reproduce the signal most accurately, not the ones that sound nicest (e.g., if the pair you have are rounded off in the higher frequencies, your mixing could sound too harsh to people who have IEMs with a flatter frequency response).

Regular cleaning of your and your clients’ IEMs is essential. Small grains of dirt on an IEM can make their way into your ear, scratch the delicate skin in the canal and lead to infection and swelling. Dirt, sweat, and wax can block the drivers’ tubes, corrode the connections and even end up in the tiny and sensitive electronics, causing damage. I would like to say if you take good enough care of them, they can last you a lifetime, but custom moulded IEMs should be replaced about every four years. The shape of your ear canal changes subtly throughout your life, so after a few years, the fit won’t be as exact and will stop forming a seal. Specialist gels like Auragel or foam wraps like Comply can help to form the seal again, but they are only a stopgap solution. Once you notice your IEMs loosening it’s time to get a new pair, from a new fitting, not the measurements the IEM company may have kept on file (these are for replacing lost or damaged IEMs).

The central part of cleaning IEMs is removing wax from the tubes that lead from the drivers to your ears. Your IEMs should come with a loop of wire with a plastic handle for this, but if they didn’t, or you lost it, or the wax is further down the tube than it can reach, there are a few do’s and don’ts you should bear in mind.

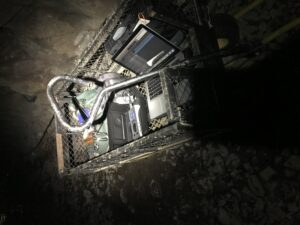
First, be gentle. Keep a close eye on what you’re doing and be careful not to damage any filters or circuitry inside the IEM. Don’t use anything that might break off and get stuck in the tube! Mechanical pencils look kind of perfect for this task, but they are a terrible idea. Also, avoid using anything pointed or sharp, like a needle. You could scratch the moulding, making tiny grooves where more wax and dirt can build up, and potentially where bacteria can fester. Using a loop, optionally followed by a specialist earwax vacuum, is the way to go. I try as much as possible to hold the IEM upside down, so any wax that gets dislodged falls out instead of further into the tube, and I use a gentle scooping motion, at an angle, to get behind the wax and bring it back out instead of risking pushing it further in. Compacted wax blocking a driver can render an IEM useless, and it can be costly and time-consuming to send back to the manufacturer to fix. I then clean the outside of the moulds with alcohol swabs.


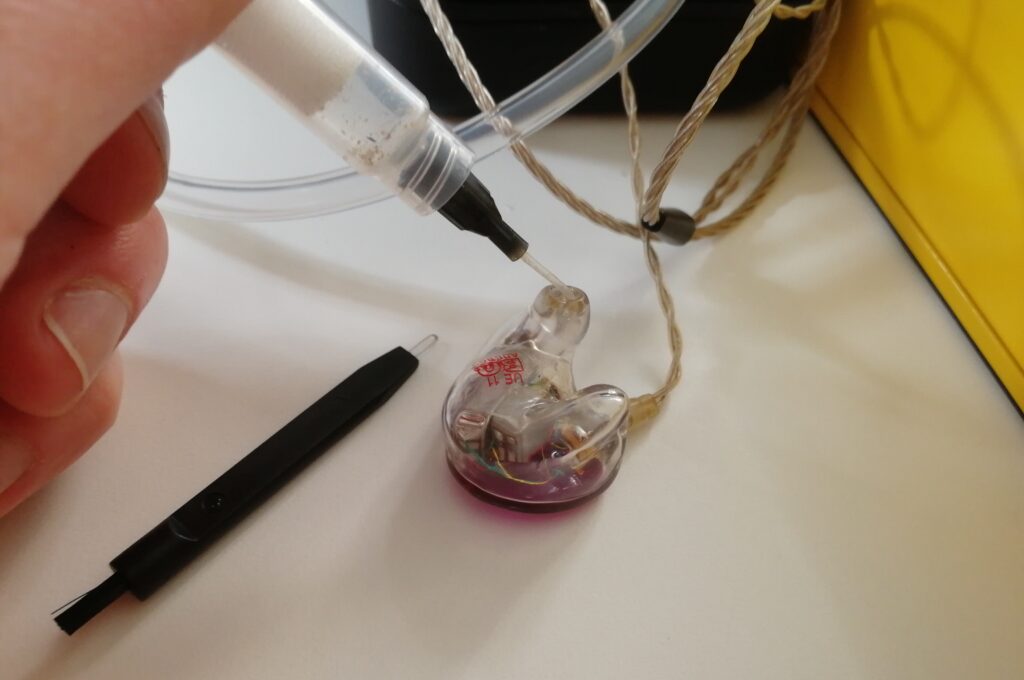
Cleaning an IEM with an earwax vacuum, nozzle inserted at an angle


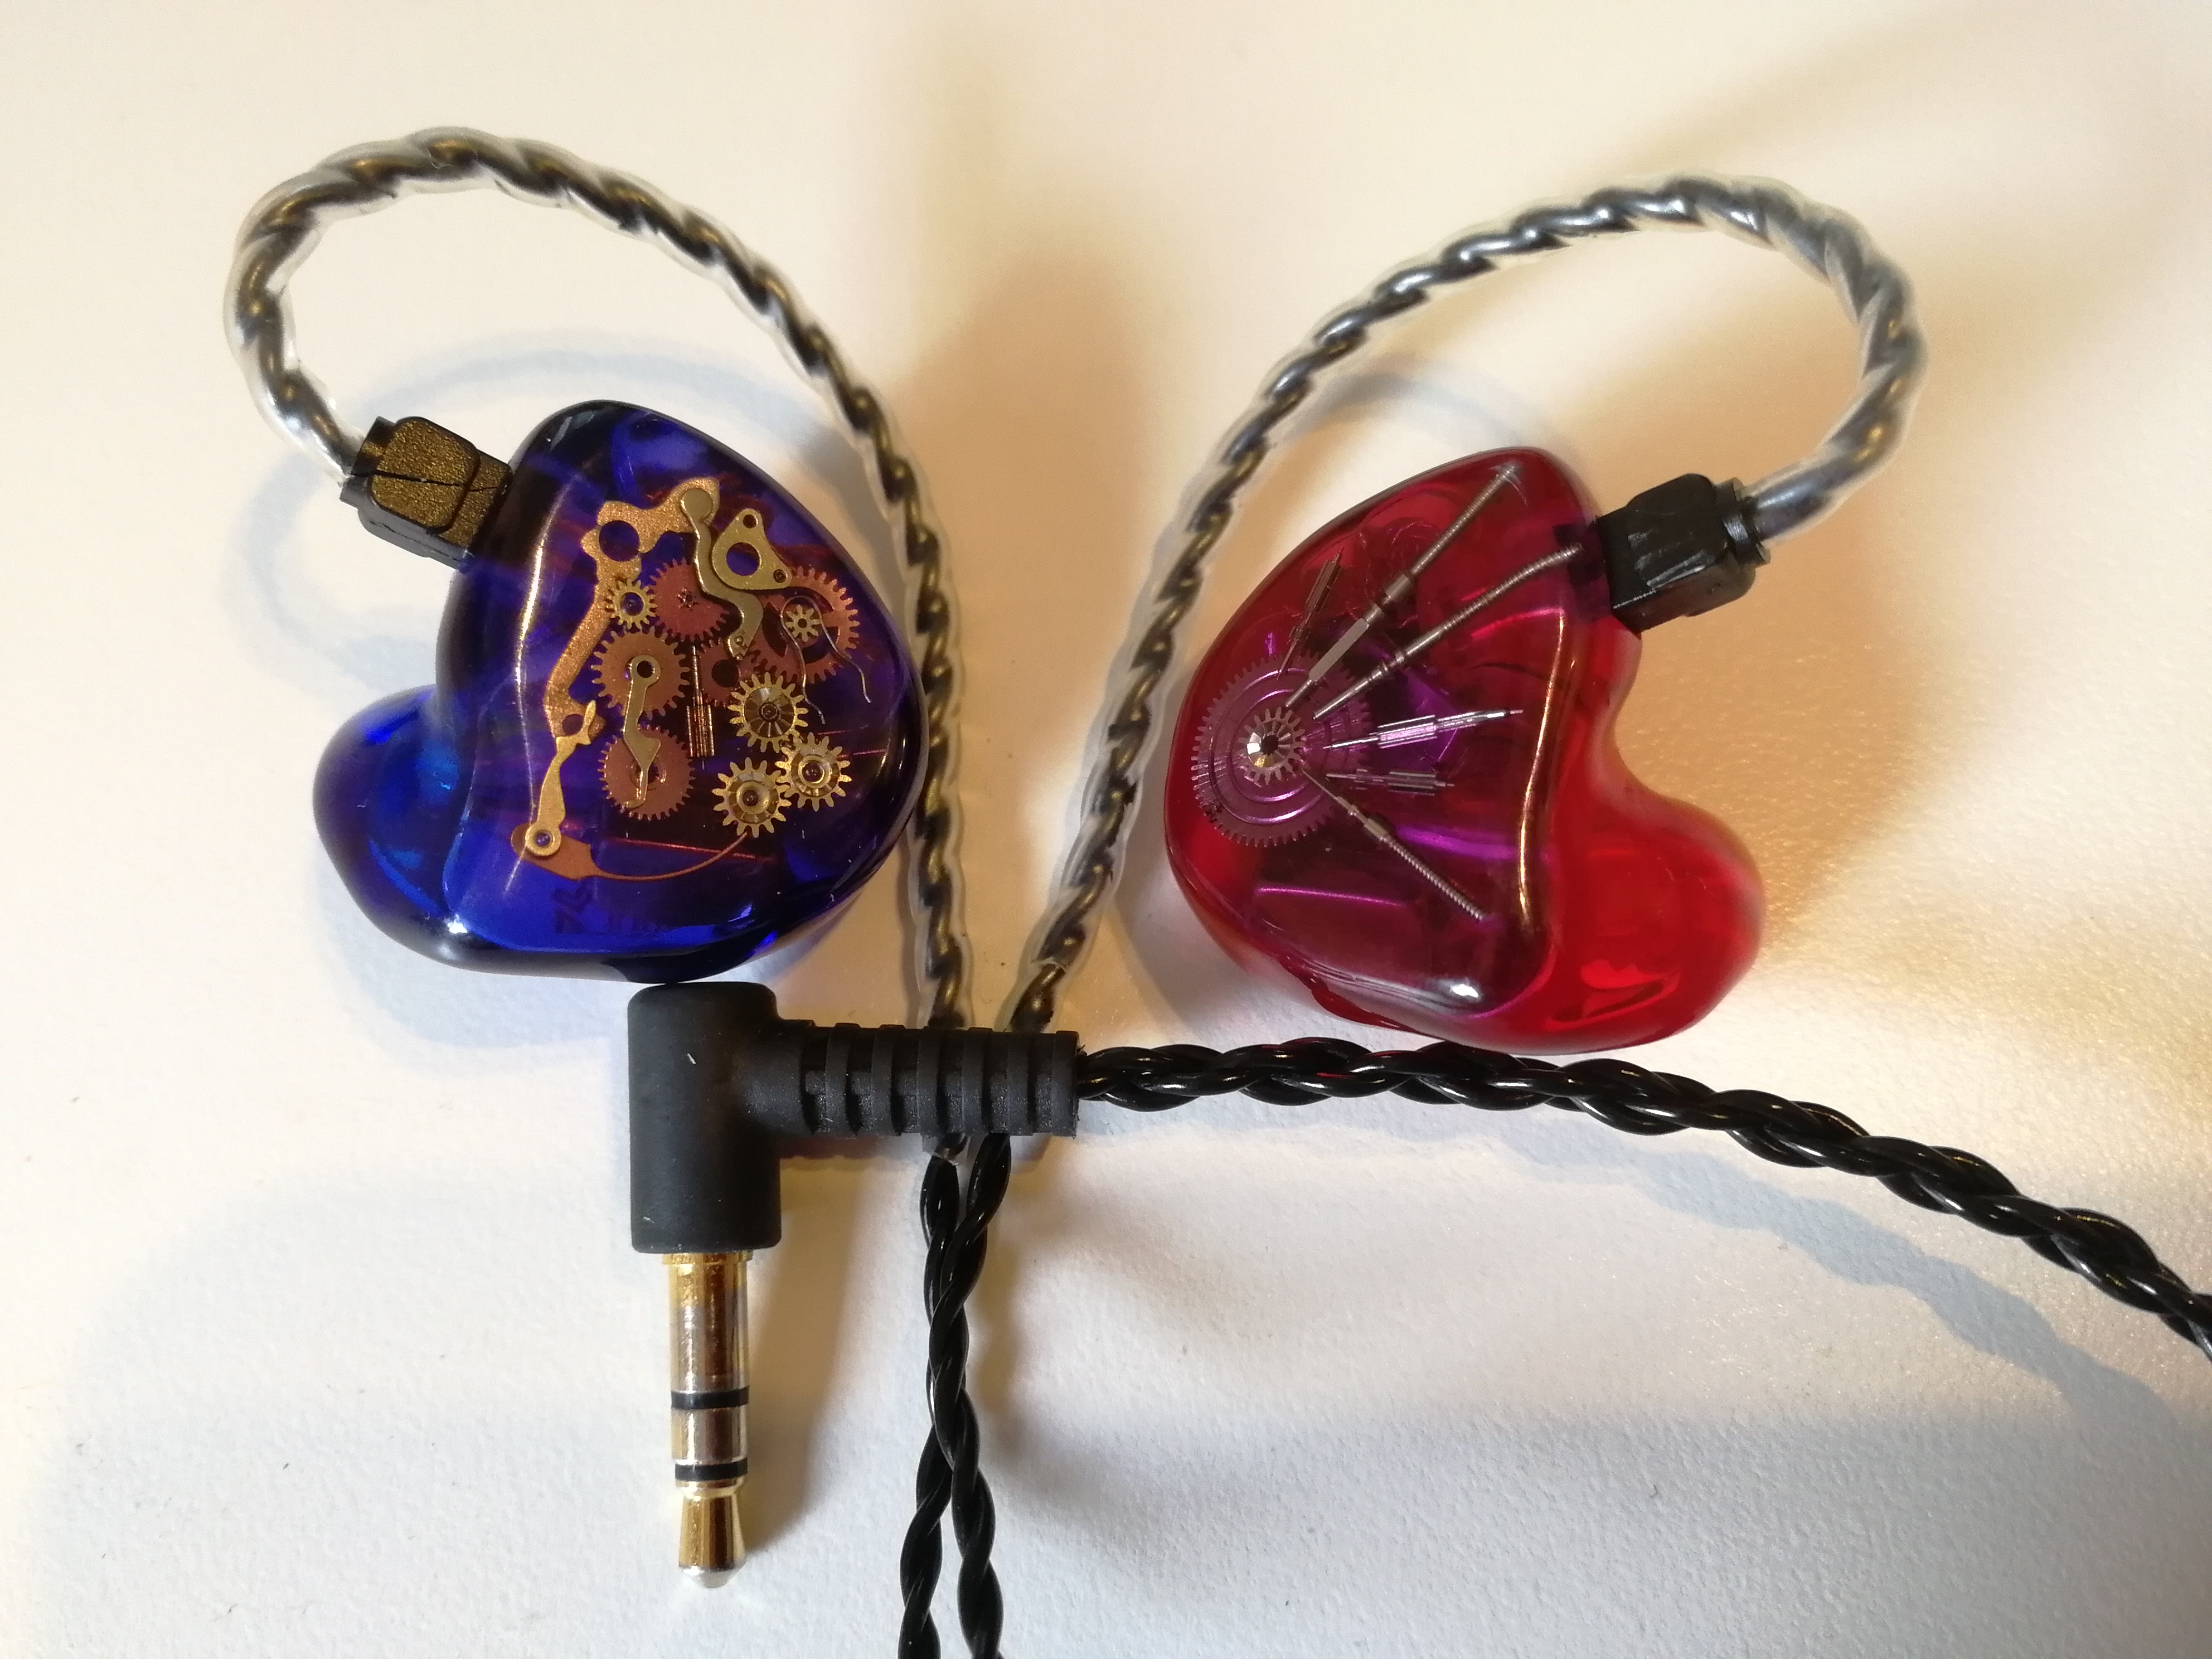
If one ear keeps cutting out, look at the connections between the cable and the IEM. It might merely be loose, but check that there isn’t any green or black stuff at the pins or in the socket. Black is most likely dirt, but green is corroding copper, usually caused by sweat. Cleaning this off with a cotton bud (Q tip) dipped in alcohol or contact cleaner (being careful not to let any liquid get into the body of the IEM) can fix this, but you need to prevent it happening again. Leaving the IEMs to air out after use, keeping a small sachet of silica gel in the case, and checking them regularly can help. If the owner likes to wear their IEMs in the gym, tell them, it’s time to invest in standard earbuds, or it will become a costly habit!

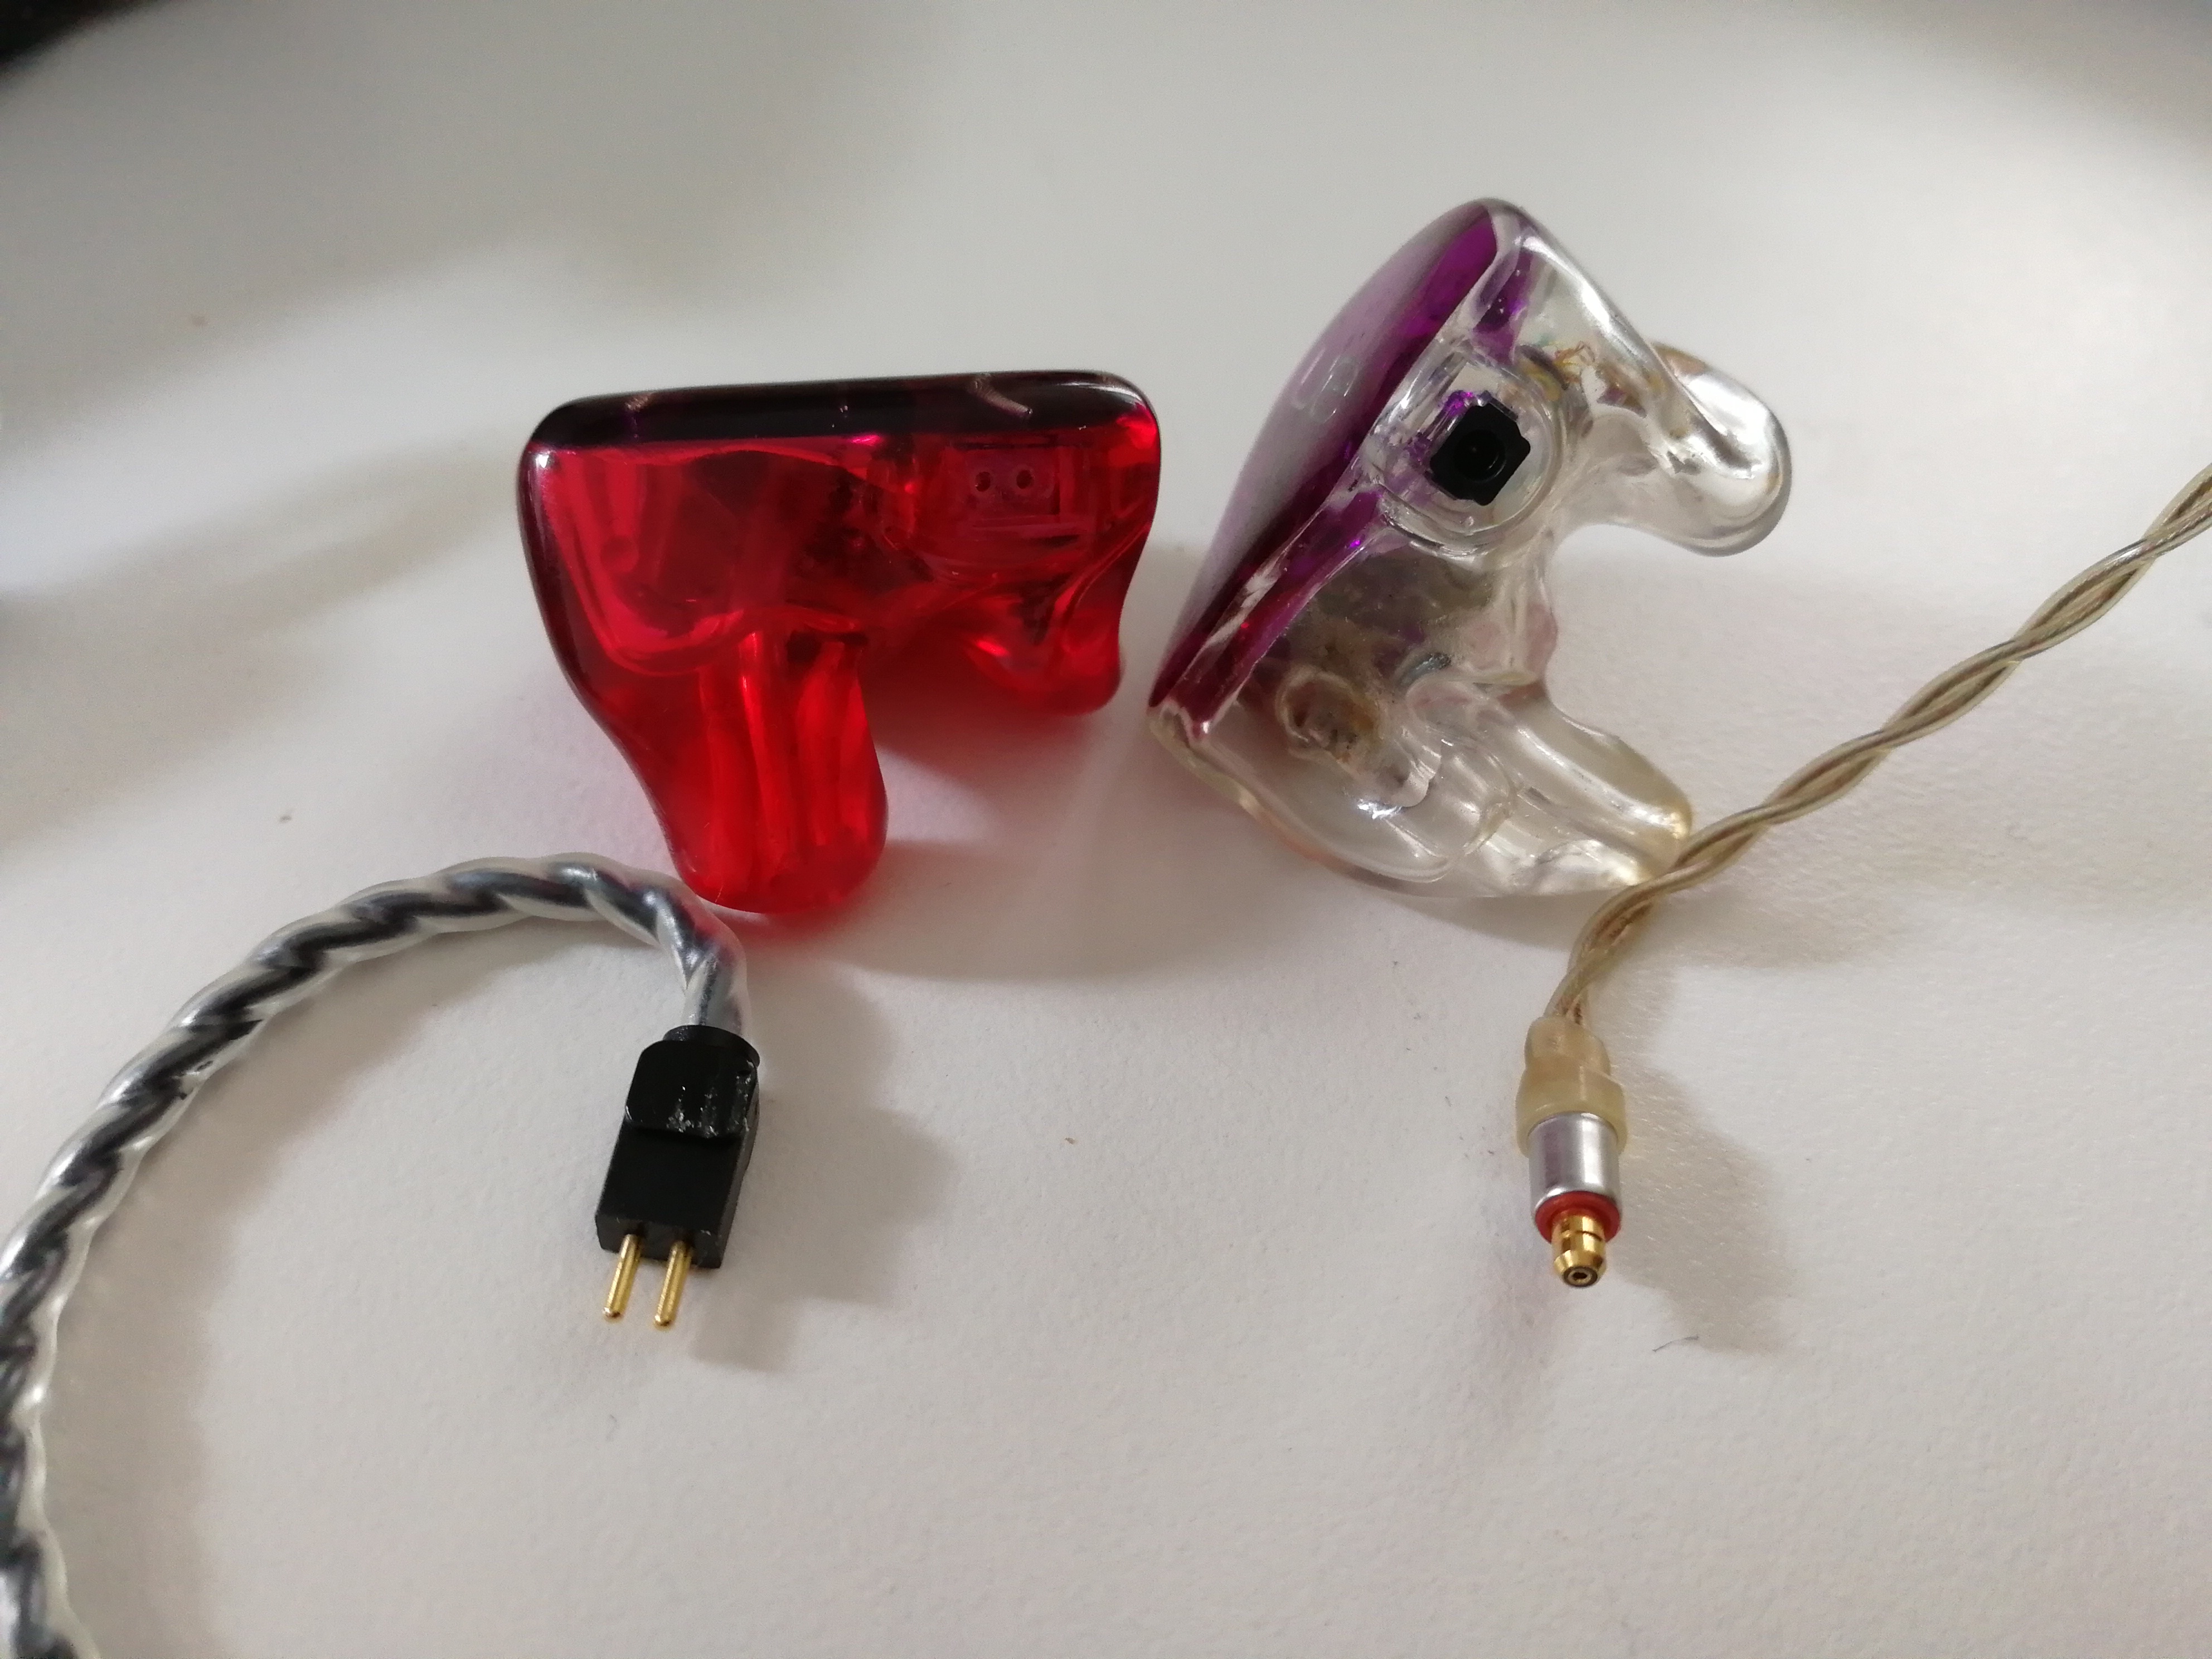
Two different brands of IEM with their respective cables. On the left, the socket is recessed into the casing where two dots can be seen, on the right, it is the area in black. There is no evidence of dirt or corrosion.


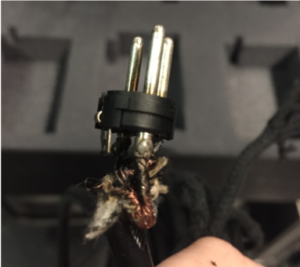
If the ear connections are fine, the minijack connector or belt pack socket might be dirty or corroded and can be treated in the same way. The minijack has to be fully seated for both ears to work. If the right side is intermittent, but the left is fine, the jack might be pulling out of the socket slightly, so the right side’s ring no longer makes a connection. Leaving more slack on the cable or taping it in place should help. If it isn’t the jack, gently wiggle the cable as you’re sending signal, to see if there’s a weak spot. IEM cables can get abused, being yanked and pulled during costume changes, snagged on door handles, crushed in their cases. It is wise to carry spare cables for each type of IEM you have so you can swap them out straight away if there’s a problem. Don’t wait until you need one, because it can take weeks to get them, especially at busy times of the year.

If the above steps don’t fix your problem, it might be an issue with the pack or radio frequencies, which is outside the scope of this post. If one ear has lost a big chunk of its frequency spectrum, or it sounds like it’s distorting at low levels, one of the drivers might have blown and will need to be sent for repair. Another reason to keep an eye on your bandmember’s pack volume levels and to mix responsibly!

There are all types of little gadgets and supplies you can keep with you to help with IEM maintenance and troubleshooting. IEMs and hearing aids have a lot in common, and it’s worth checking out audiologist suppliers as well as IEM specialists for things like cleaning loops, ear wax softener and earmould stetoclips (like a stethoscope for hearing aids). Always have plenty of alcohol/anti-bacterial wipes to hand, and thoroughly clean each piece of equipment between IEMs with a new swab to reduce the potential for cross-contamination and general grossness.

Whether the thought of dealing with other people’s earwax turns your stomach, or like me, you find cleaning IEMs strangely satisfying; it does more than keep your equipment at its best. It’s always good to get a reputation for being helpful and useful, and you can spot potential problems before they develop. It’s much easier and safer to deal with issues in your downtime than halfway through a show. It can also be an excellent opportunity to start the conversation with clients about anything they’ve noticed about their IEMs but hadn’t thought to mention, or how they’re dealing with volume levels and looking after their hearing in the long term. For example, increased earwax production can be the body’s defense against sustained, overly loud listening volumes. Showing that you’re interested in their hearing health now and in the future, and willing to go the extra mile, can cement your relationship and improve trust and communication, which will do more for your mixing than any effects unit ever could.

Missed this Week’s Top Stories? Read Our Quick Round-up!

It’s easy to miss the SoundGirls news and blogs, so we have put together a round-up of the blogs, articles, and news from the past week. You can keep up to date and read more at SoundGirls.org

August Feature Profile

https://soundgirls.org/rising-producer-engineer-lauren-deakin-davies/

Transitioning in the Music Industry


The Blogs

How Do You Go About Setting Up Your Console Workflow?

Production Communication

Community

Internet Round-Up


At home with Sheryl Crow, a widely beloved, and wildly underappreciated, rock star

Sheryl Crow ultimately self-produced the album at a time, she said, “when nobody would let a woman produce their own record, when it would be [viewed as] crazy to waste money on that.”Trina Shoemake won a GRAMMY for engineering the album.


Musiq Scene: Jess Fenton: Jess Fenton, Producer/Engineer/Mixer at Fenton Music Productions.


SoundGirls Events


An Evening with Lenise Bent

Bay Area Chapter Monthly Meetings

Ableton Live for Anybody – 4 Session Online Course


SoundGirls Opportunities


SoundGirls and SoundGym

Sound Particles Licenses Available

Meyer Sound Supports SoundGirls


SoundGirls Resources


Spotify and SoundGirls Team Up – EQL Directory

SoundGirls – Gaston-Bird Travel Fund

Letter for Trades and Manufacturers


Women-Owned Businesses

A More Inclusive Industry

Events

Sexual Harassment

https://soundgirls.org/about-us/soundgirls-chapters/

Jobs and Internships

Women in the Professional Audio

Member Benefits

Production Communication

Comms, a necessary evil

Comms are, without a doubt, integral to a production’s success. Whether it’s over a radio or full-duplex communications, comms are a necessary beast. As a sound engineer, A1, A2, production manager, producer, etc. I have worked extensively with various versions of communications technology. I will focus on tech that is not brand new, mostly because that is far more common than shiny new systems. New comms systems are as rare and magical as unicorns.

Comms systems allow a production crew to speak to each other instantly. Many of my students question, especially after seeing how the equipment LOOKS, why don’t we just use phones and text? Aside from service issues inside buildings, battery life, distractions of other apps while working, etc., the main reason for me is that using a mobile just isn’t practical or professional. How many times have you had issues with a text going through? Depending on your network, this can be a frequent and annoying issue. Portable communication systems allow me to set up a reliable network of people within minutes. Hard lines ensure fewer problems than wireless (although I’ve had my fair share of bad cables and mini fires). TEST EVERY COMPONENT before the show. Seriously. Do it. These devices are MADE to take a beating, but they are not immune to damage. They are hardy little boxes, especially compared to my glass-covered iPhone.


Handbook of Intercom Systems Engineering

This PDF guide, The Handbook of Intercom Systems Engineering, first edition, Copyright© 2007 by Telex Communications, Inc is your magic textbook to all things comms. I frequently refer this to my students as a resource, and although it was published some time ago, I still find it to be completely relevant in the scope of existing installations. This document is my BEST advice to learning comms, troubleshooting, and designing systems based on your needs. Clear-Com and RTS have been around since the 1970s, and I believe some of that original equipment is probably still in circulation. While petitioning for new comms systems, most of the responses I have personally received involve “if it ain’t broke why fix it?” or some variation of that phrase. Most times, I am cobbling together a system from half-functioning components, which is frustrating and not the most helpful for such an important system. Comms aren’t sexy though, so many people aren’t eager to replace them.

Party Lines

Party lines sound way more fun than they actually are in real life. A party-line system is probably what most of you have encountered already. This system allows a group of people to communicate and have conversations. There is no limit to who is allowed to talk at a specific time, aside from etiquette, and there is generally no privacy.  A typical setup will include a power supply, XLR cables, belt pack user station, and a headset. RTS comms are a two-wire system, meaning that you can have the same path for talk and listen, and two separate party lines. These are more commonly found in TV production and sporting events. Most user stations will be connected in parallel, although having a splitter can help when you need to go separate ways.

Equipment

There are so many options for comms equipment, and this will vary based on the manufacturer and your production needs.

A Power Supply is necessary for most comms equipment unless it comes with its own PS. For RTS, the PS20 is a standard power option.

Belt Pack User Stations are individual, portable comms stations. These require power from a power supply.

A Main Station is rack-mounted user station, which will also require power from a PS.

Master stations are rack-mounted stations, combined with a power supply.

A Biscuit Box is a portable speaker station, which will require power from a PS.

Headset types: Single Muff, Double Muff, Phone Handset, Biscuit box.


Source Assignment Panel (SAP) is integral for larger productions. This allows up to 6 sources (Party Lines) and 12 selectable outputs (to people). Each user station can have two PLs. An SAP will give your production more selective communications so that each department isn’t talking over each other. If you have a video team, they need their own PL for the Director, Producers, TD, Cameras, Floor Manager, etc. They don’t need to hear about any issues from monitor land.

Who needs to be on a headset?

Paperwork and organization is a big part of the job of an A2. Anyone who needs to execute a cue at a specific moment needs to be on a headset. Who needs which type of equipment? Where are they located? Who do they need to speak with while on a headset? TV Broadcast gigs will have a lot more people on a headset than a concert or theatre event. For larger portable events, I will employ additional equipment, including a Source Assignment Panel. An input list for comms will help keep track of everyone. I will label the BP for each person; keeping organized is key! Using their names/titles for labeling is a good practice. If you don’t know, you can ask them. Communication is key. (Obviously.)


How Do You Go About Setting Up Your Console Workflow?

Once you start mixing more than a few shows, you’ll start to find that you have some preferences in how your console is laid out.

Everyone has a particular way of doing things, and it’s all a matter of what works for you. For instance: How you do your input patch will determine where things show up on the surface.  It doesn’t have to be 1 to 1 with the snake patch; you can patch inputs to come up in whatever channels you like.

If you are mixing on a digital console with a limited number of faders available on the surface, you’ll have to think about how you want your inputs to populate them.  If you have 42 inputs and only 16 input faders/layer, how do you want to build your layers?

It’s a good idea to have all of your drums on the same layer or page so you can easily make adjustments to the overall drum mix. Likewise, if you have numerous inputs for keyboards and tracks, keeping them on the same layer or page makes for easier control.

Something I like to do is keep my most important inputs on the channels closest to the master section. For most of what I mix, this is the lead vocal or vocals. I rely heavily on VCAs/DCAs and do most of my mixing from the master section where they are found so having my most important inputs right next to the VCAs; they are always where I need them.

When I was mixing the bands Styx and Mr. Big, the music was heavy with 4 part vocal harmonies.  I would always lay out my console to make sure that the four vocal channels were right next to the master section and able to be pulled to the surface in an instant. It wasn’t a set it and forget kind of mix; there was constant massaging and blending of the vocals.

Keeping important inputs near the master section stems from the days of large frame analog consoles where inputs could be spread out over quite a distance.  But I find it still works well with digital boards and tends to keep things that need lots of attention close to that area of the console.

Other things to think about are your effects returns. You might want your effects returned in channels rather than the FX returns.  Using open channels instead of dedicated FX returns for your Effects will generally give you more flexibility in routing and better EQ options.

All of these things will be determined by your input patch, so give it some thought ahead of time.

Next, consider how you will designate your VCAs/DCAs and/or Groups. Think about how you can group things to make it easier to mix.  It’s much easier to mix from the 8 or so VCA faders than all of your individual channels, especially on smaller consoles that only give you eight input faders on the surface.

If you’ve got 42 inputs, you don’t want to have everything just assigned to L and R and be mixing on 42 faders jumping through layers or pages all night.

Things can be double assigned.  What I like to do is have one VCA,  that I label BAND for all of my instruments. I tend to set up my VCAs along these lines:

Every input goes to its intended VCA- drums to drums, bass to bass, etc., but is also assigned to the band VCA, except for the vocal channels.  This way, I have control of the overall level of the band with one fader, which is incredibly useful if I am having trouble getting the lead vocal above the music.  I can just grab the band fader and bring everything but the vocal back a bit.

Now if you have a four-piece band with 16 inputs total, this isn’t such a big issue.  But still, it’s much easier to mix on 4 VCAs than 16 channels. The more involved your show gets the more thought you’ll need to put into it.

Think about what your needs are?  What will help you be as efficient as possible, and what will give you the control you need?

Groups are great for processing multiple inputs at once.  Smaller analog consoles may only have Sub Groups available and no VCAs.  You can assign all of your drum inputs to a stereo group and insert a couple of compressors across your drum mix for a little added punch to your drum mix.  You can send multiple background vocals to a group and compress them so sit together nicely.

You’ll also want to consider AUX buses.  If you are doing monitors from FOH you’ll want the aux buses to be Pre Fader and depending on the console; you may only have the option of certain aux buses being Pre Fader.

Which Auxes will be for monitor sends and which will be for effects?  How many effects do you need? If there are enough available, it’s a good idea to have separate effects for different inputs.  For example, have one for drums, a different one for vocals and yet another for instruments like keys and guitars if needed. This gives you more control and allows for more clarity in the mix.

These are just a couple of things to think about when you are setting up your workflow on the console.  For me, I build my workflow around control and efficiency, but you may have other ideas, and I’m curious to hear what works for you.

For more from Michelle, check out Mixing Music Live

Missed this Week’s Top Stories? Read Our Quick Round-up!

It’s easy to miss the SoundGirls news and blogs, so we have put together a round-up of the blogs, articles, and news from the past week. You can keep up to date and read more at SoundGirls.org

August Feature Profile

https://soundgirls.org/rising-producer-engineer-lauren-deakin-davies/

Transitioning in the Music Industry


The Blogs

Audio Tips For The Top High School Musicals Of 2019

https://soundgirls.org/welcome-to-the-machine-the-story-of-pink-floyds-live-sound/

Getting Back in the Game

Especial Slang | Igualdad y representación

Slang Special | Equality and Representation

Internet Round-Up


https://youtu.be/UmSfDx7vJZg


So You Want To Kiss Her During a Songwriting or Recording Session


SoundGirls Events

Ableton Live for Anybody – 4 Session Online Course

An Evening with Lenise Bent

Bay Area Chapter Monthly Meetings


SoundGirls Opportunities


SoundGirls and SoundGym

Sound Particles Licenses Available

Meyer Sound Supports SoundGirls


SoundGirls Resources


Spotify and SoundGirls Team Up – EQL Directory

SoundGirls – Gaston-Bird Travel Fund

Letter for Trades and Manufacturers


Women-Owned Businesses

A More Inclusive Industry

Events

Sexual Harassment

https://soundgirls.org/about-us/soundgirls-chapters/

Jobs and Internships

Women in the Professional Audio

Member Benefits

X