On occasion, a sound editor’s musical skills are put to the test when they are asked to recreate a tune or song for a specific sound effect. For example, in the second episode of Yuki 7, the alarm clock that goes off matches the theme song of the show, which you can listen to starting at 1:11 in the video below. For sound editors with no musical training, this task can be particularly challenging. So for this blog, I’m going to teach you how to recreate a melody to use with any sound effect just by listening to it!
Just kidding. For that to happen, we’d need to review a lot of music theory and ear training, which takes more than a blog post to get the hang of. Identifying a tune in order to recreate it involves understanding what musical key it comes from, the pitches and rhythms of the notes, and sometimes, harmonic analysis of the song. Even though I come from a musical background, I want to offer methods to replicate a song for a sound effect efficiently, and while we’ll scratch the surface of music theory, a music degree isn’t necessary.
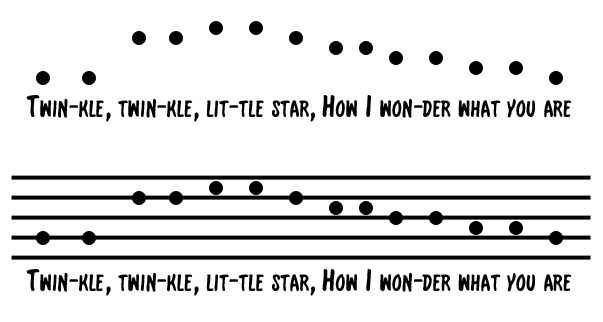
Example of melodic contour in “Twinkle Twinkle Little Star.”
There are some simple concepts in music theory that can help to build confidence when listening back to a song you need to decipher. The first idea I want to introduce to the non-musician editors out there is melodic contour. This just describes the shape and sequence of notes in a melody. There are actually a number of studies in which infants were able to discriminate basic changes in melodic sequences, so it’s likely that you already have years of practice learning this concept!
Let’s take a look at “Twinkle Twinkle Little Star” as an example. If you were to draw a line on a whiteboard that follows the melodic contour of this song, it would look like a weird set of stairs. The melody makes the largest leap between “twinkle” and “twinkle,” and descends after the second syllable in “little,” eventually returning to the same note we started on. Even if we don’t know the exact notes or the key of the song, we can start to visualize the melody of the song by looking at its shape.

Depiction of the rhythm of “Twinkle Twinkle Little Star” with lyrics and line measurements.
The same can be said for rhythm. As pattern-seeking animals, melodic contour and rhythm come rather naturally to most humans. Motor areas in the brain help us perceive consistent rhythms so we can follow the beat of a song. Early thirteenth-century rhythmic notation called mensural notation generally divided up the pulse or beat of the music into long and short patterns, and present-day notation still does pretty much the same job because it’s the best way that we can understand a song’s rhythm.
So let’s look again at “Twinkle Twinkle Little Star” to identify long and short notes. As you sing along to this song, tap along to each syllable with your finger, and notice how you hold your finger longer at “star” and “are.” These notes are twice as long as all the other notes in this passage, but what is important is that you start to pick up the difference between a long note and a short note, rather than the specific division of the beat. These two simple ear training exercises of drawing melodic contour and tapping along to short and long beats will get you comfortable with the basic structure of the songs you need to replicate. We can even utilize these exercises by mapping out songs with MIDI.

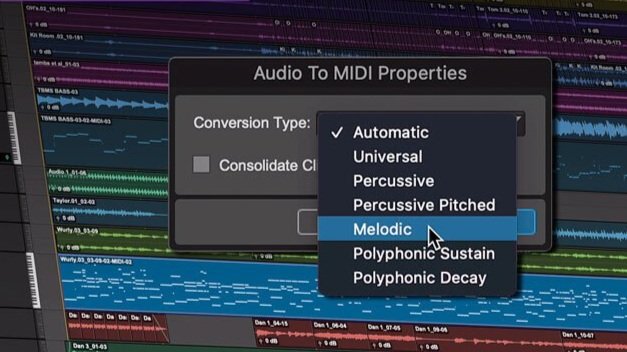
A look at the User Interface for audio to MIDI conversion with ProTools 2020.11
A valuable tool we can use for this replication task is MIDI because we can draw in notes without needing to learn how to play or read music. Plus, MIDI lets us use software synthesizers that we can manipulate into any sort of musical-based sound effect such as an alarm, car horn, or bells. I will note that many DAWs including Pro Tools version 2020.11 have an Audio-To-MIDI feature where you can take an audio clip and drag it into a MIDI instrument track that automatically converts the melody into MIDI. Here is a simple tutorial on how this works in Pro Tools. Nonetheless, not everyone has access to this version of Pro Tools which includes Melodyne Essential as a means to “convert” audio pitch and rhythmic information into MIDI, so let’s learn how to manually map out our song.
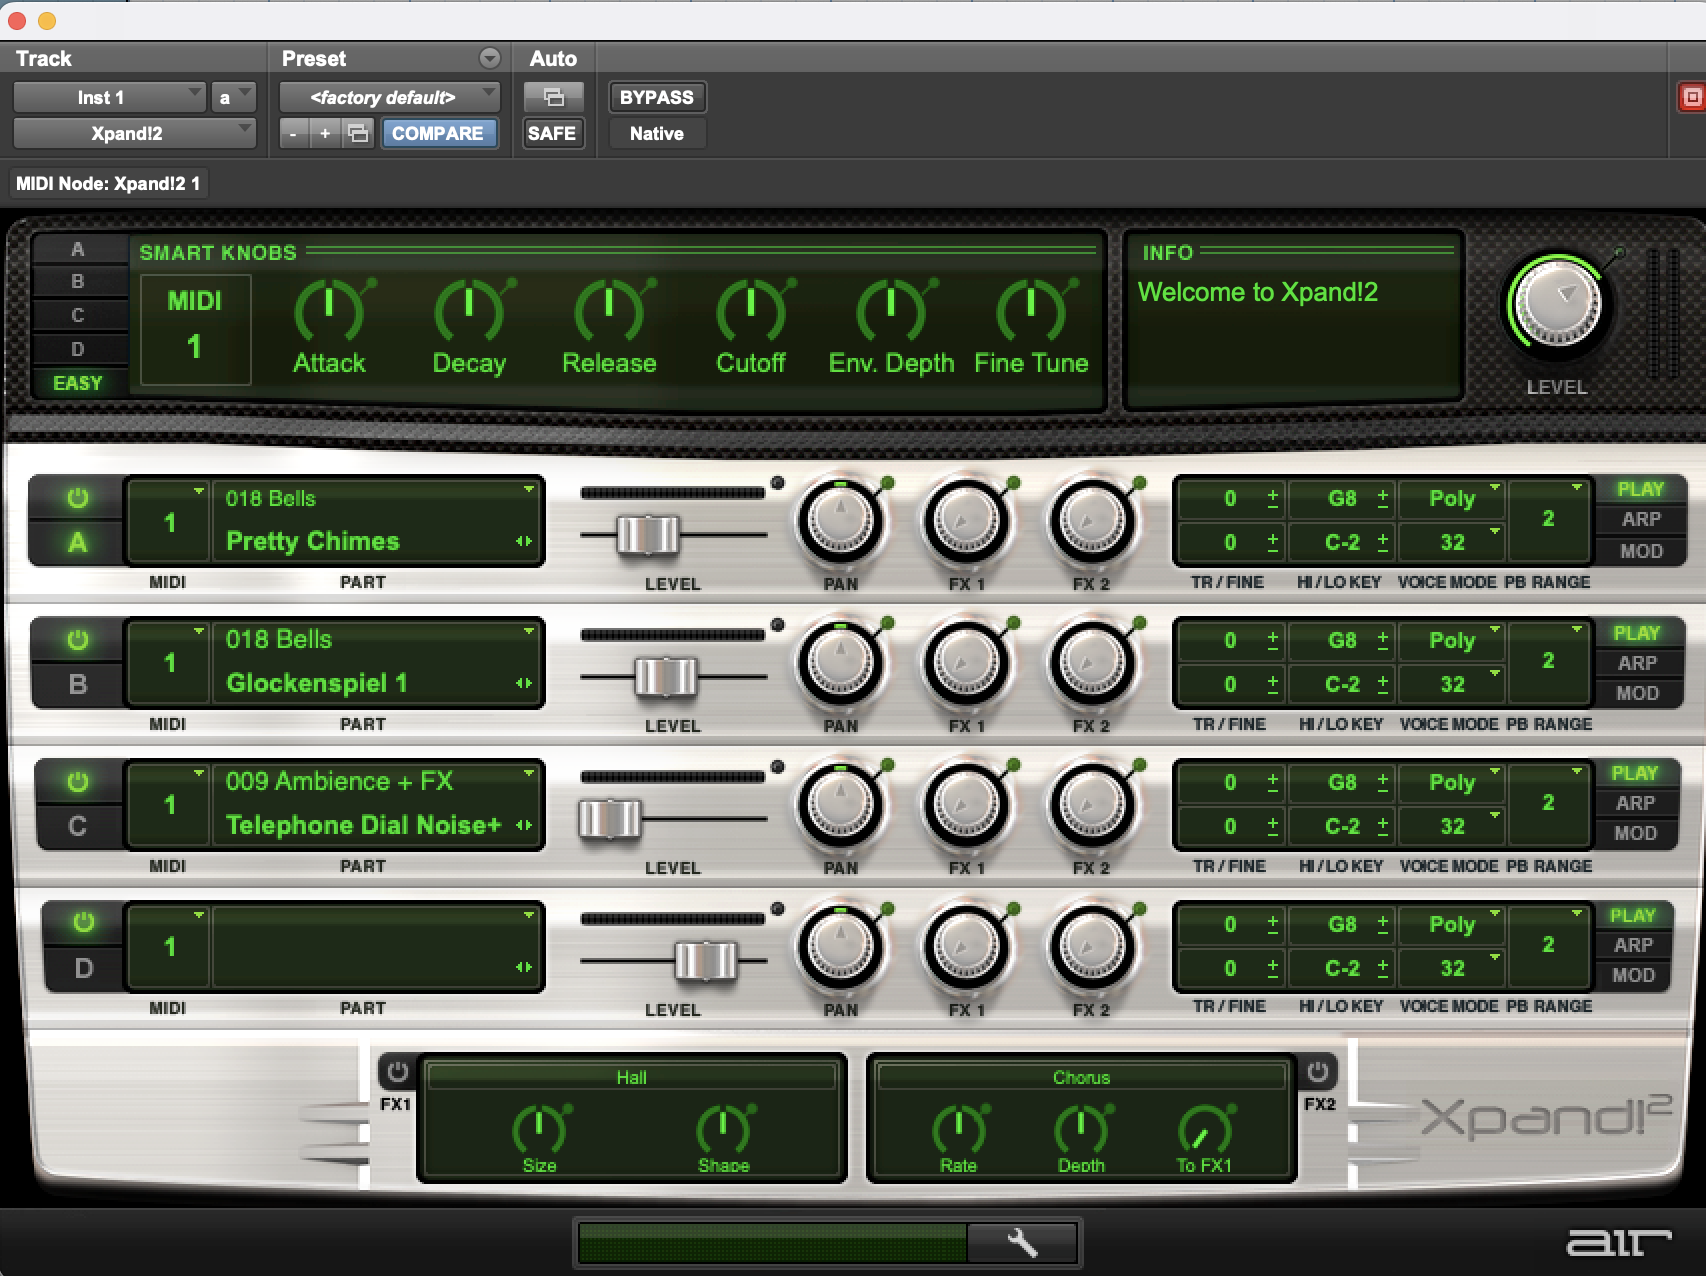
Image of Xpand!2 settings for bell sound effect.
I like looking at this sort of musical replication through the lens of a MIDI editor because it’s numerical, and you can match melodic contour and rhythm in the editor just by drawing it in. In Pro Tools, I opened up a blank session and created a mono instrument track. Then, I inserted a really simple software synthesizer called Xpand!2 which was included in my Pro Tools bundle when I purchased it. I played around with some of the presets in Xpand!2 just to get a musical sound effect going, and I blended together some chimes, a digital glockenspiel sound, and a detuned telephone dial for an old ballerina jewelry box sound.
In the View drop-down menu in Pro Tools under Rulers, I unselected Time Code and chose Bars|Beats and Tempo to represent my edit window measurements. Setting your grid up like this will make the rhythmic replication of the song much easier. To find the tempo or beats per minute, listen to the song you want to replicate and tap along to the tempo yourself. Make sure you have the MIDI controls transport window open, and the Conductor Track icon unselected. Then, highlight the tempo in the window above, and tap along to the song by clicking T on your keyboard. Give yourself some time to let your internal groove settle into the rhythm of the song, and you’ll be able to get near or on top of the BPM of the song. Click return to lock-in that tempo onto your edit window grid.
With the Bar|Beats grid set up in Pro Tools, measures are much easier to read in the grid-like time code is, so you don’t need to fully digest the unit of a measure since Pro Tools does it for you. For the measures in “Twinkle Twinkle Little Star,” we can identify this by how the phrase is broken up. The lyrics “twinkle twinkle little star” and “how I wonder what you are” have the same number of syllables and they rhyme, two indicators that each of these phrases take up an even number of measures. It is likely that in your replication, you will be dealing with a tune that is either two measures or four measures long. In my instrument track, I just highlighted the first two bars following the Bars|Beats grid, and I held Option-Shift-3 to make a blank clip. Then, I double-clicked on the clip to open the MIDI editor.
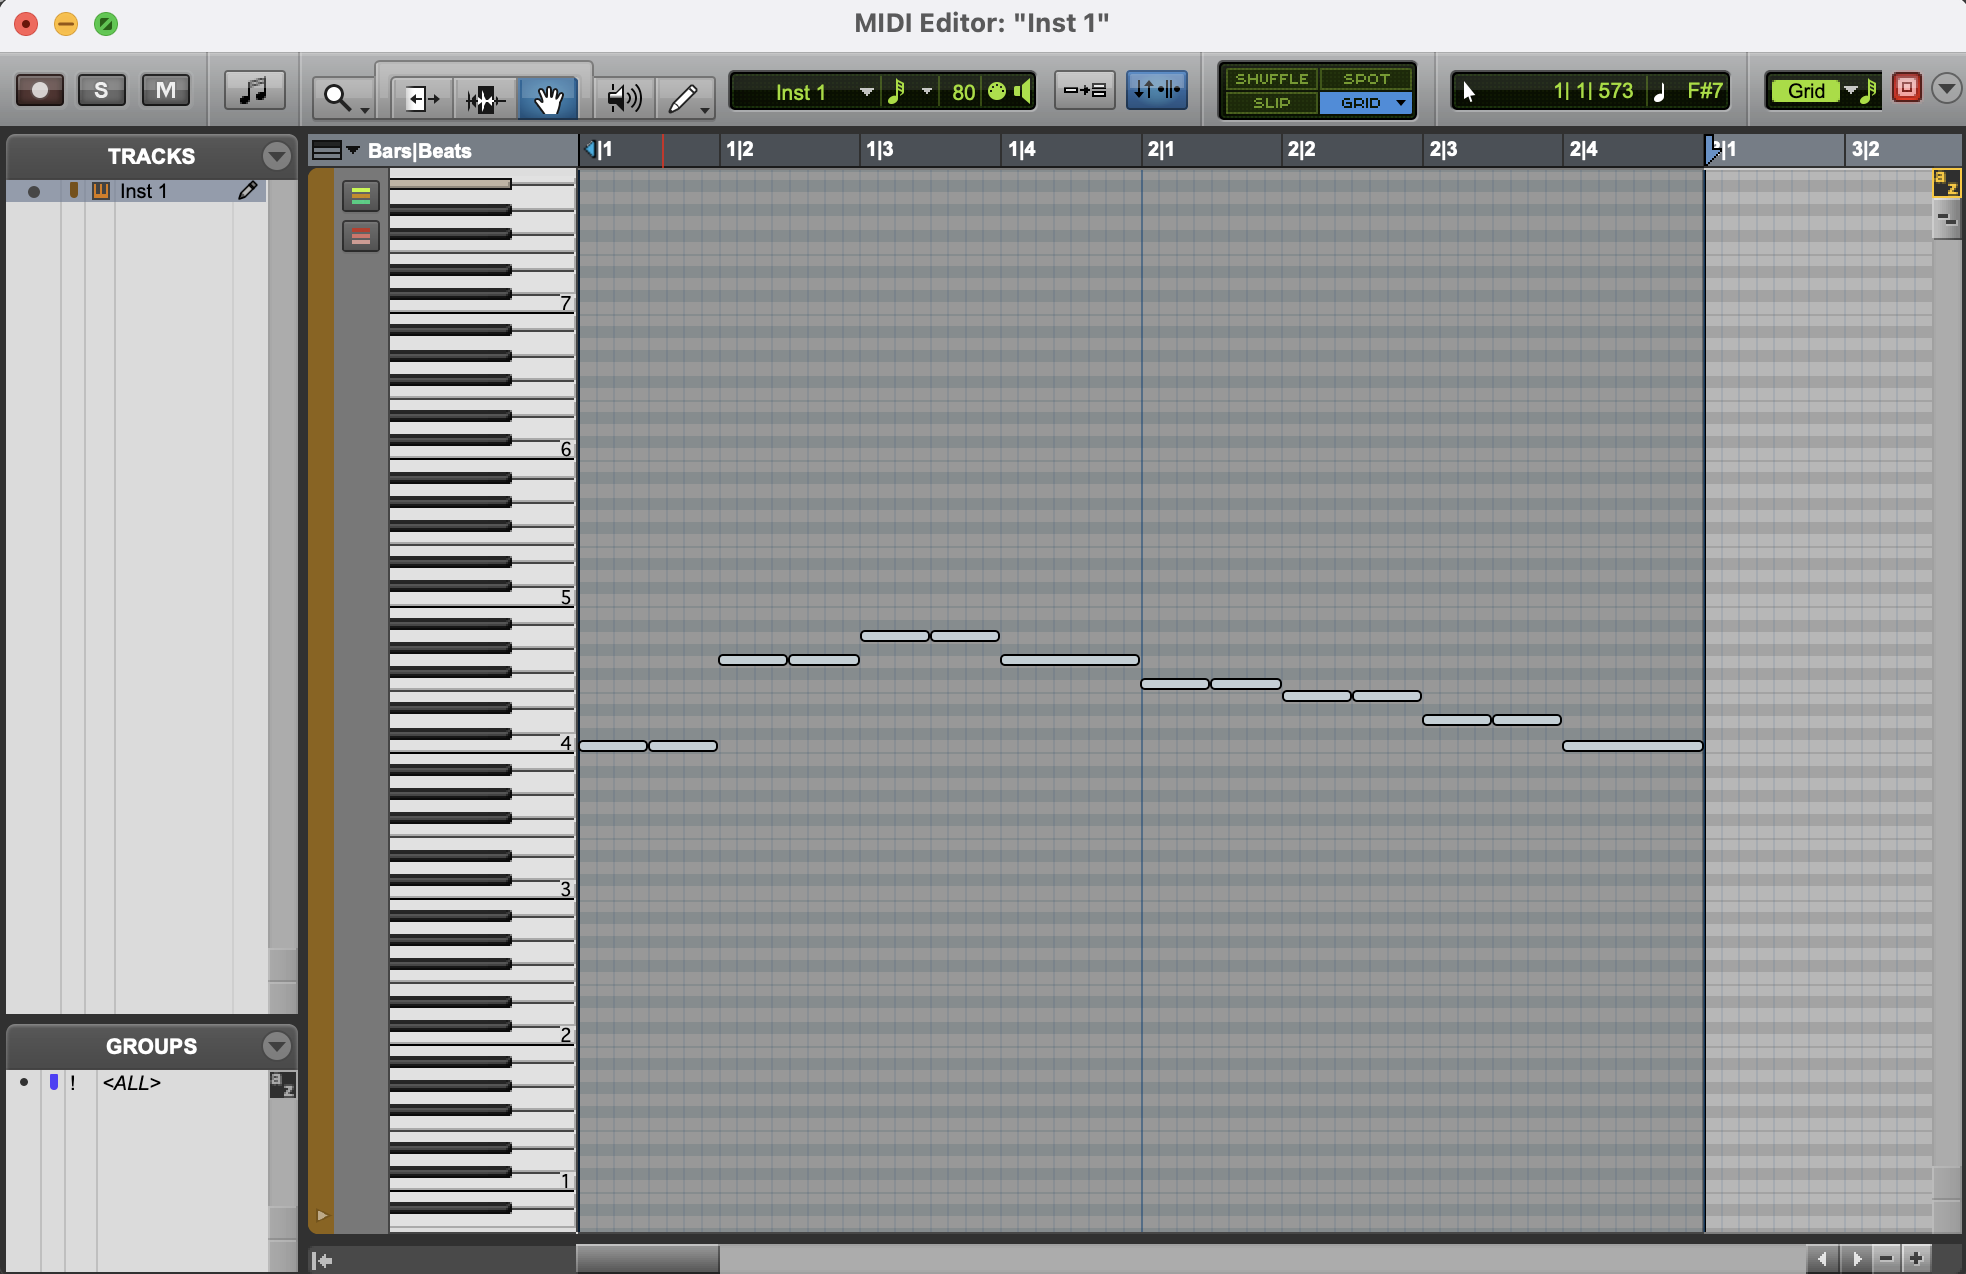
Depiction of “Twinkle Twinkle Little Star” in Pro Tools MIDI editor.
The piano to the left of the MIDI editor has spaced out numbers that represent each octave, a set of twelve values that start at the note C. So, where the four is along the piano marks the octave that begins at C4. The editor is set up this way because each note translates to a MIDI number value from 21 to 127, so C4 represents the MIDI value 60 (most MIDI values range from 0-127). There is a super handy chart here that translates frequencies to notes to MIDI values for reference. For “Twinkle Twinkle Little Star” I’m starting at C4 by placing my first note using the grabber tool and clicking next to the little 4 along with the piano. If it started at G4, I can look at the chart and see that the difference between G4 and C4’s MIDI values is seven, so I would count up the grid seven steps from the little four on the piano, and start on that grid line.
With the first note placed, I can map out the rhythm with the trim tool. Following the grid and using my short vs. long identification exercise, I know that the first six notes of the song are shorter than the seventh note, and they are equal in length too. So I copied and pasted my first note five times, and then once I got to the last beat of each phrase (“star” and “are”), I made the note twice as long in the editor. Even if you don’t get the rhythm perfect the first time, you can still get close to the rhythm by following the grid, listening back to the rhythm, and making adjustments with your trim and grabber tools. You’re approaching the MIDI notes like clips in a track that you’re editing.
Once I’ve mapped out my rhythm, it’s time to shape the melody. “Twinkle Twinkle Little Star” is an easier example because it has many notes that repeat, so I grouped each pair of short notes together throughout the passage. To make my melodic contour, I highlighted the pairs of notes, and moved them up and down the grid along the piano, holding the rhythm in place. Once I got the contour to look like what I drew in my melodic contour exercise, I could reference each note of the song by listening and dragging the notes around the grid until the pitches match. Having the contour set up already helped me get close to the original melody, so I only had to make a few adjustments. The nice thing about the MIDI editor is that you can hear each pitch as you drag the MIDI note clips, so it’s just a matter of matching the notes in your song.
Now that I’ve got my song put together and created a sound I liked, here is my result. Since I started this process in MIDI, I can change the voices on my synthesizer to a different sound or I can use a different synthesizer like Massive and design a sound from scratch with any waveform and synthesis technique. While this process is limited to the DAW and software synthesizers to which you have access as well as the kind of information you can get about the song you’re replicating, I think utilizing the tools you have as the talented editor and listener that you are in Pro Tools and MIDI can help you achieve your goal without diving into unfamiliar music theory concepts. That being said, you might read this and think, “I’d rather take the time to learn music because it seems fun!” And you’re right, it is!
This Blog Originally Appeared on Boom Box Post – You can listen to Zanne’s Finished Song Here