Post-production basics (part 2): Sound editing – Dialog
In part one, we covered file transfer between a video workstation and DAW and how to prep these materials for a sound editor. In this part, we will cover some of the basics of sound editorial.
Different types of sound editing
Sound editing for picture can be broken into different elements (and job titles):
- Dialog editing (dialog editor)
- Music editing (music editor)
- Sound FX editing/sound design (sound designer)
- Foley editing (Foley editor)
These roles could be different people or it could be one person doing all of the above. In credits, if someone is listed as “Sound Editor” they likely worked on multiple elements.
Dialog Editing
As we saw in part one, the materials are brought into an audio workstation from a video workstation (through an AAF or OMF) and then “split” so that each element is placed on appropriate tracks. The dialog editor is responsible for going through all of the dialog tracks for the following:
- Organizing files within each set of tracks
- Sorting through tracks and removing regions so only usable or preferred mics are remaining.
- Once the appropriate mics are in place: adjusting fade ins, outs, cross fades, and filling in holes as necessary.
- Removing unwanted sounds such as pops, clicks, hums, thumps, or other noises that can’t be removed by real-time mixing. Sometimes the dialog editor can remove other non-desirable sounds like dogs barking, sirens, or an unneeded car drive-by.
- Repairing sounds that can’t be fixed by real-time mixing (such as mic dropouts)
- Editing ADR (actor’s lines that were re-recorded in the studio) and voice-over narration
The fundamentals of dialog editing

Here’s an example of a very basic dialog edit; The above track is edited while the grey track (lower) is how it was delivered by the picture editor.
Production dialog naturally has an audible noise floor (from background noise). For an exterior shot, this could be distant traffic or light wind; interior might be an air conditioner running or a refrigerator hum. Most dialog clips will need a fade in/fade out to make the ambience come in (or shift to another mic) more naturally. In the above example, there’s a small spot where a mic is missing. The dialog editor would need to “fill” that – in this case, the original audio in that area was fine so the region was extended to fill in the hole.
Towards the end of the clip (the 5th region), an edit was moved slightly to clean up a bad dialog edit in the middle of a word. At the very end, the original audio had something going on (a noise or start of a new word). That had to be edited to add a clean fade out using audio from earlier in the track.
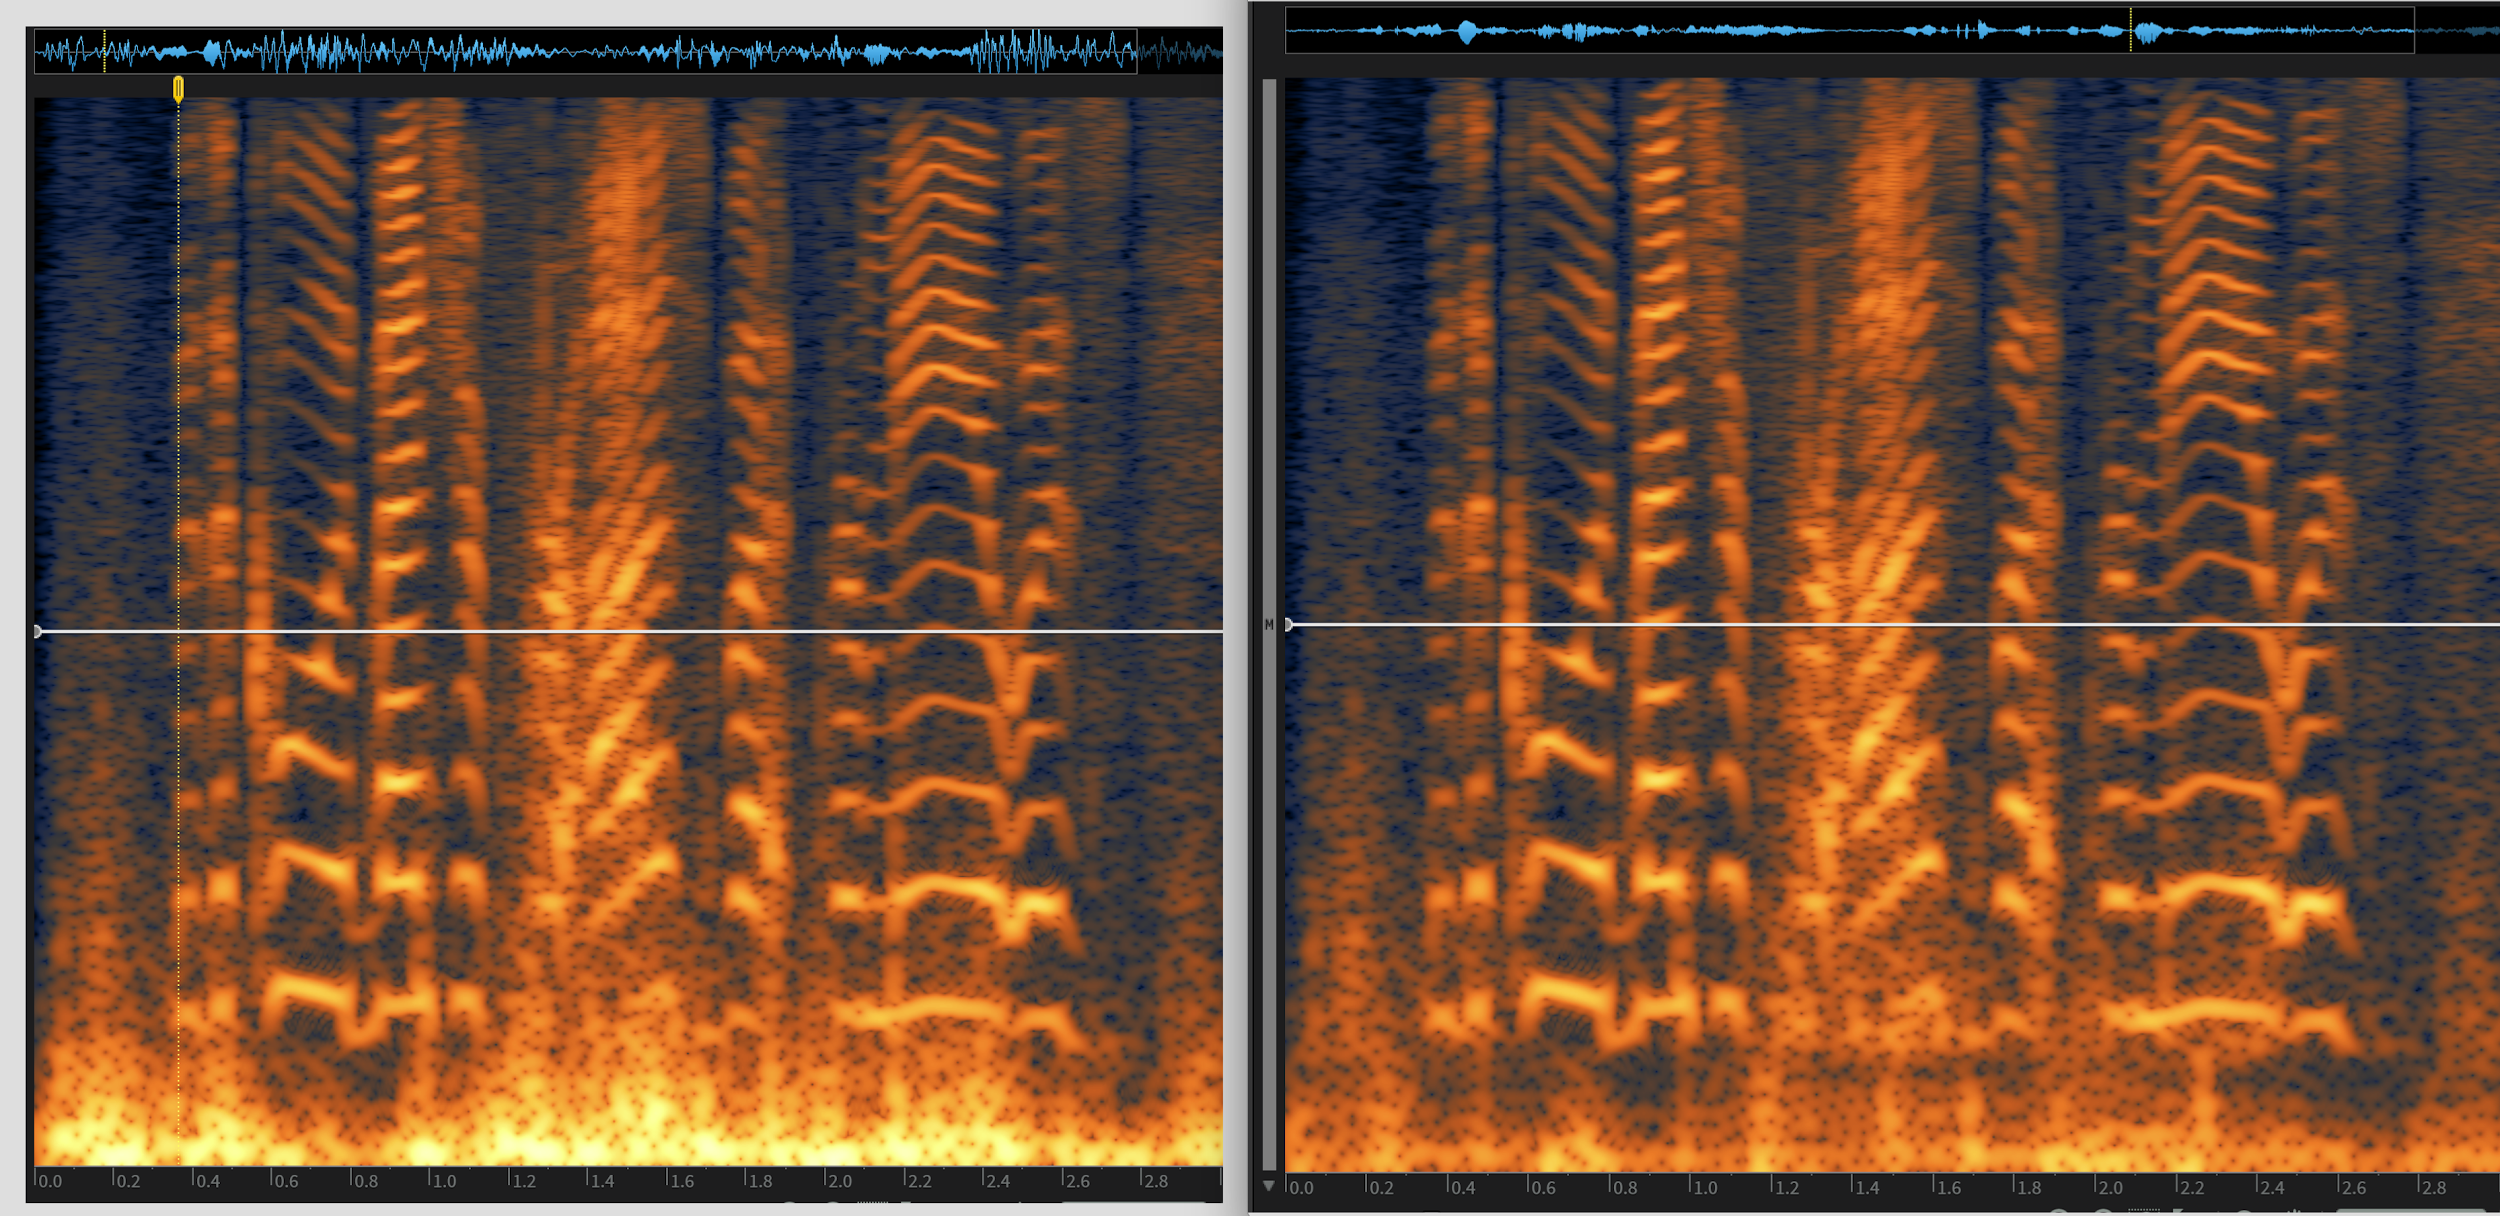
Removing mics


This is a before and after look of two tracks of dialog. It’s two people with separate mics talking at close proximity. Even just looking at the regions (without listening) you can get a general idea of when one person (or both) are talking. Even though it looks obvious, it’s still a good idea to listen through each track to make sure you’re not removing anything important that’s hidden in the waveform (like a quiet word or laugh). In this example, the second region of dialog was fill added by a picture editor (or assistant) that came from another scene. That had to be replaced with fill that from this scene to match sonically. It may have sounded fine in the picture edit bay, but the ambience shift would have been really obvious to the mixer. Sometimes issues like that aren’t audible unless you’re listening with professional-quality headphones, studio monitors, or with a compressor on the dialog.
Dialog organization
There’s a lot of different ways to organize dialog and the style can change depending on a few factors (like the style of project or the mixer). For example, when working on reality tv shows (or documentary), I like working with two sets of tracks: interviews and in-scene dialog. A scene could switch many times between action (in-scene dialog) to an interview of someone talking about what’s happening. Here’s an example of that style:
Even though it’s the same person talking, it doesn’t make sense to have on the same track because it’s different locations, different mics (or mic placement), and the source mics probably have different levels.
That style of dialog editing may not work for a scripted film or tv show, though. It may make more sense to have 5-10 generic dialog tracks. Regardless of who’s mixing, you typically want to edit the same character/same mic on the same tracks through a scene. In this example, there’s 3 people (or three mics):

It’s possible that the character on DIA B will be on the track DIA C in the next scene.
There’s a lot of small details to dialog editing that will be specific to the mixer you are editing for; Below is the same audio but edited to another mixer’s preferences (no straight fades, longer fade ins/outs, switching between tracks A-B and C-D between scenes):

It’s always a good idea to speak with the mixer you’re editing for to get a sense for their preferences. Some mixers have 5 dialog tracks ready to go and others have 20. Some mixers only want a specific type of cross fade. It can help to see another project that was edited for that mixer, too. In essence, the dialog editor’s job is to make it easy and seamless for the mixer to import the dialog edit and start working as quickly as possible.
Removing sounds
It’s pretty much expected for a professional dialog editor to know how to do detailed audio clean up using corrective software or plugins (with functions like declick, decrackle, and hum removal). Detail work is the key; Broadband noise reduction (globally reducing noise) typically happens during the mix, not by the dialog editor.
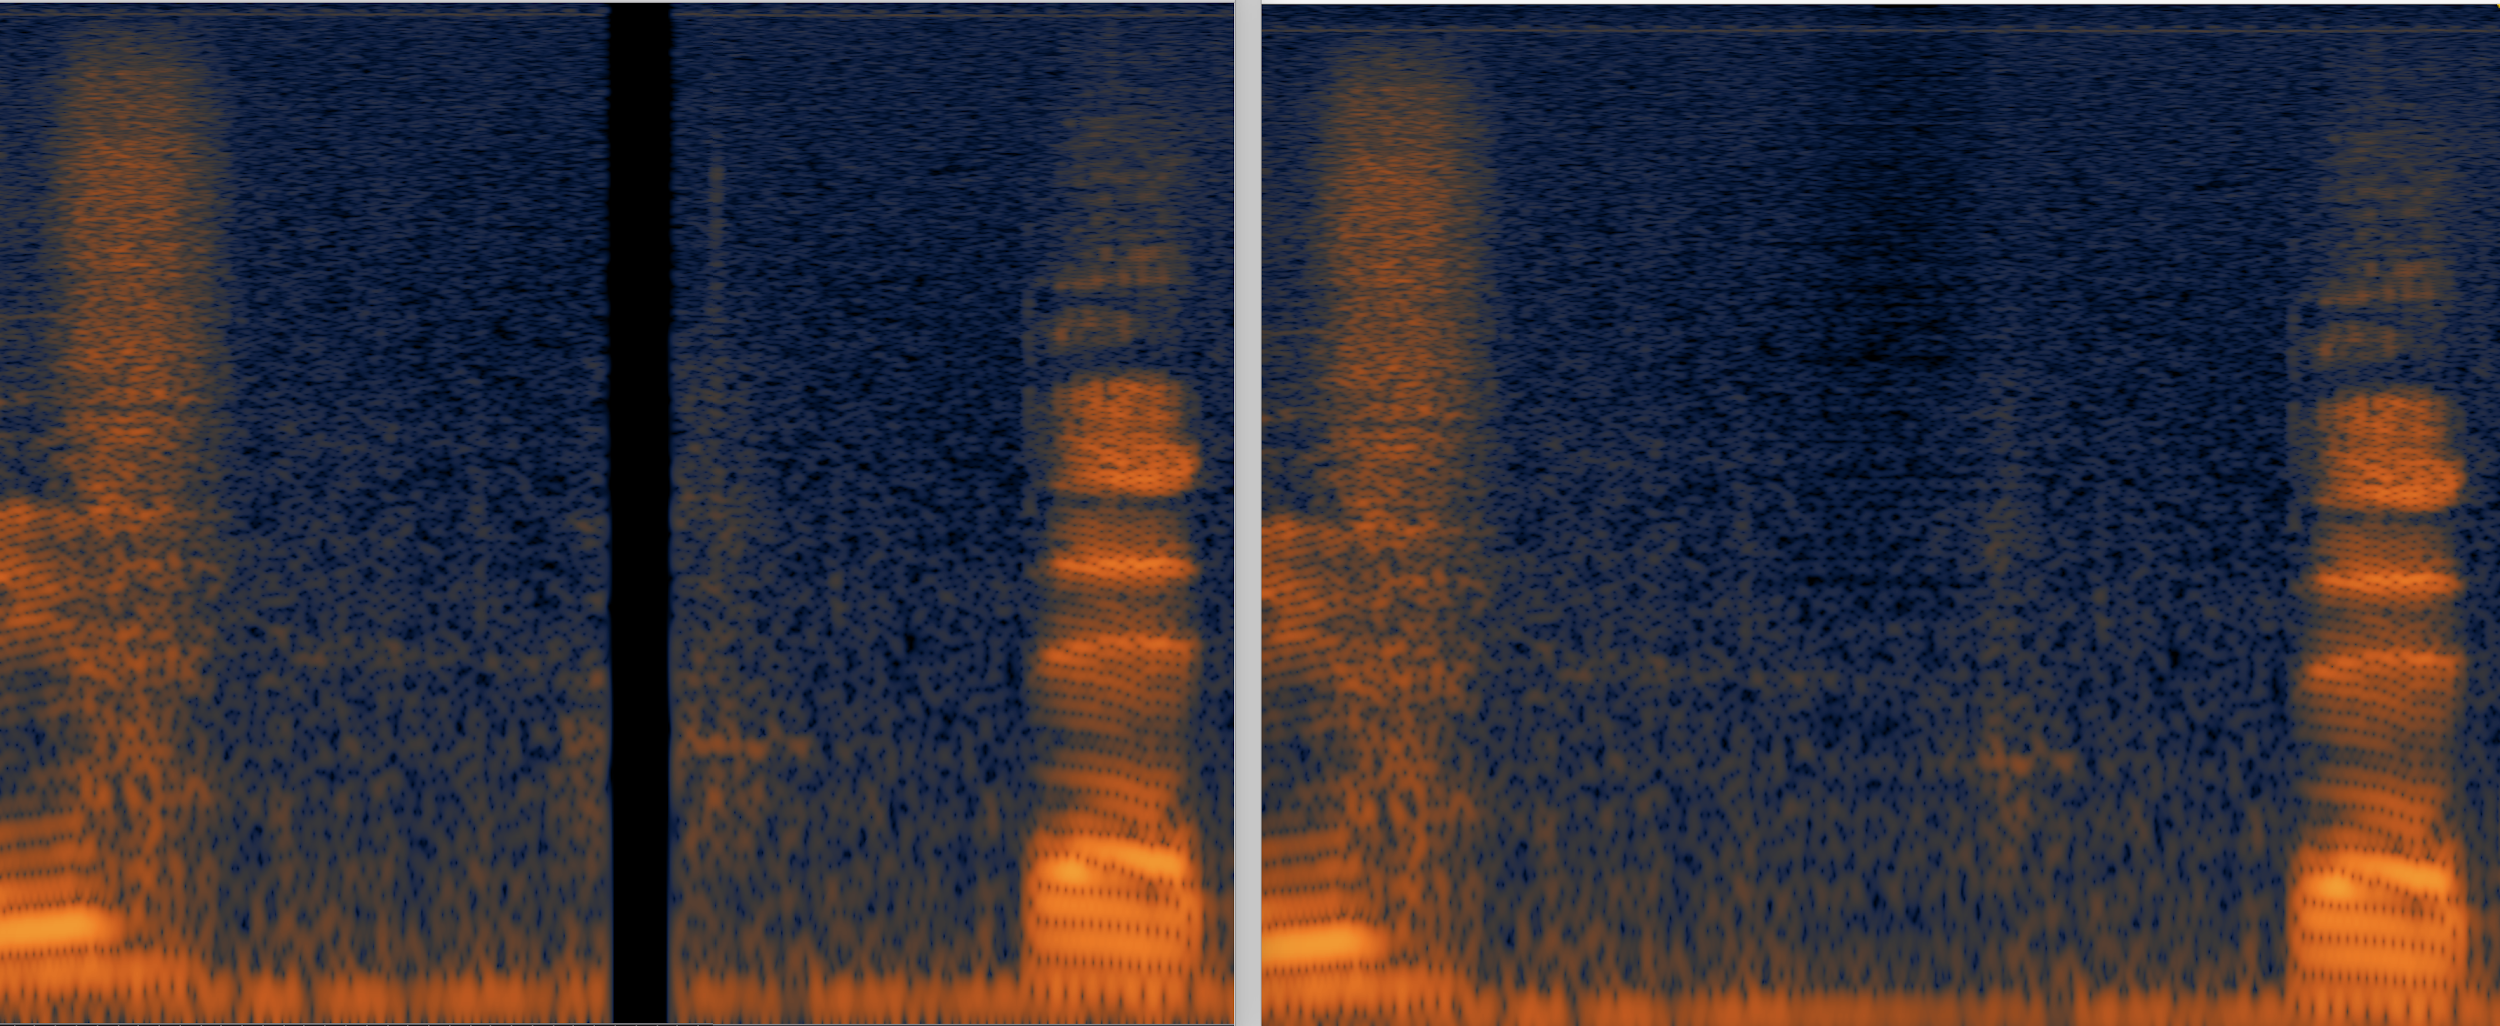
Izotope RX is commonly used software that dialog editors use to remove problem sounds. In the example below, there’s wind on the mic that’s causing rumble and clicks. The left side is the original audio; the right side is after it’s been treated by RX 5 (to remove low pops, de-plosives and declick):
The biggest change is in the low frequencies (seen as bright yellow in the left photo). What’s impressive is that it’s done without compromising the quality of the dialog. A mixer could achieve a similar result with a high pass filter but they would be completely losing low end information – which can cause a shift in ambience or negatively affect the sound of the voice.
Izotope can also repair mic dropouts, as seen in this before and after:
Tips for dialog editing
One trick that I use when dialog editing is to add EQ and compression (for my own reference) – basically to listen similarly to how the mixer will be. It may take some adjusting between scenes but the idea is to hear things that you may not catch otherwise. For example, some lavs sound very dull or boxy (especially if poorly placed). A lav might need 6 dB or more of a high end boost – significant enough to hear issues that went totally unnoticed before.
Sometimes it’s up to the dialog editor whether to cut a scene with lavs or booms (this is another discussion to have with your mixer; some people prefer one or to have both options in the cut). It can be hard to gauge which sounds better when one of the EQs is totally off (or levels are totally off). In addition to adding a temp EQ, it can help to adjust clip gain as you’re working. Ultimately this could help your mixer too (if they are using clip gain data when it comes time to mix).
Unused mics: There’s a couple ways to handle mics that aren’t needed. If there’s two mics on the same person and both sound pretty good, it’s ok to edit both and leave one unmuted and the other one muted. You could also make “X” tracks; “X1, X2, etc” and place any unused tracks on there. Your mixer may want these tracks or not (that’s another question to ask). It’s good to hang onto as much as possible in your own work session, either way. If a mixer later asks, “were there any other mics for this spot?” you can easily see how many mic options there were and can listen to the alts (so you can explain why you chose the way you did).
If you’re doing any processing (declicking, etc), it’s really important to keep a copy of the original somewhere accessible. Sometimes it’s muted on the track below or you can make a track labelled “unprocessed” (or something similar) so anyone can get back to the original, if needed. If it’s only a small portion of a region it may not be necessary to separate out. In general, you want to make it as quick and easy as possible for someone to hear the original (whether it’s on another track or pulling out a handle).
Headphones versus studio monitors: This is a personal preference, but I typically prefer headphones unless I’m working in a decent sounding room with monitors that I know and trust. It’s hard to hear rumble on a speaker that only has a 6 inch woofer, for example. If I’m working at a studio, I would rather edit on a mix stage than an edit bay (it’s not always possible but it’s really helpful if you have an option). Even better is to work in the mix room that the final mix will take place. The mic choices that you make in one room may sound very different in another – especially between a small edit room and a mix bay.
Advanced dialog editing
This has been a basic overview of dialog editing. There’s more advanced skills that come up such as:
- Removing sound fx that naturally occur in production audio so they can be used in the M&E (foreign versions)
- Creating fill that can be used for ADR, filling in holes, or used as transitions between mics
- Adjusting mics for phase or sync issues
- Conforming lav mics (from the source recording) when they aren’t included or cut by the editor
Who makes a good dialog editor?
Dialog editing is a good fit for people who like to work alone and is generally more independent and less stressful than mixing. You have to be detail-oriented and like problem-solving. It’s rewarding because it’s often a drastic change between where you started and what it sounds like when you’re done. It can be really challenging at times, too. As far as sound editing goes, it’s probably the most important job (because dialog is up front and center – literally).