The Glamour Starts Here
Special thanks to Josh Thomas for all his help with writing this article.
A few years ago, I went to a talk about mixing for in-ear monitors (IEMs), given by one of the top monitor engineers in the UK, Mr. Justin Grealy. As someone who mainly worked in-house, but had to accommodate more and more acts turning up with their own IEM systems, I was intrigued to learn as many tips and tricks as possible to give artists great mixes. I was not expecting most of the hour to be taken up with all the different ways to get earwax out of an IEM. Some were admittedly genius – hairdryers were mentioned at one point – but I didn’t understand at the time just how important good IEM hygiene and maintenance is for a successful mix. No amount of volume, pretty effects or space-creating trickery will make up for the sound being muffled by a wall of wax, or cutting out because of dirty connections.
IEMs can be the biggest purchase you make in your early career, so it’s worth taking the time to find the right ones for you. If you need them to work with the same act regularly, try to get the same make and model as they use (or the main person uses if they all have different ones). The goal is to get as close as possible to what they hear. Discuss with management whether their budget will cover part or all of the cost.
If you need them for one-offs or working in-house, get the best quality that you can afford. It can make a massive difference to what you hear, and so how well you can react and make subtle adjustments in a mix. Generic IEMs are cheaper and quicker to buy than a custom moulded pair, but getting a custom fit will properly seal the IEMs against the ear canal, which helps with isolation from external noise and provides a better bass response. If possible, go to a local IEM dealer and demo a few different ones before you decide. Remember, you want the ones that will reproduce the signal most accurately, not the ones that sound nicest (e.g., if the pair you have are rounded off in the higher frequencies, your mixing could sound too harsh to people who have IEMs with a flatter frequency response).
Regular cleaning of your and your clients’ IEMs is essential. Small grains of dirt on an IEM can make their way into your ear, scratch the delicate skin in the canal and lead to infection and swelling. Dirt, sweat, and wax can block the drivers’ tubes, corrode the connections and even end up in the tiny and sensitive electronics, causing damage. I would like to say if you take good enough care of them, they can last you a lifetime, but custom moulded IEMs should be replaced about every four years. The shape of your ear canal changes subtly throughout your life, so after a few years, the fit won’t be as exact and will stop forming a seal. Specialist gels like Auragel or foam wraps like Comply can help to form the seal again, but they are only a stopgap solution. Once you notice your IEMs loosening it’s time to get a new pair, from a new fitting, not the measurements the IEM company may have kept on file (these are for replacing lost or damaged IEMs).
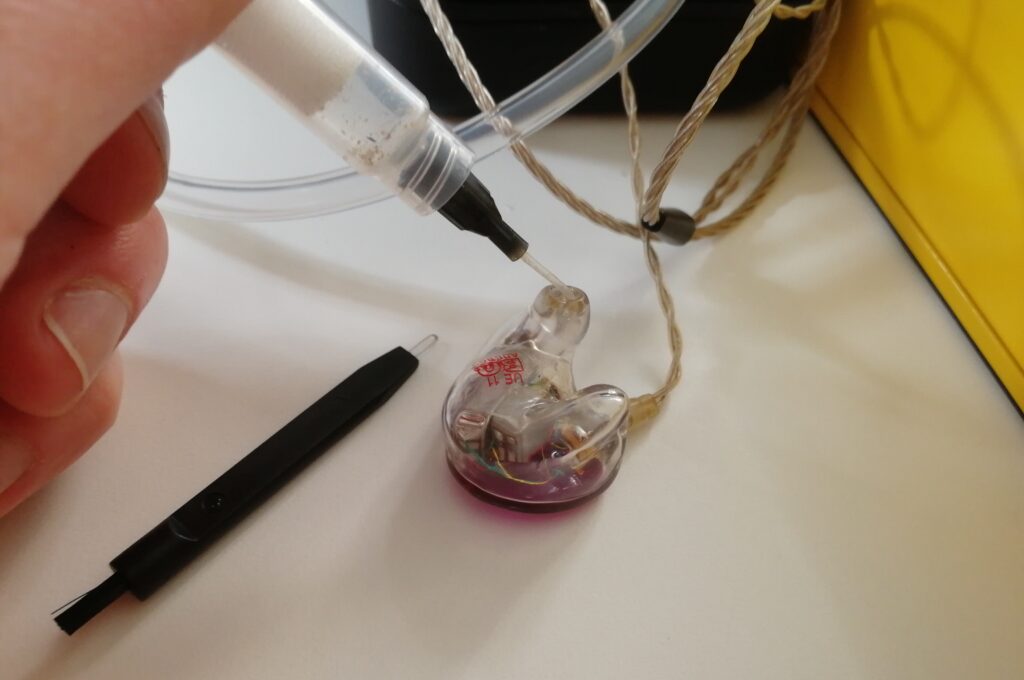
The central part of cleaning IEMs is removing wax from the tubes that lead from the drivers to your ears. Your IEMs should come with a loop of wire with a plastic handle for this, but if they didn’t, or you lost it, or the wax is further down the tube than it can reach, there are a few do’s and don’ts you should bear in mind.
First, be gentle. Keep a close eye on what you’re doing and be careful not to damage any filters or circuitry inside the IEM. Don’t use anything that might break off and get stuck in the tube! Mechanical pencils look kind of perfect for this task, but they are a terrible idea. Also, avoid using anything pointed or sharp, like a needle. You could scratch the moulding, making tiny grooves where more wax and dirt can build up, and potentially where bacteria can fester. Using a loop, optionally followed by a specialist earwax vacuum, is the way to go. I try as much as possible to hold the IEM upside down, so any wax that gets dislodged falls out instead of further into the tube, and I use a gentle scooping motion, at an angle, to get behind the wax and bring it back out instead of risking pushing it further in. Compacted wax blocking a driver can render an IEM useless, and it can be costly and time-consuming to send back to the manufacturer to fix. I then clean the outside of the moulds with alcohol swabs.
If one ear keeps cutting out, look at the connections between the cable and the IEM. It might merely be loose, but check that there isn’t any green or black stuff at the pins or in the socket. Black is most likely dirt, but green is corroding copper, usually caused by sweat. Cleaning this off with a cotton bud (Q tip) dipped in alcohol or contact cleaner (being careful not to let any liquid get into the body of the IEM) can fix this, but you need to prevent it happening again. Leaving the IEMs to air out after use, keeping a small sachet of silica gel in the case, and checking them regularly can help. If the owner likes to wear their IEMs in the gym, tell them, it’s time to invest in standard earbuds, or it will become a costly habit!

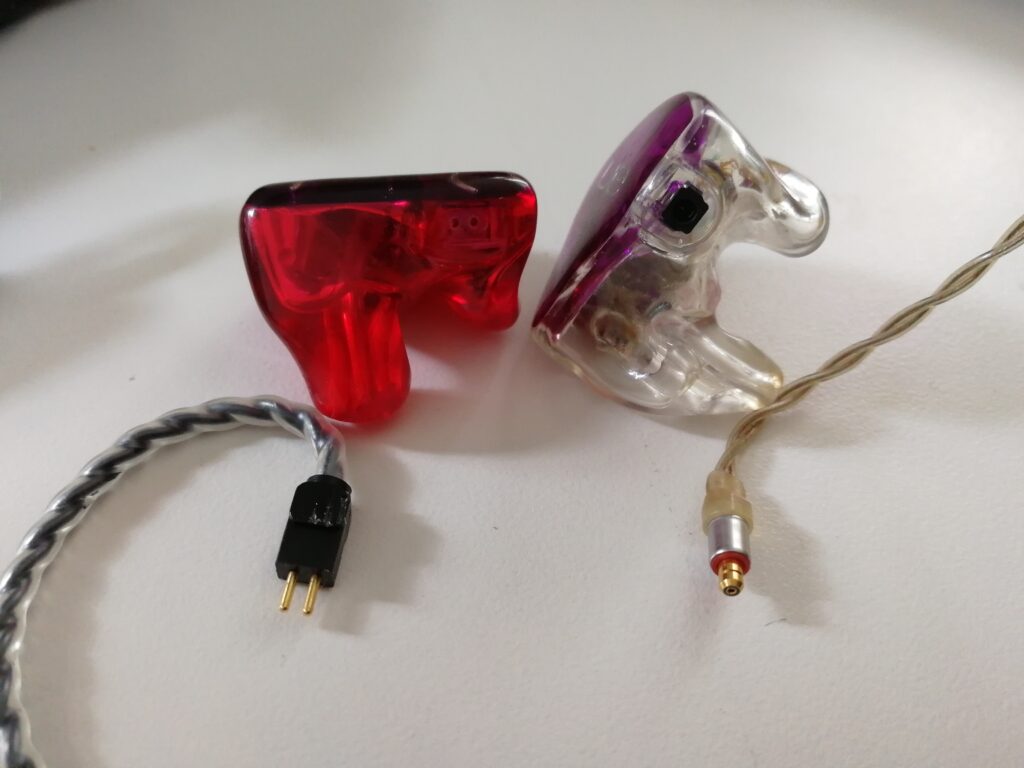
Two different brands of IEM with their respective cables. On the left, the socket is recessed into the casing where two dots can be seen, on the right, it is the area in black. There is no evidence of dirt or corrosion.
If the ear connections are fine, the minijack connector or belt pack socket might be dirty or corroded and can be treated in the same way. The minijack has to be fully seated for both ears to work. If the right side is intermittent, but the left is fine, the jack might be pulling out of the socket slightly, so the right side’s ring no longer makes a connection. Leaving more slack on the cable or taping it in place should help. If it isn’t the jack, gently wiggle the cable as you’re sending signal, to see if there’s a weak spot. IEM cables can get abused, being yanked and pulled during costume changes, snagged on door handles, crushed in their cases. It is wise to carry spare cables for each type of IEM you have so you can swap them out straight away if there’s a problem. Don’t wait until you need one, because it can take weeks to get them, especially at busy times of the year.
If the above steps don’t fix your problem, it might be an issue with the pack or radio frequencies, which is outside the scope of this post. If one ear has lost a big chunk of its frequency spectrum, or it sounds like it’s distorting at low levels, one of the drivers might have blown and will need to be sent for repair. Another reason to keep an eye on your bandmember’s pack volume levels and to mix responsibly!
There are all types of little gadgets and supplies you can keep with you to help with IEM maintenance and troubleshooting. IEMs and hearing aids have a lot in common, and it’s worth checking out audiologist suppliers as well as IEM specialists for things like cleaning loops, ear wax softener and earmould stetoclips (like a stethoscope for hearing aids). Always have plenty of alcohol/anti-bacterial wipes to hand, and thoroughly clean each piece of equipment between IEMs with a new swab to reduce the potential for cross-contamination and general grossness.
Whether the thought of dealing with other people’s earwax turns your stomach, or like me, you find cleaning IEMs strangely satisfying; it does more than keep your equipment at its best. It’s always good to get a reputation for being helpful and useful, and you can spot potential problems before they develop. It’s much easier and safer to deal with issues in your downtime than halfway through a show. It can also be an excellent opportunity to start the conversation with clients about anything they’ve noticed about their IEMs but hadn’t thought to mention, or how they’re dealing with volume levels and looking after their hearing in the long term. For example, increased earwax production can be the body’s defense against sustained, overly loud listening volumes. Showing that you’re interested in their hearing health now and in the future, and willing to go the extra mile, can cement your relationship and improve trust and communication, which will do more for your mixing than any effects unit ever could.

