Time to Train
At the beginning of this year, I made a major life change
I left a tour to see what life would be like living off the road, specifically in New York City. Touring folk tend to fall into two camps: those who are planning to eventually go to NYC to live and work full time, and those who enjoy visiting, will go there for shop prep, but never want to live there. They’re either happy to head back to their home locals when they get off tour or plan to spend the majority of their career on the road. I’ve always been of the mind that touring was a phase of my career, not the endgame. I know I’ll miss it, I look forward to visiting for vacation coverage or tech periods, but I’m ready to try something new.
It’s rare that you’ll move to the city and immediately get a full-time show tossed in your lap (although there are people that move here because they have a job already lined up), so I came here with the intention to find work subbing on the mix for Broadway shows (which would provide income, but also counts towards qualifying days to help me keep my health insurance, plus getting to mix!) as well as working in the shops (for income and the ability to meet more people in the industry, so part socializing, part networking).
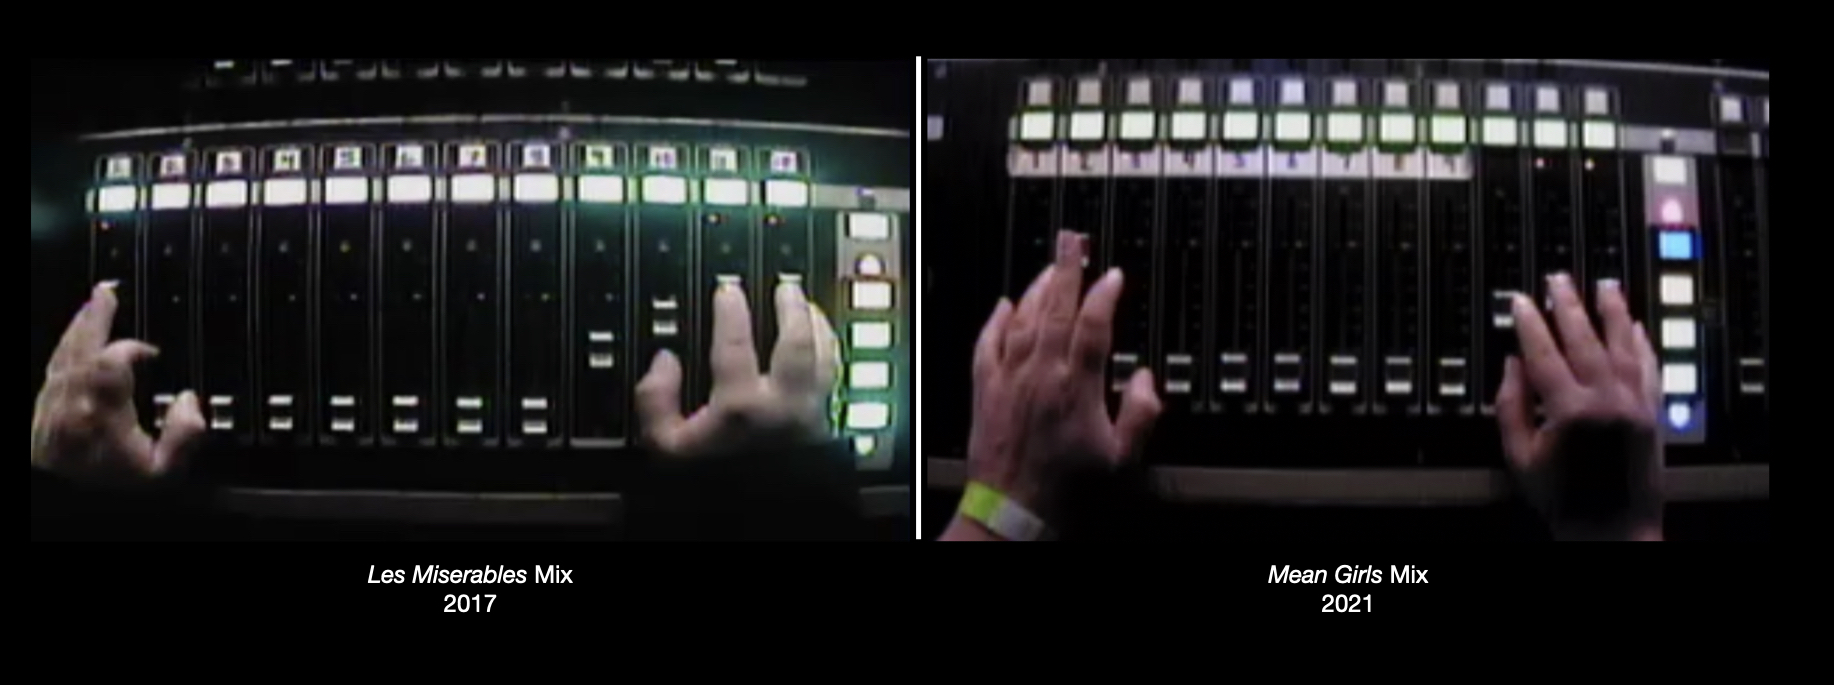
Thanks to my time on the road, I have some contacts here, so I came to the city with a rough semblance of a plan. Part of which was subbing on Funny Girl. The same sound design team I worked with on Mean Girls also did Funny Girl, so when I let them know I was planning to leave the tour and move to the city, they put me on their list of people they could call. It worked out that they needed to get someone up on the mix around the time I settled in, so I was able to get approved by management and start the training process fairly quickly.
When you’re learning to mix an existing show
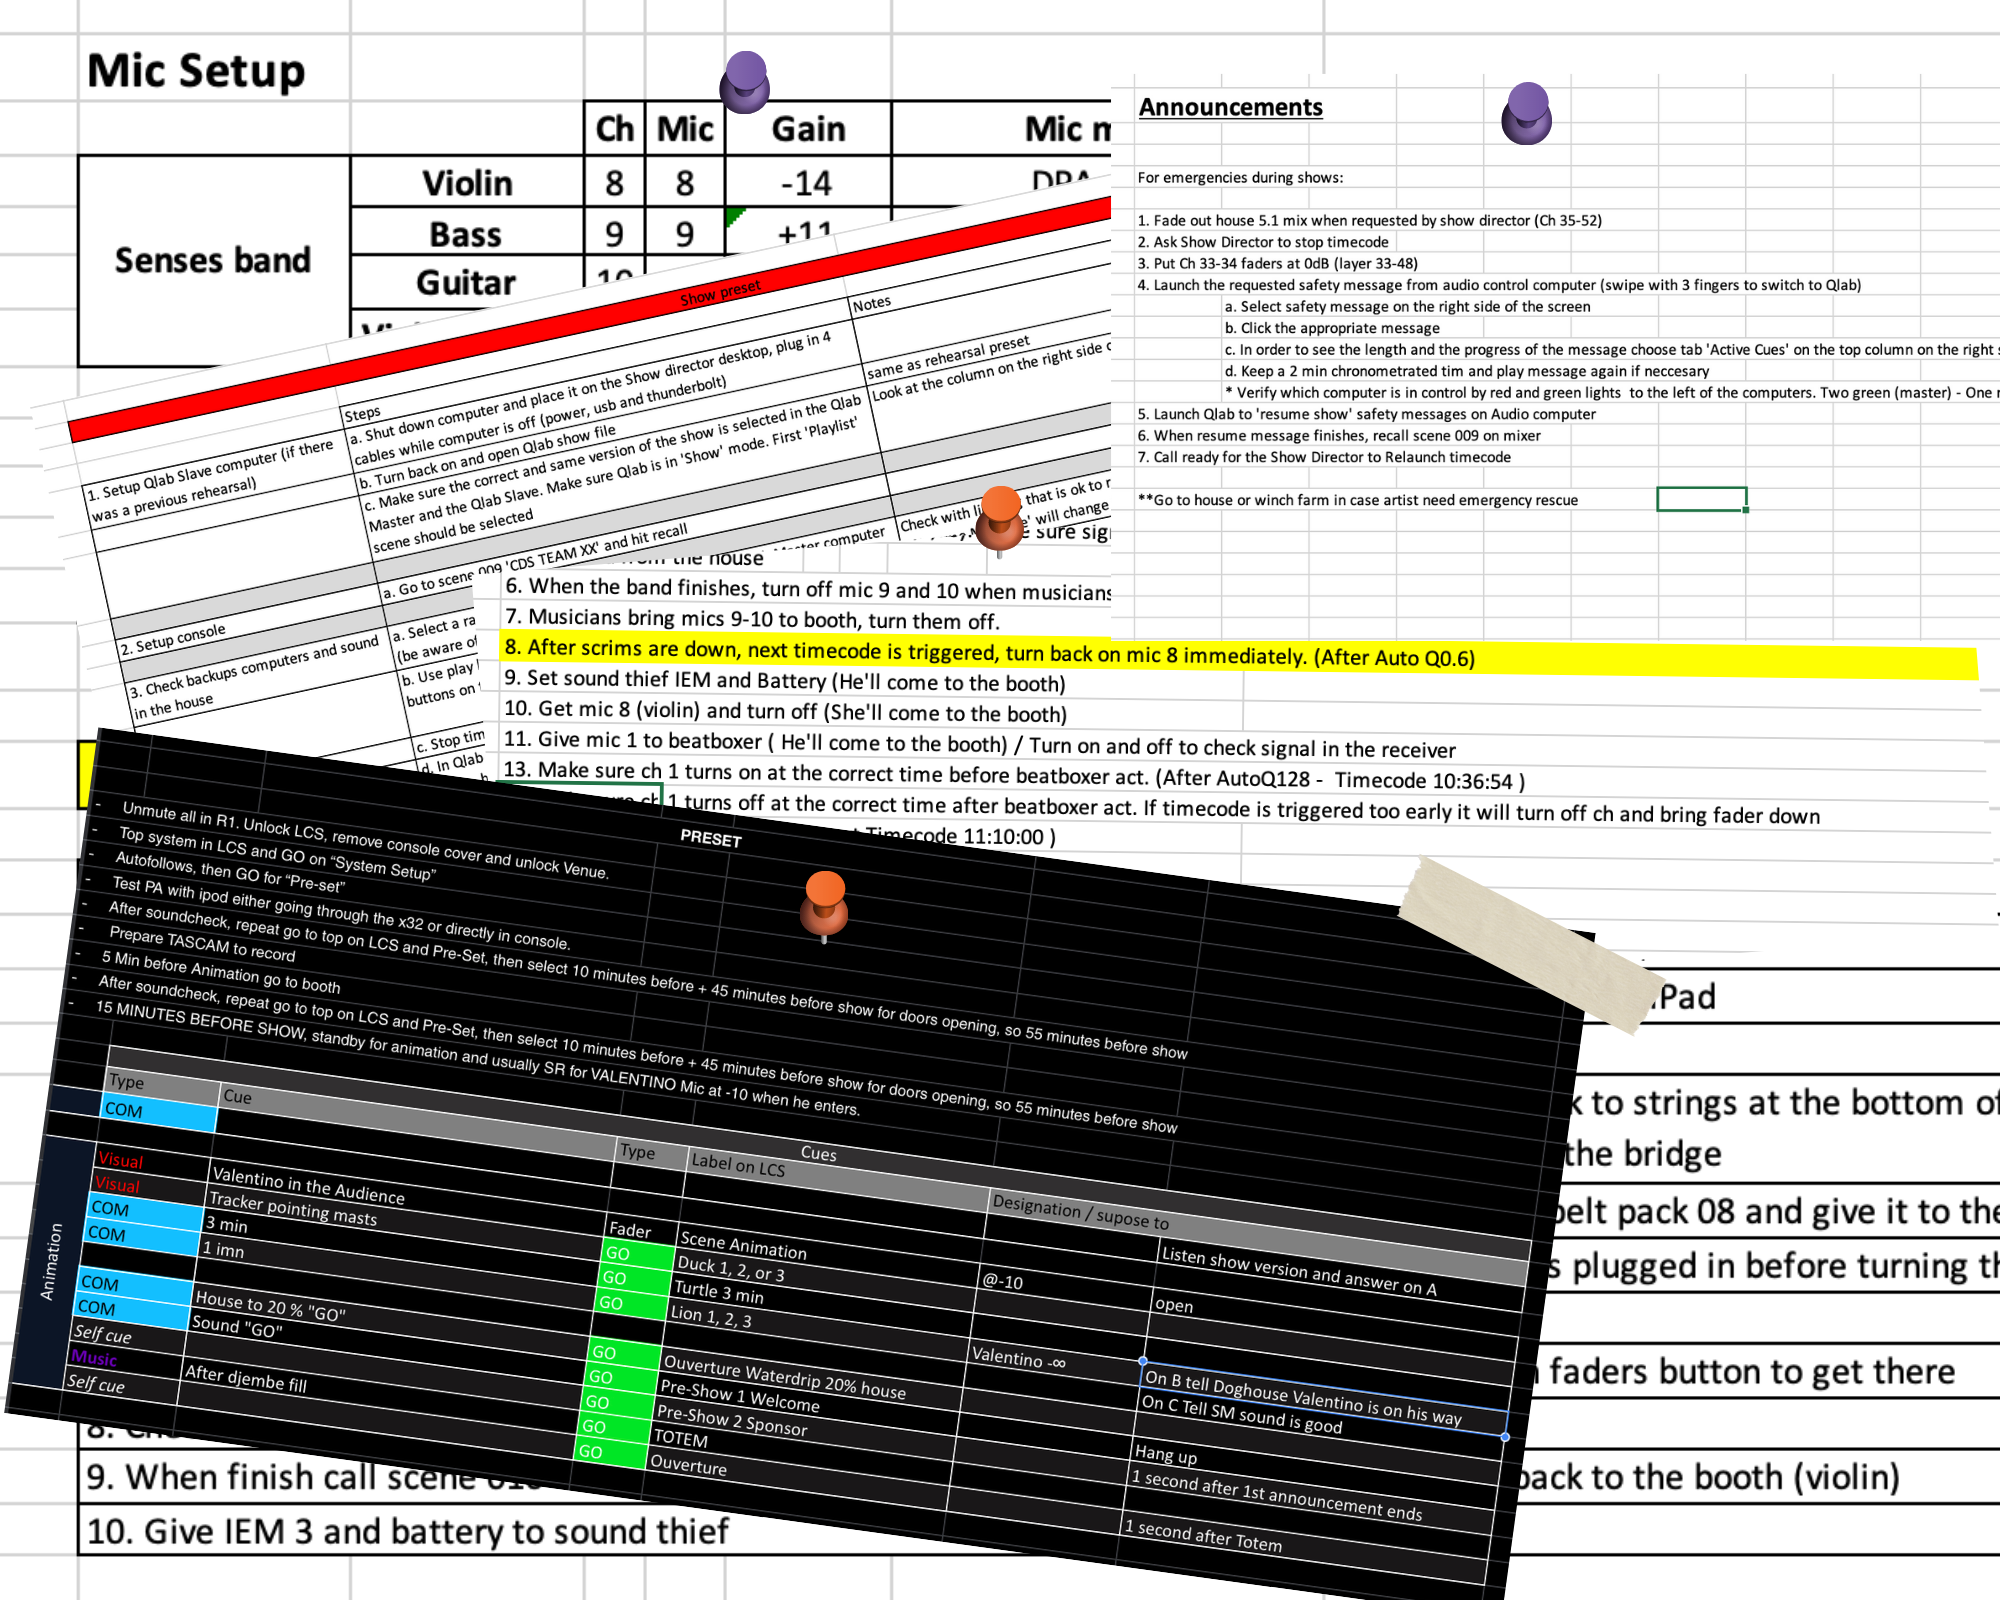
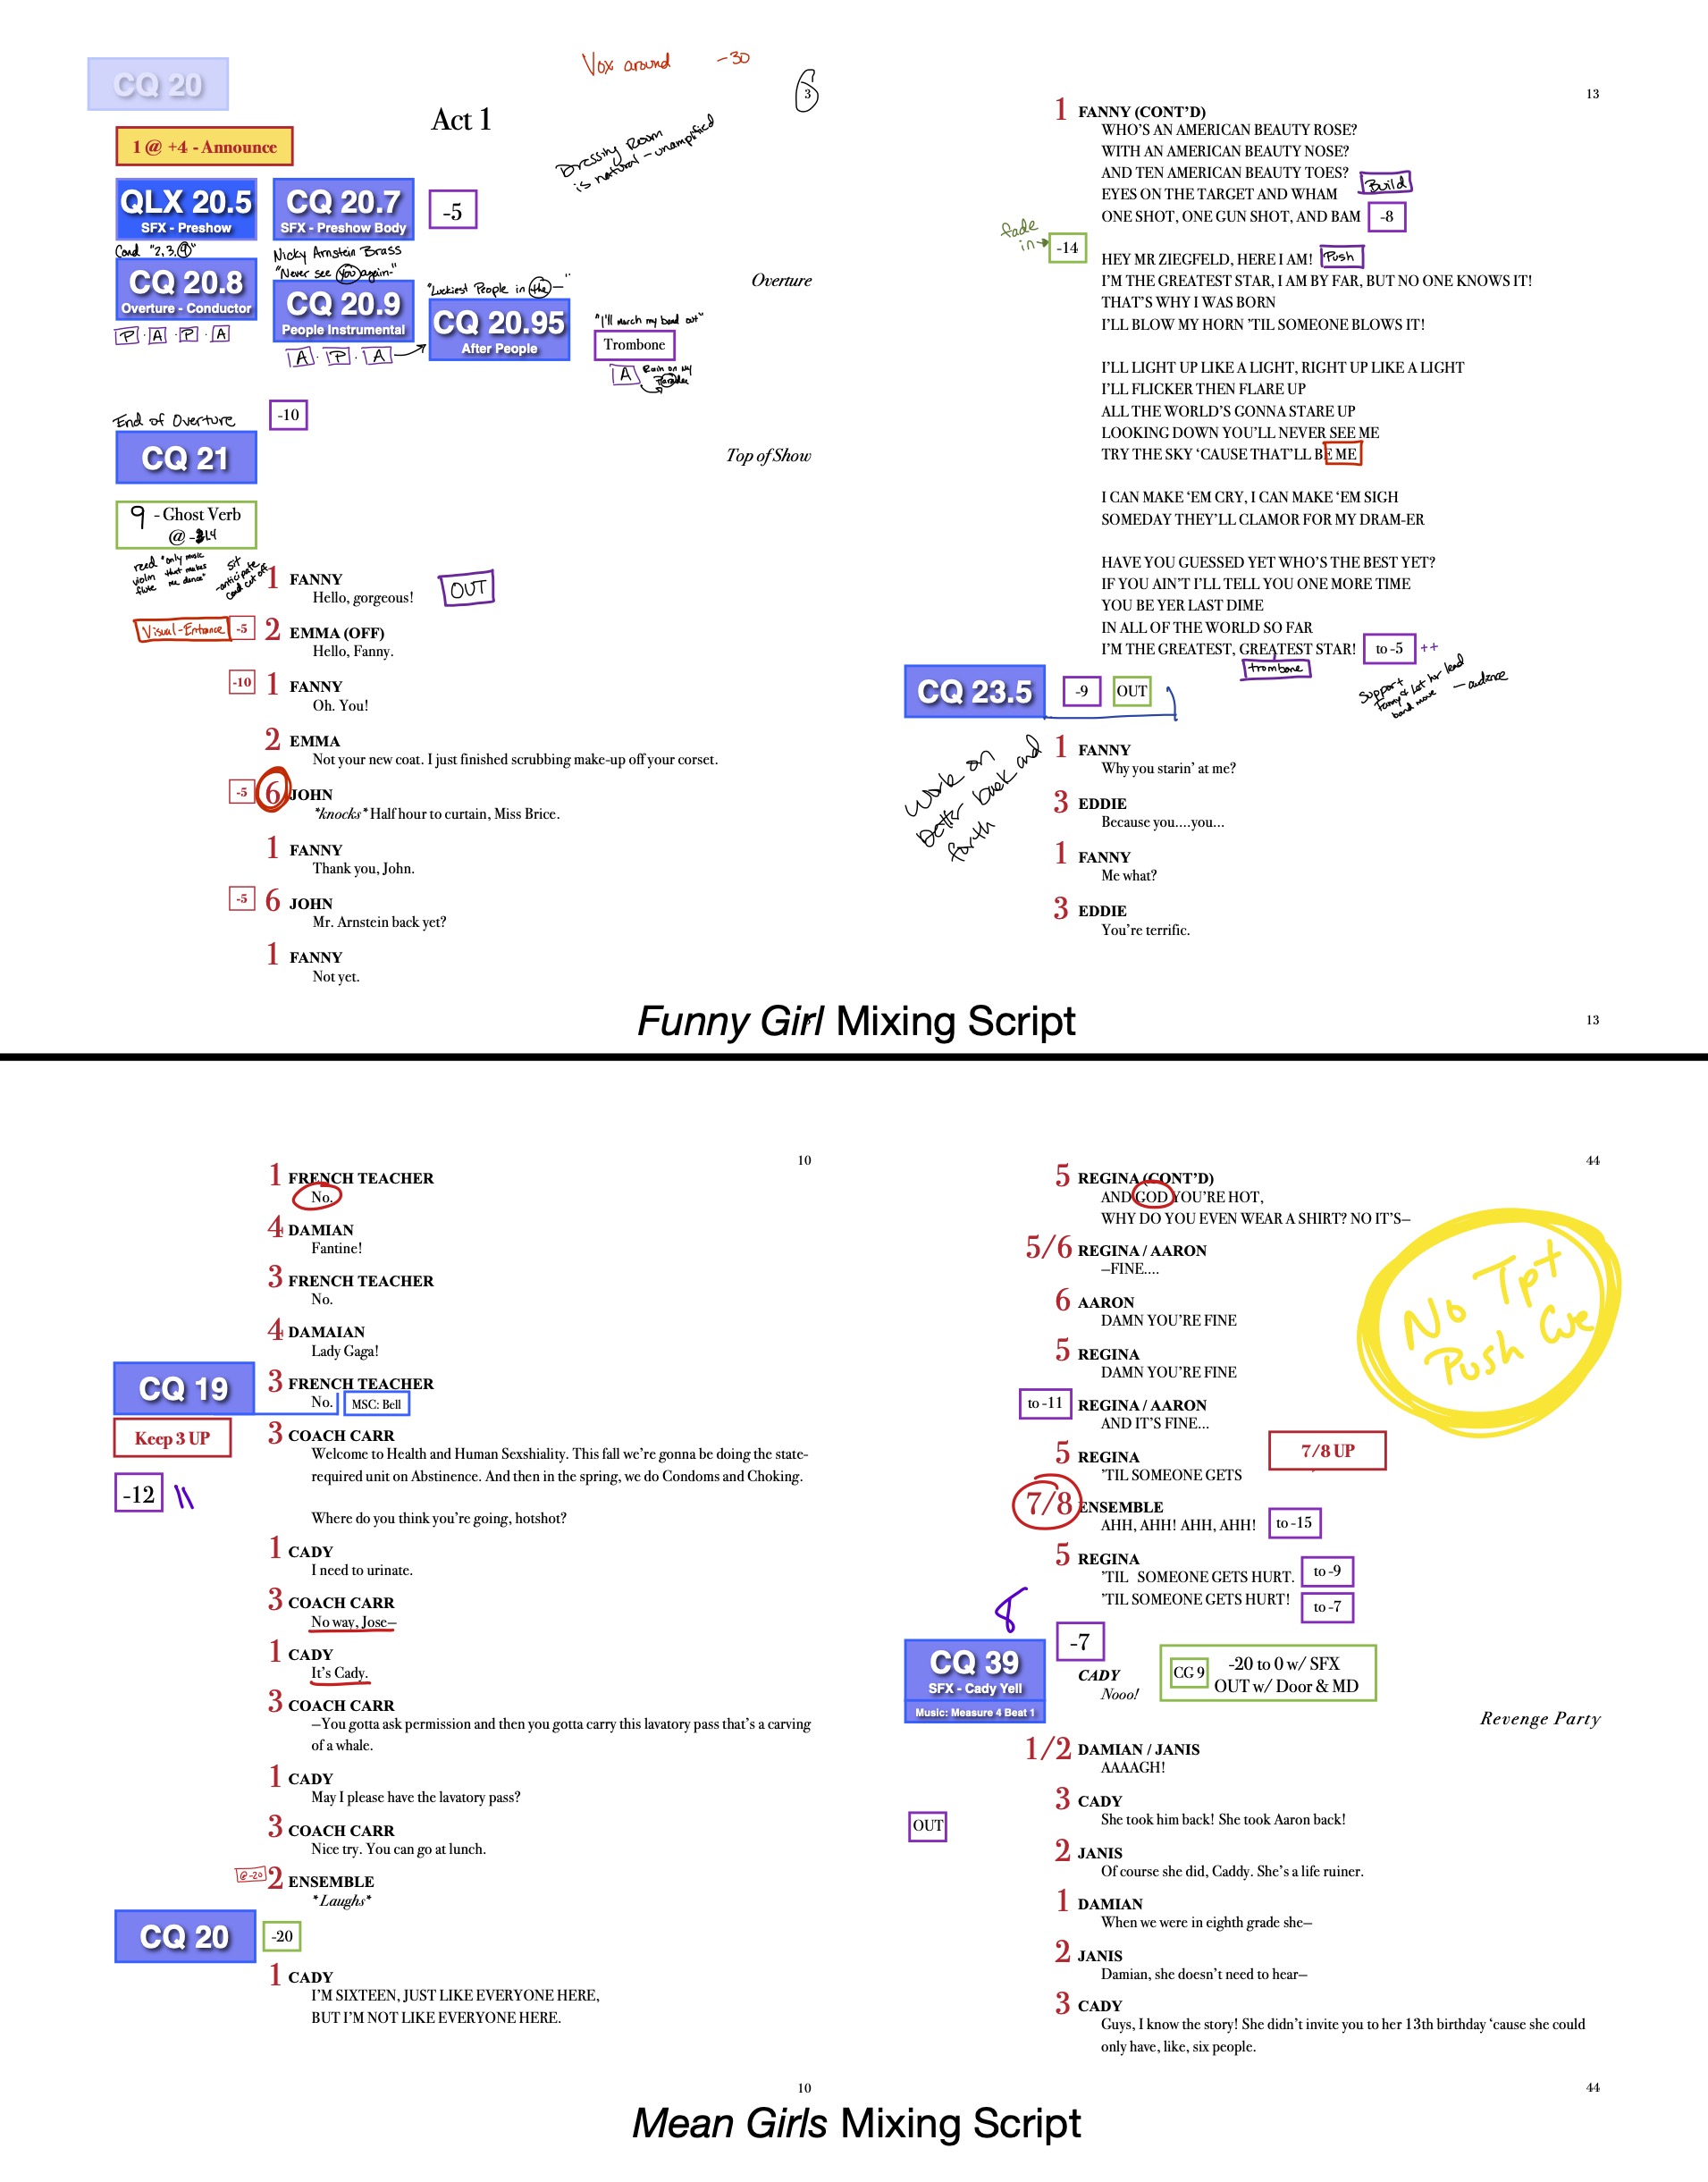
You usually have between two and three weeks (16-24 shows) to get from watching the show to mixing it and your training is live, during performances with a paying audience. I got approved about a week before I actually started (it took time to finalize a schedule), so I was able to get the script and an audio archive recording of the show to start. It’s a much shorter process than I’ve talked about in a previous blog, but I still retyped the script, added in my own annotations (all the while listening to the recording of the show so I could get familiar with it), and practiced mixing it all the way through at least once a day, going through my script, adjusting or adding notes or figuring out how to make page turns easier.
Once I was in the theatre I set a rough schedule of goals. I try to break it down so I watch the show at least once, only to watch so I can start to connect what’s happening onstage to what I’ve been hearing in the recording. Then I’ll use a couple of shows to watch the mixer with my script in front of me and make notes or mark questions. Next, I’ll ghost mix for a few shows, which is basically the same thing I did with my practice board the previous week, just in the theatre, during the show where I can see how my timing lines up with the mixers. Usually, you can make a side fader bank on the console blank, so I can mix at the console, next to the mixer, without actually controlling anything. After that, I’ll start mixing the show, a few scenes at a time, adding on more each show, and ghost-mixing the rest. Finally, once I’ve mixed through the full show, I’ll plan it out so I have a few shows left in the training period where I’m just mixing the show, getting repetitions so I can settle in.
It’s worth noting that as a sub, my script has far more markings than when I’m the primary where I learn the show in tech and consistently mix it afterward. A sub is someone they’ll call for sick days, vacations, or possibly for a brush-up if it’s been a while. All of this means that I might go weeks or even months between mixing (hopefully if it’s months, that’s where the brush-up show would come in), so I need to have more detailed notes instead of assuming that I’ll remember some timing or nuance.
When you’re breaking down the show into sections
There are a couple of ways to do it, based on how you learn best:
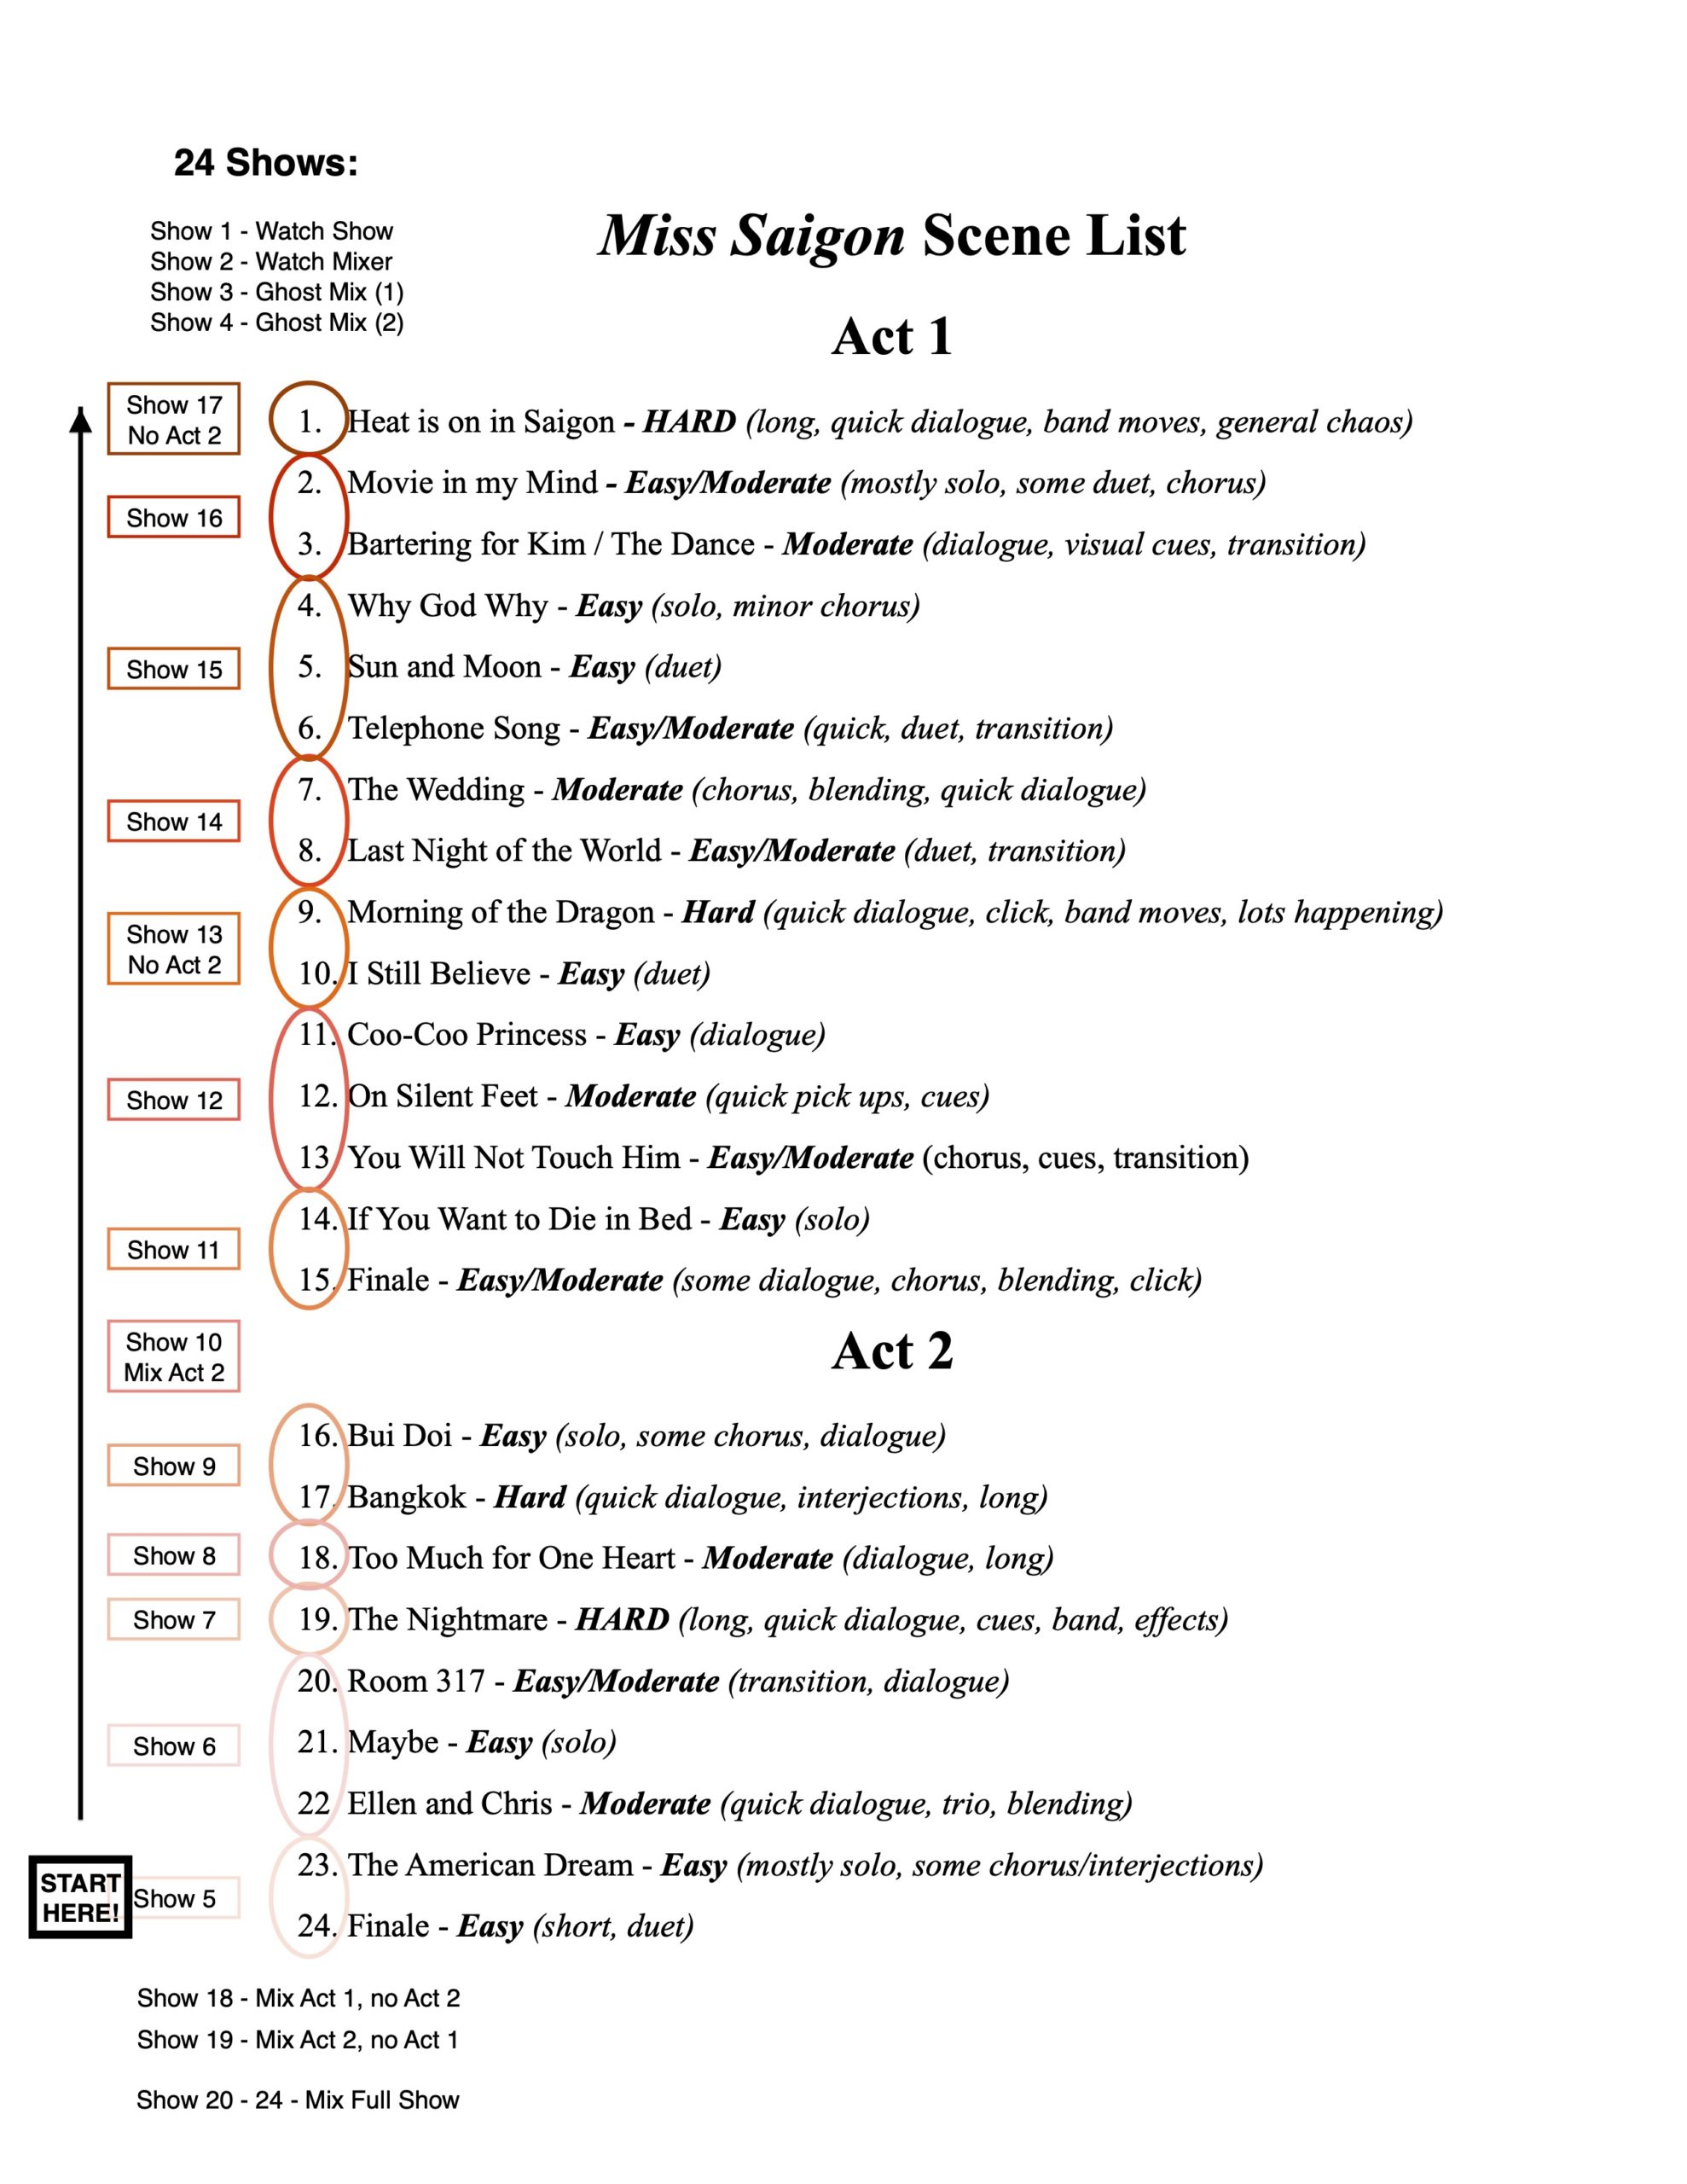
- First to Last: You start mixing with the first scene of the show on the first day, the second day you mix the first and the second scene, on the third you mix the first, second, and third scene, and so on, starting with the material you already know, adding new scenes onto the end.
- Pros: You start with familiar scenes and can settle in before you get to the new material. Also, you have the option to continue past what you’ve planned if you find you’re comfortable.
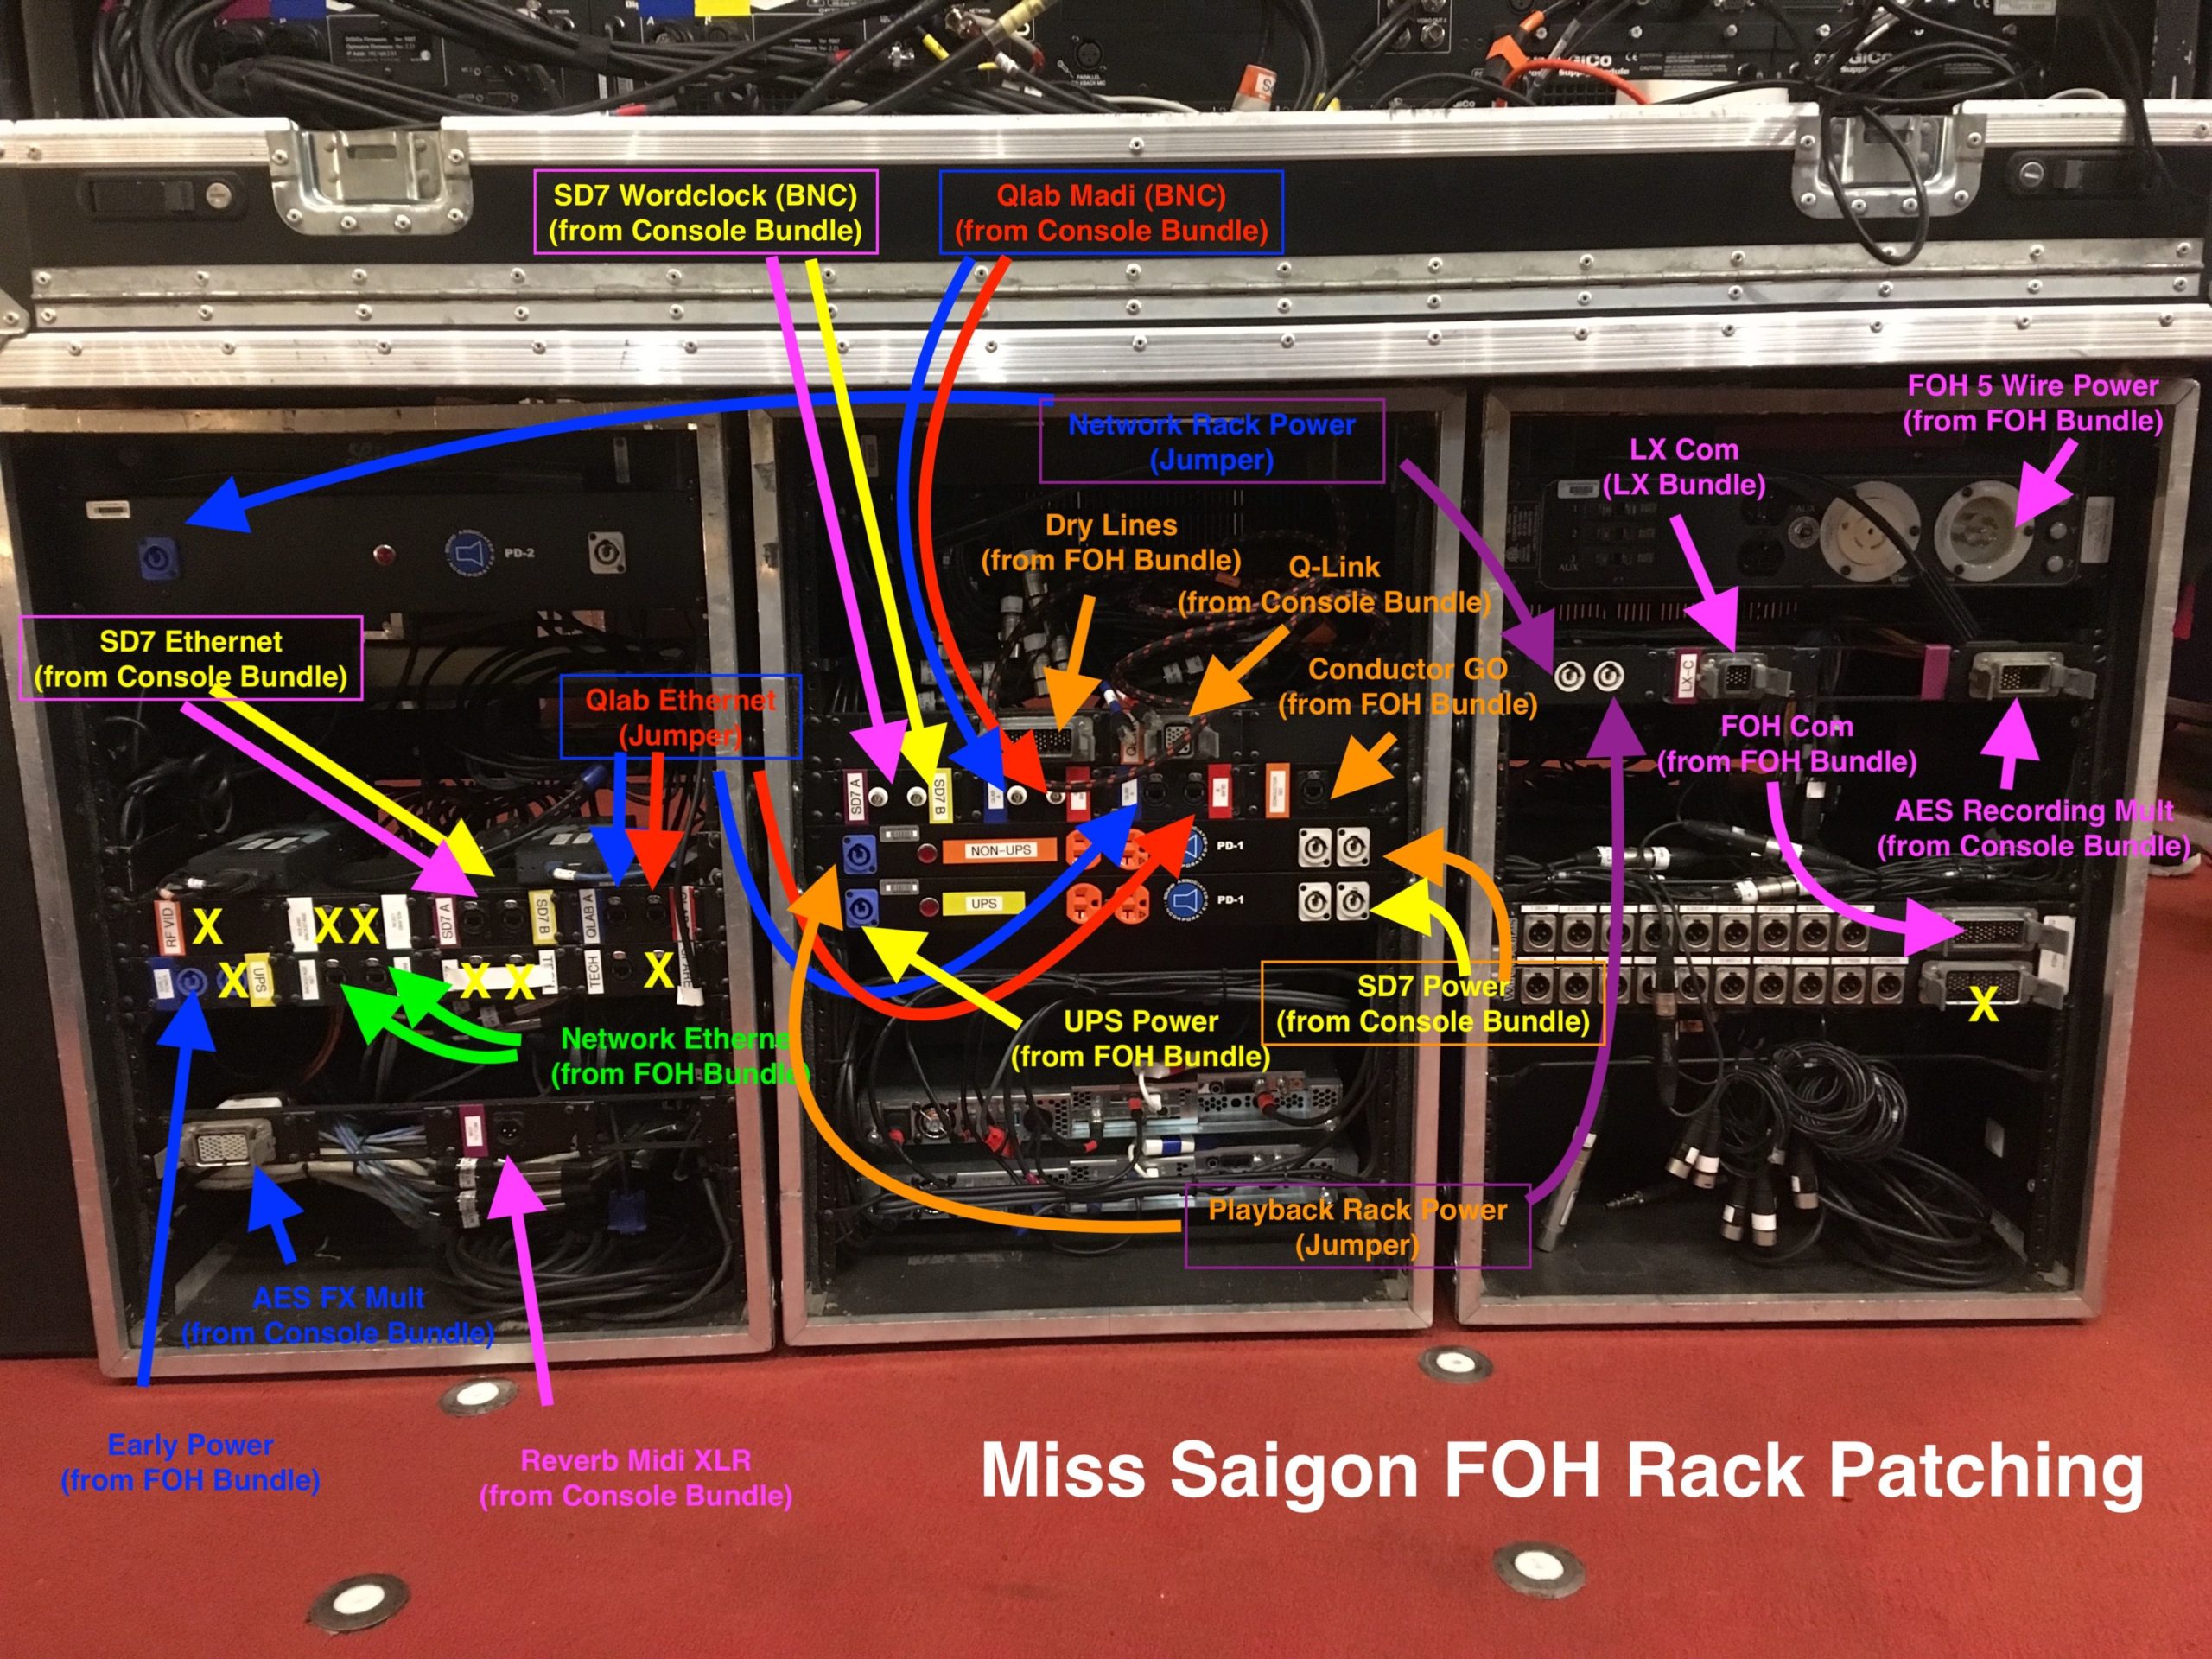
- Cons: You hop right in at the beginning regardless of the difficulty of a scene. In Miss Saigon, the first scene is “The Heat is on in Saigon” and it’s one of the hardest to mix, having a lot of quick pickups as well as band moves, cues, and ad-libs all happening at the same time. It’s not a great place to throw a mixer in for their first go.
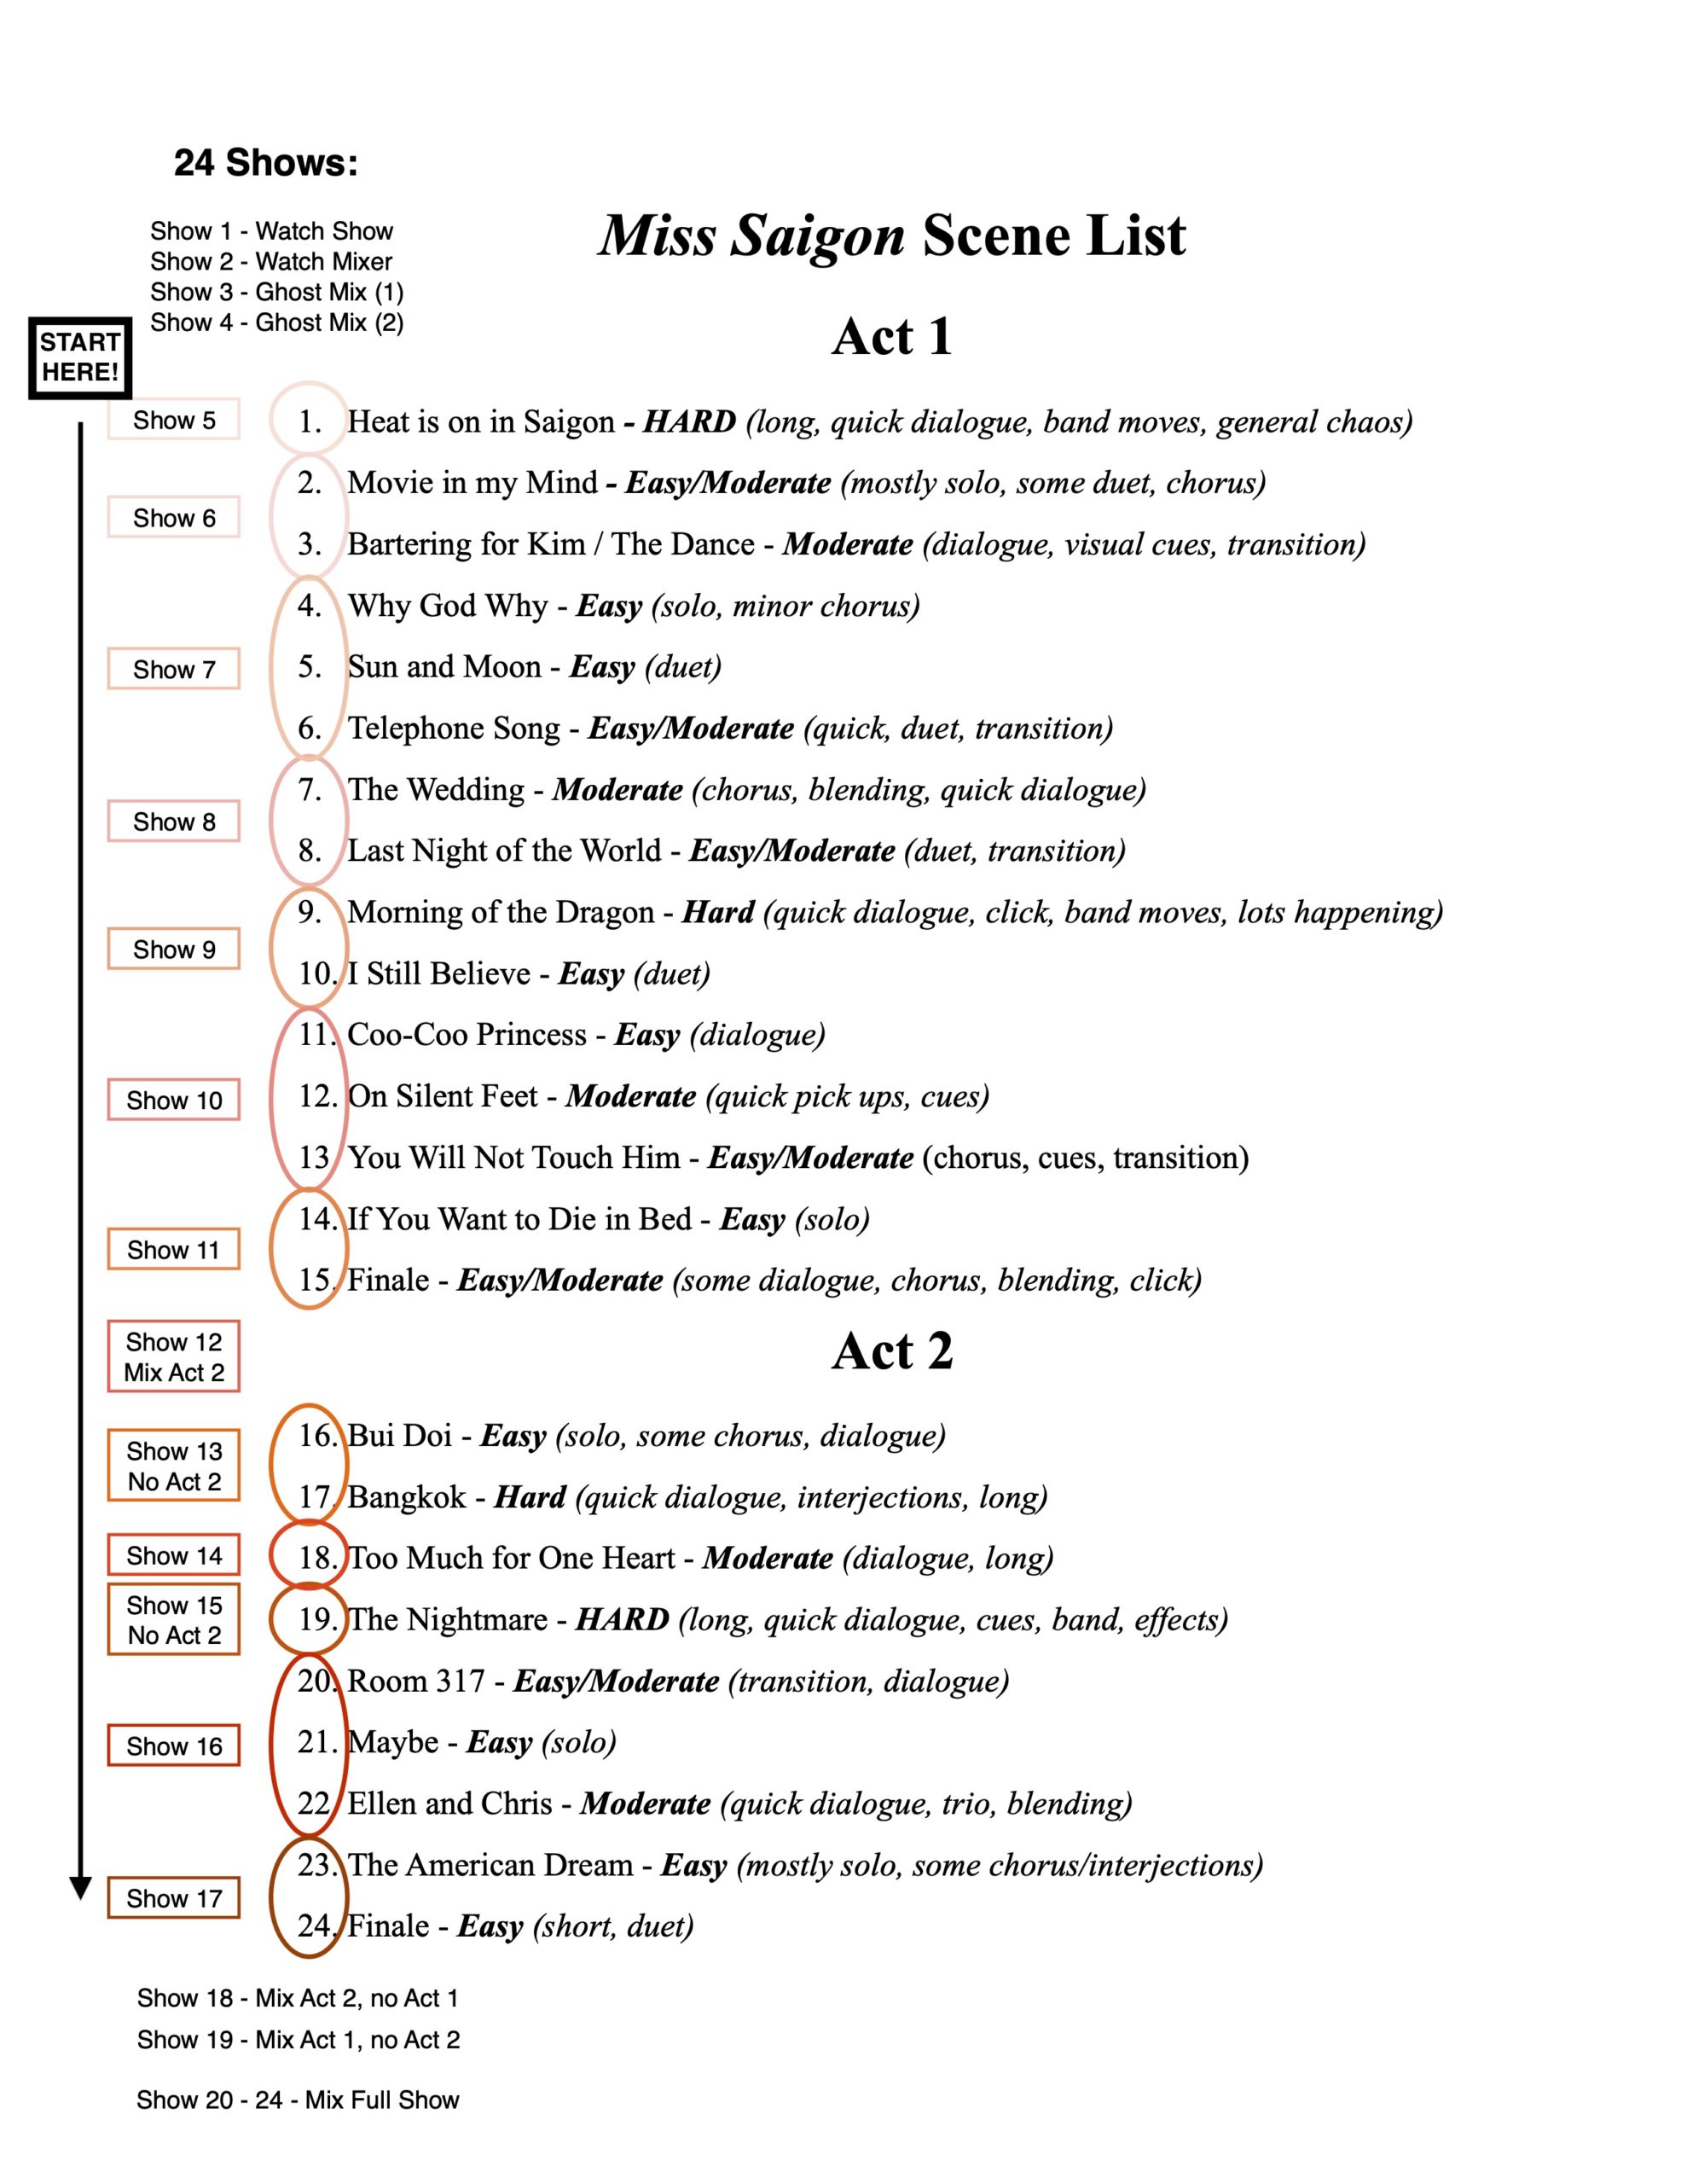
- Last to First: This is the opposite of first to last. You start on the first day with the last scene of the show (say Scene 10). On the second day you mix scenes 9 and 10, the next scenes 8, 9, and 10, etc. You start adding new material on the front, with older scenes coming later.
- Pros: Your stress level declines as you’re mixing because you started with the newest piece first and then get to more familiar territory as you continue.
- Cons: Like First to Last, it doesn’t account for the difficulty of the scenes. However, shows are more likely to have a complicated opening scene than a closing number. Also, there’s no option to keep going if you’re comfortable, so there’s less flexibility
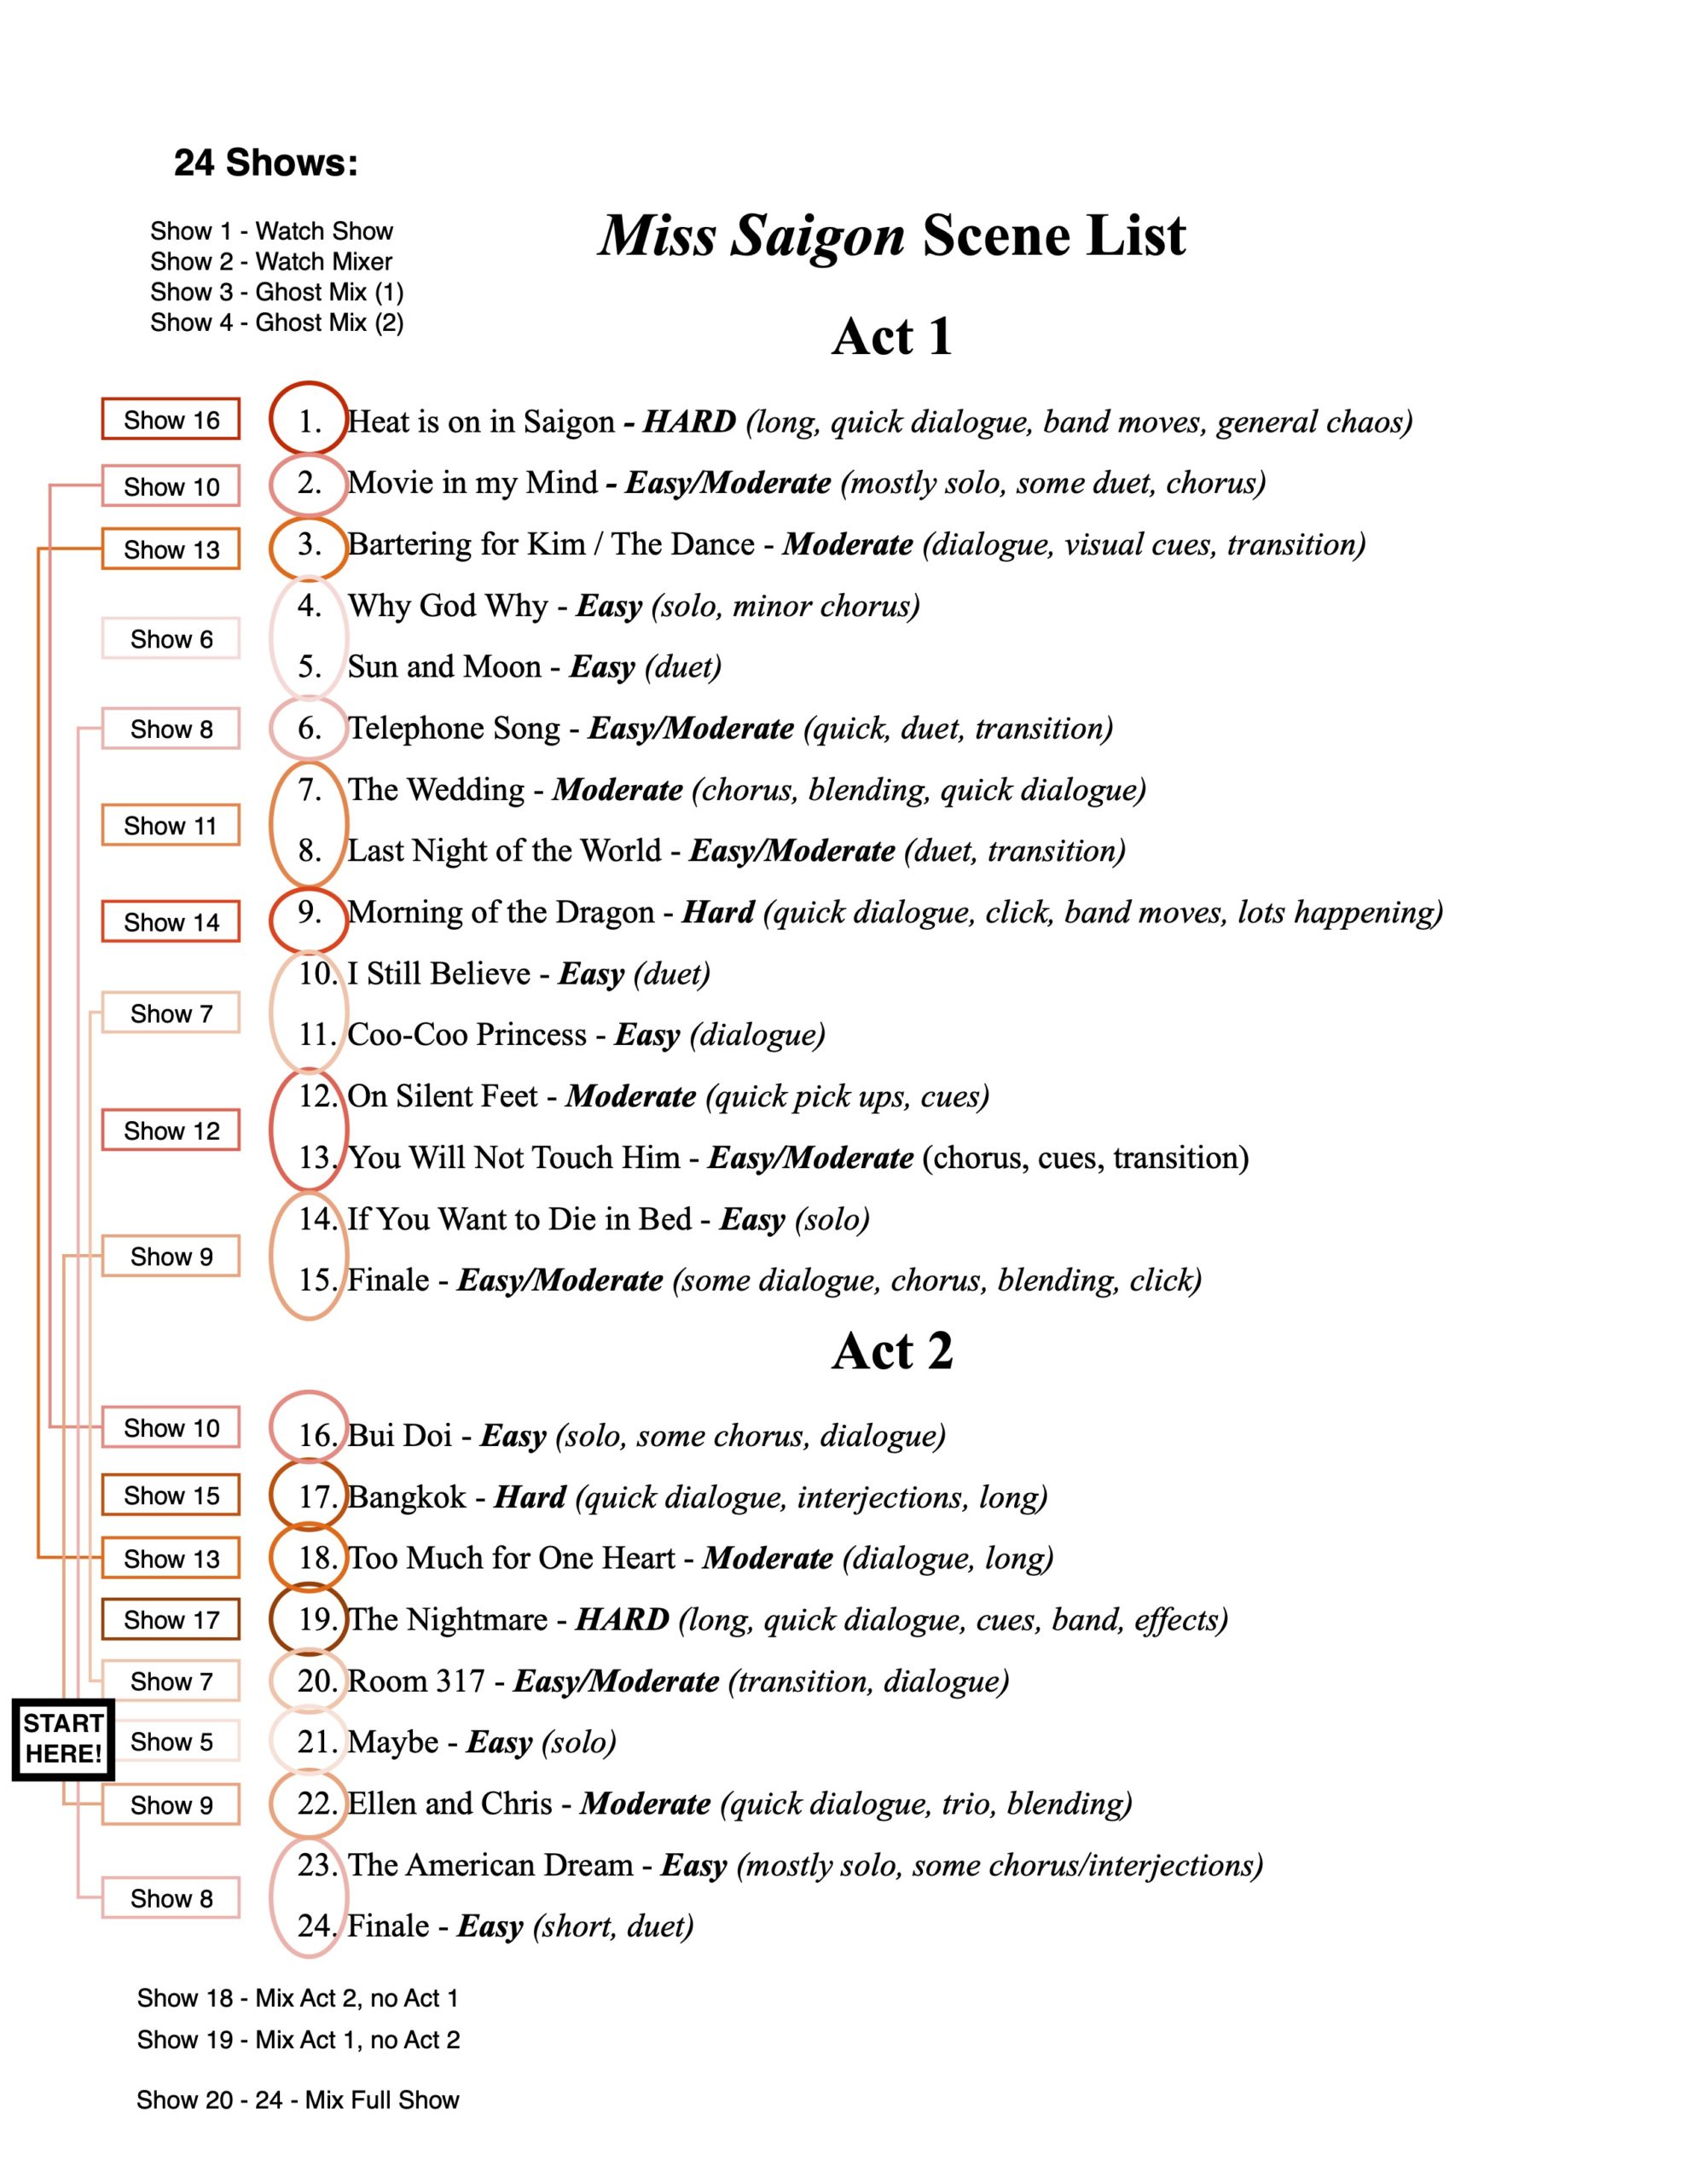
- Least to Most Complicated: Here you start with the easiest scenes or songs, like solos, then add on progressively more complicated numbers: next duets, then small groups, and finally large full company numbers.
- Pros: Helps to promote confidence by starting simple. Also, you have the option to continue on in a scene if you’re ready for more complicated material.
- Cons: It’s disjointed as you switch back and forth between the mixer and the trainee.
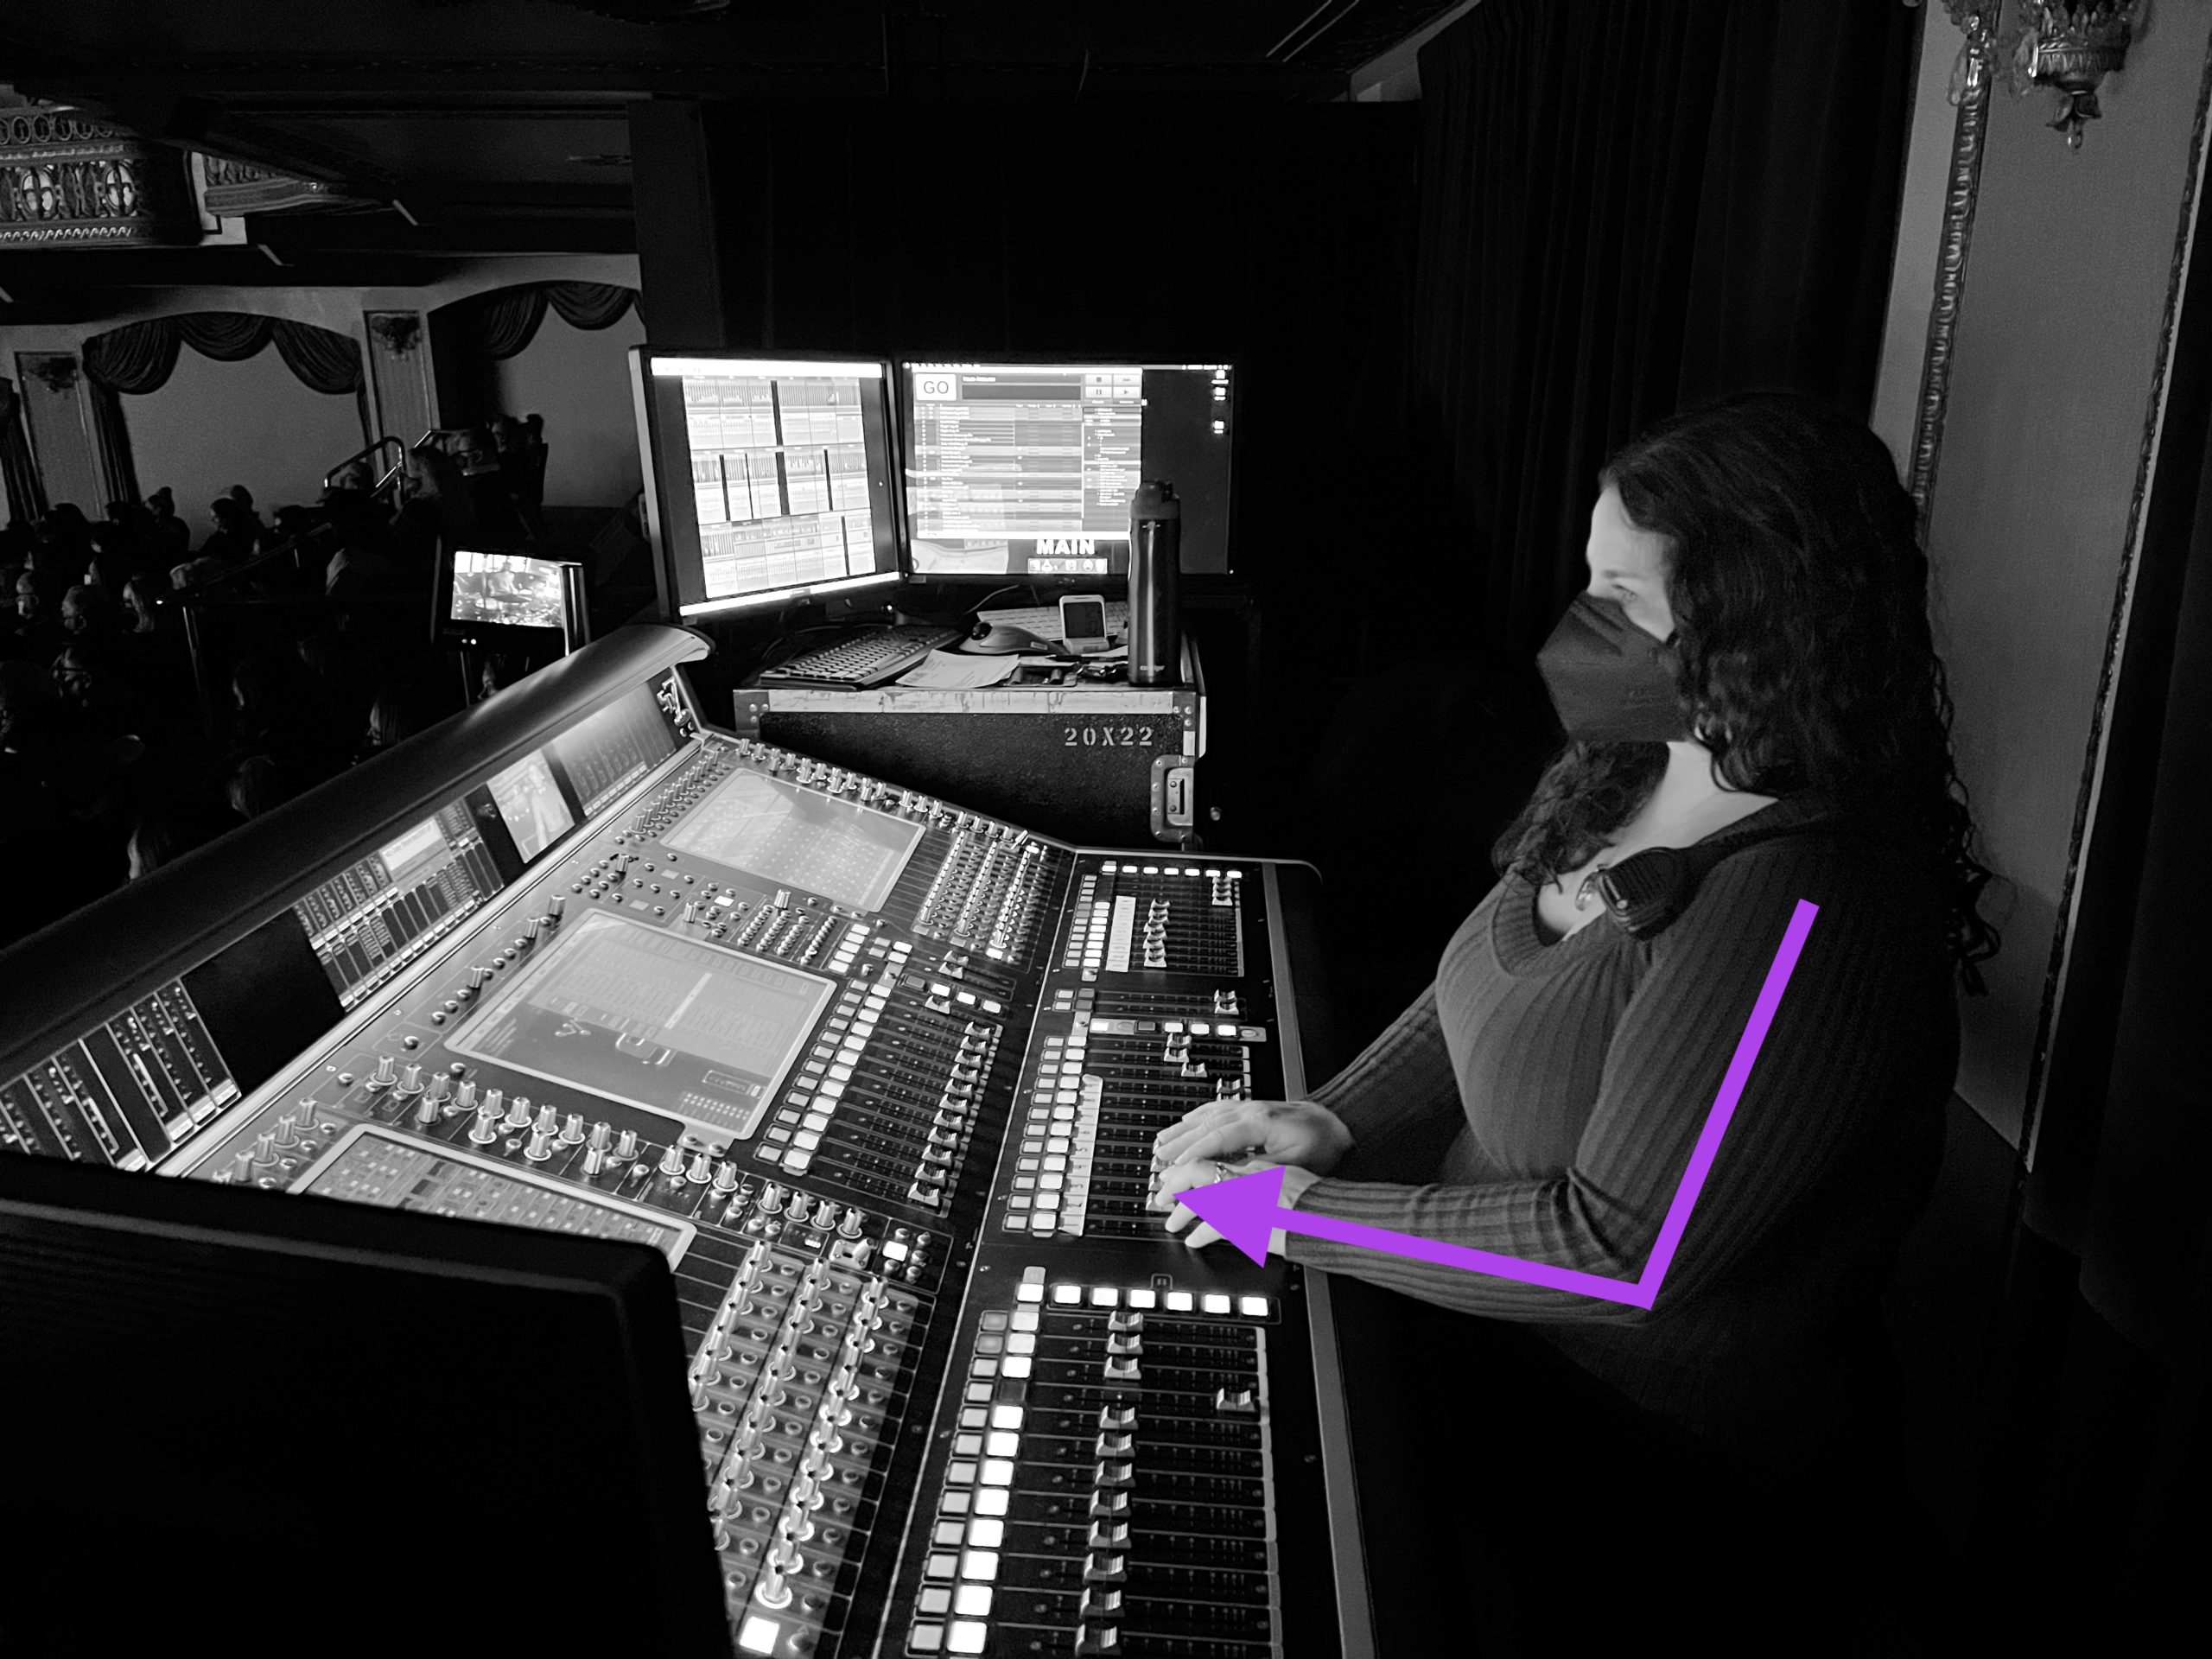
Personally, I prefer to learn a show first to last, and this seems to be the case with most mixers. After consistently mixing shows for a long period of time, I have a system for my script and notations to make busier, more complicated scenes easier to navigate. That way, jumping straight into a difficult scene isn’t as daunting. Plus, I found I don’t have to look down at my hands as often anymore. In my last blog, I talked about how I anchor the heel of my hands on the console and that muscle memory reference helps me know how far I’m throwing the fader. That means I can keep my attention on the script and what’s coming next instead of having to always check where my levels are.
However, when I’m the one responsible for training someone (usually when an A2 is learning the mix) I like to use the least to most complicated method. It tends to be a good way for people who are either new to mixing or don’t do it on a regular basis to ease into the show.
No matter how many shows you’ve learned or how comfortable you feel mixing, it’s a daunting task
The first show I started pushing faders for real on Funny Girl (I mixed almost the first 30 minutes of the show), I was so nervous: my palms were sweating, my shoulders were tense, and I was on edge the entire time. I try to keep in mind that everyone makes mistakes, especially when they’re learning, but that only does so much to ease your mind in a high-stress environment. However, as you start mixing chunks of the lives shows, the mixer is always standing by, ready to step in if you lose your place in the chaos of a busy scene or fumble a section and need a moment to regroup. They’ll gradually give you more space as you settle in because it’s also important for you to learn how to recover if you miss a pickup, but they’re still there to support you and get you back on track.
There’s a period after you’ve mixed a few shows and you’re getting comfortable: this is a danger zone. This is where you’re prone to make more mistakes than at the beginning.
The first few times you mix a show you’re laser-focused and have plenty of adrenaline pumping through your system. As you mix scenes over and over again, that adrenaline starts to fade and you end up thinking about notes you got from the last show or a mistake you made before that you need to avoid. This is when the easy things that you thought you knew to start to slip and you make more mistakes.
I call them regression shows. In high school, we called it the “second show slump” when our first show would be great and full of energy, in the second show almost everything would go wrong, and then the third would finally be solid. Regression shows happen at different points on different shows and for different mixers, but there will likely be a point where you’ve mixed something enough times to feel confident and then out of the blue you’ll make a dumb mistake. When I was training on Mean Girls, I did well as I was learning the mix and flubbed a few smaller things like band moves or cues that were just a touch late. Then, when I was mixing the full show for the first time, I ended up missing two pickups that I’d never missed before, neither of which were in the scenes I was mixing for the first time. Same on Funny Girl: the first pick-up I missed was the fifth show I mixed, and it came with the third page (so a section I’d mixed all five times) as I was focusing on a band move.
Every time, you just have to get back up and keep going. The more mistakes you make, the better you become at recovering and sometimes you’ll even be able to catch them before you miss a line or stop yourself before you take a cue at the wrong time. The more shows you do, the more you discover better ways to help yourself learn which speeds up the process. Always ask for help when you need it: if someone’s training you to mix, they already know you can do it and they want to help you succeed.