Empowering the Next Generation of Women in Audio

Join Us

Re-Amping a Guitar Signal

Happy June everyone! I hope you enjoyed my three-part blog about “how to” record a four-piece band (drums, bass, guitar, and vocals). For this month I am going to be talking about the significance of re-amping a guitar signal.


I JUST re-amped a guitar signal for the first time in my life two days ago, and again yesterday. So, I’m no expert, but I will say that I did enjoy the process and I wanted to share my experience with SoundGirls! I’ve never “had” to do it before because I usually live track when recording a band. When I live track, I focus on getting the tone I want for the guitar right then and there, but I’ve always captured the DI signal from the guitar just in case I ever wanted or needed to change it later. The reason I am going to start re-amping more, and why I thought it would be an interesting blog post is because I see it as a more efficient way for my band to record guitar. Why is that you say? Well, this way we can just record a clean DI guitar at my house through my Focusrite 2i2, and then schedule a guitar session at one of the studios I intern out of to re-amp the signal we got from my home studio. It’s time-efficient, and to be honest- less stressful. Also, it can save you money! If you have a small home set-up but have always had trouble getting the right guitar tones, or don’t want to settle using an amp simulator (which I am NOT opposed to- there are some really great ones out there), capturing a DI signal at home, and scheduling time at a studio for a small amount of time instead of a giant block can save you money, and get you the right guitar tones!

Now that I’ve talked about the significance of re-amping, I’ll go over step by step how to do it.

The first step would be to record a clean DI. You don’t want to overdrive whatever pre-amp you may be using because you don’t want to “color” the tone of this clean DI. I suggest running your DI through a solid-state pre, not a tube pre. Let’s say you have a good signal. Record guitar with that clean DI signal until you settle on the takes you want for your guitar part. Make sure there are no clicks or pops in the audio. Go through and listen to each track you recorded in solo mode to make sure. You wouldn’t want to get to the studio, run the signal through an amp and then realize that there were comps needing to be faded or anything like that!

Now that you’ve got the takes you want & a clean DI signal let’s re-amp. Let’s assume you’ve already got your amp setup. In this case, you’ve placed it in an isolated room. You’ve already got mics picked out and set up, etc. Open pro-tools, and go to the first DI guitar you want to re-amp. Output the audio track for that guitar to a mono converter output.

The tricky part is patching. You’re going to want to patch from the converter’s output on the patch bay into the snake channels output for the room you put the amp in.

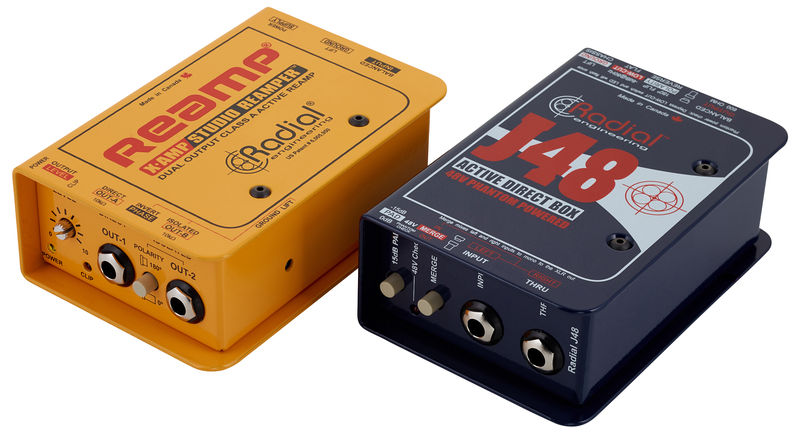
When re-amping you need a couple of different cables and boxes. You need a male-to-male XLR, a Re-Amp box (the Re-Amp box brings the line-level your sending the signal in back down to instrument level), a power supply for the re-amp box, and an instrument cable. Now let’s put all of those gadgets to use! Put the Re-Amp box, and its power supply in the iso room with your amp. Plug in the power supply. Take the male to male XLR cable, and plug it into the Re-Amp box, and then into the snake channel. Make sure the volume knob on the Re-Amp box is turned all the way down (you’ll use this sort of like a gain stage later on when you start to work on getting your tone). Now take the instrument cable out of the Re-Amp box and into the input of the amp. Hit play on Pro-Tools, and slowly turn up the volume knob on the box. You should start to hear signals. Now you can start working on getting your tone!

A couple of things to note:

Thanks for reading this month’s blog post! If you use this process for recording, let me know what your results are. I’m always interested in hearing other people’s processes, preamp/mic choices, etc. My email is virginia@backbeat365.com.


Consoles, Consoles, Consoles

Part of the fun of working in live music is the variety and unpredictability it inevitably brings. Great as that may be, my bosses recently set up a training day for my colleagues and myself,  using some of the consoles likely to be installed on future client contracts. We spent the day getting our geek on, and these were my top three.

# 3 Allen & Heath SQ5

The SQ5 is an attractive desk – the digital display looks slick and modern, while the touch screen features are precise and impressive. On first appearance, it feels sturdy, which I later find out is something the company prides itself on – they rigorously test the materials for resilience and longevity of moving parts. With 48 processing channels, 16 faders, and a 96kHz mix core, the desk can handle plenty before I need to worry.

I found the main setup to be a little time-consuming at first but well worth it in the end. Once the balance was struck (or learned) between using the touch screen and the controls, life was good! The copy and paste function is sure to be a timesaver, and the soft controls are presented in a logical way, also making life easier.

The detailed level of control and precision available (I stopped counting all the EQs on offer) plus the easy personalisation all seemed very intuitive. The final plus for me was the ability to save the settings onto USB, ensuring your setup stays just how you like it.


#2  Yamaha QL1

Nobody had a bad word to say about the QL1. It comes with 16 inputs, 8 outputs, and 16 faders, and has 33 mono and 8 stereo mix channels, and 16 mix and 8 matrix busses. Almost certainly the most foolproof of all the desks (if there is such a thing), there’s an effortless feel and ease of locating everything on it. The visuals and functions are all clear and easy to use, and GEQ, soft controls, and DCAs are all quick and obliging. The desk equivalent of a comfortable pair of shoes.


# 1 Midas Pro 2c

I was struck by how at home I felt with the 2c, owing to it perhaps to the feeling of 90s nostalgia from the screen and mouse functions. For me, it was the most visual of the desks, and at times felt more like using a DAW, which I rather liked. For a desk with 156 inputs, 166 outputs, and 64 simultaneous input processing channels, it’s very approachable, which is another plus.

Although some of the controls and buttons can look and feel quite old school, they are just a rouse to impress you all the more when you discover the touch response feature – a light tap to the faders will display your current level without moving, and when done to the knobs will select that setting control on-screen. I really liked this for being so clever, but mostly for being incredibly useful and practical.

The GEQ function works great overall, and as standard, the desk can save lots of scenes and shows as presets, with the necessary option of saving to USB for future work and clarity. The desk feels great to use, makes sense, and has plenty of great features that add a little extra.

Troubleshooting (and Avoiding!) Common Problems in ProTools

We all have technical difficulties from time to time, especially when using software as intricate as ProTools.  But, after years of making what seems like every mistake in the book, hanging out on Avid DUC, and stalking Gearslutz.com, I pride myself in my ability to overhear frantic technical freakouts and supply solid advice on the best course of action. Here are a few of the problems I see most often, and how to get through them while salvaging as much of your work and sanity as possible.


Problem: My Session Is Missing Audio Files

This happens all the time.  And as a supervisor, nothing is more annoying to than sitting down to review work and then finding that not everything links up.

How to Solve It

When you open a session with this issue, a dialogue box will pop up tell you that you have missing files.  Always choose “Manually Find & Relink.” Letting your computer automatically do so will take forever. Select the files you wish to relink (hopefully, all of them), and check out the path.  This will tell you where the session believes that the files live. Most likely, this will be on another drive or another computer. Once you see where the files are, you have a few options:

  1. Plug in the drive that contains the files, select that drive in the area to search, and choose find links and then commit links once the files have been found.  At that point, any files which were missing will still be missing from your audio files folder. They will only be linked to the session when the drive is plugged in.  So, you will then need to “Save Session Copy In” to save a session which does include all audio files.
  2. If you know that the files also live somewhere else on your local computer (such as a library drive), relink to that drive. Again, you will need to Save Session Copy In if you would like the files to be saved into your audio files folder where they belong.
  3. Find all of the missing files manually, and then drop them into your session’s audio files folder.  Then, relink to that folder. You may need to choose to relink the file name only if it does not work to use file name and ID.  There is no need to Save Session Copy In.
  4. If the files ARE in fact in your audio files folder, but ProTools isn’t recognizing them, you may need to search your audio files folder and relink by file name only instead of file name and ID.  Every once in a while, the file IDs become corrupt, and ProTools mistakenly can’t use them to locate your audio files.

How to Avoid It In the Future

When saving your work to give to another person or to take to another computer, always use either Save Session Copy In or Export Selected Tracks as New Session.  Doing so gathers all audio files that are linked to your session from locations other than your audio files folder (like if you didn’t have “copy on import” selected or chose to import tracks by linking to files instead of copying) and copies them into the new session’s audio files folder so that they live in one place.  If you simply click and drag your working session’s folder, any files which are linked from other locations will not be copied and will be missing once the session has been moved.


Problem: My Session Keeps Crashing While Saving

This is one of the most aggravating things that can happen and always seems to occur at the end of a really long day. But there’s hope!

How to Solve It

In my experience, the most likely culprit is that your drive is near capacity.  Check the drive to which you are attempting to save, and make sure to clear off enough space.  Even if you technically have just barely enough space, this can cause the bits to be written in every tiny nook and cranny on your drive, which makes it take forever to process the request.

If drive space isn’t the issue, then you’re probably dealing with a corrupt file.  Here are your options:

  1. Close your session, open the most recent backup in your Session File Backups folder and save it off with the correct name (if you can). Then, you’ll need to redo any work between that backup and where you ended.
  2. If the above does not work, then there is probably a corrupt file somewhere in your session.  The next thing to try is to close your session, create a whole new session (checking that all of your settings such as frame rate, sample rate, etc. are the same), and then import all of your tracks through the Import Session Data file menu.  Make sure to copy all audio files instead of linking.

How to Avoid It In the Future

Keep track of your available drive space at all times.  Have a system in place for archiving old work onto separate drives to make sure that your project drive always has space.


Problem: Whenever I try to use the function keys to change tools or modes, nothing happens, or another application opens.

If you’re working on a mac, you will need to disable the function key features in order to select your tools/modes with the keyboard function keys.

How to Solve It

Open System Preferences, and click on Keyboard. Then, check the box that says, “Use F1, F2, etc. keys as standard function keys.”

How to Avoid it in the Future

Once you check this setting, you won’t have to think about it again until you purchase a new computer or reinstall your operating system.


Problem: All of the waveforms appear to have the audio zoomed in to different degrees.  Quiet-sounding files have waveforms that look huge and vice versa.

This is the result of using the audio zoom in function when you are not showing all tracks.  Clicking on the audio zoom in/out button only affects clips which are visible in your current display of tracks.  When you show all tracks, the newly displayed tracks will have non-zoomed waveforms. Yet, the audio which was visible when you zoomed in/out will continue to display the new size.

How to Solve It

To reset all waveforms to their actual size, use the quick key Control+Option+Command+[ on a mac.

How to Avoid It In the Future

If you want to avoid this issue altogether, only zoom your waveforms while all tracks are visible. Otherwise, the key command is a very quick fix.


Problem: I keep spotting my video into place, but when I re-open my session, the first frame of the video is off by a frame or more.

This is most likely the result of having your session set at an incorrect frame rate.

How to Solve It

  1. Open your video in QuickTime and hit Command+i to get info.  This will display the video’s frame rate.
  2. In ProTools, open your Session Setup window and choose the corresponding frame rate.
  3. Re-spot your video into place.

How to Avoid It in the Future

Always check the frame rate of your video in Quicktime before importing into ProTools. If you prefer not to do this, your video track in ProTools displays the frame rate below the track name. If your video’s frame rate does not match your session’s frame rate, the number will appear red. Change the frame rate in your Session Setup window to match the video.


Problem: I keep spotting my video into place, but the ProTools timecode display gets further and further away from the timecode burned into the video.

This issue is known as drift and is the result of having your session set to an incorrect frame rate.

How to Solve It

  1. Open your video in QuickTime and hit Command+i to get info.  This will display the video’s frame rate.
  2. In ProTools, open your Session Setup window and choose the corresponding frame rate.
  3. Re-spot your video into place.

How to Avoid It in the Future

Always check the frame rate of your video in Quicktime before importing into ProTools. If you prefer not to do this, your video track in ProTools displays the frame rate below the track name. If your video’s frame rate does not match your session’s frame rate, the number will appear red. Change the frame rate in your Session Setup window to match the video.


Problem: I accidentally worked on a project at the wrong frame rate.  When I was done, I set the frame rate to the correct one in the Session Setup window, but now everything is out of sync.

If you have already begun working on a project with your session set to the wrong frame rate, you cannot fix the problem by simply setting your session to the correct frame rate.  You must perform a sample rate conversion to re-sync your work.

How to Solve It

  1. Open your video in QuickTime and hit Command+i to get info.  Check the correct frame rate of the video.
  2. Open a new ProTools session with the correct sample rate and bit depth.
  3. Open the Session Setup window and choose the new (correct) frame rate to match your video.
  4. Go to File > Import Session Data, and navigate to your project, which was done at the wrong frame rate.
  5. Select all of your tracks, and make sure you are copying all audio (not linking).  Click the Apply SRC checkbox, and choose the correct pull-up/pull down from the Source Sample Rate dropdown menu. To do this, choose your sample rate from the bottom of the list and then choose which direction you need to adjust.
  6. Click OK.
  7. Import your video, and re-sync it to your session.
  8. Check that the timecode burn-in matches the ProTools timecode window.  Your audio should be in sync.

How to Avoid It in the Future

Always check the frame rate of your video in Quicktime before importing into ProTools. If you prefer not to do this, your video track in ProTools displays the frame rate below the track name. If your video’s frame rate does not match your session’s frame rate, the number will appear red. Change the frame rate in your Session Setup window to match the video.


Problem: I was working in ProTools, and now my computer is displaying the “spinning beachball.” I can’t click on anything.  What should I do?

Your session has crashed.  You will need to force quit and open one of your backups (and pray that it was set to back up fairly recently).

How to Solve It

  1. Use the key command Control+Option+Command+Esc to bring up the force quit window.
  2. Force quit ProTools and any other applications that are listed as not responding.  If you still cannot click on anything, you may want to force quit the Finder as well.
  3. If that does not work, you will need to “hard restart” your computer by holding down the on/off button on the computer until you hear it restart.
  4. Once you are able to use your mouse again, navigate to your Session File Backups folder and choose the most recent version. You will need to redo any work that was accomplished after that copy was saved.
  5. Re-save this as your original file name and it will replace your previously saved session.

How to Avoid It in the Future

Crashes are unavoidable. But, you can usually get used to which actions in ProTools are most likely to bog down your system. Take note of what you were doing each time this happens, and try to avoid it in the future. If a particular file is causing the crash, try to save a new copy of the file, or revert to an old version which doesn’t cause the issue.

Dealing with Burnout as a Musician

Burnout can come in many different forms for musicians. It might manifest as writer’s block, or the feeling of being overworked, or perhaps financial stress has taken its toll. For whatever reason, burnout can be difficult to manage however, you don’t have to go through it alone.

Here are some tips to help battle burnout:

For a lot of musicians, it’s hard to draw the line between creating music as part of your job and writing music for yourself or for fun.  Even if you do enjoy it, it’s important to have a life outside of music.

Financial stress is not something new to musicians. Almost every week in the U.K there seems to be a new report about funding cuts or lack of work for people within the arts sector. It’s a difficult situation to be in and there is no easy answer to secure a financially stable future however, planning your jobs out in advance can certainly help ease your mind about where the gaps are and perhaps spark a few ideas on how to fill them.

When you’re in the midst of burnout it’s often hard to see the positives. If you take five minutes out of your day, try to write down or at least think about why you decided to create a career in music. Hopefully, you’ll remember the positive reasons for wanting to be a musician.

Good luck and just remember you’re not alone: this too shall pass.

More Resources:

Tips for Staying Healthy on the Road

Health and wellness on the road. Why you owe it to yourself.

The Tour Life is Hard — Homeopathy Can Help

Rock ‘n’ Roll Yogi

A Red and Sensitive Topic

Let’s Talk About Mental Health

Fit on Tour


SoundGirls Wikipedia Edit-A-Thon

On May 26th, 2019, a group of SoundGirls met online to discuss the ins and outs of Wikipedia.  Myself and April Tucker led the talk, and while initial attendance was small, I could see a growing interest among the SoundGirls community.  Much of what was covered was an expansion of the previous articles I had written. I began with the ethos of the online encyclopedia, and quickly progressed to a step-by-step instruction of how to edit Wikipedia pages.  April focused on tips and tricks that make Wikipedia even easier to navigate. I admit, I learned many new techniques from this talk.

If you missed the Wikipedia Edit-A-Thon event, we have you covered, starting at the 2-hour mark.


Furthermore, the best way to start editing Wikipedia is to create an account there. Wikipedia was made for everyone, and there are tasks for every editing level. I have a page available specifically for those SoundGirls starting their editing journey with guides and links.  My Talk Page is also available for specific questions, and I check it regularly.

SoundGirls have an opportunity to spread awareness through Wikipedia, but it takes all of us.  Every little edit, no matter how small, adds up. Similar to Geena Davis’ crusade of “If She Can See It She Can Be It,” let us build towards gender parity.

User Page

Talk Page

Editing Sound Girls into Wikipedia

Editing SoundGirls into Wikipedia


Choose a Different Route


The other day I was on my way to work, and I always take the same route unless there are some disruptions on my tube line. There were, in fact, some disruptions this particular day so I had to take different trains, but luckily that route takes about the same amount of time for me to take me from my home to work.

I thought that I almost prefer this other route, it is mostly overground and you know, it is nice to change up your habits a bit. We tend to get stuck in the same routines. Mix a show in the same way you’ve always done, mic up a drum kit the same way as you always do, EQ monitors precisely the way you did yesterday. Sure it is tried and tested, but it gets a bit repetitive after a while.

Playing it safe:

In the live industry, you sort of have to play it safe most of the time, simply because there is no time to be adventurous. You got to make it sound good, and you have to do it fast.

However, if you are a venue engineer, you can easily get set in the same ways. But if you don’t challenge yourself, you’re not going to improve nor learn something new. It is like working out in the gym, if you work out a muscle the same way and not adding weight or variety to it you will not become stronger. You will simply just plateau.

The upside of being a venue engineer is that it is a safe environment. If you have been in a place for a little while, you probably feel relatively comfortable and will hopefully have a small bit of extra time to play around with things. This is a perfect environment to try and do things differently if you’ve got something that is tried and tested, you’ve always got that to fall back onto.

The ‘One-way’ route:

I work in a venue where the speakers are all hidden away and scattered around the building, surrounded by loads of marble. Not ideal for creating ‘the perfect sound.’ You just have to make it sound good with what you’ve got, and honestly, it is not that bad. However, anytime there is a visiting engineer they get entirely thrown off; because they are so set in the way they usually do things they can’t figure out a different route to get where they want to go..

The live sound industry is not a ‘one-way’ route. There are tons of roundabouts, disruptions, left turns, stops, and traffic lights. Some people work at 100mph and others are lingering around about 30mph. You have to adapt and treat every situation differently.

Very often you just have to work around it. With amazing gear nowadays, it is easy to forget the room and how critical it is for the overall sound of the show. Halls, venues, arenas, stadiums all sound different, there is not a ‘one-way route’ to mix a performance.

Challenge yourself:

We need to be thrown off in able to learn new things. Adapt the way you set up and tune to each venue, each artist. Work off the basics but work with space you are in vs. fighting it.  Ask engineers that work in that venue regularly, how they go about tuning the room. Always be willing to adapt, change, and learn new things.

So whenever you have any disruptions on your line, embrace it. Approach it with the right attitude, and you will see that it will not set you back as much as you might have thought it would. See it as a new learning experience, and hey, you might even find yourself enjoying the alternative route!


Interview Tips for the Theatre Technician


Interviewing for a new job has always been a source of anxiety for me.  I did not choose a behind-the-scenes career just so I could talk to strangers about myself, but it seems that the job interview is a necessary evil.  Over the years, I’ve learned that interviewing doesn’t have to be scary. You can prepare for an interview without feeling like you’re cramming for a final, and there is a bit of a formula that can be applied so that it doesn’t feel like you’re shooting in the dark or starting from scratch with each interview.

Admittedly, it’s been a while since I’ve had an interview.  That’s the good part of being in a residency for many years.  I am, however, in the position of interviewing several people every year, and I have definitely learned what makes me happy and what turns me off after an interview.  Even if an applicant has a good resume, it’s hard to justify moving them forward if they don’t interview well. It’s true what they say about first impressions, and the bigger the applicant pool, the more memorable an applicant needs to be.  No pressure.

Step one:  Do your research.

A very typical interview question is, “Why this company.”  You need to be able to answer that, and my pro tip here is, make the answer be about the company.  If you tell your interviewer that you’re just trying to find a job or that you apply to every job you see posted, that can be a mark against you.  They also do not want to hear that their company is a great stepping stone along the path to the job you really want. The theatre world is a very small one, and if you put some feelers out, you might find that you know someone, or have a friend of a friend who has worked with this company.  Pick their brain, and find out how their experience was. What aspects resonate with you? Also, the internet is your friend. Use it to learn everything you can about the company. They will likely have their mission statement posted and probably an “about us” section on their website. Do you have like views?  How so? These will be great talking points. If you don’t agree with their mission or don’t like how the company operates, stop right there and reconsider applying for this job.

Step two:  Know your resume.

Your interviewer will most definitely have your resume in front of them, so that is going to be a source of questions from them.  I know I have several different resumes I use depending on the job I’m applying for, and they don’t all contain all of the same information.  I don’t know how many times I have referenced something from an applicant’s resume, and they didn’t know what I was talking about, because they couldn’t remember the specific resume they sent me.  If I’m applying to several companies at once, I will immediately print out the resume I submitted and staple it to a sheet of paper with the company’s name on it. Looking at the same thing the interviewer is looking at will help keep your head clear when you’re searching for just the right answer to their questions.  Btw, that blank sheet of paper is also the thing you should use to write notes on.

Step three:  Be yourself.

Something about your application materials drew this company to you, so don’t mess it up by trying to sound more important, or professional, or what have you.  These people are very likely just looking for a human that is good at their craft. That’s you. Be a human. It’s ok to laugh or crack a joke here and there, that stuff lets the interviewer know that you can be relaxed in high-stress situations.  Be careful, though; you don’t want to push this point. Don’t go out of your way to sound extra funny, or extra cool, or just plain extra. It’s awkward and uncomfortable to listen to, and it’s also not an accurate representation of who you are. So again, just be yourself.

Step four:  Create a stress-free environment.  

Many of my interviews are conducted over the phone, and I have heard it all, so let me start by saying that a busy loading dock, the subway, your car in rush hour traffic, the airport, the bar (yes, I have called someone for an interview while they were at the bar) are not considered a stress free environment.  If it’s hard to hear you because of background noise, or if you’re driving in and out of cell service, or I guess if you’re wasted at the bar, it is going to be very frustrating for your interviewer, and they are likely going to skip some questions just to be finished with that phone call sooner, and you’re going to miss out an opportunity to show this company how awesome you are.  Also, make sure you have plenty of time available before and after the interview. Your interview could be 20 minutes, or it could be 2 hours. It’s also possible that you might get a call a little early, so be prepared, and just block out a good chunk of time. Choose a quiet, good phone service area. If you’re doing a video interview, look at the world around you. Are your interviewers looking at your dirty laundry or watching cartoons in the background of your camera?  “No” should be the answer here.

Step five:  Take notes.

Before your interview, write down some questions you have about the company or the job.  Even the question, “Do you have any questions for us” is a test. They want to know that you have standards, and you’ve done your homework.  Indifference is not a good quality to have in an interview, or in life, really, so having some opinions about how you would like to potentially be fit into this new company is a good thing.  Also, write down the questions you are asked. If you get a little rambly or need a second to think about the questions, having them written down in front of you will help you keep your thoughts collected.

Step six:  Be polite and gracious.  

Manners go a long way.  This company has gone into a lot of trouble to work you into their busy schedule, so thank them for their time at the end of the interview.  I think a follow-up email within the hour thanking them again is a really nice touch, and I definitely always take note when I get that email.  Also, remember that your interviewer works for the company for which you are applying, so it stands to reason that they probably like the company.  Don’t bash it during your interview. I know this seems like strange advice, but I wrote it because I’ve encountered it. Also, this person is also probably a department head or production manager, so keep that in mind, and don’t tell this person everything you hate about production managers.  Trust me; it won’t go over well.

Step seven:  Stay engaged, not pushy.  

You have no idea what your interviewer’s schedule is like, so don’t expect to hear from them the next day.  It’s fair to ask during your interview when they expect to get back to you and if you’ll hear back whether or not you get the job.  If the date that you were expecting a call has gone by, feel free to follow up with a friendly email, but I would suggest stopping at one email.  Not everyone gets back to applicants if they didn’t get the job, so if you haven’t heard anything even after you sent a follow-up email, you probably have your answer.

All in all, confidence, genuine personality, and organization are going to be your best lines of defense during your interview.  If you feel good about how your interview went, then remember what you did, and make it your base formula that adjusts based on the company.  If you didn’t get the job, but you truly thought your interview went well, don’t blame the interview. There are a myriad of reasons why you might not have been chosen, and you don’t want to psych yourself out before the next interview, so just know that you have done your best work, and you can do it again.


A Simple Method for Recording Drums

Recording drums is an important part of any project but the process can often seem quite daunting. Often in-studio pictures feature an abundance of microphones on and around the kit, suggesting that you might need a lot of equipment to get the job done.

However, one simple method of recording drums that is highly effective is the Glyn Johns method.

It uses only four microphones and is relatively easy to set up.

What you need

Overheads

First, begin by placing one overhead mic about a metre (3 or 4 feet) above the snare. The microphone diaphragm should be pointing down at the kit. Then take your second overhead microphone and place it to the right of the drummer (so the microphone diaphragm is facing the Hi-Hat). Then measure the distance so that it’s the exact same measurement from the first overhead mic (so about a metre). Pan the two mics in the mix and you should get a nice balanced sound.

*The image shows the distance of the microphones but not the correct diaphragm placement

Snare + Kick Drum

The snare and kick drum microphone placements can be played around with until you find a sound you like. Often with kick drum mics you can place the microphone inside the drum or have it set up on the outside.

Overall this is a great and relatively easy way to record drums.


Impostor Syndrome in Creative Industries

This month’s blog topic is not directly related to audio. Yet it relates to our work and everyday life. It is a topic I have been thinking a lot about lately and one I hope others find educational or can relate to.

One evening, I was talking to a good friend about work and our successes. I’ve had some important accomplishments recently, and I was telling her how I felt undeserving of the recognition. I feared that soon, someone would point out how I didn’t know what I was doing. She said, look up impostor syndrome.

As defined by the Cambridge Dictionary, impostor syndrome “is the feeling that your achievements are not real or that you do not deserve the praise or success.” Great, I thought. There is a word to explain how I feel, but why do I feel this way? As I began looking into this, I’ve learned more about the syndrome and myself.

Impostor syndrome was introduced in a 1978 research paper by Pauline Rose Clance and Suzanne Ament Imes titled “The Impostor Phenomenon in High Achieving Women.” From the abstract: “Certain early family dynamics and later introjection of societal sex-role stereotyping appear to contribute significantly to the development of the impostor phenomenon. Despite outstanding academic and professional accomplishments, women who experience the impostor phenomenon persist in believing that they are really not bright and have fooled anyone who thinks otherwise.” Clance and Imes aimed their research at how the syndrome affects women, yet further studies have since shown that many men also suffer from the phenomenon. Why do so many of us feel this way?

I believe that part of it, for me, is confidence and insecurity. I understand deep down that I know what I am doing, but there’s that subconscious nagging jerk tapping me on the shoulder saying “But you don’t really understand this thing. Everyone else understands it and will figure out soon enough that you don’t.”

In creative industries, it’s especially tough as your work is very subjective, yet constantly scrutinized. When you get positive feedback you think, that must have just been luck. And of course, there can be negative comments from people jealous of your successes that help crush you even further.

I try to push myself through these moments of insecurity by doing the things that feel uncomfortable.  Writing these blogs, for instance, is not a comfortable thing for me. No matter how well I write a blog, someone is going to point out a mistake and figure out that I don’t actually know what I’m talking about. And why would anyone want to read what I have to say, anyways? I persist because positive feedback fuels my confidence in my knowledge, and negative feedback fuels my pursuit of knowledge and growth even further.

If this subject interests you as well, I encourage you to check out Valerie Young at http://www.impostorsyndrome.com. She has some great resources in her blog that may help you understand and work with your impostor syndrome. (I found this one particularly helpful: https://impostorsyndrome.com/are-creative-people-more-susceptible-to-impostor-syndrome/)


X