A Beginners Guide to Wireless Frequencies
Learning about and using wireless equipment can be overwhelming – there are a lot of differences from traditional gear and rather importantly there are strict rules around using radio frequencies that vary from country to country.
How does wireless equipment work?
Wired microphones convert sound into an electrical signal. This is sent through the wire to the sound system. Wireless microphones, however, convert sound into radio signals. This signal is then sent from a transmitter to a receiver which sends it to the sound system. The transmitter is a device that converts the audio signal into a radio signal and broadcasts it through an antenna.
Transmitters are small clip-on packs or in the case of handheld wireless microphones, they are built into the design of the handle. All wireless transmitters generally use a 9-volt battery. The receiver is tuned to receive the radio waves from the transmitter and convert it back into an audio signal. This means that the output of the receiver is just like a traditional wired signal. The balanced audio signal from the receiver output is then connected via an XLR to a typical input in a sound system.
There are a few different kinds of antennae on receivers – single and diversity. Single antenna receivers have one receiving antenna and one tuner but these can be prone to dropping out or getting interruptions in the signal. Diversity receivers, however, perform better as they have two separate antennas and two separate tuners. This means the receiver will automatically choose the best of the two signals, sometimes using a blend of both. This reduces the chance of a drop out because the likelihood is high that one antenna will be receiving a clean signal.
What frequency should I use for my equipment?
This is one of the trickiest areas to cover with wireless equipment because it depends on a lot of factors. Some frequency bands work brilliantly for speech but not for music, and some bands are simply too small to fit in lots of audio channels for a larger group. Some are prone to interference due to being license-free, popular bands and it can be a minefield working out where to begin.
When deciding what band to use, firstly it is good to know that each performer/person that is using wireless in the same location needs to be using a different frequency. It’s good practice to set up the receiver with a blank channel in between or a spacing of 0.25Hz increments on the receiver. Secondly, it’s important to know which spectrum band is suitable and legal to use for your venue – this will depend on the number of wireless devices you’re using, where you are in the world, and if you are moving around or touring with the same equipment. Wireless devices include “low power auxiliary station” equipment such as IEMs, wireless audio instrument links, and wireless cueing equipment, which all have the same rules as wireless microphones. Though not fully extensive, a guide to the available frequency rules of most countries can be found at Frequencies for wireless microphones
There are different areas of the radio frequency spectrum that we are allowed to use for wireless equipment but some are more suitable and better than others, and these are constantly changing, which makes it a hot topic for discussion. It’s useful to remember that the frequency spectrum works in the same way as physical space, in that it has a finite amount of room to be shared. The company Shure has strong concerns, particularly about the ever-decreasing UHF band in the Netherlands and has set up a site to raise awareness at www.losingyourvoice.co.uk
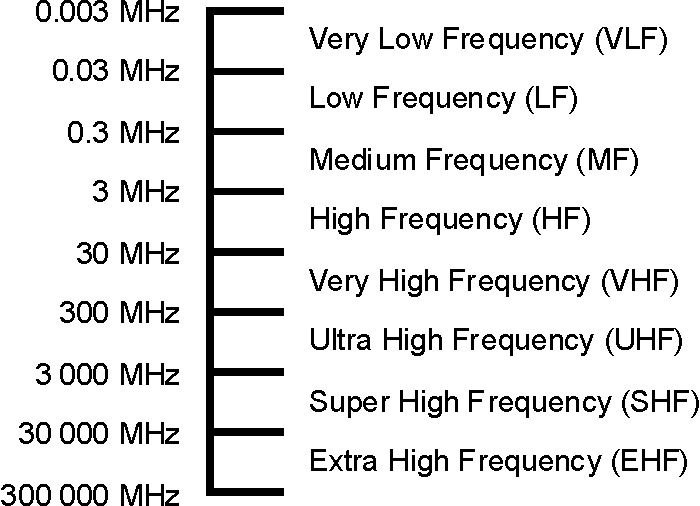
The UHF band is the preferred spectrum for wireless equipment however this is getting smaller for wireless use all the time. Ultra-high frequency (UHF) is the ITU designation for radio frequencies in the range between 300 megahertz (MHz) and 3 gigahertz (GHz), also known as the decimetre band as the wavelengths range from one meter to one-tenth of a metre (one decimetre).
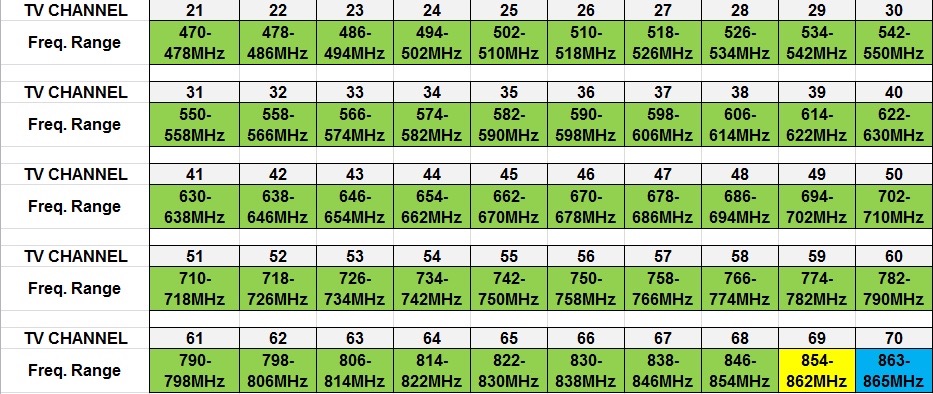
Most places including the UK and the USA have overhauled their UHF frequency ranges in recent years due to the digitisation of television, freeing up the old analogue frequencies. Originally analogue television transmitted in the 400-800MHz range had been separated into 8MHz “channels” and these refer to a particular frequency range.
Channel 38 is the spectrum of 606.5 – 613.5MHz and is a popular choice in the UK. Governing body Ofcom requires customers to purchase a yearly UHF UK Wireless Microphone Licence to use Channel 38. A flexible license means that owners are allowed to use radio microphone systems in any location. Channel 38 is a shared space and is large enough for 12 radio microphone systems, however, the downside is that if wireless equipment is tuned to the alternative Channel 70 it cannot then return to Channel 38.
Channel 70 is the band of 863 – 865MHz and this is free to use for radio microphone equipment in the UK. This spectrum is so small that it can be difficult to fit many systems into this space. Additionally, if other users nearby are also trying to use this space it can cause interference. Another issue with Channel 70 is that there is no “buffer” range at the lower end as 4G transmission lives immediately below 863MHz which can cause interference.
The band of what used to be Channel 69 (833-862MHz) is illegal to use since its’ digital auctioning in 2013 and it was replaced with Channel 38 for wireless equipment. Because of these challenges, Channel 70 may not be the best solution for larger setups requiring more space.
In the USA there are similar changes coming into place courtesy of the FCC which is the US governing body. The latest changes include the bands 617 – 652 and 663 – 698MHz which will be banned from wireless use as of July 13 2020. The move away from the 600MHz band is due to channels 38-51 in this spectrum being auctioned to television stations. This means that after July 2020 the available frequencies for wireless will include some frequencies on TV channels 2-36 below 608MHz, 614 – 616MHz, 653 – 657MHz, and 657 – 663MHz. Though this may seem like a current transition, this has been in progress for some time – the use of band 698 – 806MHz has been prohibited by the FCC since 2010 as this was repurposed for licensed commercial wireless services and public-safety networks.
What other frequency options am I allowed to use if the UHF range isn’t right for me?
Again, the list of available space is specific to each country, license and equipment tuning limitations however utilising either side of the UHF range can work, with the VHF (very high frequency) spectrum often making a good and practical backup solution.
The VHF band is classed as 30 – 300MHz, with a differentiation given between low and high VHF:
“Low-band VHF range of 49 MHz includes transmission of wireless microphones, cordless phones, radio controlled toys and more. A slightly higher VHF range of 54-72 MHz operates television channels 2-4, as well as wireless systems defined as “assistive listening.” VHF frequencies 76-88 MHz operate channels 5 and 6.
Band III is the name of the range of radio frequencies within the very high frequency (VHF) part of the electromagnetic spectrum from 174 to 240 megahertz (MHz). It is primarily used for radio and television broadcasting. It is also called high-band VHF, in contrast to Bands I and II.”
The Shure website explains the pro points of using the high-band VHF range, saying:
“The high-band VHF range is the most widely used for professional applications, and in which quality wireless microphone systems are available at a variety of prices. In the U.S., the high-band VHF range is divided into two bands available to wireless microphone users. The first band, from 169 – 172 MHz, includes eight specific frequencies designated by the FCC for wireless microphone use by the general public. These frequencies are often referred to as “traveling frequencies,” because they can theoretically be used throughout the U.S. without concern for interference from broadcast television. Legal limits of deviation (up to 12 kHz) allow high-quality audio transmission.”
Other than the UHF and VHF bands, if we look to the higher end of the spectrum the WiFi frequency range at 2.4GHz is another option, however, this also has its limitations due to it being a small shared space and the fact that a lot of WiFi networks in the area can cause interference.
So what does this mean in practical terms to get started?
If you are purchasing new wireless equipment it’s very important to understand its limitations in what frequencies you will be working with at any given venue, and this is multiplied tenfold if you intend to travel with the same equipment. Many modern receivers do not allow the tuning options to change ranges once they have been set – as previously mentioned, the UK channels 38 and 70 cannot be swapped once they have been tuned, and similarly, radio microphones that can tune to Channel 38 will not tune to the “Duplex Gap” of 823 – 832MHz or the shared space of 1785 – 1805MHz. This means that equipment needs have to be very well researched prior to purchasing and that pre-loved second-hand gear will need extra investigation for this reason.
What are the power restrictions for my wireless equipment?
As a general rule the power must not be in excess of 50 milliwatts when operating in the television bands, and no more than 20 milliwatts when operating in the 600MHz band or the Duplex Gap.
So to recap what questions should I ask first to get setup?
To get started with wireless equipment the key starting questions are:
- What is the wireless equipment going to be used for – is the setup going to be microphones for speech purposes or microphones for singers and wireless instrument packs for music?
- Is this going to need a small or a large amount of space – do you need a big frequency spectrum suitable for clean, interference and delay-free signal for music, or can you work with a small, license-free range for a handful of corporate setting speech microphones?
- Are you intending to travel or tour with the equipment – have you checked and committed to a frequency band that suits your audio needs that is legally compliant with the venues you will be visiting?
- Do you need to purchase licenses for this spectrum?
While it may seem like a lot of questions to ask and elements to consider, most wireless manufacturers will state the capabilities and limitations of their equipment, and keep you up to date with changes that may affect its’ use. With a bit of research and preparation, it’s possible to find wireless equipment to meet a variety of audio needs and budgets, that works within the law and sounds great wherever you may be.