Empowering the Next Generation of Women in Audio

Join Us

Gain Without the Pain


Gain Structure for Live Sound Part 1

Gain structure and gain staging are terms that get thrown about a lot, but often get skimmed over as being obvious, without ever being fully explained. The way some people talk about it, and mock other people for theirs, you’d think proper gain structure was some special secret skill, known only to the most talented engineers. It’s actually pretty straightforward, but knowing how to do it well will save you a lot of headaches down the line. All it really is is setting your channels’ gain levels high enough that you get plenty of signal to work with, without risking distortion. It often gets discussed in studio circles, because it’s incredibly important to the tone and quality of a recording, but we have other things to consider on top of that in a live setting.

So, what exactly is gain?

It seems like the most basic question in sound, but the term is often misunderstood. Gain is not simply the same as volume. It’s a term that comes from electronics, which refers to the increase in amplitude of an incoming signal when you apply electricity to it. In our case, it’s how much we change our input’s amplitude by turning the gain knob. In analogue desks, that means engaging more circuits in the preamp to increase the gain as you turn (have you ever used an old desk where you needed just a bit more level, so you slowly and smoothly turned the gain knob, it made barely any difference… nothing… nothing… then suddenly it was much louder? It was probably because it crossed the threshold to the next circuit being engaged).

Digital desks do something similar but using digital signal processing. It is often called trim instead of gain, especially if no actual preamp is involved. For example, many desks won’t show you a gain knob if you plug something into a local input on the back of it, because its only preamps are in its stagebox. You will see a knob labelled trim instead (I do know these knobs are technically rotary encoders because they don’t have a defined end point, but they are commonly referred to as knobs. Please don’t email in). Trim can also be used to refer to finer adjustments in the input’s signal level, but as a rule of thumb, it’s pretty much the same as gain. Gain is measured as the difference between the signal level when it arrives at the desk to when it leaves the preamp at the top of the channel strip, so it makes sense that it’s measured in decibels (dB), which is a measurement of ratios.

The volume of the channel’s signal once it’s gone through the rest of the channel strip and any outboard is controlled by the fader. You can think of the gain knob as controlling input, and the fader as controlling output (let’s ignore desks with a gain on fader feature. They make it easier for the user to visualise the gain but the work is still being done at the top of the channel strip).

Now, how do you structure it?

For studio recording, the main concern is getting a good amount of signal over the noise floor of all the equipment being used in the signal chain. Unless you’re purposefully going for a lo-fi, old-school sound, you don’t want a lot of background hiss all over your tracks. A nice big signal-to-noise ratio, without distortion, is the goal. In live settings, we can view other instruments or stray noises in the room as part of that noise floor, and we also have to avoid feedback at the other end of the scale. There are two main approaches to setting gains:

Gain first: With the fader all the way down, you dial the gain in until it’s tickling the yellow or orange LEDs on your channel or PFL while the signal is at its loudest, but not quite going into the red or ‘peak’ LEDs (of course, if it’s hitting the red without any gain, you can stick a pad in. You might find a switch on the microphone, instrument or DI box, and the desk. If the mic is being overwhelmed by the sound source it’s best to use its internal pad if it has one, so it can handle it better and deliver a distortion-free signal to the desk). You then bring the fader up until the channel is at the required level. This method gives you a nice, strong signal. It also gives that to anyone sharing the preamps with you, for example, monitors sharing the stagebox or multitrack recording. However, because faders are measured in dBs, which are logarithmic, it can cause some issues. If you look at a fader strip, you’ll see the numbers get closer together the further down they go. So if you have a channel where the fader is near the bottom, and you want to change the volume by 1dB, you’d have to move it about a millimetre. Anything other than a tiny change could make the channel blaringly loud, or so quiet it gets lost in the mix.

Fader at 0: You set all your faders at 0 (or ‘unity’), then bring the gain up to the desired level. This gives you more control over those small volume changes, while still leaving you headroom at the top of the fader’s travel. It’s easier to see if a fader has been knocked or to know where to return a fader to after boosting for a solo, for example. However, it can leave anyone sharing gains with weak or uneven signals. If you’re working with an act you are unfamiliar with, or one that is particularly dynamic, having the faders at zero might not leave you enough headroom for quieter sections, forcing you to have to increase the gain mid-show. This is far from ideal, especially if you are running monitors, because you’re changing everyone’s mix without being able to hear those changes in real-time, and increasing the gain increases the likelihood of feedback. In these cases, it might be beneficial to set all your faders at -5, for example, just in case.

In researching this blog, I found some people set their faders as a visual representation of their mix levels, then adjust their gains accordingly. It isn’t a technique I’ve seen in real life, but if you know the act well and it makes sense to your workflow, it could be worth trying. Once you’ve set your gates, compressors, EQ, and effects, and added the volume of all the channels together you’ll probably need to go back to adjust your gains or faders again, but these approaches will get you in the right ballpark very quickly.

All these methods have their pros and cons, and you may want to choose between them for different situations. I learned sound using the first method, but I now prefer the second method, especially for monitors. It’s clear where all the faders should sit even though the sends to auxes might be completely different, and change song to song. Despite what some people might say, there is no gospel for gain structure that must be followed. In part 2 I’ll discuss a few approaches for different situations, and how to get the best signal-to-noise ratio in those circumstances. Gain structure isn’t some esoteric mystery, but it is important to get right. If you know the underlying concepts you can make informed decisions to get the best out of each channel, which is the foundation for every great mix.


Living In and Out of A Big Fat Suitcase

Tips for packing smarter

I love travelling, I love going on tour, but I hate packing. I think it boils down to my inability to make decisions, which is what packing is after all; deciding what you’ll need for maybe months at a time. You might leave home during a heatwave and not come back until the middle of winter, taking in all sorts of weather in between. How can anyone know what they’ll need through all that?

I tried to pack light for years, partly so I wouldn’t put my back out dragging everything around, but partly because I didn’t want to be seen as the clothes-addicted, materialistic woman. As I’ve grown older (and stopped caring what other people think so much) and spend more and more time working away, I’ve come to realise that my suitcase is the closest thing I have to a home on the road. I’m not a follower of fashion or a hoarder by any means, but if having more than one day-off outfit and a bath bomb or two makes a big difference to my quality of life, damn it, I’m going to bring them. I now look for smart swaps that I can make that will streamline my packing while leaving space for a few creature comforts.

I read travel and backpacker sites to get inspiration for lightweight, collapsible, or multipurpose versions of things I need. Some of them can be very expensive, but if you can afford the initial outlay, buying great quality items that will last for years will save you hassle and money in the long run, and have the added bonus of being better for the environment than buying multiple cheaper versions. A lot of the high-end brands also have lifetime guarantees, which can be invaluable. I have a wishlist and keep an eye out for any discounts or sales that will make them affordable. Here are the main changes I’ve made, whether packing for one night or three months:

Water Bottle

An increasing number of festivals and venues in the UK have stopped supplying disposable water bottles, and rightly so. Besides, bringing your own means, you don’t need to waste time searching for the water stash when you run out. Just find a tap. I got a silicone one that rolls up when it’s empty so I’m not losing space in my bag to air.

Coffee Cup

Again, reusable cups are much better for the environment, but they take up a lot of space. I bought a collapsible cup, with a wide foot so I’m less likely to knock it over.

Laundry Egg

I’ve replaced washing detergent and fabric softener with a reusable, eco-friendly laundry egg. They last for months and months before needing a top up, so I know it’s sorted for my whole time away.

Ereader

I know some people can’t be parted from paper, and I love reading real books too, but having the ability to choose from thousands of stories while taking up less space than a paperback is worth it for me. You can also load them with user manuals and catch up in your bunk if you’re struggling to get to sleep.

Coat

Unless you’re touring through the arctic circle, you shouldn’t need a big bulky coat. The key to packing smart while being prepared for any weather is lots of thin, breathable layers. I invested in a super thin jacket from Arc’teryx, which has lots of smart features like moisture-wicking material and a hood that will fit over my hard hat, while rolling up to the size of my headphones. I can use it all year round, and add thermals in the winter to keep warm.

Base Layers

You can avoid having to bring thick warm clothes ever again by getting some good thermal base layers. Merino wool ones are super toasty while staying breathable. Apparently, they also keep you cool in summer and can be worn for a week or so without smelling, but I have too much respect for my colleagues to put that to the test. More and more sports and outdoors brands are making ‘smart’ clothing, which can be super thin, moisture-wicking, breathable and quick-drying and many are made from synthetic material or bamboo, so don’t involve animal products.

Zip-off Trousers

Ok, you’re not going to win any best-dressed awards in zip-offs, but they are really useful. Not only will you save space compared to packing separate shorts and trousers, you have options for when the temperature suddenly changes without having to run back to the bus or hotel. I got a couple of pairs from an outdoors shop that are lightweight and quick-drying, so if I get caught in a downpour, I’m not soggy for the rest of the day.

Safety Shoes

If your role requires safety shoes, it’s non-negotiable. However, there are lots of lighter, trainer-style shoes out there so you don’t have to lug massive steel-toed boots around. I have some great springy, composite-toed, high-top style ones (because I don’t trust people not to push flight cases into my ankles) from Jallatte, which are not only lighter to carry in my bag, they’re a pleasure to wear.

Toiletries

I’m trying to replace as much as possible in my washbag with solid alternatives. They’re more compact, use less plastic, last longer, don’t leak and you don’t need to worry about taking them through airport security. I have solid shampoo and conditioner and use soap instead of shower gel (I was really interested in a major chain’s solid shower gel until I realised that it was just an expensive way of saying ‘soap’). I use stick deodorant, but it’s best not to bring aerosols on tour anyway. It’s rude and inconsiderate to use sprays inside the bus. For liquids, I buy the smallest bottle or decant it into travel containers. Again, this saves space and means I can bring most stuff in my hand luggage if I’m flying. You can always buy more as you go along.

Menstrual cups not only take up way less space than pads and tampons, but they’re also better for the environment, and you don’t need to worry about running out.

I use packing cubes to keep all this stuff organised. It’s quick, it helps you compress your clothes down so you have more space, and it’s an extra layer of privacy while you’re rummaging through your suitcase at the side of the road in front of your colleagues and passers-by. I also bring a smaller canvas bag so I can take everything I need until the next day off up to my bunk and leave the suitcase in the bus bay. If you delve into travel blogs, you can get a wealth of information for packing lighter and smarter, but don’t get too caught up in minimising your luggage. We aren’t on holiday, we do this full time. While it’s a good idea not to have too much stuff weighing you down, we deserve to have a few luxuries or reminders of home to make us feel human.

IEM Maintenance & Troubleshooting

The Glamour Starts Here

Special thanks to Josh Thomas for all his help with writing this article.


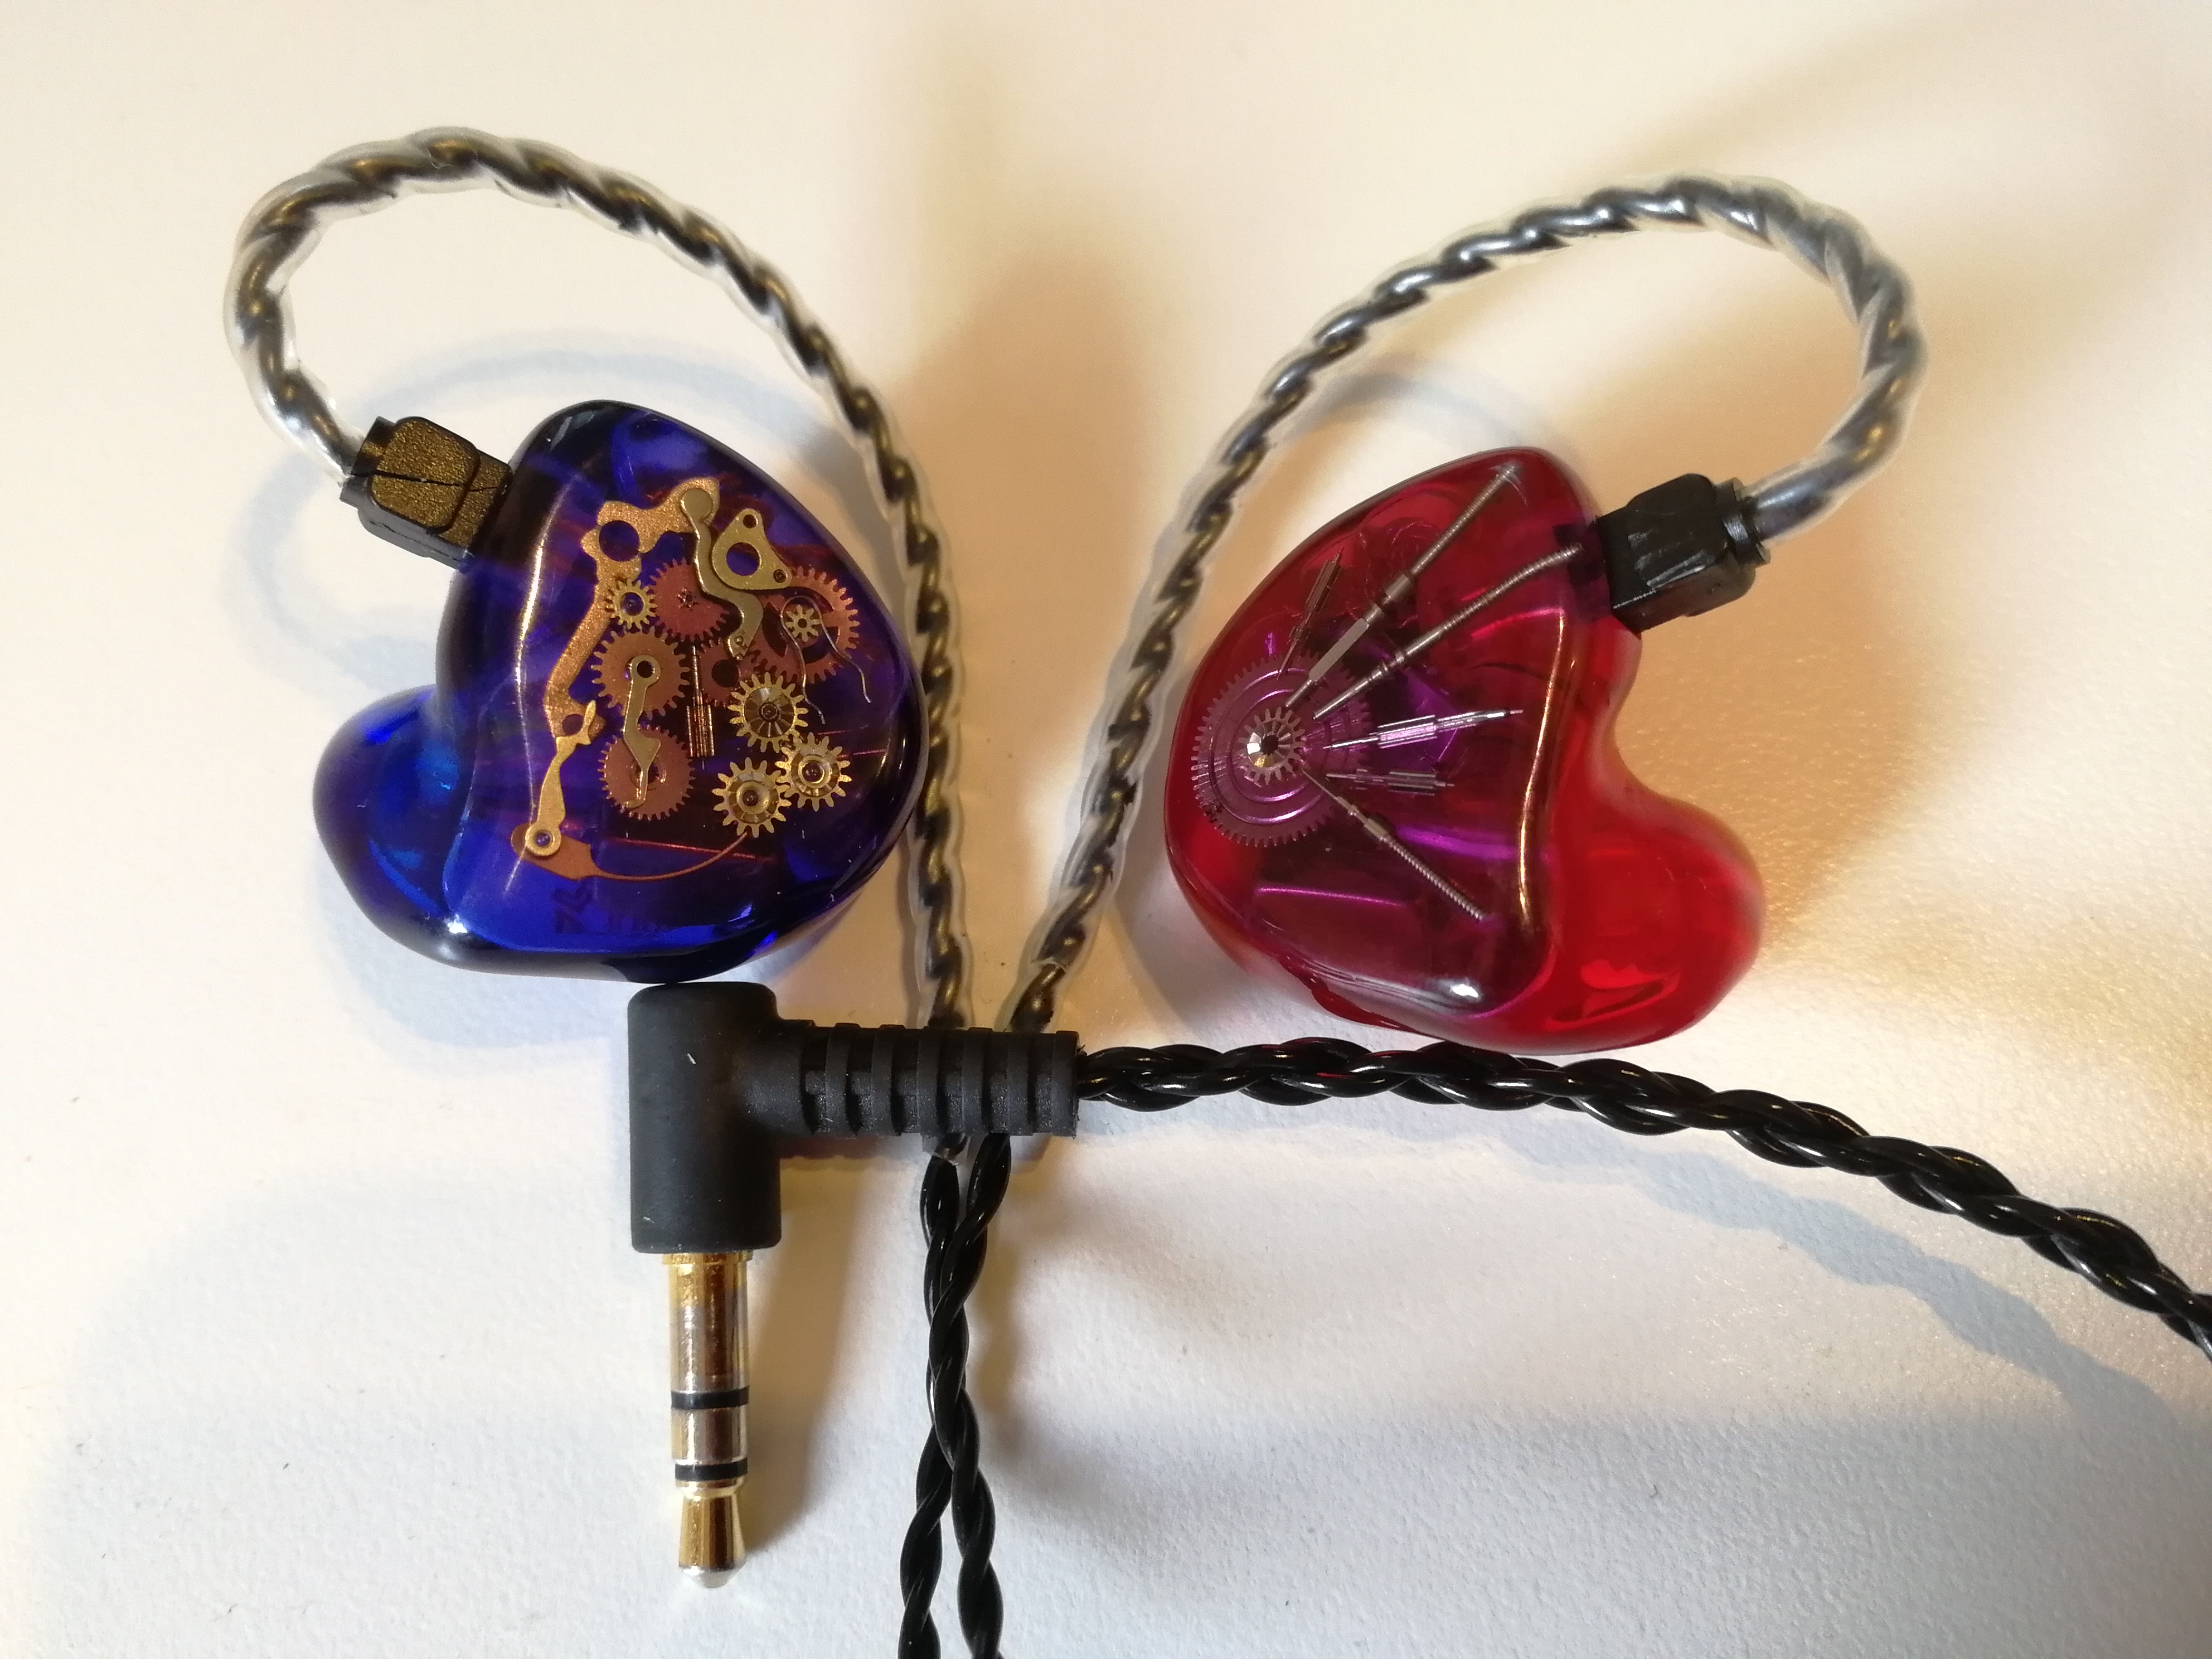
A few years ago, I went to a talk about mixing for in-ear monitors (IEMs), given by one of the top monitor engineers in the UK, Mr. Justin Grealy. As someone who mainly worked in-house, but had to accommodate more and more acts turning up with their own IEM systems, I was intrigued to learn as many tips and tricks as possible to give artists great mixes. I was not expecting most of the hour to be taken up with all the different ways to get earwax out of an IEM. Some were admittedly genius – hairdryers were mentioned at one point – but I didn’t understand at the time just how important good IEM hygiene and maintenance is for a successful mix. No amount of volume, pretty effects or space-creating trickery will make up for the sound being muffled by a wall of wax, or cutting out because of dirty connections.

IEMs can be the biggest purchase you make in your early career, so it’s worth taking the time to find the right ones for you. If you need them to work with the same act regularly, try to get the same make and model as they use (or the main person uses if they all have different ones). The goal is to get as close as possible to what they hear. Discuss with management whether their budget will cover part or all of the cost.

If you need them for one-offs or working in-house, get the best quality that you can afford. It can make a massive difference to what you hear, and so how well you can react and make subtle adjustments in a mix. Generic IEMs are cheaper and quicker to buy than a custom moulded pair, but getting a custom fit will properly seal the IEMs against the ear canal, which helps with isolation from external noise and provides a better bass response. If possible, go to a local IEM dealer and demo a few different ones before you decide. Remember, you want the ones that will reproduce the signal most accurately, not the ones that sound nicest (e.g., if the pair you have are rounded off in the higher frequencies, your mixing could sound too harsh to people who have IEMs with a flatter frequency response).

Regular cleaning of your and your clients’ IEMs is essential. Small grains of dirt on an IEM can make their way into your ear, scratch the delicate skin in the canal and lead to infection and swelling. Dirt, sweat, and wax can block the drivers’ tubes, corrode the connections and even end up in the tiny and sensitive electronics, causing damage. I would like to say if you take good enough care of them, they can last you a lifetime, but custom moulded IEMs should be replaced about every four years. The shape of your ear canal changes subtly throughout your life, so after a few years, the fit won’t be as exact and will stop forming a seal. Specialist gels like Auragel or foam wraps like Comply can help to form the seal again, but they are only a stopgap solution. Once you notice your IEMs loosening it’s time to get a new pair, from a new fitting, not the measurements the IEM company may have kept on file (these are for replacing lost or damaged IEMs).

The central part of cleaning IEMs is removing wax from the tubes that lead from the drivers to your ears. Your IEMs should come with a loop of wire with a plastic handle for this, but if they didn’t, or you lost it, or the wax is further down the tube than it can reach, there are a few do’s and don’ts you should bear in mind.

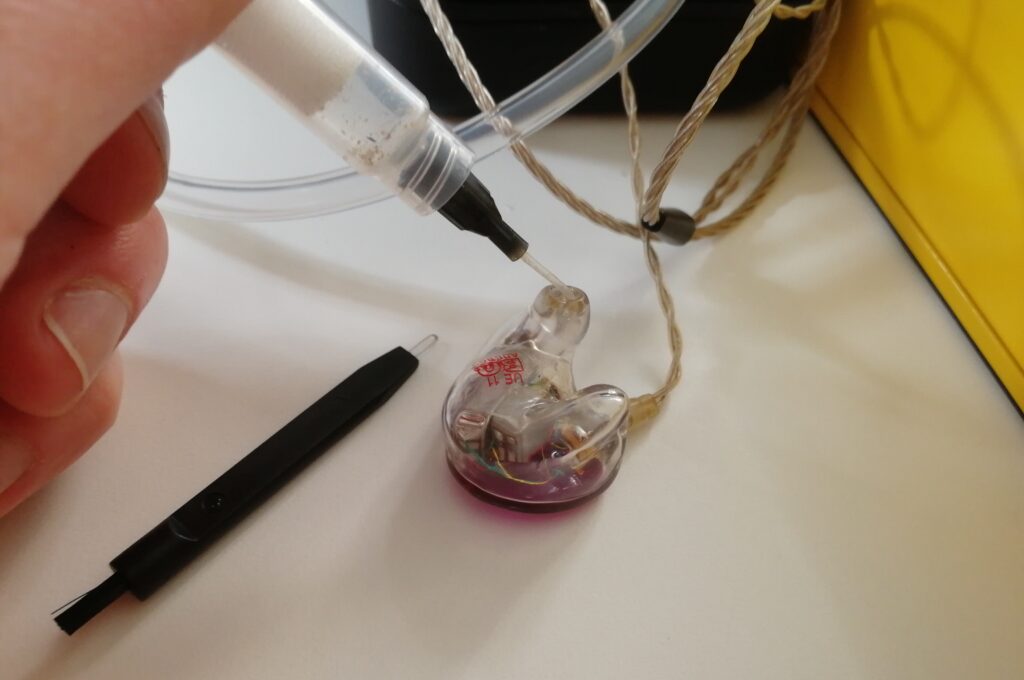
First, be gentle. Keep a close eye on what you’re doing and be careful not to damage any filters or circuitry inside the IEM. Don’t use anything that might break off and get stuck in the tube! Mechanical pencils look kind of perfect for this task, but they are a terrible idea. Also, avoid using anything pointed or sharp, like a needle. You could scratch the moulding, making tiny grooves where more wax and dirt can build up, and potentially where bacteria can fester. Using a loop, optionally followed by a specialist earwax vacuum, is the way to go. I try as much as possible to hold the IEM upside down, so any wax that gets dislodged falls out instead of further into the tube, and I use a gentle scooping motion, at an angle, to get behind the wax and bring it back out instead of risking pushing it further in. Compacted wax blocking a driver can render an IEM useless, and it can be costly and time-consuming to send back to the manufacturer to fix. I then clean the outside of the moulds with alcohol swabs.


Cleaning an IEM with an earwax vacuum, nozzle inserted at an angle


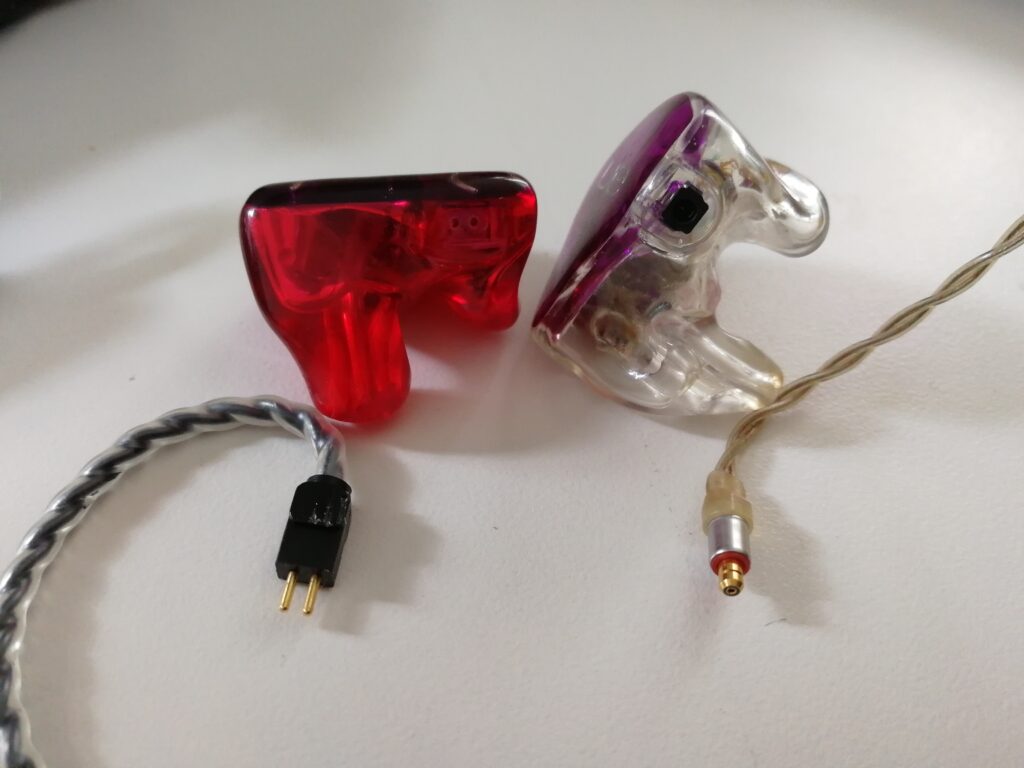
If one ear keeps cutting out, look at the connections between the cable and the IEM. It might merely be loose, but check that there isn’t any green or black stuff at the pins or in the socket. Black is most likely dirt, but green is corroding copper, usually caused by sweat. Cleaning this off with a cotton bud (Q tip) dipped in alcohol or contact cleaner (being careful not to let any liquid get into the body of the IEM) can fix this, but you need to prevent it happening again. Leaving the IEMs to air out after use, keeping a small sachet of silica gel in the case, and checking them regularly can help. If the owner likes to wear their IEMs in the gym, tell them, it’s time to invest in standard earbuds, or it will become a costly habit!

Two different brands of IEM with their respective cables. On the left, the socket is recessed into the casing where two dots can be seen, on the right, it is the area in black. There is no evidence of dirt or corrosion.


If the ear connections are fine, the minijack connector or belt pack socket might be dirty or corroded and can be treated in the same way. The minijack has to be fully seated for both ears to work. If the right side is intermittent, but the left is fine, the jack might be pulling out of the socket slightly, so the right side’s ring no longer makes a connection. Leaving more slack on the cable or taping it in place should help. If it isn’t the jack, gently wiggle the cable as you’re sending signal, to see if there’s a weak spot. IEM cables can get abused, being yanked and pulled during costume changes, snagged on door handles, crushed in their cases. It is wise to carry spare cables for each type of IEM you have so you can swap them out straight away if there’s a problem. Don’t wait until you need one, because it can take weeks to get them, especially at busy times of the year.

If the above steps don’t fix your problem, it might be an issue with the pack or radio frequencies, which is outside the scope of this post. If one ear has lost a big chunk of its frequency spectrum, or it sounds like it’s distorting at low levels, one of the drivers might have blown and will need to be sent for repair. Another reason to keep an eye on your bandmember’s pack volume levels and to mix responsibly!

There are all types of little gadgets and supplies you can keep with you to help with IEM maintenance and troubleshooting. IEMs and hearing aids have a lot in common, and it’s worth checking out audiologist suppliers as well as IEM specialists for things like cleaning loops, ear wax softener and earmould stetoclips (like a stethoscope for hearing aids). Always have plenty of alcohol/anti-bacterial wipes to hand, and thoroughly clean each piece of equipment between IEMs with a new swab to reduce the potential for cross-contamination and general grossness.

Whether the thought of dealing with other people’s earwax turns your stomach, or like me, you find cleaning IEMs strangely satisfying; it does more than keep your equipment at its best. It’s always good to get a reputation for being helpful and useful, and you can spot potential problems before they develop. It’s much easier and safer to deal with issues in your downtime than halfway through a show. It can also be an excellent opportunity to start the conversation with clients about anything they’ve noticed about their IEMs but hadn’t thought to mention, or how they’re dealing with volume levels and looking after their hearing in the long term. For example, increased earwax production can be the body’s defense against sustained, overly loud listening volumes. Showing that you’re interested in their hearing health now and in the future, and willing to go the extra mile, can cement your relationship and improve trust and communication, which will do more for your mixing than any effects unit ever could.

Should You Stay or Should You Go?

Imagine you’re catching up with a dear friend. They tell you how their partner calls them names, makes mean comments about their appearance, gets angry at them if they don’t do the chores right. You’re shocked; you ask why they don’t break up with such a nasty person, and they stare at their shoes and mumble something about their partner being right: they are terrible at washing dishes and could do with losing a few pounds. You almost laugh at how ridiculous that is, because you know they’re wonderful and deserve so much better. You want to get them to wake up and walk out like you’re sure you would in the same situation.

So why do we allow ourselves to be treated like this in the workplace? Not every day is going to be a walk in the park, but far too often, we find ourselves in toxic work environments that make us miserable. We know that we need to be tenacious to succeed. When we’re the new person, we need to get our head down and work hard, do the crappier jobs, and don’t take the teasing (that seems essential to the running of our industry for some reason) too personally. But there comes a point where the initiation period ends, and if you’re still the butt of every joke and being told you’re useless by most of your colleagues, you might begin to believe it. Perhaps it’s more insidious than that: your boss has reasons for why other people keep getting the jobs and promotions, even if they’re less experienced. Your coworkers might not yell at you, but they’ll roll their eyes and have hushed conversations that stop suddenly when you’re around. You might even work in several places with similar atmospheres, so you think this is normal. Dreading going to work and feeling worthless is not normal. Or at least not inevitable.

If you find yourself in this situation, the first step is to take stock of what is actually wrong, and how you feel about it. If you love the work, but there are a couple of things that make it difficult, talk to a friend or trusted colleague for a less emotionally invested perspective. Your coworkers might genuinely think you like the nickname they gave you or didn’t realise how much the joking was getting to you. If that doesn’t improve things, or the problems are systemic, try raising it with HR if you have an HR department or your boss/head of department/tour manager. Try to discuss it calmly, relying on facts more than feelings as much as possible, and approach it with the goal of making the work environment better for everyone both now and in the future. A reconciliatory approach will be better received than an accusatory one, no matter how justified it might feel. It’s always worth working at relationships, whether personal or professional, before declaring them dead.

There will still be times when this doesn’t fix the problem. It might even be that no one is at fault, you just don’t fit well together, or you feel like it’s just time to move on. Ideally, you’ll have saved up some emergency cash to tide you over until you find another job. Paulette Perhach illustrated the importance of a “F**k off fund” in this great but NSFW article. It can also be an incredibly powerful negotiating tool. You can be more confident and assured, and make much better decisions when you know you don’t need the money.

If you’ve given it a good shot, there is no shame in walking away. Even though it might be tempting, try not to burn your bridges as you leave. This industry is close-knit, and your reputation will precede you. The best revenge is simply living well. There are so many different work environments out there if you keep looking, you will find one that clicks sooner or later. It might not be easy: you might need to move city or discipline, or you might need to leave sound altogether. It can be tough, but once you are in a better place, you’ll wonder why you wasted so much time in a situation that didn’t work. Deciding to find better opportunities is a positive thing, even if it feels like quitting at the time. Letting people who don’t appreciate you take your time and your joy for years on end would be the real failure

I Have Confidence in Me


So, let them bring on all their problems – I’ll do better than my best

I have confidence they’ll put me to the test – But I’ll make them see I have confidence in me

I Have Confidence, from The Sound of Music: Rodgers and Hammerstein, 1965

To succeed in audio, having the right amount of confidence is key. I struggle with a lack of confidence, and this post will mostly deal with how I counteract that. However, if you think you’re god’s gift to sound, you might want to take a minute to reflect on whether that’s true too, especially if your bragging is overcompensation for low-esteem. Being realistic about your abilities, and having a mindset somewhere between Marvin the Paranoid Android from the Hitchhiker’s Guide to the Galaxy and the average Pop Idol contestant is the goal.

Plenty of aspects of this job can knock your confidence: as a freelancer, it’s easy to constantly compare yourself to others. As I mentioned in my last post, social media can be toxic; when all you see is the best aspects of your peers’ lives, it’s easy to think you’re lagging far behind. If office workers get stressed out and jealous any time there’s a promotion to compete for; we can feel that way for every gig. “Why did they put him on that show?” “Why did they think she’d be good for that role?” “Why didn’t they ask me?” The politics of who gets hired are many and varied, and if you try to make sense of it or take it personally, you may well end up sobbing in a corner. Even if you try to abstain from it, your colleagues might loudly and rudely question your abilities for you, either to make themselves feel better or to advance their careers. Having the confidence to get on with your job and show them why they’re wrong to doubt you are the best way to fight back.

Lack of confidence can sabotage you while you’re in the middle of work. We often have to deal with complex issues while sticking to tight deadlines. We can’t wander off, read up on the topic then come back the next day feeling educated and refreshed; the gig has to happen today. And of course, what every sound person dreads: the announcement that there are “technical issues.” The entire audience turns around as one to stare at the front of house, even if it’s a dodgy connection on a guitar pedal. You didn’t even see that bus coming before they threw you under it!

A healthy level of confidence (not to be confused with arrogance) is essential to remain resilient and effective in the face of challenges. It benefits the gig, your career, and your well-being. Cognitive behavioural therapy (CBT) is often recommended to treat depression and anxiety, but I think it can help everyone. Courses are freely available online and from your local library, and they help you to get perspective on things and break out of negative thought processes. For example, if you lost out on a job, imagine what you would say to a good friend if they were in your situation. You deserve as much faith and respect as anyone else, telling yourself you’re worthless or unemployable is not constructive.

I have referred to this blog post about caring about the opinion of others before, but I don’t think it’s an exaggeration to say it changed my life: Taming the Mammoth: Why You Should Stop Caring What Other People Think. The main point to take away is that people are far more interested in themselves than you, and it’s a waste of time to worry about what others think of you. Let’s take a classic rom-com cliche as an example: you pass a group of people who all smile at you. Wait, why did they do that? Are they just happy? Are they smiling at something behind you? What if they’re actually sniggering at you because you have something stuck in your teeth?

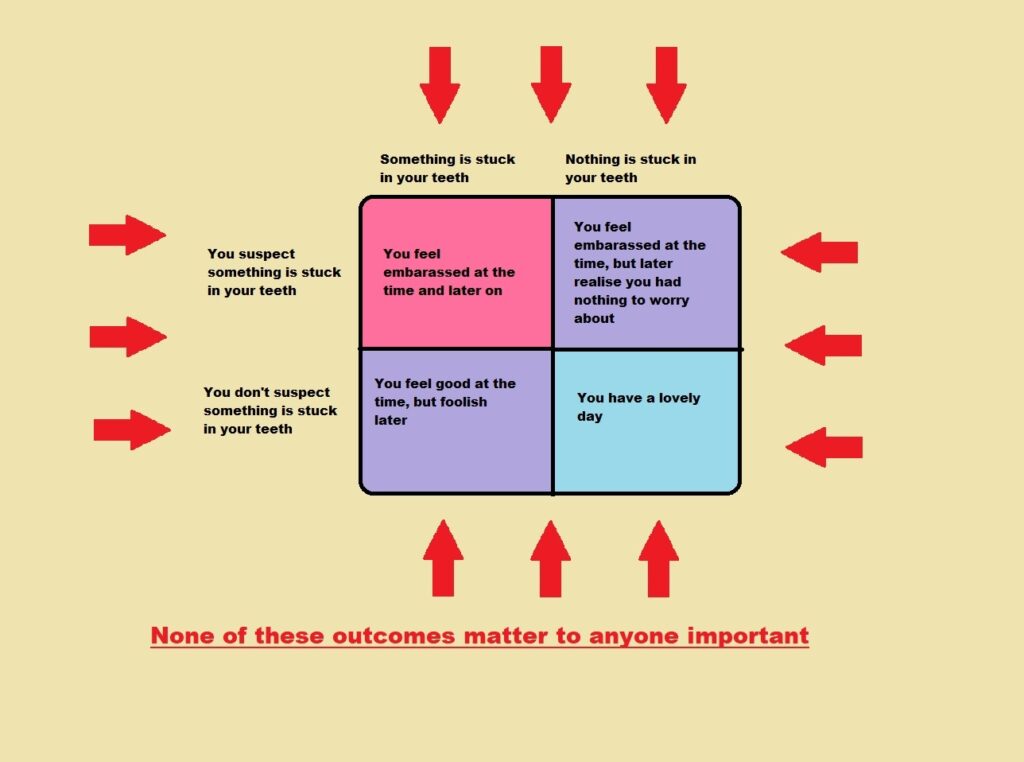
As you can see from the Punnet Square of Embarrassment, there are four main possible scenarios, and in each of them worrying that you have something stuck in your teeth achieves nothing. We all have teeth. We all eat food. Stuff sometimes gets stuck in our teeth; no one cares. If they are laughing at you, you can pity them for wasting their time caring about something so inconsequential. For a bonus tip: very occasionally, I go for a walk and pretend that anyone looking my way is simply awestruck by how incredibly amazing I am. Obviously, that isn’t the case, but it lifts my mood and makes me laugh anyway.

The Punnet Square of Embarrassment. Pink denotes a waste of all your energy to worrying, purple denotes a waste of some energy, and in the blue area, no energy is wasted.

Of course, messing up at work is a bit more important than dental greenery, and laughing it off like you don’t care is not the approach to take. The principle remains the same, though: it happens to everyone, even the best engineers in the world have bad days. By all means, learn from what happened and plan how to prevent it from happening again, but then brush yourself off and move on. Dwelling on it can ruin your focus for the rest of the day and lead to more silly mistakes.

A great way to have confidence is to genuinely have a solid understanding of the topics at hand, and I recommend learning all you can at every opportunity. However, no one can know everything about every piece of equipment, every band, every venue. It can take a bit of experience to know what’s normal to know, and what isn’t. If you’re not sure of something, don’t be afraid to admit it; we’ve all been there, and it’s how we all learn. Everyone needs to ask the internet, a friend, or a manufacturer’s tech support for help sometimes. It isn’t a sign of failure; it’s part of the job.

Finding a happy medium in self-confidence, and having an accurate idea of your competence is a constant growing exercise. Discuss it with colleagues you trust, as it is often easier to gauge from an outside, more experienced perspective. Ask for input from several sources, so you aren’t unduly influenced by one opinion. Knowing your worth can reduce stress at work, reassure your clients and colleagues, help you when negotiating pay and lead you ever closer to your goals. It also encourages you to help others: only people who are afraid of competition hoard their knowledge. People who are confident in their abilities are happy to share and raise everyone up, which increases their confidence too.

Networking on Social Networks

In my last blog, I wrote about how thinking of artists and project managers as clients rather than bosses can really change your perspective for the better. An essential part of being your own boss is selling yourself to other potential clients, and social media is becoming an even more significant part of that. The way you present yourself online can have a substantial effect on how people perceive you and your approach to work, whether you’re consciously image crafting or not. Everyone’s situation and goals are different, but there are a few guidelines it is wise to follow when starting to navigate online self-promotion.

Social media can be a low-cost and effective way of getting your name out there and quickly showing people what you’re about. However, it can be a double-edged sword. Whether you agree with it or not, it is common practice to perform internet searches on people before inviting them for an interview. Plus, in an industry as tight-knit as ours, it’s inevitable that you’ll see the same names popping up on discussion threads and groups, so we often form impressions of each other before we ever meet or think to be on our best behaviour to land a job. It’s worth reviewing your privacy settings regularly, and perhaps making a separate list or entire account for work-related posts (this also saves your poor family and friends from being bored by tech talk!). Even if none of your posts are public, discussion groups can have many more people watching than you might realise, and anything you put in writing can be screenshotted and forwarded, so think carefully before posting. Make sure you’re happy to stand by what you say if challenged and avoid posting when angry or under the influence. Getting drawn into an argument online rarely achieves anything but time-wasting, and tends to show all parties in a bad light.

If you want to post about a gig, especially sharing photos, ask whoever is in charge first. Bear in mind that a non-disclosure agreement might have been buried in the small print of your contract if you have one, or someone might have signed an NDA on behalf of everyone in the department without your knowledge (these may not be legally binding, but it will not help your professional relationships if you break them). The rule of thumb is it’s okay to post photos of things the audience can see after the gig has finished, but always check before taking the photo. Don’t take photos of celebrities backstage! Ever! It is rude and unprofessional, and you may end up answering some very angry security guards. Never post pictures of your pass until after the gig or tour, and alter the image and make it clear it’s an out-of-date one if you must post it at all. Even if you don’t think it matters for your little gig, posting photos of passes encourages others to do it. Not everyone forging a pass is simply trying to see a show for free. Contributing to a culture of pass posting compromises everyone’s safety throughout the industry. Just don’t do it.

So what do you post then? This blog post from Wait but Why breaks down what makes a good or bad post. In short, if you’re trying to build your brand for work, your posts should be informative, entertaining and/or engaging. Everyone is human, and we all have bad days, but constant moaning about work does not show your best side. It is better to get stuff off your chest with close friends, ideally in person, when you can instead. Simply posting that you are in X venue doing Y gig is frankly boring. Add a bit of feeling or humour, like you’re so excited to finally work for a band you’ve admired for years, or how you totally deserve your afternoon cupcake after checking the coverage in a venue with so many stairs. It doesn’t have to be groundbreaking, but personalising your posts will help people warm to you and remember you instead of just scanning past, along with all the other utilitarian “look at me, I’m at work” stuff.

How often should you post? Most people I know would only post once roughly every 5-10 gigs on average. Of course, that varies. Some people never share anything, and others can’t do a day’s work without telling the world about it. There is also a time and a place for social media. If you have a phone in your hand, you can’t lift a flight case or coil a cable. Potential clients might be impressed by your stage selfies, but your current colleagues and clients will notice your lack of focus on the job at hand.

The other side of all this is how you perceive what other people share. It’s often said that social media makes us compare our every day with everyone else’s highlights. If you have a lot of friends in the industry, it can seem like everyone’s having the best time touring the world but you. Remember that most people can’t resist posting a photo of themselves drinking cocktails on their day off, but they’re much less likely to publicly admit that they had a terrible soundcheck, or that they’ve been suffering from crippling diarrhea ever since the second show. Take everything with a pinch of salt and know that you’re only seeing people at their best, or even better than that, if they see telling the whole truth as optional.

The thing is those people who post all the time appear 5-10 times as busy as their peers by comparison. It is also common for prolific posters to embellish the truth or present things in an ambiguous way. Saying you’re working at a festival, accompanied by a photo of the main stage taken from front of house when you’re actually a stagehand on the fourth stage isn’t a lie, but it isn’t honest. There’s a trend of posting photos of nice desks and outboard gear when the person posting is not the one using it. They never say they are the engineer, but it’s heavily implied, and it’s dishonest. It can feel like these people are putting themselves at an unfair advantage and it can be tempting to sink to their level and play that game too. There’s nothing stopping you, but when everyone knows everyone else, it’s very likely you’ll get caught out sooner or later. Even if you delete those posts, screengrabs can come back to haunt you years down the line.

At the end of the day, it’s up to you to judge what is appropriate to share, and with whom. However, no amount of bragging online will make you good at your job in real life. I’m far from perfect, but I try to remain positive and professional online and take the high road as much as possible so I can sleep at night. I find I do my best work when I’m well rested.

Editors Note More on Social Media Tips and Career Development.

Where Are You Going?


Around January, you can’t help but take stock of things. Even if you aren’t a “new year, new you” kind of person, over the holidays your family and friends quiz you on what you’ve been up to all year, and what you’ve got coming up. You might not want to say that you’ve had a tough time, or feel undervalued or ignored at work. Maybe your boss seems like the biggest a-hole ever, not giving you any support, or even somehow purposely sabotaging your career. Even if you’ve had a great twelve months, the unpredictable nature of the entertainment industry can make you feel like you just got lucky, or you’re floating from one job to the next without any direction or purpose.

I am not here to tell you that all you need is to believe in yourself and everything will work out. I’ve seen musician friends get nowhere because they thought believing in yourself and waiting to be discovered was how you got famous. The music business is a business. You have to put yourself out there, be your own promoter, find out who the decision-makers at record labels and festivals are, and hassle them until they give you a meeting. Throwing your demo at the stage when you watch your favourite artist will not magically give you your break (seriously. The artist never listens to them. We just have to throw them away afterward).

It’s the same on the audio side. Even if you’re in a full-time position, these days our (literal and metaphorical) gig economy means very few people have a job for life. Your boss is only your boss at the moment. If you’re a freelancer, they’re not even your boss. A friend of mine helped me to change my perspective on this: these people who give you work, or give other people work instead of you, are not your bosses, definitely not your friends, they’re your clients. They don’t owe you fairness, or help, or career progression. You wouldn’t hire a builder who didn’t know how to construct a wall, but was “eager to learn.” You wouldn’t take kindly to them complaining that you chose a better-qualified tradesman instead, or that you’re not sharing the workaround. At the same time, you don’t owe your clients loyalty or unpaid hours unless they deserve it. When you stop thinking of yourself as an employee and start framing yourself as an independent contractor, you realise that you are free to do what you want. There’s no point in complaining about your boss keeping you in a bad work situation because your boss is you. There are always other options, even if they seem scary at first. If you do work for good people who are willing to help you grow and flourish, I hope you see how lucky you are, and appreciate them for the superheroes that they are.

So, once you take ownership of your career, what are you going to do with it? You don’t need to come up with a detailed ten-year plan of how you’re going to take over the world just yet (although companies love that kind of drive and independence). Take a while to think about what you truly want from life, independent of the job role. Instead of thinking “I want to be a touring front of house engineer,” think “I want to travel,” “I want to help people,” or even “I want to be happy.” Once you have a shortlist of what you want out of life, think about the jobs that will help you get there. If you’re going to settle down, with a family, pets and a reliable income, or if quiet and personal space is integral to your functioning, touring is not for you, but you might do brilliantly in education. If all you want is to go to Coachella, it’s much easier and more profitable to get a steady job and buy tickets to it than to throw yourself into freelancing and hope someday you’ll get to work on it. If doing the same thing in the same place day in, day out would drive you mad, working in-house on a long-running theatre show will not suit you but the chaos of festivals might. If you love being artistic and creative, being a corporate AV tech will leave you frustrated, but you could be an exceptional sound designer. The audio world is much more varied than we first realise, and there are all sorts of niches that don’t often get discussed (that I will explore in a future post).

Of course, you’re very unlikely to work in one role for your entire career. Perhaps swapping between positions day to day, or spending a few years at each, will work for you. Your priorities will change at different ages as well, so be prepared to adjust your goals as you go along. Both life and this industry are so unpredictable, remaining flexible will help you make the most of what you’re presented with and will stop you feeling like a failure if you get thrown off track. Realising your lifelong dreams can feel like an impossible task, but the key is to break your goals down into achievable steps, as small as possible. If you celebrate the first time you troubleshoot a crunchy mic input as a step towards someday system teching for a festival, you will feel much more satisfied in your work. That sense of purpose will also increase your resilience: not every job will be awesome, but if you can put it into the context of how it’s helping you get to where you want to be (and paying the rent is a valid part of that!), you can take lessons away from it. At the very least, you can smile and invoice, and learn that it is not a job worth repeating. When you find the gigs that make you feel great and help you progress, you can recognise them for what they are, and it will motivate you to pursue more of them. I know it sounds unbelievably cheesy, but although it might not be where you planned at first, hopefully, you will end up in the right place, and enjoy the journey along the way.

When it stops running like clockwork – troubleshooting the basics

Live Digital Audio Part 4

What can you do when it goes wrong? Each live set up will vary, but there are a few fundamentals you can check before having to call tech support.

Snap, crackle, and pop – how to recognise digital issues

What does a sampling or word clock issue even sound like? Unfortunately, they can sound like all sorts of weird noises. As mentioned in previous posts, if your word clock starts to slip out of sync it will just sound a bit off. You may notice the stereo image doesn’t feel as big, or it sounds a little dull, or phasey. More disconcerting problems manifest themselves as strange periodical pops or clicks, or even like someone twanging a rubber band. Think of the 1s and 0s – if the information isn’t transmitted correctly there isn’t any intermediate value, there is no 0.5 in binary. The bit is either there, or it isn’t. Devices then try to read the empty (or partially empty, in the case of slight mistiming) slot and it may result in random noise. If we go back to our video analogy if you’re watching an analogue transmission and the reception goes bad, it will go fuzzy around the edges, but it’ll still be watchable. If a digital transmission does the same, the entire image tends to freeze, become pixelated, or fill with weird patterns and colours.

Don’t overcomplicate it

So what can you do about it? The number one step should be to make sure it is actually a digital issue. Don’t hear hooves and presume zebras. If something is crackling, make sure it isn’t a bad stage cable or piece of backline, etc. If there’s a weird noise, is it over the entire system or is it just on one or two channels? If it isn’t global, it’s more likely to be something like a broken input or analogue transmission line. If it’s over several channels, it could be crosstalk in a multipin cable or something in one area of the room that several mics are picking up.

If you’re certain it’s a sampling or word clock problem, think through the signal path methodically, like you would with any other fault. Make sure everything is still set to the correct sample rate, master clock, and IP address. Check your cables are seated correctly – this is especially important for BNC connectors. Due to the central pin being so small, if they aren’t in the socket completely straight, or are taking a lot of strain, they can lose too much of their connecting surface area and stop passing signal. Optimally (I always try to secure cables in such a way that the weight is taken off the connections for this reason. It also keeps the cable in good condition for longer). Double-check that you haven’t connected cables of differing impedance. Work from one end of the signal path to the other, swapping out cables or bypassing devices one at a time. Take it down to the simplest setup you can, removing things like effects units or even the desk. If your amps have the capability, playing music or pink noise directly into them can take a big chunk of your setup out of the equation. If you are still experiencing problems, check that everything’s firmware is up to date, or at least the same version as other devices of the same type (e.g., all the amps, or desk stage boxes).

Have you tried turning it off and on again?

If this is all in order, it’s time to turn things off and on again! I know it sounds like a cop-out, but power cycling devices (using that term in front of clients makes you sound more professional than saying you’re turning it off and on again) can force them to reset to the right settings, or do their boot-up checklist, where they do a sweep of the network and see other devices that they might have lost contact with for whatever reason. It might not be enough to just switch it off; completely unplugging the device from its power source and leaving it for half a minute can sometimes make it forget any bad information it had stored and start again. Of course, be sure to save anything you need, like your show file, before trying this step!

Make the call

If none of this helps, I’m sorry to say it’s time to call tech support. But here’s the secret to most tech’s tech support: it’s other techs. Nearly everyone in this industry has friends who know more than them about certain topics, which they can phone when they’re stuck.  If nothing else, they might know the solution just because they’ve had the same thing happen to them before. Yet another reason to be (genuinely) nice to everyone; we’re all part of a hive mind of knowledge, and nearly all of us are more than happy to help a colleague out of a bind. On top of this, audio equipment manufacturers are invested in making sure you don’t have bad experiences with their gear, and their support people are often ex-techs themselves, so they will definitely want to sort you out! There’s no shame in tapping into that knowledge if it gets the gig back up and running, and soon enough you’ll be the one who receives the panicked phone call half an hour before doors. Just remember that the more problems you experience, the more you can help others in the future.

Live Digital Audio Part 3

Digital Audio in the Real World   

Read Part One and Part Two

Knowing the theory of digital audio is all well and good, but how do you set all that stuff up on-site? First of all, both good and bad news about digital audio is a lot of the equipment looks after things like sampling and clocking for you. Word clock signal is often carried on the same path as the audio signal, so for a lot of systems, you don’t need to worry about plugging sync cables in separately at all. This automation makes it much more user-friendly and quick to set up, but it also means it can be tricky to troubleshoot because manufacturers will proudly proclaim that their system “just works!” This is also yet another subject where there is no consensus, and each brand has its preferred protocols, cables, and network topology. When using any new equipment, primarily digital, it pays to read the manual: you might find out about some crazy quirks you would never have thought of checking for. You are also likely to have several pieces of equipment from several different manufacturers; follow their advice about how to connect these together, including using the correct convertors or adaptors.

Practise best practice

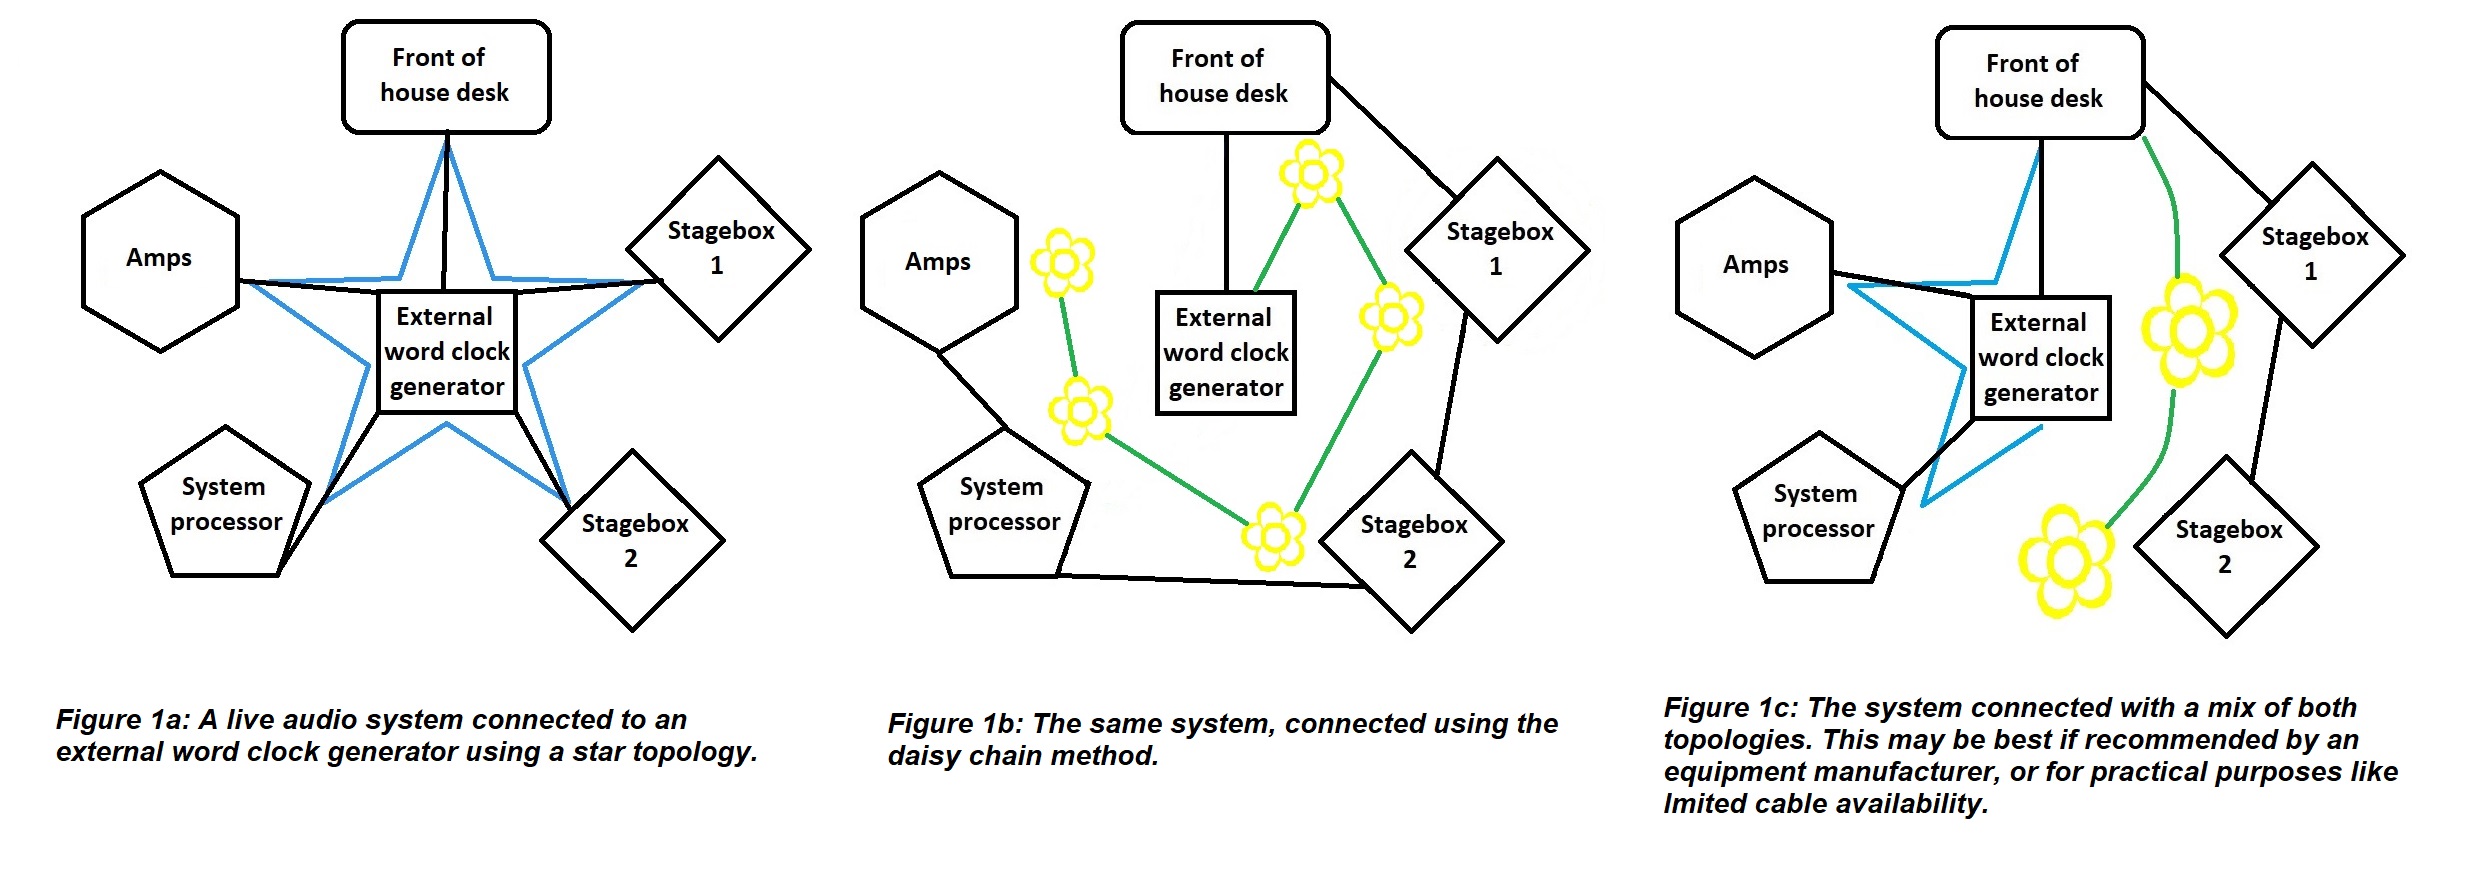
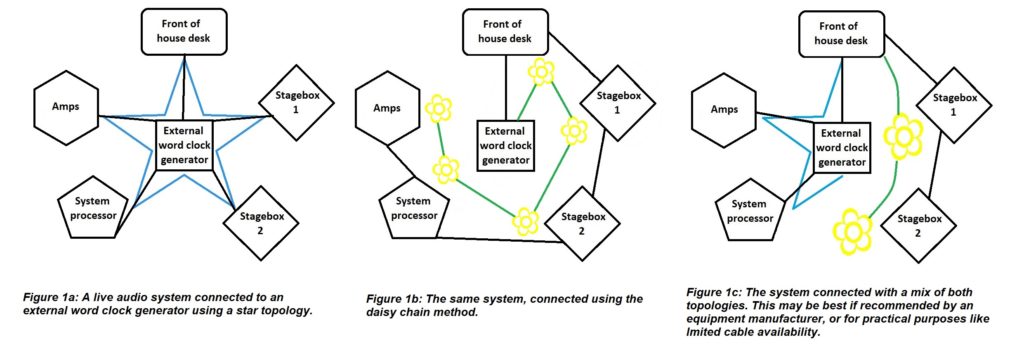
If you want to avoid digital audio issues, keep your system as simple and neat as you can. Much like analogue, you usually want to minimise the number of connections and cable length between points in your system. For example, connect your devices in a “star” topology when possible – this means each unit gets plugged straight to one central device, like a network router for system communication or master clock generator for synchronisation (like in figure 1a). The alternative is a “daisy chain” topology – linking from one unit to the next (figure 1b). Even if you use a direct output from a device, each loop through introduces latency to your system. It may be a fraction of a millisecond, but if you have several units, those can add up to cause trouble. It can also mean that if one device or cable fails in the chain, everything downstream of that loses connection. If your devices don’t have the ability to link out, you’ll need to use a splitter or ‘T’ connector to carry the chain on, which is another potential point of failure or signal loss. However, certain manufacturers recommend leaving their section of the set up (e.g., a desk and its stage boxes) connected in a chain for syncing purposes. Their argument is if everything is clocked directly to an external master and it fails, everything will fall out of sync. Their equipment was designed to work together, so allowing it all to clock from one of its own units, which in turn is clocked to your system’s master, means that if the master goes offline all that gear will at least be in sync with each other, if not the rest of your system (figure 1c).

Figure 1: Different methods for connecting a live system


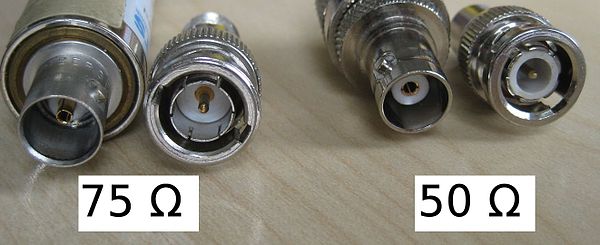
Figure 2: 50 ohm male and female BNC connectors (right) with their dielectric rings clearly visible, and 75 ohm male and female connectors (left) without. Source: By Kaback [CC BY-SA 3.0 (https://creativecommons.org/licenses/by-sa/3.0)], from Wikimedia Commons.

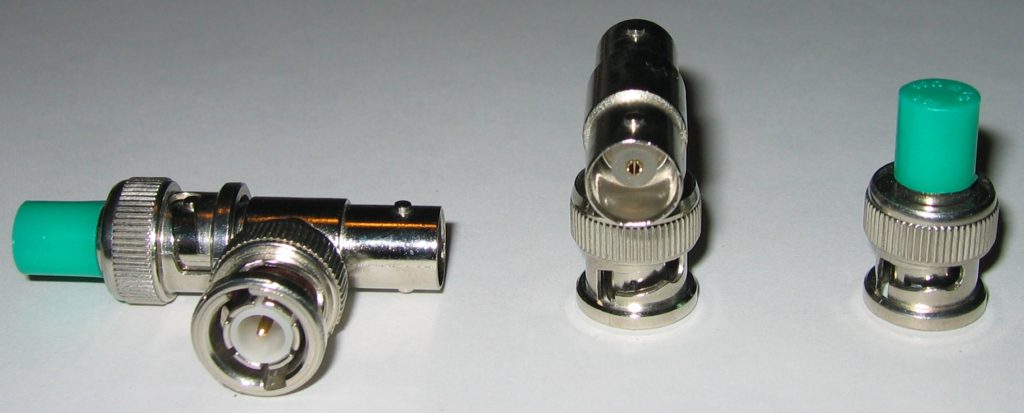
Figure 3: A BNC terminator connected to a T connector (left), a T connector (centre) and a terminator. As you can see by the dielectric material, these are actually 50 ohm connectors and would not be ideal for digital audio setup. Source: By Romantiker [GFDL (http://www.gnu.org/copyleft/fdl.html), from Wikimedia Commons.

Are you using the correct connections?

There are a whole bunch of different cables used to connect digital audio. Confusingly, several have the same connectors as other cables, and look and feel very similar. For example, your device might have BNC sockets, but should you use RG58 coaxial cable or RG59? What’s the difference? RG58 has a characteristic impedance of 50 ohms and is used for RF applications because it can deal with the high power involved in radio transmission. RG59 (you might know it as ‘video cable’) is 75 ohms and is what you need for digital audio connections. Its lower impedance will let the signal pass through it more efficiently and accurately.

Similarly, AES3 cable uses XLR connectors but is 110 ohms rather than mic cable’s 75 ohms. If you’re lucky, the grade will be printed along the length of the cable, but if not, RG59 and AES3-grade cables tend to be stiffer and less flexible than RG58 and mic cable (beware of RG213, which is even thicker than RG59! There are quite a few different cables with BNC and XLR connectors out there. If you are in charge of organising cables in your workplace, please store all these different ones in clearly marked places, far away from each other! It will save a lot of confusion). There are two different BNC connectors: a 50 ohm one with white plastic ‘dielectric’ rings and a 75 ohm one without (see figure 2). However, this isn’t a foolproof way of identifying the cable itself, because some manufacturers or repair people cut corners or are genuinely mistaken and can use the wrong ones. The shorter the distance, the less critical it is to use the correct cable, but if you’re having issues and you know you cheaped out and used let’s say mic cable instead of AES3-grade cable, swapping it for the real deal is a smart move. Make sure you don’t connect cables of different impedances too. Each time you connect a 50 ohm and 75 ohm coax together it can result in the loss of roughly 5% of your signal (this is also something to bear in mind if you know your cables have the wrong impedance connectors).

If you connect your devices to a word clock generator separate to the audio transmission, you also need to make sure that each path is terminated, to stop parts of the signal being reflected back down the cable and causing jitter. Some devices have a switchable internal terminator that you can select, or if you’re using BNC you can plug a T connector into the input of the last device in the chain, with the word clock plugged into one side of the T and a (75 ohm) terminator (see figure 3) on the other side.

Is everything singing from the same hymn sheet?

Once everything is powered up, make sure all your devices are running at the same sample rate. Most equipment these days has an internal sample rate convertor, which can switch between sample rates, called up or downsampling. Downsampling to the slowest device’s rate is the norm in live audio. This option is usually found in the system/settings menu, but sometimes there is a physical switch on the unit. If a device has a second brain/engine or fallback feature, make sure that it is also set to the correct sample rate. Some systems are now smart enough to choose the best word clock to be the master themselves and even switch to the second best one if something happens to the first, without interrupting the audio. If your system doesn’t do this, decide on a master clock and tell each device what it is. Again, this will be in the system/settings menu.

Is the network working?

If you networked units together, make sure they each have a unique IP address, that can be seen by the router (if you have a straightforward setup you may not need a separate router). If two or more devices have the same IP address, or any device has the wrong type of IP address, it will cause issues. Here is a brief rundown of the basics of IP addressing:

Static IP: You set the IP (‘internet protocol’) addresses of each device manually, and they stay the same until you change them. This is best for most live audio cases, so you can keep track of all your devices and can quickly identify which unit is faulty, for example, by its IP address.

DHCP (Dynamic Host Configuration Protocol): You let the router assign addresses. This is faster, and best if other units are likely to be added to the network without your knowledge (this is normally used for things like wifi networks in offices and cafes). As devices come and go, they are certain to have unique IP addresses and won’t clash. However, the same unit can be assigned different IP addresses over time, which can get confusing.

Subnet: The part of the IP address that a router looks at to see all the devices in a particular network. e.g., a desk might be 192.12.34.3, a stagebox might be 192.12.34.4, and they are both part of the “192.12.34.x” subnet. A laptop with the address 168.12.34.5 would not be part of that subnet.

Subnet mask: The number that defines the range of the subnet. For each section of the mask, if the number is 255, each IP address must match at that section exactly. If the number is 0, it can be any value between 0 and 255. For example, if the subnet mask is 255.255.255.0, each device’s address must match in the first three sections. 192.12.34.3 and 192.12.34.4 would be seen, but if an amp was set to 192.12.56.7, it wouldn’t be seen. If you expanded the subnet mask to 255.255.0.0 the amp would then be seen by the router, along with anything else that had an IP address starting with 192.12. (so that laptop would still not be seen as part of the subnet). It is best to avoid assigning IP addresses that end in 0 or 255 because these are often used by the router for its own system tasks.

It might seem like a lot to take in, but most of this only really comes down to setting up like you would an analogue system, then doing a few extra checks in your gear’s settings menus. Getting the fundamentals right will minimise the need for troubleshooting, which I promise I will get on to in my next post!

X