When I moved to Los Angeles, I knew three people including a friend from home named Dustin. On my first night in town, I went for dinner with him and a few of his friends. One asked the waiter about something on the menu. The waiter replied, “Well, as long as I’ve been here – which is five years now – this has been the most popular item on the menu. But the only reason I’ve been here five years is because I’m still trying to get my screenplay published.” The waiter then took our order as nothing had happened.
After he left, I asked if the waiter’s comment struck anyone as odd. “Nah,” Dustin said, “you get used to it after a while. Everyone wants to be doing something else in this town.” His friend shared a story about a colleague who recently landed a job. The colleague was at Starbucks venting about how she couldn’t find work. The guy at the next table overheard her and said he needed to hire someone to do exactly what she was talking about. They exchanged information and she was hired a few days later.
Since I didn’t move to LA with a job, my first couple months were spent taking “meetings” (aka lunch, coffee, or a drink) with “connections” (aka friends of friends or people I met through an ad on Craigslist). I tried the regular job channels like applying to job listings or sending my resume to studios but got no response. It was so bizarre that all of this was the reality of starting a career. It felt more like a game making friends using code words versus job seeking.
Instead of seeking work, I started seeking information. I wanted to know how others got their start or what their career paths were like. How did they get interviews or job offers? What could I do to find more opportunities? What path should I be taking? It was those questions that lead to more meetings and more connections and eventually to work and more opportunities. The more I got to know people the more they offered to help.
I also met up with a college friend (one of the three I knew when I moved out). She worked at a post-production studio. She said the studio received at least 30 resumes a week and if they have an opening (even for receptionist) the owner would give an interview to someone an employee knew over a no-name resume from the pile. She showed me the cabinet full of resumes – all people who never got an interview.
I got a great piece of advice during one of those first meetings: “It’ll take six months just to make the connections to start looking for work in Los Angeles.” Once you start seeing the web of connections and how it works you realize opportunity could be anywhere – even from a stranger at Starbucks or a friend from college. The hard part is getting used to selling yourself in unexpected situations. There’s a balance, though, in knowing when it’s appropriate to talk about your skills or work. The waiter, for example, may have been too forward bringing up his screenplay while he was working another job. It takes some practice but if you’re comfortable sharing about yourself (and knowing how much or when to share) a stranger can turn into a connection or even lead to a great job.
In part one, we covered file transfer between a video workstation and DAW and how to prep these materials for a sound editor. In this part, we will cover some of the basics of sound editorial.
Different types of sound editing
Sound editing for picture can be broken into different elements (and job titles):
Dialog editing (dialog editor)
Music editing (music editor)
Sound FX editing/sound design (sound designer)
Foley editing (Foley editor)
These roles could be different people or it could be one person doing all of the above. In credits, if someone is listed as “Sound Editor” they likely worked on multiple elements.
Dialog Editing
As we saw in part one, the materials are brought into an audio workstation from a video workstation (through an AAF or OMF) and then “split” so that each element is placed on appropriate tracks. The dialog editor is responsible for going through all of the dialog tracks for the following:
Organizing files within each set of tracks
Sorting through tracks and removing regions so only usable or preferred mics are remaining.
Once the appropriate mics are in place: adjusting fade ins, outs, cross fades, and filling in holes as necessary.
Removing unwanted sounds such as pops, clicks, hums, thumps, or other noises that can’t be removed by real-time mixing. Sometimes the dialog editor can remove other non-desirable sounds like dogs barking, sirens, or an unneeded car drive-by.
Repairing sounds that can’t be fixed by real-time mixing (such as mic dropouts)
Editing ADR (actor’s lines that were re-recorded in the studio) and voice-over narration
The fundamentals of dialog editing
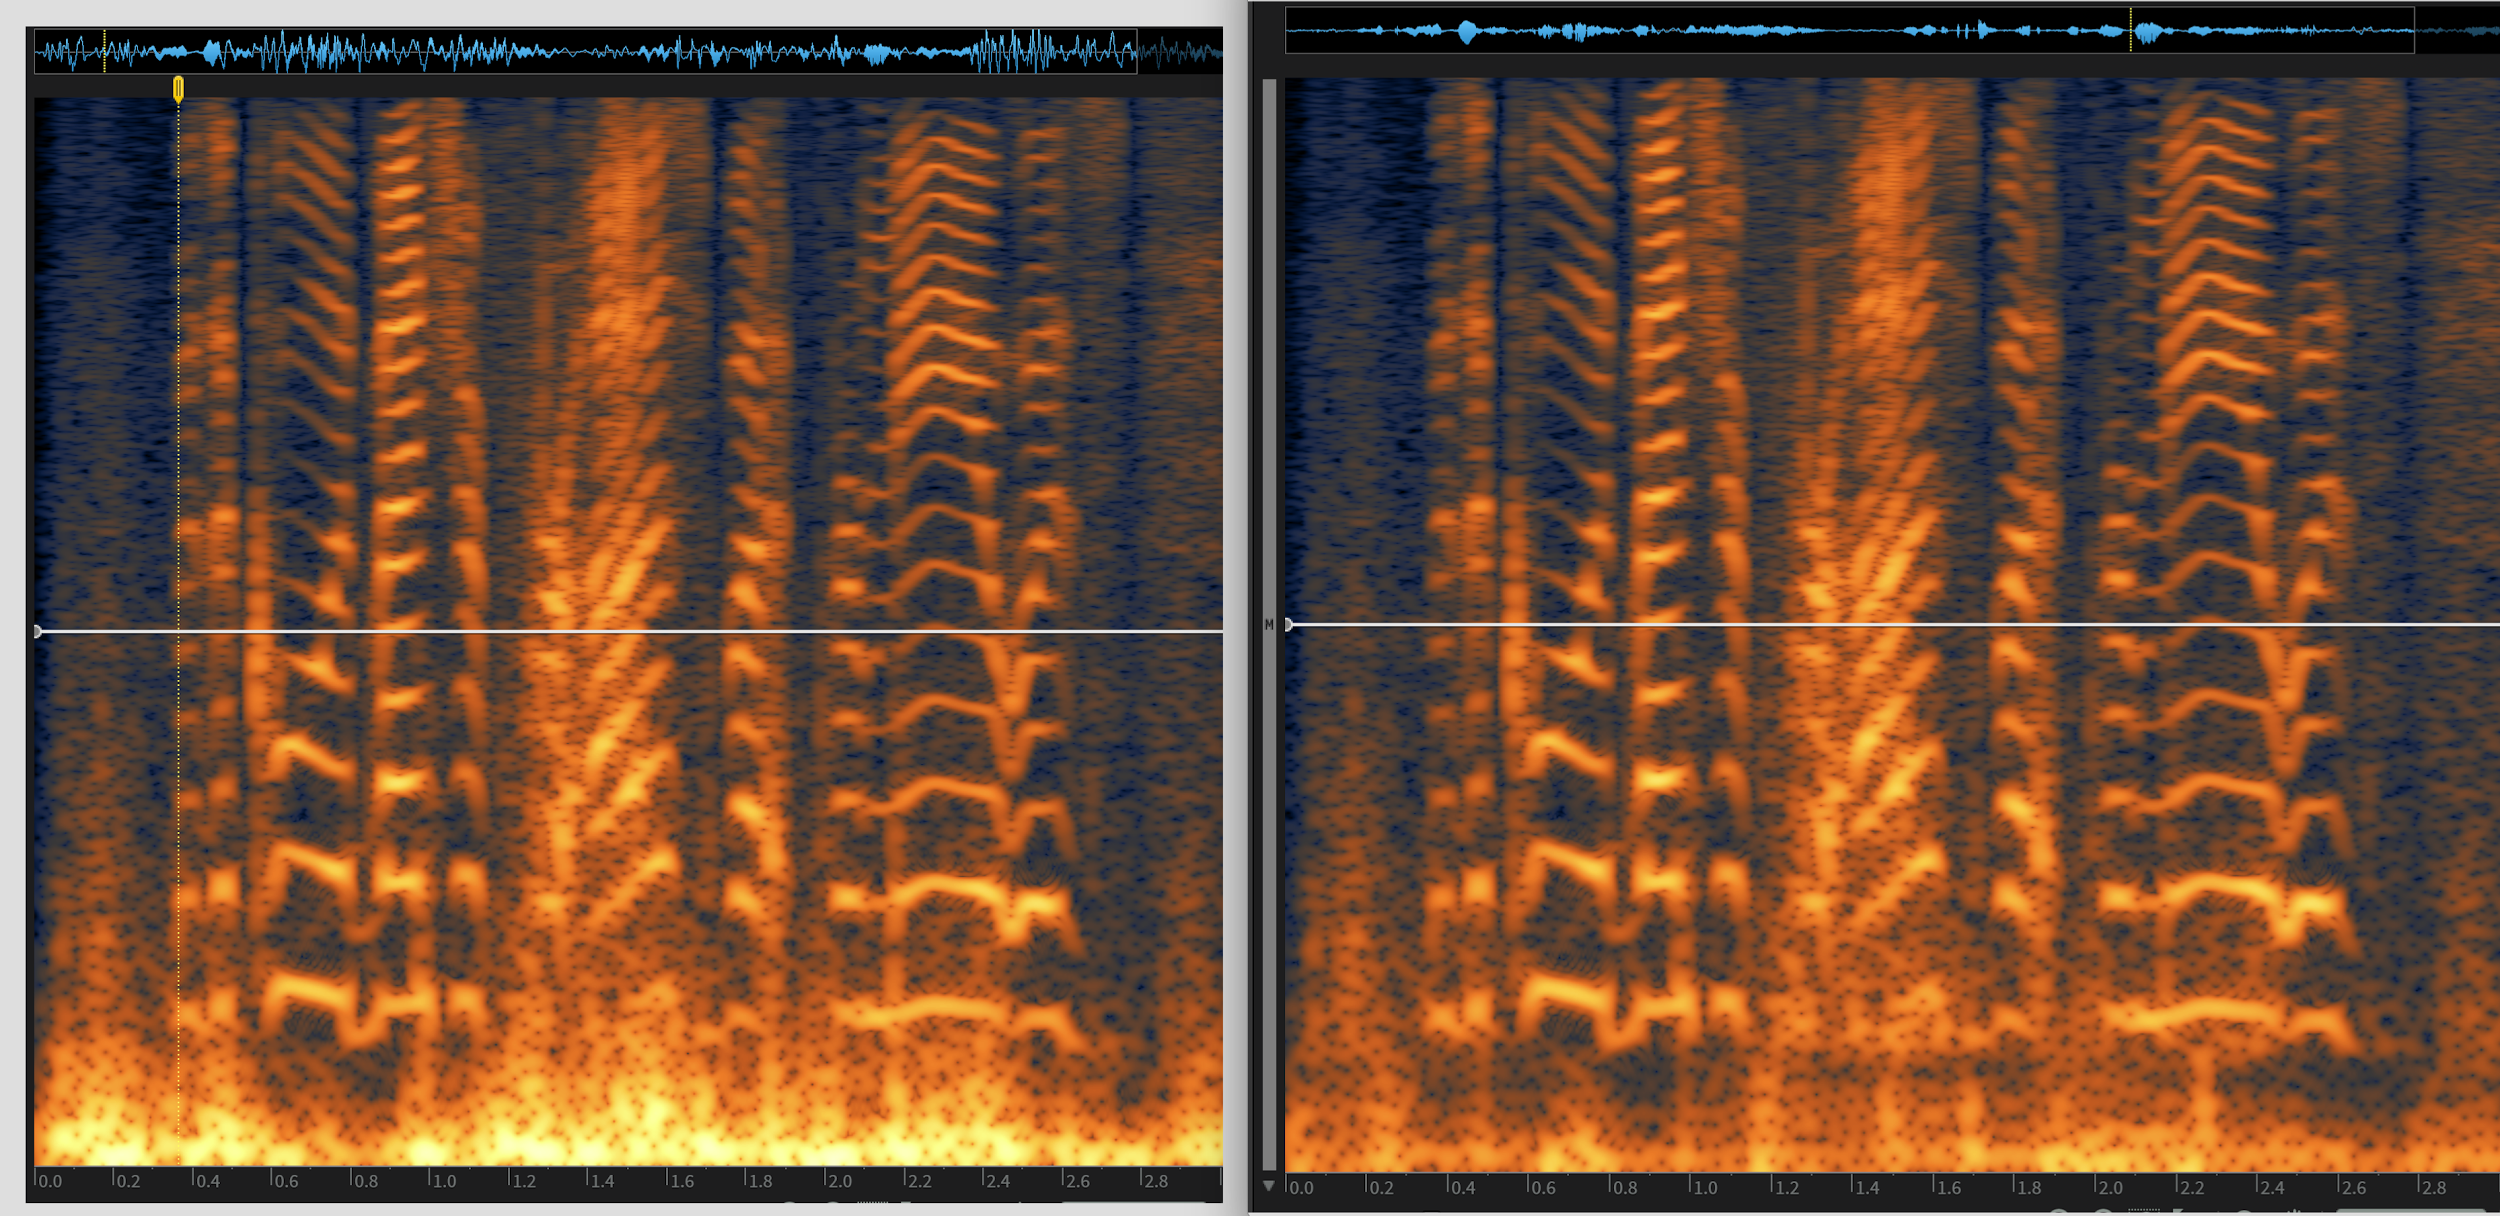
Here’s an example of a very basic dialog edit; The above track is edited while the grey track (lower) is how it was delivered by the picture editor.
Production dialog naturally has an audible noise floor (from background noise). For an exterior shot, this could be distant traffic or light wind; interior might be an air conditioner running or a refrigerator hum. Most dialog clips will need a fade in/fade out to make the ambience come in (or shift to another mic) more naturally. In the above example, there’s a small spot where a mic is missing. The dialog editor would need to “fill” that – in this case, the original audio in that area was fine so the region was extended to fill in the hole.
Towards the end of the clip (the 5th region), an edit was moved slightly to clean up a bad dialog edit in the middle of a word. At the very end, the original audio had something going on (a noise or start of a new word). That had to be edited to add a clean fade out using audio from earlier in the track.
Removing mics
This is a before and after look of two tracks of dialog. It’s two people with separate mics talking at close proximity. Even just looking at the regions (without listening) you can get a general idea of when one person (or both) are talking. Even though it looks obvious, it’s still a good idea to listen through each track to make sure you’re not removing anything important that’s hidden in the waveform (like a quiet word or laugh). In this example, the second region of dialog was fill added by a picture editor (or assistant) that came from another scene. That had to be replaced with fill that from this scene to match sonically. It may have sounded fine in the picture edit bay, but the ambience shift would have been really obvious to the mixer. Sometimes issues like that aren’t audible unless you’re listening with professional-quality headphones, studio monitors, or with a compressor on the dialog.
Dialog organization
There’s a lot of different ways to organize dialog and the style can change depending on a few factors (like the style of project or the mixer). For example, when working on reality tv shows (or documentary), I like working with two sets of tracks: interviews and in-scene dialog. A scene could switch many times between action (in-scene dialog) to an interview of someone talking about what’s happening. Here’s an example of that style:
Even though it’s the same person talking, it doesn’t make sense to have on the same track because it’s different locations, different mics (or mic placement), and the source mics probably have different levels.
That style of dialog editing may not work for a scripted film or tv show, though. It may make more sense to have 5-10 generic dialog tracks. Regardless of who’s mixing, you typically want to edit the same character/same mic on the same tracks through a scene. In this example, there’s 3 people (or three mics):
It’s possible that the character on DIA B will be on the track DIA C in the next scene.
There’s a lot of small details to dialog editing that will be specific to the mixer you are editing for; Below is the same audio but edited to another mixer’s preferences (no straight fades, longer fade ins/outs, switching between tracks A-B and C-D between scenes):
It’s always a good idea to speak with the mixer you’re editing for to get a sense for their preferences. Some mixers have 5 dialog tracks ready to go and others have 20. Some mixers only want a specific type of cross fade. It can help to see another project that was edited for that mixer, too. In essence, the dialog editor’s job is to make it easy and seamless for the mixer to import the dialog edit and start working as quickly as possible.
Removing sounds
It’s pretty much expected for a professional dialog editor to know how to do detailed audio clean up using corrective software or plugins (with functions like declick, decrackle, and hum removal). Detail work is the key; Broadband noise reduction (globally reducing noise) typically happens during the mix, not by the dialog editor.
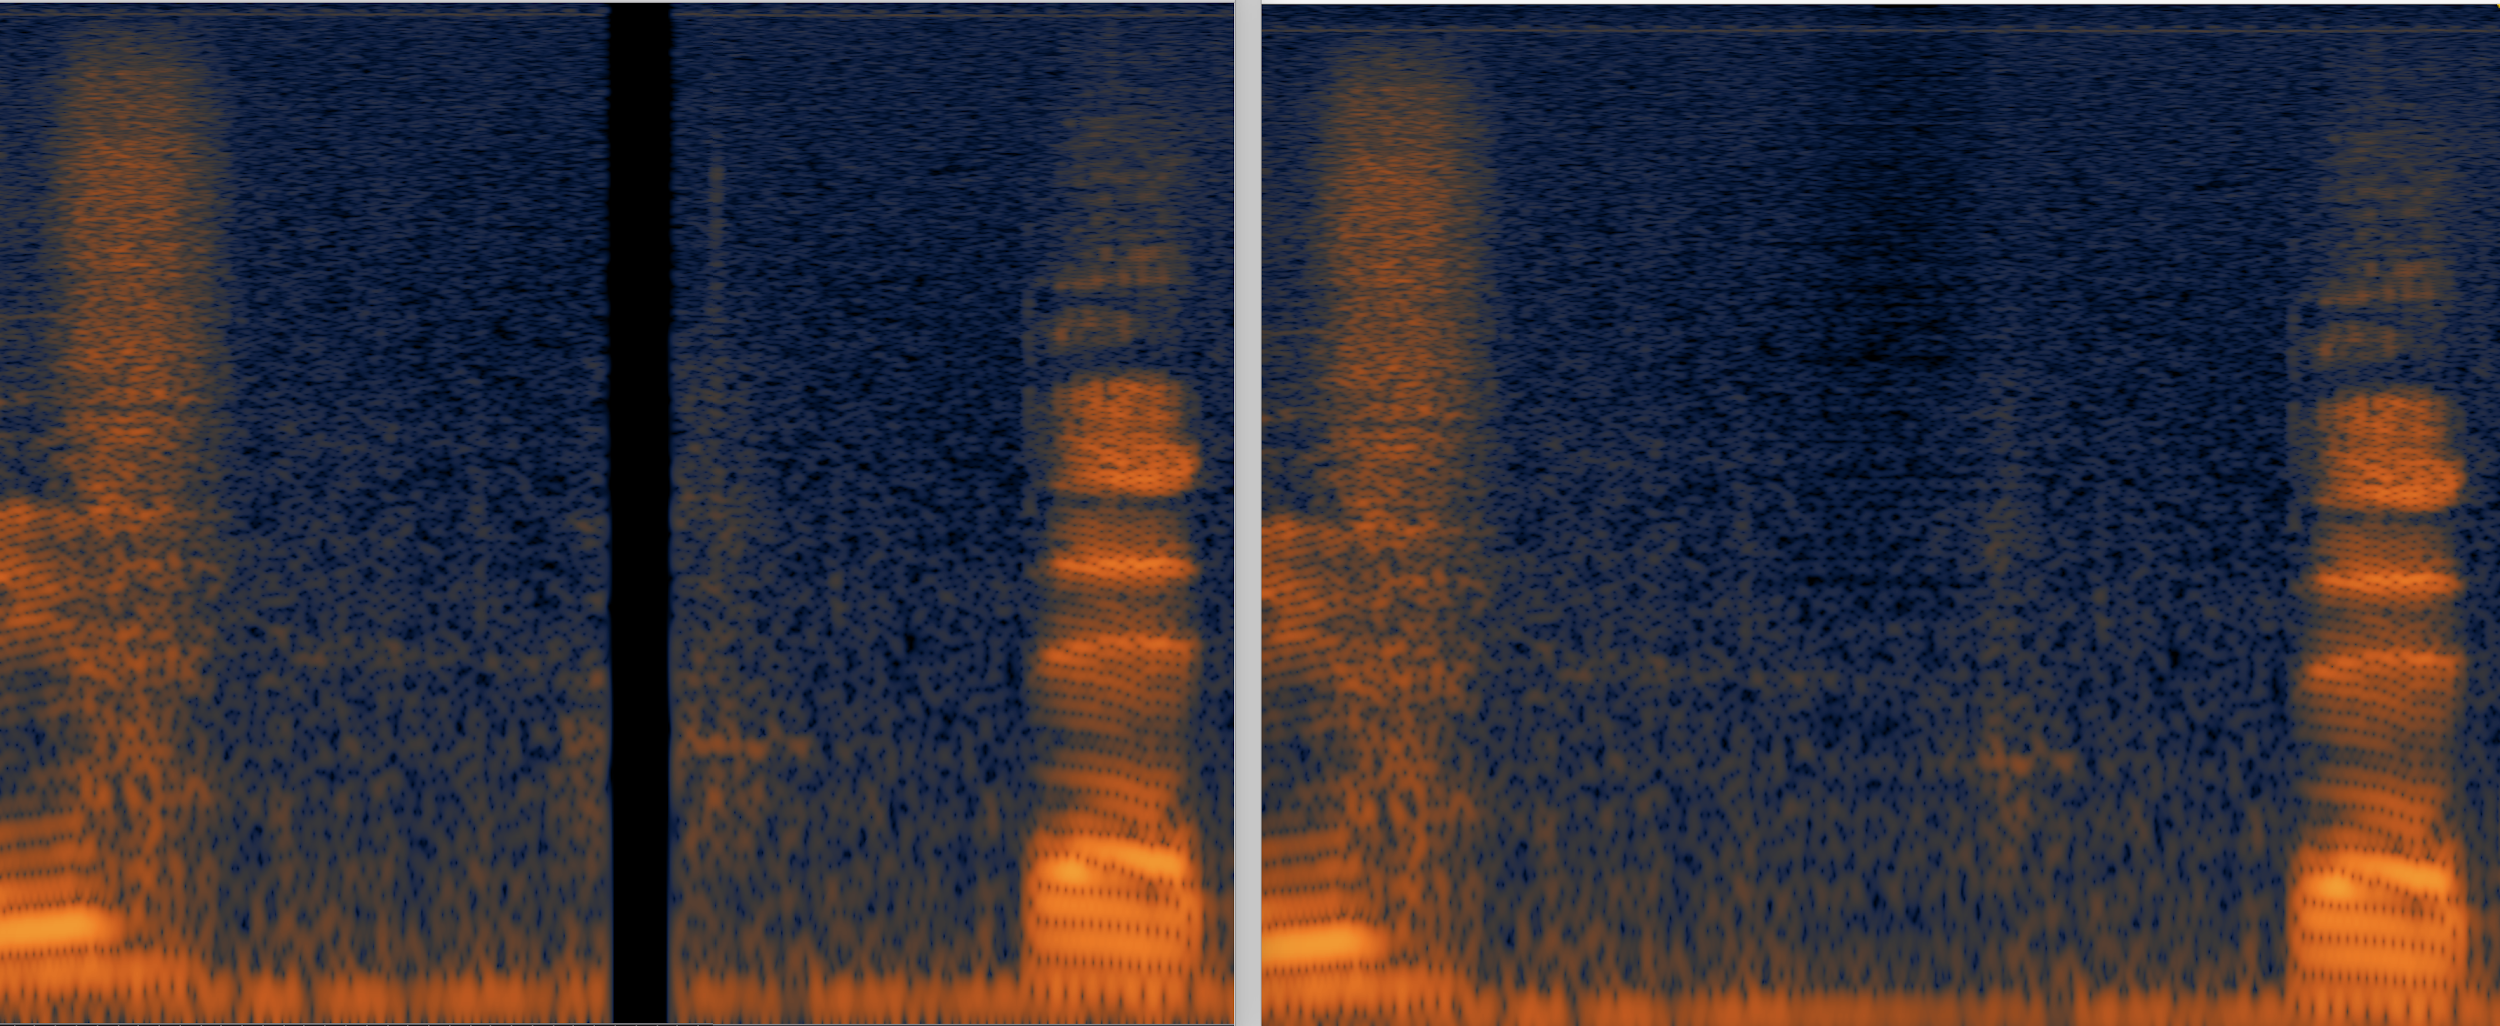
Izotope RX is commonly used software that dialog editors use to remove problem sounds. In the example below, there’s wind on the mic that’s causing rumble and clicks. The left side is the original audio; the right side is after it’s been treated by RX 5 (to remove low pops, de-plosives and declick):
The biggest change is in the low frequencies (seen as bright yellow in the left photo). What’s impressive is that it’s done without compromising the quality of the dialog. A mixer could achieve a similar result with a high pass filter but they would be completely losing low end information – which can cause a shift in ambience or negatively affect the sound of the voice.
Izotope can also repair mic dropouts, as seen in this before and after:
Tips for dialog editing
One trick that I use when dialog editing is to add EQ and compression (for my own reference) – basically to listen similarly to how the mixer will be. It may take some adjusting between scenes but the idea is to hear things that you may not catch otherwise. For example, some lavs sound very dull or boxy (especially if poorly placed). A lav might need 6 dB or more of a high end boost – significant enough to hear issues that went totally unnoticed before.
Sometimes it’s up to the dialog editor whether to cut a scene with lavs or booms (this is another discussion to have with your mixer; some people prefer one or to have both options in the cut). It can be hard to gauge which sounds better when one of the EQs is totally off (or levels are totally off). In addition to adding a temp EQ, it can help to adjust clip gain as you’re working. Ultimately this could help your mixer too (if they are using clip gain data when it comes time to mix).
Unused mics: There’s a couple ways to handle mics that aren’t needed. If there’s two mics on the same person and both sound pretty good, it’s ok to edit both and leave one unmuted and the other one muted. You could also make “X” tracks; “X1, X2, etc” and place any unused tracks on there. Your mixer may want these tracks or not (that’s another question to ask). It’s good to hang onto as much as possible in your own work session, either way. If a mixer later asks, “were there any other mics for this spot?” you can easily see how many mic options there were and can listen to the alts (so you can explain why you chose the way you did).
If you’re doing any processing (declicking, etc), it’s really important to keep a copy of the original somewhere accessible. Sometimes it’s muted on the track below or you can make a track labelled “unprocessed” (or something similar) so anyone can get back to the original, if needed. If it’s only a small portion of a region it may not be necessary to separate out. In general, you want to make it as quick and easy as possible for someone to hear the original (whether it’s on another track or pulling out a handle).
Headphones versus studio monitors: This is a personal preference, but I typically prefer headphones unless I’m working in a decent sounding room with monitors that I know and trust. It’s hard to hear rumble on a speaker that only has a 6 inch woofer, for example. If I’m working at a studio, I would rather edit on a mix stage than an edit bay (it’s not always possible but it’s really helpful if you have an option). Even better is to work in the mix room that the final mix will take place. The mic choices that you make in one room may sound very different in another – especially between a small edit room and a mix bay.
Advanced dialog editing
This has been a basic overview of dialog editing. There’s more advanced skills that come up such as:
Removing sound fx that naturally occur in production audio so they can be used in the M&E (foreign versions)
Creating fill that can be used for ADR, filling in holes, or used as transitions between mics
Adjusting mics for phase or sync issues
Conforming lav mics (from the source recording) when they aren’t included or cut by the editor
Who makes a good dialog editor?
Dialog editing is a good fit for people who like to work alone and is generally more independent and less stressful than mixing. You have to be detail-oriented and like problem-solving. It’s rewarding because it’s often a drastic change between where you started and what it sounds like when you’re done. It can be really challenging at times, too. As far as sound editing goes, it’s probably the most important job (because dialog is up front and center – literally).
Post-Production Basics – What is an OMF or AAF, and Why Does it Matter?
Post-Production Basics Part 1
One of the technical challenges in post-production is sharing media between video and audio. Here’s a basic overview of how it works.
Audio on the Picture Side
After a production shoot, video (from each camera) and all of the audio mics (captured to a recorder or the camera) are ingested/imported to a drive or server. Audio and video are then combined so the picture editor can see all camera angles and mics together in sync (and in phase). The picture editor then edits with that combined media in a video workstation, such as Avid Media Composer, Apple Final Cut, or Adobe Premiere. Some picture editors leave every mic in their sequence and others choose certain mics (like a line mix), leaving the remaining mics to be sorted through later in the process.
While the project is in editorial, the picture team (picture editor and assistant editors) are doing their own rough mix. They’re picking what mics to listen to, adding and editing music tracks, and adding temp sound fx and temp voice over. These choices aren’t final, but their work does act as a guide for the sound team.
Sometimes the music included is final and sometimes a composer is hired to write replacement music. If there’s a composer or music editor on the project, they will likely be involved during editorial. On low budget projects, the rest of the sound team is not involved during editorial (other than animation) unless it’s necessary for consulting or creative reasons. For big budget Hollywood films, sound editors, supervisors and mixers can be involved throughout.
After rounds of picture editing (and approvals), a final version of the picture will be “locked”. This means no further timing changes will be made and the project will be turned over to audio. There’s still changes happening on the video side (adding graphics, visual effects, color correction). When it’s all married back together, the timing should still line up exactly.
What is OMF/AAF?
Since we can’t open audio and video sessions with each other’s software (yet), there’s a couple file formats used to transfer audio between programs: OMF and AAF. The file extensions are .omf or .aaf.
To explain how it works, think about trying to move an audio session between two incompatible DAWs, like Protools to Logic or Logic to Cubase. OMF/AAF can be used to do this – it retains all of the region names, placement, length, handles (so you can still edit), volume data, clip gain, cross fades, fade ins/outs, pans, markers, and some fx. You lose plugins, but overall it’s a lot better than trying to place audio files by hand and redoing all the edits from scratch.
The difference between AAF and OMF is that AAF is a newer format and has some advancements (such as larger file sizes and more metadata). Not all video software can output AAFs, though. Technically, there are two types of OMF (OMF1 and OMF2). OMF1 is an older format and is rarely used anymore, so when the term “OMF” is used it generally means OMF2.
How to open an OMF (or AAF)
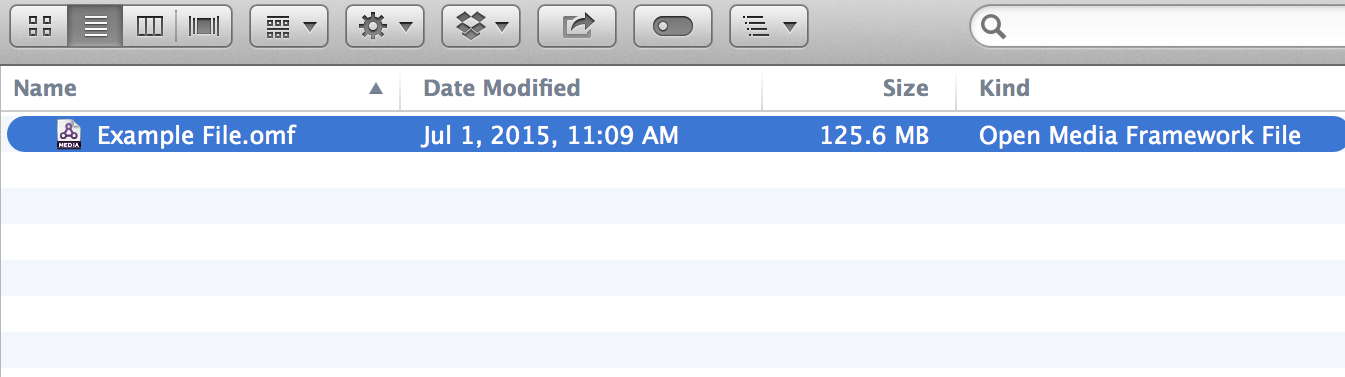
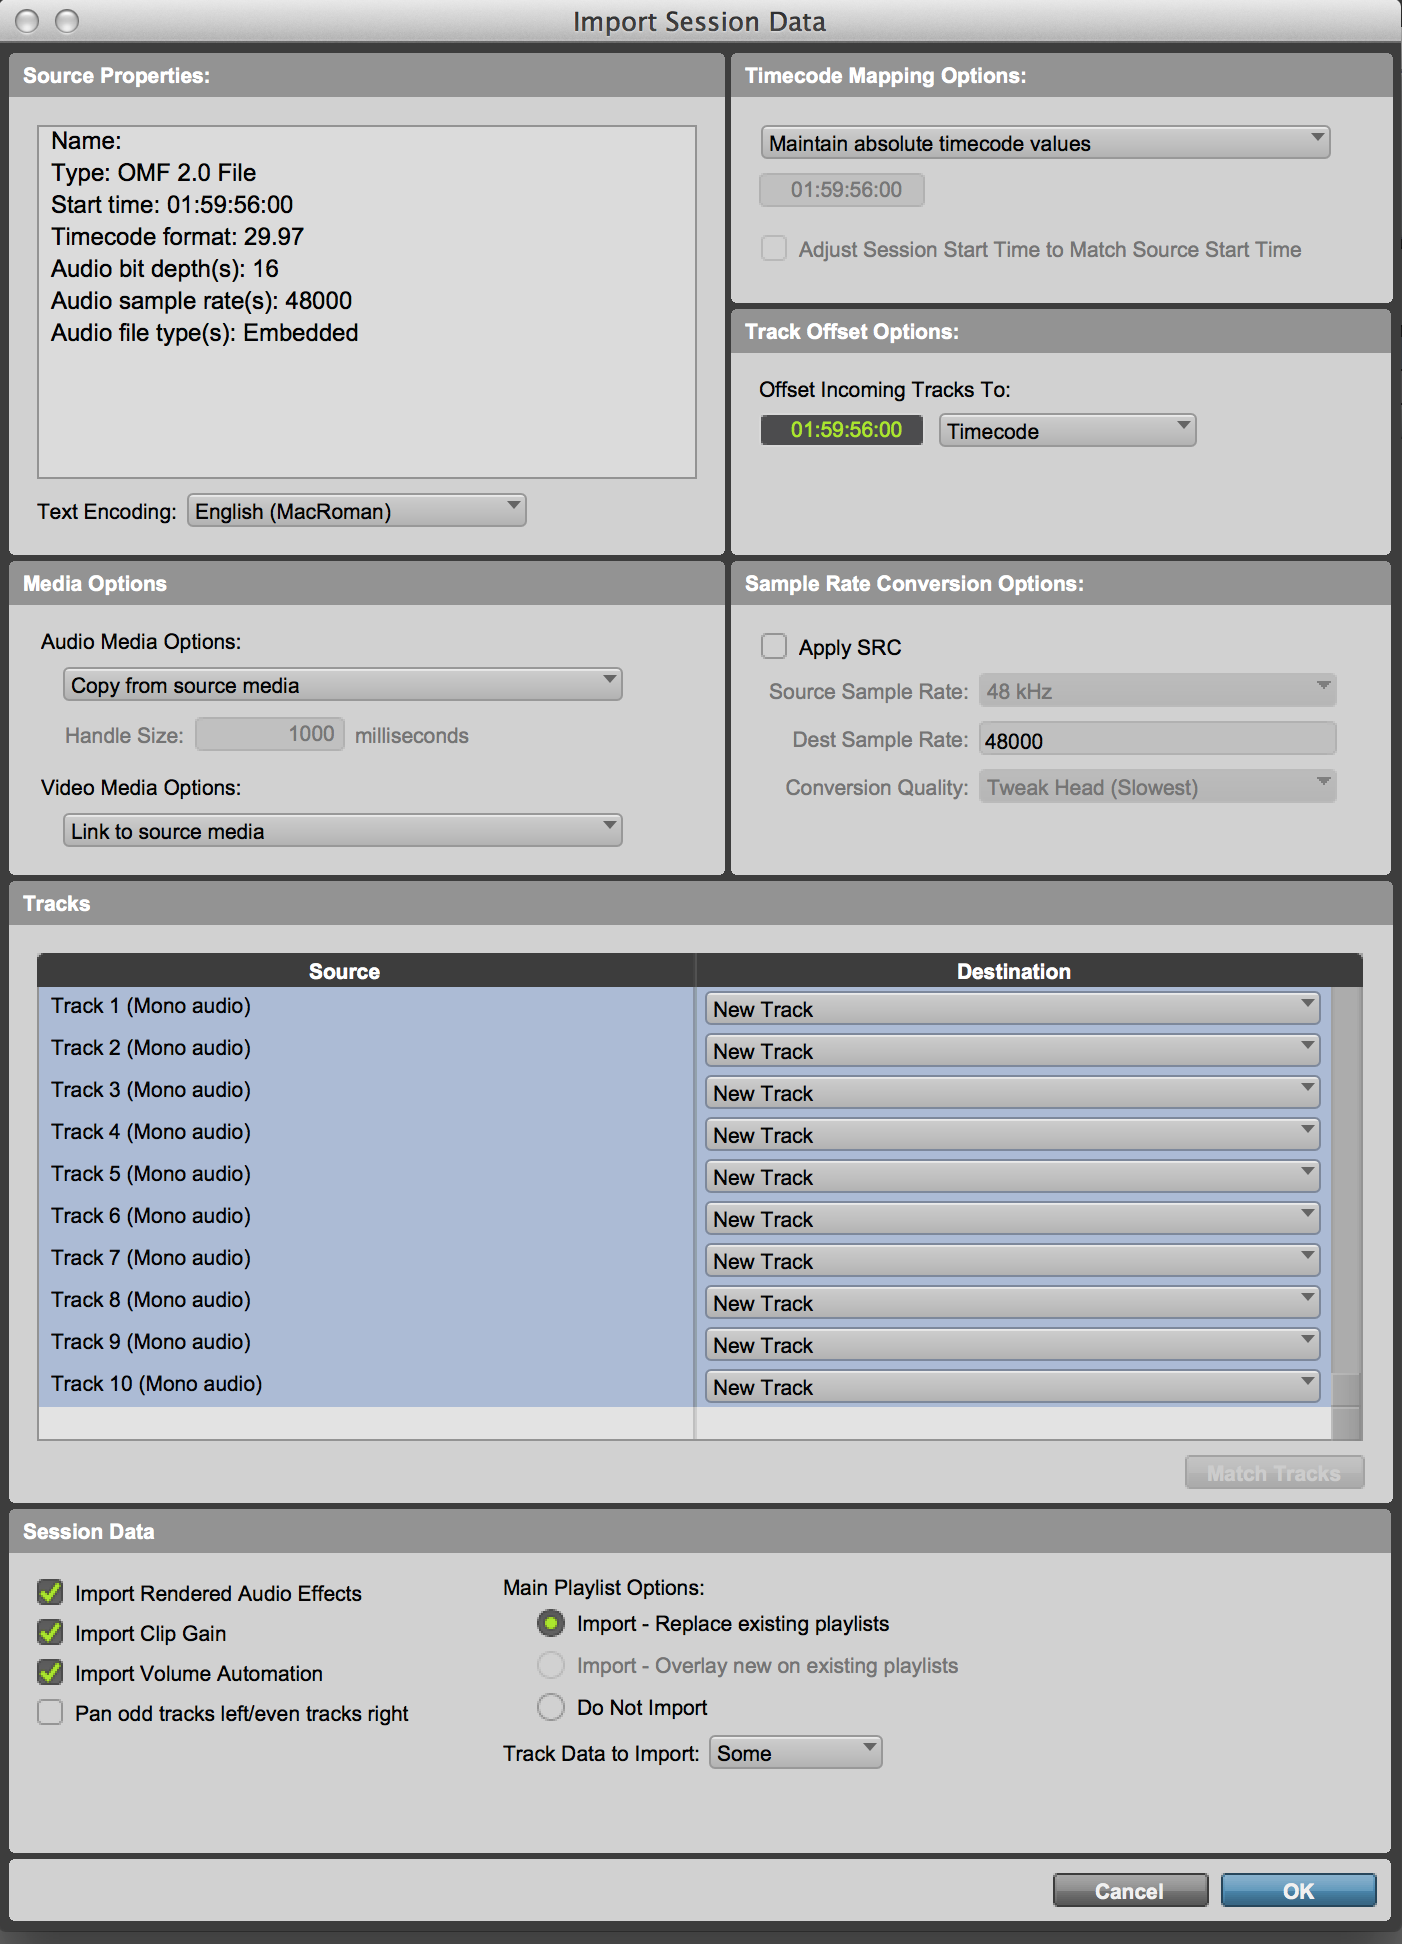
The picture editorial crew (usually an assistant editor) are responsible for outputting materials for audio, which are a reference video (Quicktime) and OMFs (or AAFs) of the locked sequence. When you open (or import) an OMF file with Protools, this is what you’ll see:
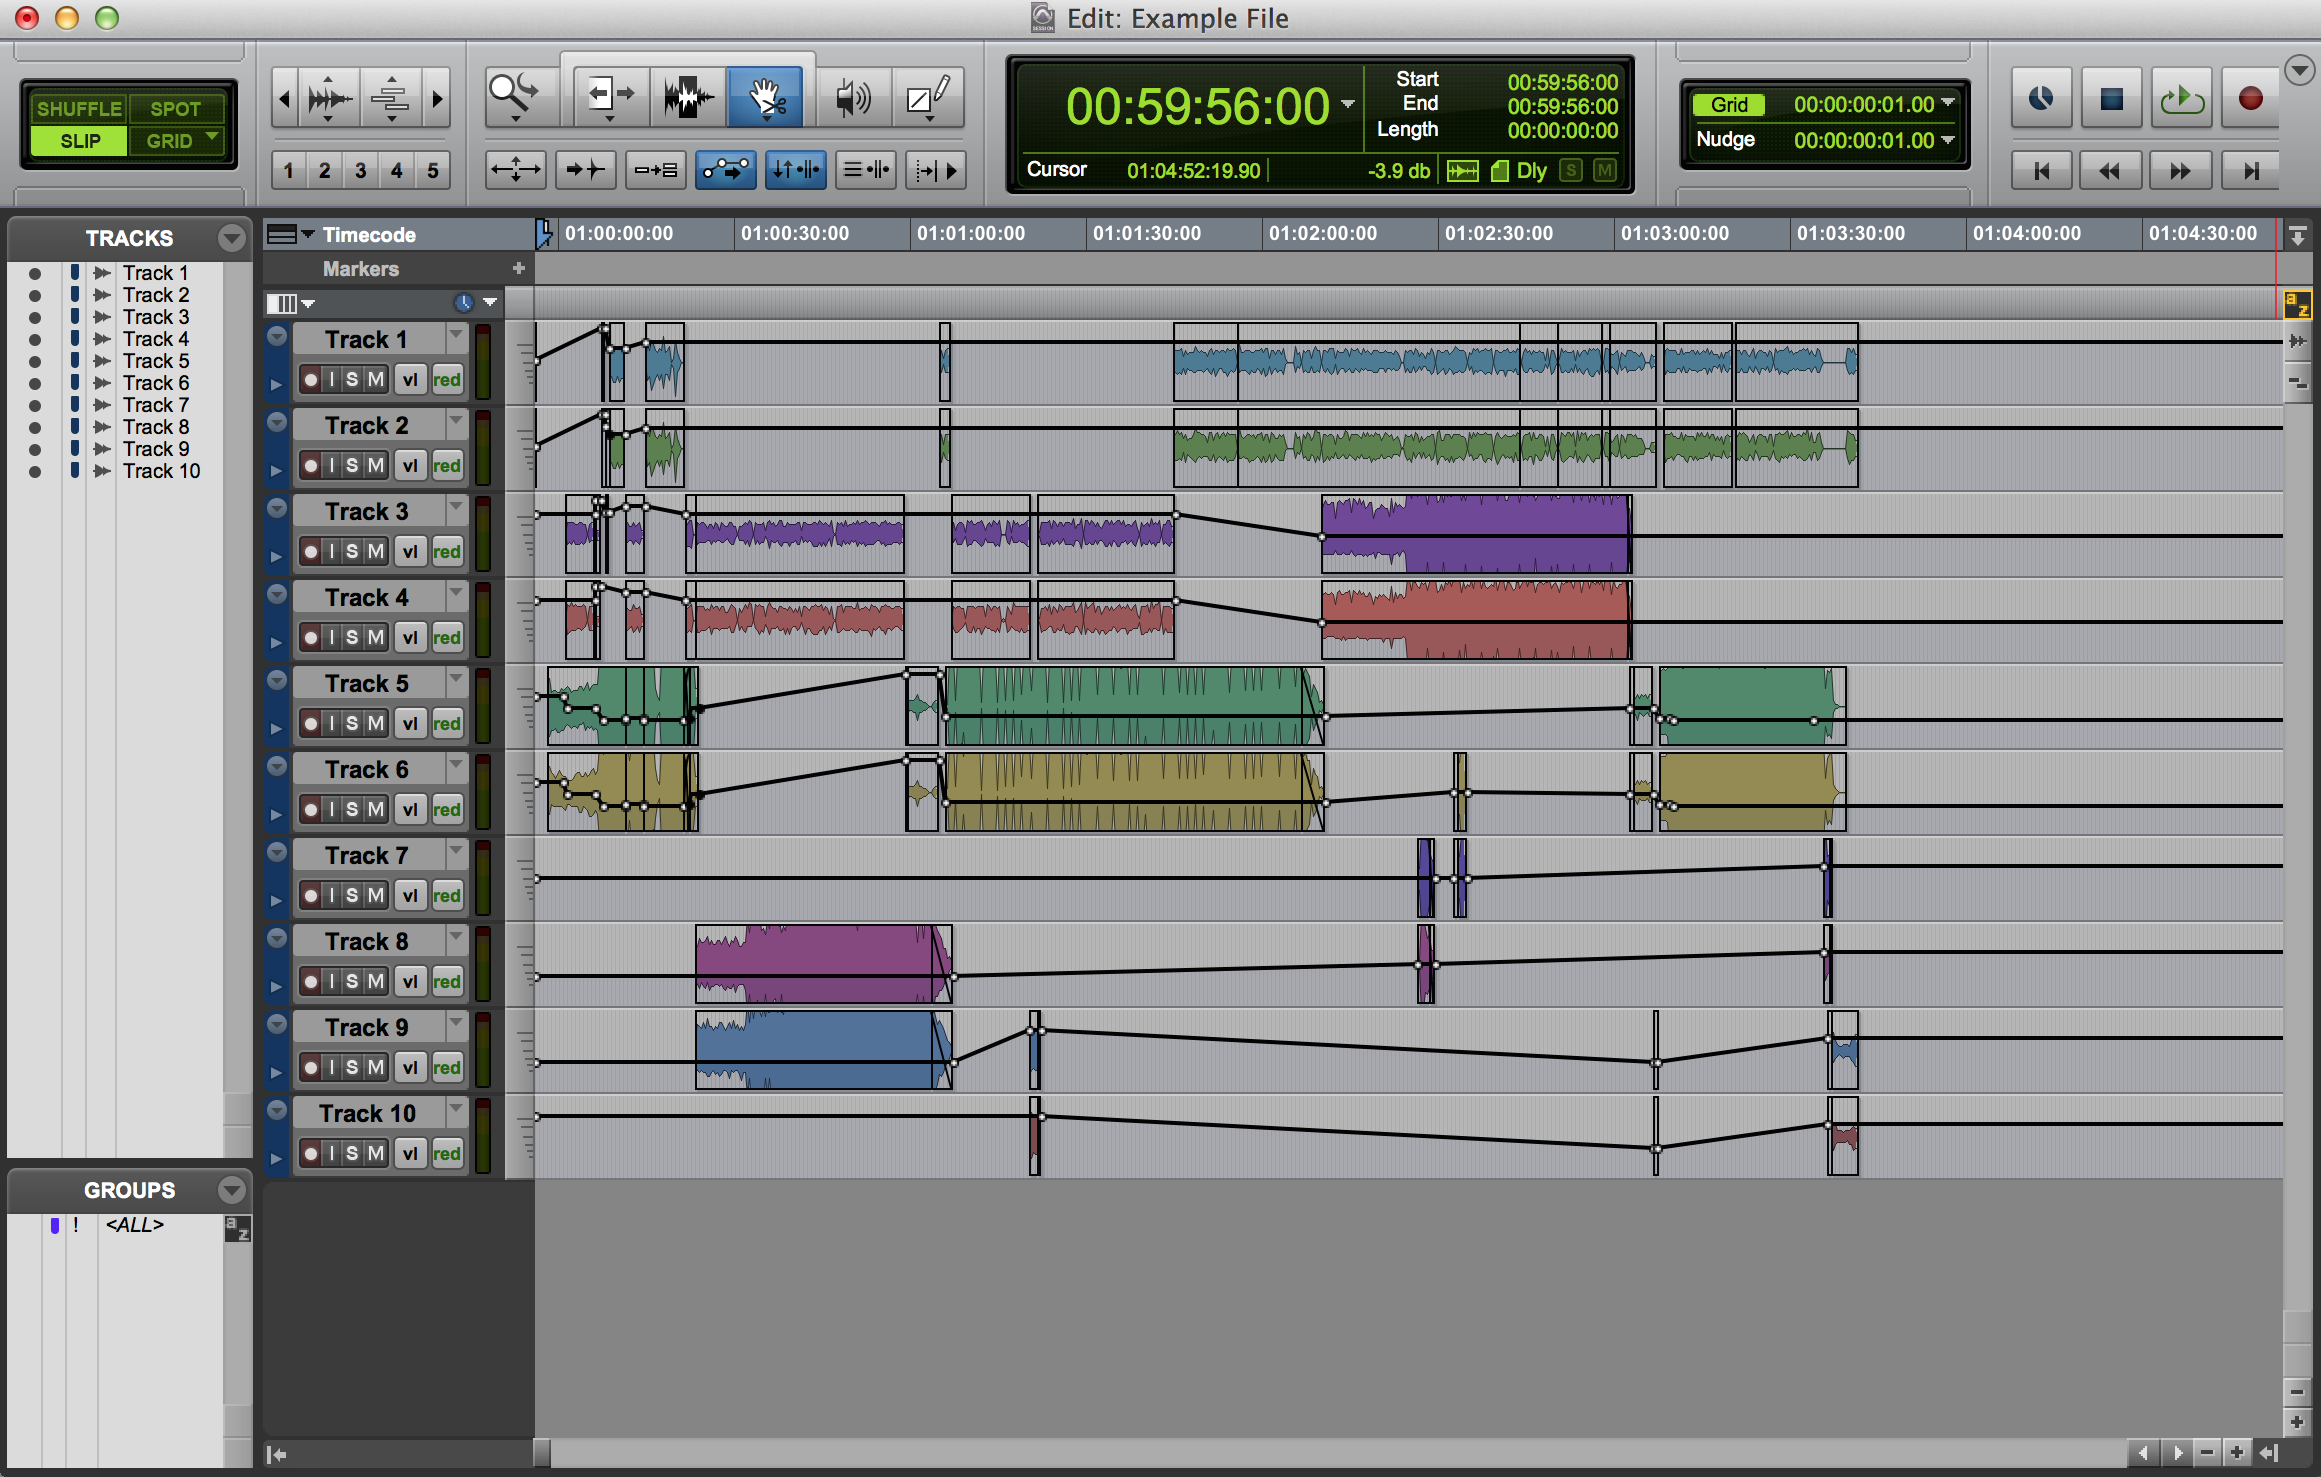
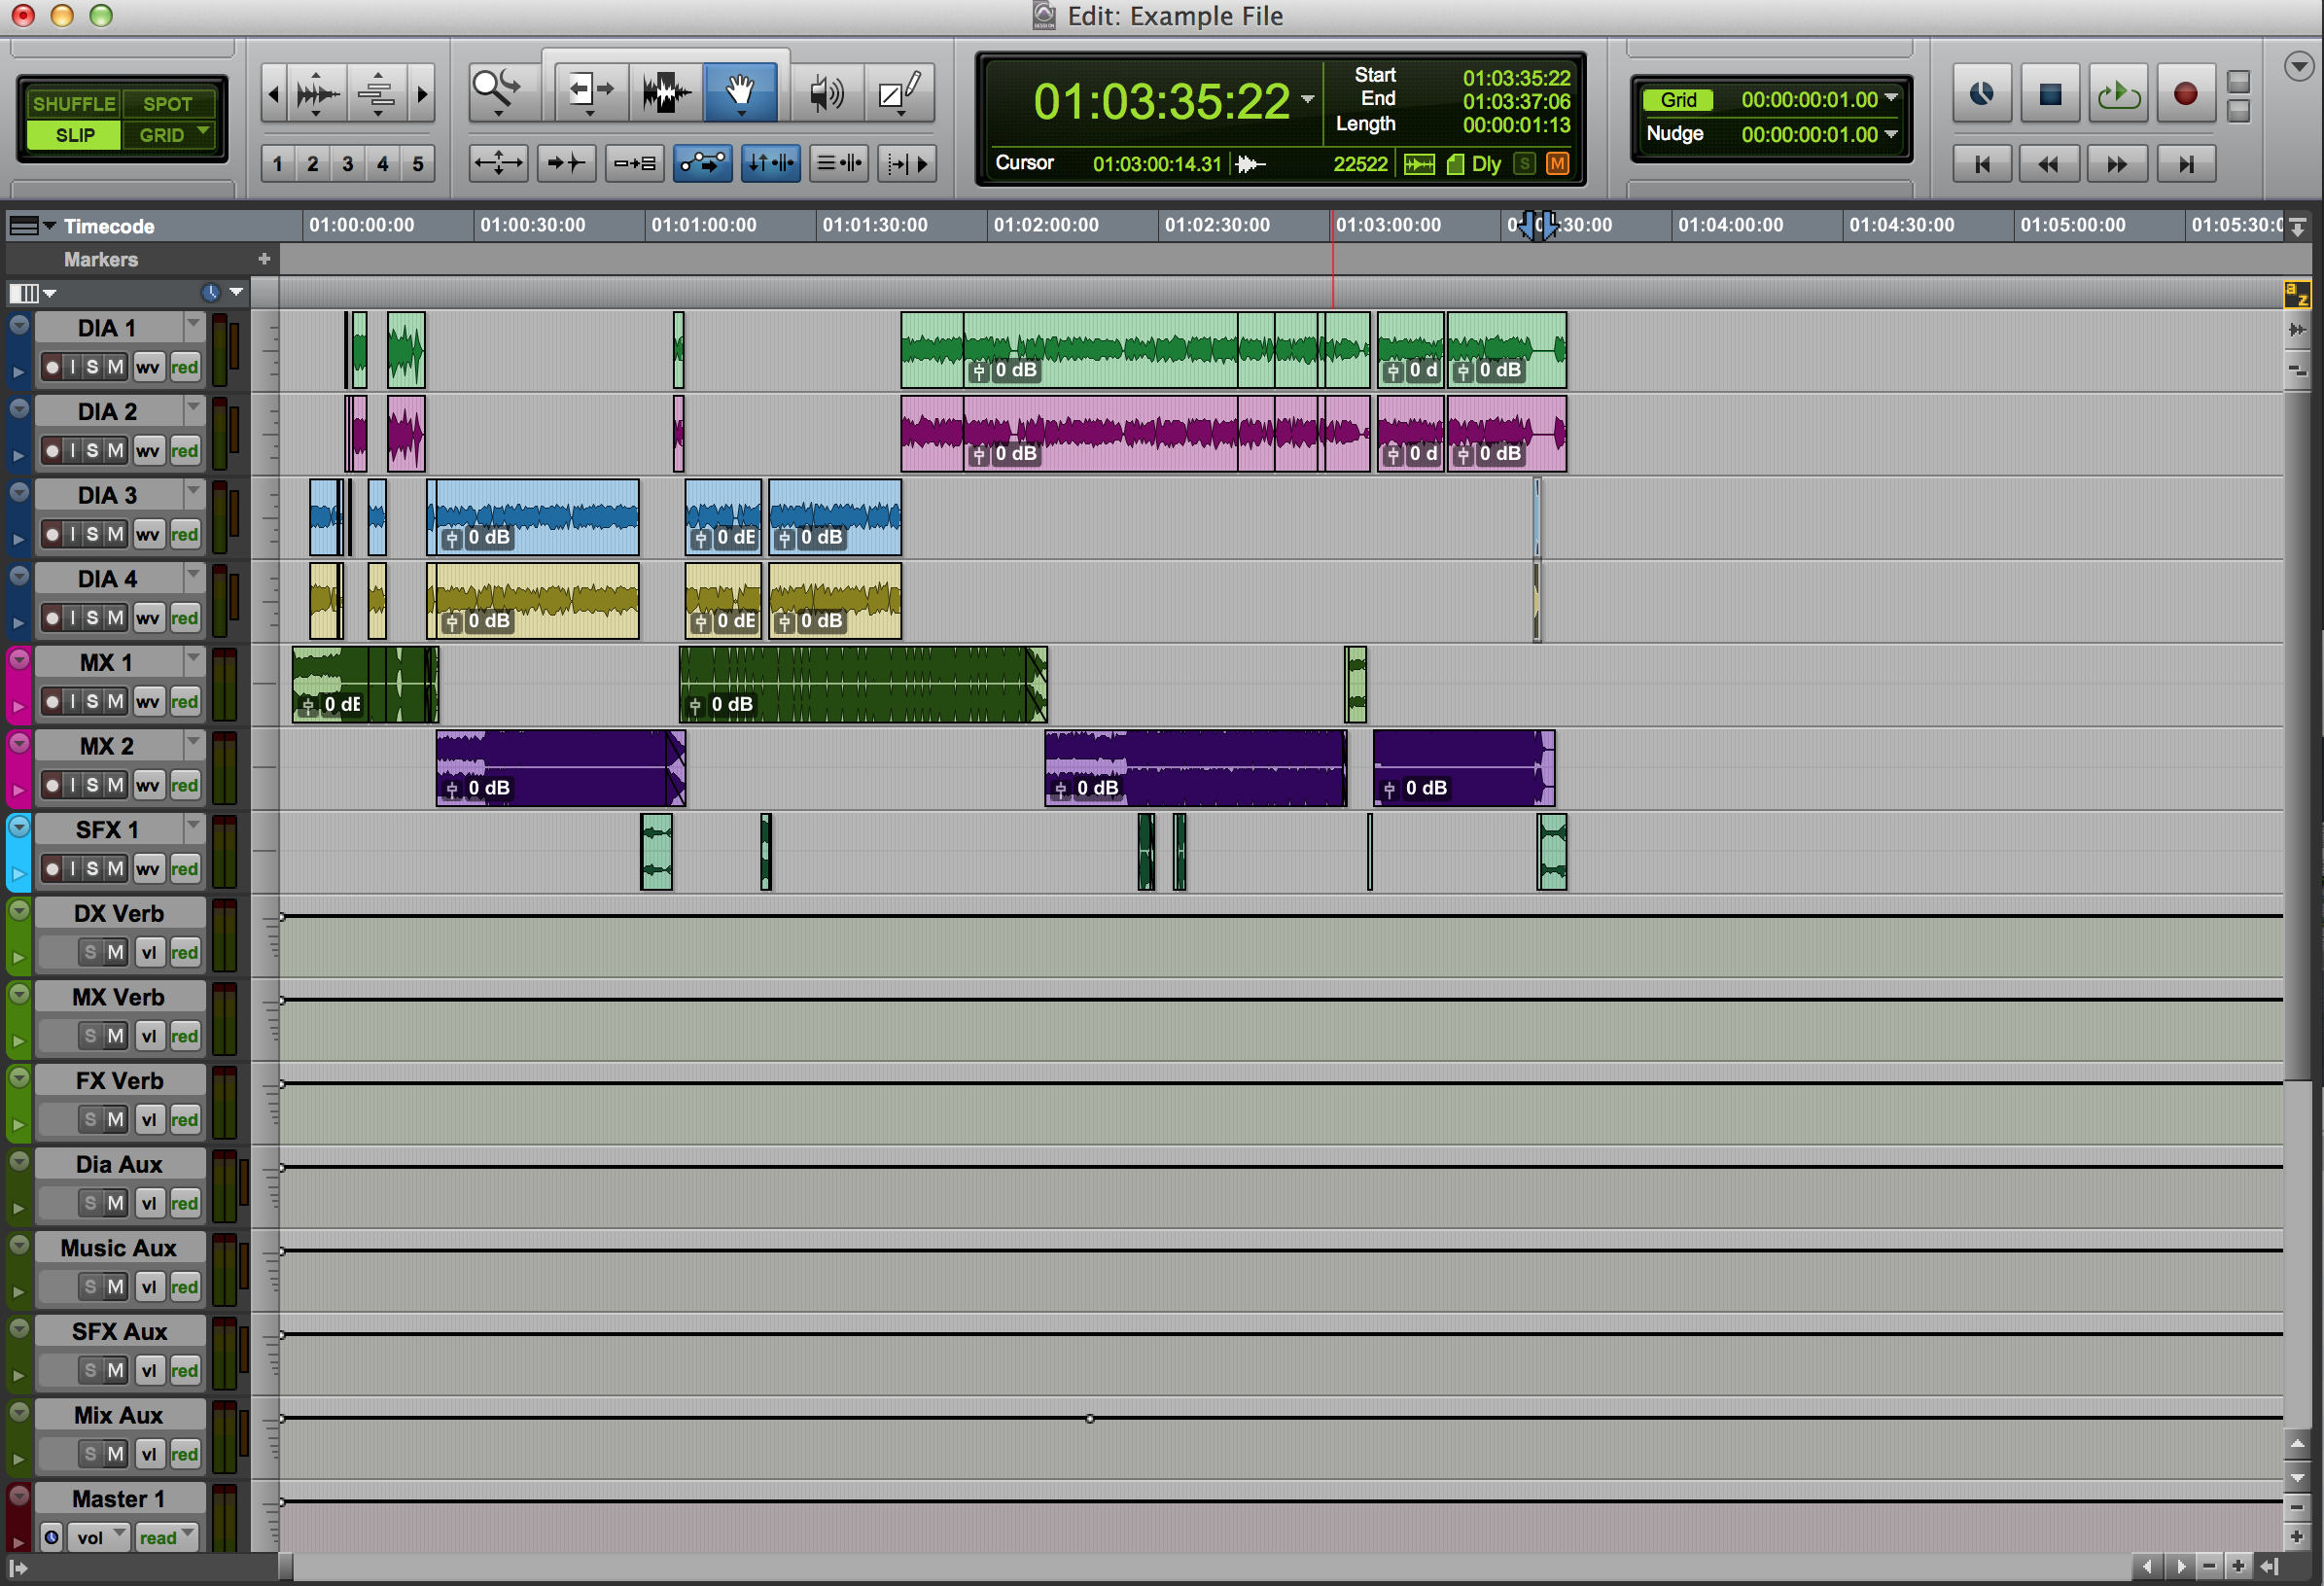
Once it’s opened, we’ll get to see how the picture editor had everything organized in Final Cut. In this case, he had all of the audio elements across 10 tracks. Here’s what the example OMF looks like opened in Protools (in volume view):
There’s no standard for how picture editors lay out audio in their sequences. Sometimes they don’t have time for much organization at all. In this OMF, all of the dialog is on tracks 1-4. Music is spread across tracks 3-9. Sound fx are on tracks 6-10. There’s a lot of overlap between elements. It’s not perfect, but the editor’s priority is to cut picture.
At this point, you would normally import picture to check if the OMF is in sync and if the two match in length. In this example, we are skipping this step.
Splitting an OMF
One of the first tasks after opening an OMF/AAF is to “split it out,” which means each region needs to be moved to an appropriately labeled track. It’s a good idea to make duplicate tracks before moving anything (these can be made inactive and hidden). Splitting is important for organization and also to have each element (dialog, sound fx, music) totally isolated from each other. After splitting out this session (listening to regions to verify where each should go), you can see that all of the dialog is now on tracks labelled DIA, music on MX tracks, and sound fx on SFX:
This is a pretty simple example, but it’s the same process with a bigger project. An OMF could be split into a template that already has dozens (or hundreds) of tracks, auxes, reverbs, output tracks, etc.
It’s important to do the split accurately for a few reasons. First, the sound editor(s) need the proper materials to work with. Often the work is divided between different sound editors (dialog editor, sound fx editor, music editor), so they may miss something if it’s not included in their tracks. It’s also important so when the mix is finished, the mixer can deliver or archive individual stems that are accurate (voiceover, dialog, music, sound fx, Foley). A good split can affect the foreign version, too. The music and sound fx stems combine to create an M&E. The M&E is used to dub a film or show into another language. There can’t be any native language on the M&E track – otherwise you’d end up with English words in the Spanish version of a film (for example).
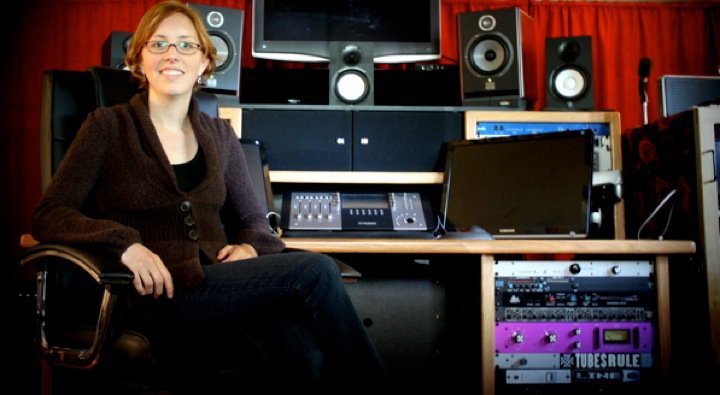
April Tucker is a re-recording mixer in post-production sound who currently works for FX Networks. She started her career in post-production in 2004 and has been doing freelance work since 2007. (more…)
X
We use cookies on our website to give you the most relevant experience by remembering your preferences and repeat visits. By clicking “Accept All”, you consent to the use of ALL the cookies. However, you may visit "Cookie Settings" to provide a controlled consent.
This website uses cookies to improve your experience while you navigate through the website. Out of these, the cookies that are categorized as necessary are stored on your browser as they are essential for the working of basic functionalities of the website. We also use third-party cookies that help us analyze and understand how you use this website. These cookies will be stored in your browser only with your consent. You also have the option to opt-out of these cookies. But opting out of some of these cookies may affect your browsing experience.
Necessary cookies are absolutely essential for the website to function properly. These cookies ensure basic functionalities and security features of the website, anonymously.
Cookie
Duration
Description
cookielawinfo-checkbox-analytics
11 months
This cookie is set by GDPR Cookie Consent plugin. The cookie is used to store the user consent for the cookies in the category "Analytics".
cookielawinfo-checkbox-functional
11 months
The cookie is set by GDPR cookie consent to record the user consent for the cookies in the category "Functional".
cookielawinfo-checkbox-functional
11 months
The cookie is set by GDPR cookie consent to record the user consent for the cookies in the category "Functional".
cookielawinfo-checkbox-necessary
11 months
This cookie is set by GDPR Cookie Consent plugin. The cookies is used to store the user consent for the cookies in the category "Necessary".
cookielawinfo-checkbox-others
11 months
This cookie is set by GDPR Cookie Consent plugin. The cookie is used to store the user consent for the cookies in the category "Other.
cookielawinfo-checkbox-performance
11 months
This cookie is set by GDPR Cookie Consent plugin. The cookie is used to store the user consent for the cookies in the category "Performance".
viewed_cookie_policy
11 months
The cookie is set by the GDPR Cookie Consent plugin and is used to store whether or not user has consented to the use of cookies. It does not store any personal data.
Functional cookies help to perform certain functionalities like sharing the content of the website on social media platforms, collect feedbacks, and other third-party features.
Performance cookies are used to understand and analyze the key performance indexes of the website which helps in delivering a better user experience for the visitors.
Analytical cookies are used to understand how visitors interact with the website. These cookies help provide information on metrics the number of visitors, bounce rate, traffic source, etc.
Advertisement cookies are used to provide visitors with relevant ads and marketing campaigns. These cookies track visitors across websites and collect information to provide customized ads.