Empowering the Next Generation of Women in Audio

Join Us

A Beginners Guide to Wireless Frequencies 

Learning about and using wireless equipment can be overwhelming – there are a lot of differences from traditional gear and rather importantly there are strict rules around using radio frequencies that vary from country to country.

How does wireless equipment work?


Wired microphones convert sound into an electrical signal. This is sent through the wire to the sound system. Wireless microphones, however, convert sound into radio signals. This signal is then sent from a transmitter to a receiver which sends it to the sound system. The transmitter is a device that converts the audio signal into a radio signal and broadcasts it through an antenna.

Transmitters are small clip-on packs or in the case of handheld wireless microphones, they are built into the design of the handle. All wireless transmitters generally use a 9-volt battery. The receiver is tuned to receive the radio waves from the transmitter and convert it back into an audio signal. This means that the output of the receiver is just like a traditional wired signal. The balanced audio signal from the receiver output is then connected via an XLR to a typical input in a sound system.

There are a few different kinds of antennae on receivers – single and diversity. Single antenna receivers have one receiving antenna and one tuner but these can be prone to dropping out or getting interruptions in the signal. Diversity receivers, however, perform better as they have two separate antennas and two separate tuners. This means the receiver will automatically choose the best of the two signals, sometimes using a blend of both. This reduces the chance of a drop out because the likelihood is high that one antenna will be receiving a clean signal.

What frequency should I use for my equipment?

This is one of the trickiest areas to cover with wireless equipment because it depends on a lot of factors. Some frequency bands work brilliantly for speech but not for music, and some bands are simply too small to fit in lots of audio channels for a larger group. Some are prone to interference due to being license-free, popular bands and it can be a minefield working out where to begin.

When deciding what band to use, firstly it is good to know that each performer/person that is using wireless in the same location needs to be using a different frequency. It’s good practice to set up the receiver with a blank channel in between or a spacing of 0.25Hz increments on the receiver. Secondly, it’s important to know which spectrum band is suitable and legal to use for your venue – this will depend on the number of wireless devices you’re using, where you are in the world, and if you are moving around or touring with the same equipment. Wireless devices include “low power auxiliary station” equipment such as IEMs, wireless audio instrument links, and wireless cueing equipment, which all have the same rules as wireless microphones. Though not fully extensive, a guide to the available frequency rules of most countries can be found at Frequencies for wireless microphones

There are different areas of the radio frequency spectrum that we are allowed to use for wireless equipment but some are more suitable and better than others, and these are constantly changing, which makes it a hot topic for discussion. It’s useful to remember that the frequency spectrum works in the same way as physical space, in that it has a finite amount of room to be shared. The company Shure has strong concerns, particularly about the ever-decreasing UHF band in the Netherlands and has set up a site to raise awareness at www.losingyourvoice.co.uk


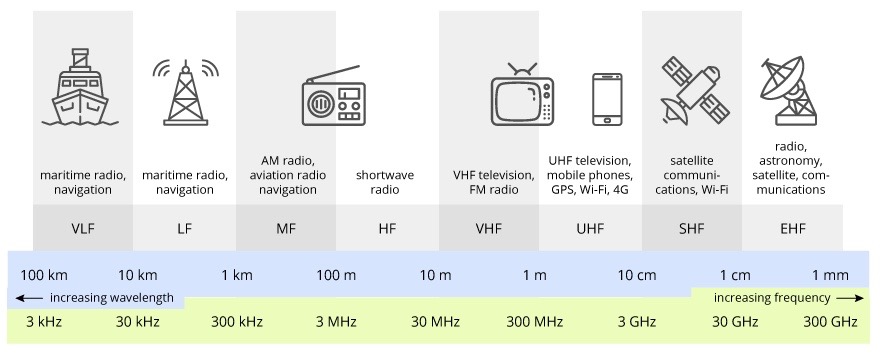
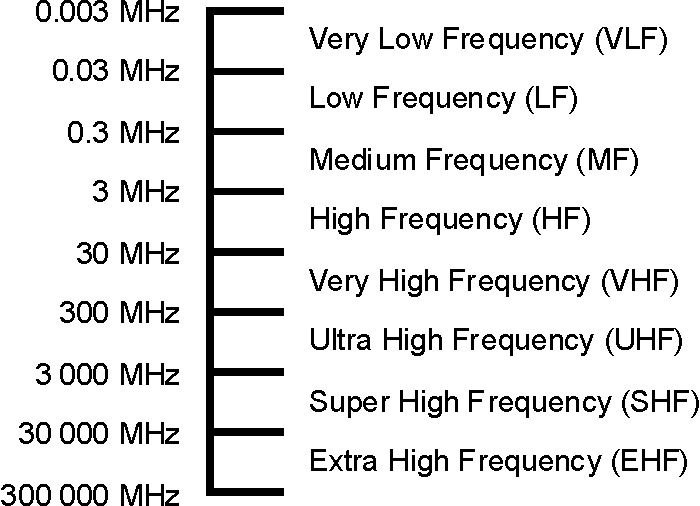
The UHF band is the preferred spectrum for wireless equipment however this is getting smaller for wireless use all the time. Ultra-high frequency (UHF) is the ITU designation for radio frequencies in the range between 300 megahertz (MHz) and 3 gigahertz (GHz), also known as the decimetre band as the wavelengths range from one meter to one-tenth of a metre (one decimetre).

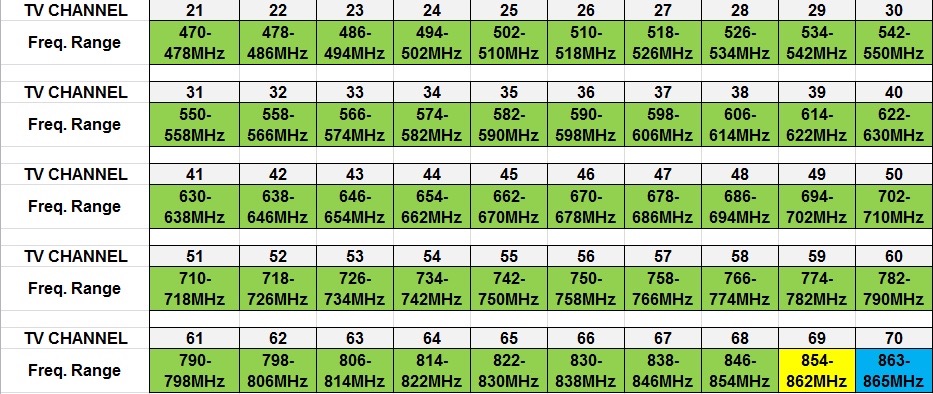
Most places including the UK and the USA have overhauled their UHF frequency ranges in recent years due to the digitisation of television, freeing up the old analogue frequencies. Originally analogue television transmitted in the 400-800MHz range had been separated into 8MHz “channels” and these refer to a particular frequency range.

Channel 38 is the spectrum of 606.5 – 613.5MHz and is a popular choice in the UK. Governing body Ofcom requires customers to purchase a yearly UHF UK Wireless Microphone Licence to use Channel 38. A flexible license means that owners are allowed to use radio microphone systems in any location. Channel 38 is a shared space and is large enough for 12 radio microphone systems, however, the downside is that if wireless equipment is tuned to the alternative Channel 70 it cannot then return to Channel 38.

Channel 70 is the band of 863 – 865MHz and this is free to use for radio microphone equipment in the UK. This spectrum is so small that it can be difficult to fit many systems into this space. Additionally, if other users nearby are also trying to use this space it can cause interference. Another issue with Channel 70 is that there is no “buffer” range at the lower end as 4G transmission lives immediately below 863MHz which can cause interference.

The band of what used to be Channel 69 (833-862MHz) is illegal to use since its’ digital auctioning in 2013 and it was replaced with Channel 38 for wireless equipment. Because of these challenges, Channel 70 may not be the best solution for larger setups requiring more space.

In the USA there are similar changes coming into place courtesy of the FCC which is the US governing body. The latest changes include the bands 617 – 652 and 663 – 698MHz which will be banned from wireless use as of July 13 2020. The move away from the 600MHz band is due to channels 38-51 in this spectrum being auctioned to television stations. This means that after July 2020 the available frequencies for wireless will include some frequencies on TV channels 2-36 below 608MHz, 614 – 616MHz, 653 – 657MHz, and 657 – 663MHz. Though this may seem like a current transition, this has been in progress for some time – the use of band 698 – 806MHz has been prohibited by the FCC since 2010 as this was repurposed for licensed commercial wireless services and public-safety networks.

What other frequency options am I allowed to use if the UHF range isn’t right for me?

Again, the list of available space is specific to each country, license and equipment tuning limitations however utilising either side of the UHF range can work, with the VHF (very high frequency) spectrum often making a good and practical backup solution.

The VHF band is classed as 30 – 300MHz, with a differentiation given between low and high VHF:

“Low-band VHF range of 49 MHz includes transmission of wireless microphones, cordless phones, radio controlled toys and more. A slightly higher VHF range of 54-72 MHz operates television channels 2-4, as well as wireless systems defined as “assistive listening.” VHF frequencies 76-88 MHz operate channels 5 and 6.

Band III is the name of the range of radio frequencies within the very high frequency (VHF) part of the electromagnetic spectrum from 174 to 240 megahertz (MHz). It is primarily used for radio and television broadcasting. It is also called high-band VHF, in contrast to Bands I and II.”

The Shure website explains the pro points of using the high-band VHF range, saying:

“The high-band VHF range is the most widely used for professional applications, and in which quality wireless microphone systems are available at a variety of prices. In the U.S., the high-band VHF range is divided into two bands available to wireless microphone users. The first band, from 169 – 172 MHz, includes eight specific frequencies designated by the FCC for wireless microphone use by the general public. These frequencies are often referred to as “traveling frequencies,” because they can theoretically be used throughout the U.S. without concern for interference from broadcast television. Legal limits of deviation (up to 12 kHz) allow high-quality audio transmission.”

Other than the UHF and VHF bands, if we look to the higher end of the spectrum the WiFi frequency range at 2.4GHz is another option, however, this also has its limitations due to it being a small shared space and the fact that a lot of WiFi networks in the area can cause interference.

So what does this mean in practical terms to get started?

If you are purchasing new wireless equipment it’s very important to understand its limitations in what frequencies you will be working with at any given venue, and this is multiplied tenfold if you intend to travel with the same equipment. Many modern receivers do not allow the tuning options to change ranges once they have been set – as previously mentioned, the UK channels 38 and 70 cannot be swapped once they have been tuned, and similarly, radio microphones that can tune to Channel 38 will not tune to the “Duplex Gap” of 823 – 832MHz or the shared space of 1785 – 1805MHz. This means that equipment needs have to be very well researched prior to purchasing and that pre-loved second-hand gear will need extra investigation for this reason.

What are the power restrictions for my wireless equipment? 

As a general rule the power must not be in excess of 50 milliwatts when operating in the television bands, and no more than 20 milliwatts when operating in the 600MHz band or the Duplex Gap.

So to recap what questions should I ask first to get setup?

To get started with wireless equipment the key starting questions are:

While it may seem like a lot of questions to ask and elements to consider, most wireless manufacturers will state the capabilities and limitations of their equipment, and keep you up to date with changes that may affect its’ use. With a bit of research and preparation, it’s possible to find wireless equipment to meet a variety of audio needs and budgets, that works within the law and sounds great wherever you may be.
 

The Bad Buzz: Finding and Fixing Unwanted Noise

Of all the irritating things that happen when you’re rushing to finish a soundcheck, an unwanted buzz coming through the PA system is one of the worst. There are so many possible culprits, and it seems to happen all the time. Since it’s such a common issue, I wanted to walk through the process I use to find and eliminate unwanted noise, in an attempt to make troubleshooting less stressful.

Finding the Source

To begin, determine whether the buzz is coming from the audio system or something onstage by turning off the PA and monitors. If there’s silence, you know the problem is within the system itself. Turn them both back on and mute the PA system: do you still hear the buzz in the monitors? Use this information to narrow your focus area. If the buzz is solely in the monitors, for example, then you know to examine the channels and equipment that are being sent to the monitors only (such as a click track), and can consider the possibility of a bad channel on the monitor board.

Most likely the buzz is caused by a specific input. If it is unclear from the meters which channel is noisy, mute your inputs one by one until the noise stops. (If you are running monitors from front-of-house, make sure your aux sends are post-fader so that the send is muted along with the channel). Check for a bad channel on the board by hard patching the noisy input to another channel. If the buzz persists, check for a bad channel in the signal path by changing inputs on any snakes or sub snakes in use. Listen for any crackling, pops, or other giveaways that there may be a bad microphone or cable.

Most importantly, talk to the musicians! Ask them to stay quiet while you are troubleshooting and ask about their gear – they will be able to tell you any problems they have experienced at past gigs, and maybe even what solutions have worked.

Troubleshooting the System 

If the buzz is system-only, the issue is probably power. Check where everyone onstage is pulling power from and whether or not the circuit is used exclusively as audio power. Ideally, backline power will be on a circuit used only for the musicians’ gear, but often at smaller venues lighting and audio share power. Lighting dimmers, movers and fans may be audible if power is shared, so see if the buzz changes as lighting dimmers are moved. It may disappear when the lights are at 100%. In this case, there’s not much you can do besides try to reconfigure the power to be as separated as possible.

Next, check for cable crossing. Look at the paths of unbalanced cables. Do they cross paths or run along any cables carrying AC power? Electrical interference often arises when AC cables are in close proximity to unbalanced cables (for example, pedalboard cables), so it’s best to keep them as separated as possible.

There can also be grounding issues at play. If the hum sounds like it’s around 60 Hz, you probably have what’s called a ground loop. Ground loops occur when the ground connections from two or more separate sources (say, the system power and amplifier power) differ. Ideally, both pieces of equipment reference ground at 0 Volts. But nothing is ideal in real life, so it’s more likely that the ground readings differ slightly: say, 10 millivolts and 0 Volts. When this happens, the difference in electric potential can cause a small current loop that flows between the two connections, resulting in noise.

Here the quickest fix is to lift the ground switch on the channel or amplifier (if there is one) or use an adapter that accomplishes the same thing. But this workaround is not ideal since it removes a safety feature. Having the guitarist move around and angle the pickups differently may be enough to get rid of or at least lessen the hum.

Troubleshooting the Stage

If the noise is coming from one of the pieces of equipment on the stage itself, turn the PA system off and start with the simplest case. Here we’ll use the signal flow of a guitar as an example.

To begin, have the guitarist set their amp to clean. Have them unplug and re-plug their instrument cable at both ends – sometimes the problem is as simple as one end of the cable not being completely connected.

Next, have the guitarist plug directly into the amp, bypassing any pedals. Ask the guitarist to move around onstage, to see if the noise changes with location. If so, environmental noise is probably being picked up by the instrument cable, and there should be a spot on stage where the sound minimizes or even disappears altogether.

Connect pedals one by one and see if the buzz reappears with a specific pedal. Plug the guitarist directly into a DI box, and see if the hum disappears with the ground-lift switch flipped. If so, then you know it’s a grounding problem, with either a ground loop in place or an instrument grounding issue somewhere.

A buzz can also be the sign of tubes in a tube amp going bad. If so, there’s not much you can do beyond tolerating the buzz or switching amps. In the rare case that the guitarist is plugged into two amps and sending each amp one side of a stereo pedal, noise can result from a grounding issue between the two amps themselves.

The General Process

Buzzes, hums, and other unwanted noises only have a few likely sources: instruments, cables, and equipment. When unwanted noise occurs, stay calm and determine the general location of the buzz (system or stage). Then, continue narrowing in until you find the source. You may not always be able to find or fix the exact source, but the tips I have given should help you on your way.


Rising Star – Carolyn Slothour Live Sound Engineer

Carolyn Slothour is an up-and-coming independent FOH and Monitor engineer, who has been working in the industry for just over five years. She works as an A1 and A2 at a few production companies based in Pittsburgh and Philadelphia, including a company called Zero Fossil which is a clean energy/solar-powered production company. She is the house engineer at a local venue called Brillobox and fills in at several other local venues while not on the road. The past year she has been touring as FOH, tour manager, and playing flute with a variety of artists including Mija, !!! (Chk Chk Chk), Alison Sudol, & a rock theatre group called Squonk Opera. She has several tours planned for 2020 as well.

Carolyn has always been passionate about playing & performing music and decided to move from New Jersey to Pittsburgh to attend college at the California University of PA to follow her love of music, while not really knowing what path she would ultimately take within the industry. The Music Technology Bachelor’s degree she received covered a wide range of things, including music performance & theory, music business, and recording & live sound technology. During her time in college, she interned at a recording studio and production company. While interning, Carolyn discovered she was most passionate about live sound. Having attended and performed in live concerts throughout her life, she says “I realized it made sense for me to work in an environment I’ve always loved and felt at home in from the start.” From there she started picking up freelance sound gigs and has been building her diverse resume of audio work since.

Her current goals are to mix at more large-scale festivals and continue to grow in many different ways. “I have always loved to attend festivals, and working them has become some of the best times of my life, despite the usual “throw-and-go,” high-stakes style mixing at them tends to be. I enjoy the rush and the feeling of accomplishment when it all comes together. I also hope to continue to grow in several different areas of the music industry – including live sound, performance, studio engineering, sound design, composition, and production. I love to learn and I don’t plan on stopping anytime soon.”

Can you tell us about a tour or show that you’re proud of? A challenge that you pulled off?

My last FOH tour with !!! (Chk Chk Chk) was one that I’m very proud of because I was able to combine my two passions – mixing FOH & playing the flute. When I first met the band, they asked if I would be interested in playing flute with them on a couple of songs of theirs. I was absolutely interested and ended up playing flute on 2-3 songs every night from FOH. It could be a little challenging at times to take my focus away from mixing and put it on performing, but playing the flute is like second nature to me and it felt great to play in front of large audiences with such a great group of musicians. I’m a huge fan of their music, so it was definitely the most fun I’ve ever had at work. I also recently mixed FOH for Mija at Corona Capital Music Festival in Mexico City, along with some extremely talented musicians & engineers. The festival brings in around 146,000 people, so that was a pretty special gig for me as well.

Can you tell us about failure and what you learned from it?

I wouldn’t necessarily call this a failure, but one mistake I made recently was creating a show file at a venue while on tour within someone else’s show structure. It all worked fine until I loaded it up at the next venue with that same console, & there was a lot of basic setup that did not work for the new venue. The house engineer and I spent a while trying to figure out why a variety of things did not work correctly and I ended up finding that certain settings were set very strangely when the show file was initially created. After all that trouble, the show ended up sounding great and it was a good night. But I definitely learned the hard way to only travel with show files that I personally created from the start.

What do you like best about touring? 

My favorite thing about touring is that every day is never exactly the same as the last. There are always different challenges & different people, in a different place, so it’s never boring. It’s taught me to take life one day at a time – not only in my career but in all aspects of my life. It can be a stressful job, but it also takes a certain amount of ‘letting go’ and just going with the flow. And I feel really lucky that my career enables me to travel around the globe and see places that many people only dream of.

What do you like least? 

My least favorite part about touring is being away from my cat, & not being able to focus on playing music & my other interests as much as I’d like. I try to make time for my hobbies on the road as much as possible though.

What is your favorite day off activity? 

My favorite day off activities is finding crystal shops & beautiful nature spots where I can relax and spin poi or play the flute. I also enjoy searching for good vegan restaurants in whatever city I’m in.

What, if any, obstacles and barriers have you faced? 

Freelance audio is a competitive industry, and every engineer has to prove themselves in order to build a reputation. Sometimes it’s a little harder to prove myself to those who may not have faith in women to do a great job, but it’s to be expected when less than 5% of audio engineers are not men. Women tend to be held to a higher standard, but that is a blessing in many ways. We work harder and better in order to make it. If you’re truly passionate about your job & have a solid work ethic, you won’t have trouble finding gigs.

How have you dealt with them? 

I’ve grown a thicker skin since I started freelancing. As in any job, there are people who are unpleasant to work with or don’t believe you will do well. The key is to focus on your own work & put in 100% effort so that they have nothing negative to say after seeing/hearing you do your job well. It’s important not to compare yourself to other engineers because everyone is on a different path and will come across opportunities at different points. Having a positive attitude helps immensely.

The advice you have for other women who wish to enter the field? 

Take the time to learn the basics and do prep work – read manuals, ask questions, & have the initiative to figure things out on your own. Then when you’re put in front of a new console, or any new piece of hardware or software, you’ll have some base knowledge to figure out how it works quickly. Never be discouraged by your lack of knowledge. Most of the learning you’ll do will be on the job, so try not to worry too much about what you do & do not know. No engineer knows EVERYTHING. It’s also very important to not have an ego about your knowledge and experience because it will keep you from learning and is generally just a bad attitude to have. There’s always something to be learned from a situation, as well as from fellow engineers. Plus, the more knowledge you have, the more you’ll realize how much more there is to learn. As long as you keep the drive to learn & adapt, you will go far.

Must have skills? 

Communication & social skills are a must – those were honestly the hardest ones for me starting out because I was always a fairly withdrawn & antisocial child. But it’s the key to getting a lot of gigs. You must be friendly, understanding, easy to get along with, and able to stay calm in stressful situations and never place blame. Generally, people will hire someone they like before someone they don’t, even if they’re a little less competent. Adaptability is also a very important skill – when you work with different people & different sound systems every day, you have to be able to work with many types of personalities and limitations.

Favorite gear? 

I’m a huge fan of analog consoles and gear in general because it tends to sound really great right off the bat. I always enjoy mixing on the classic Midas H3000, and I’m a sucker for good outboard compressors. As for digital consoles, my favorite brand is DiGiCo because they have the power to do pretty much anything I want. I’m a firm believer that if something sounds bad through a sound system while completely flat, you should change the mic first – so great mics are very important to me. I’m currently in the process of building my personal mic closet, so I enjoy testing out different mics that venues have in-house. My favorite combination of microphones varies from artist to artist depending on the sound I’m going for, but it’s usually a mixture of Sennheiser & Audix microphones. My favorite kick drum mic combination is a Shure Beta 91a inside, and an Audix D6 outside.

The SoundGirls Podcast – Carolyn Slothour: FOH Engineer and Flutist

Find More Profiles on The Five Percent

Profiles of Women in Audio

How Do You Measure Career Success?


Written By: Erica D’Angelo


I’ve been working as an audio engineer in Australia since 1997.  When I meet young sound engineers starting out, particularly women,  I am inspired by their passion and fearless attitude towards forging a career in this very challenging industry, particularly in a country like Australia where the market for audio professionals is pretty small.  The same questions and fears that I faced working in a male-dominated industry still confront women today. I want to share my story to illustrate how a career in sound can take many paths, but the key ingredients for longevity are the same today as they were 25 years ago.

I started life as a classical musician completing a Bachelor of Music majoring in Clarinet in Adelaide, South Australia.  In the classical world, it was rare to come across audio reinforcement, only on the odd occasion of being part of a recording, but when I finished my studies and started gigging as a sax player and with pops style orchestras I started to notice the microphones, the miles of cables, and how there were only ever guys running the sound.  That all looked way cool compared to hanging out with the middle-aged people sitting in symphony orchestras.

Teaching music in the UK a few years later – the early 90’s, when techno/jungle and drum and bass were coming up from the underground in London,  kids were bringing cassette recordings to the class of pirate radio techno raves and asking how to make that music. I didn’t know, but I wanted to learn.  Each school had bits and pieces of gear – 4 track recorders, microphones, outboard gear, mixing desks – so I started to teach myself. Eventually, I enrolled in the SAE Diploma of Audio Engineering course and embarked on a new career at the age of 26.

Studying in London brought great opportunities.  I was resident FOH at my local Latin bar, mixing salsa bands that actually came from South America, which for an Australian was a new experience.  The guy that owned the PA became my first mentor – a generous Ghanaian man called Tito, who was happy to teach me everything he could. Other opportunities arose in film and TV but overwhelmingly I found live sound to be the most exciting.

Early days at Adelaide Festival

Eventually, the lure of the sun and the beach called me back home, where I landed in Sydney as an experienced live sound engineer, but with no idea of how the Australian industry operated.  I talked to every FOH engineer at every gig or festival I went to and found a lot of great advice was freely offered. It became clear that to be a working sound engineer in Australia you had to mix rock and roll.

So far, I had never crossed paths with any other women working in the industry.

I went and got a job with Jands – who at the time was the biggest PA company in Sydney that provided the production for all the touring acts, had a huge inventory of Clair Bros, Meyer, and JBL, and employed dozens of audio and lighting technicians for both touring and local shows.  Finally, I met two women employed as lighting techs, but working for Jands was as masculine an environment as was possible. These guys were (notoriously) hardcore roadies, in the days when OH&S concerns were laughed at, and you proved your worth by being able to lift the most, party the hardest and work the longest hours.

Despite the prevailing attitudes, I earned respect from my colleagues, and again was mentored by a couple of the guys, gaining invaluable training on large-scale sound reinforcement systems.   I liked the job, the loading in and out, the long hours, the banter – the physicality of it all. I learned quickly that you don’t need to be able to lift as much as the guys – there are plenty of other jobs to do and if everyone is working together no one has an issue.

Jands was going through one of their many restructure, which saw them sack all their permanent staff and invite back half of them as casuals.  I took this opportunity to get out and keep looking / learning. A couple of years in TV followed – working on entertainment shows which showcased live bands, as well as some very well-paid hell in the Shopping Network channels.

My next major achievement was being part of the Adelaide International Arts and Fringe Festivals for eight years.  These gigs were so much fun, working in crazy purpose-built venues, or parks, or rivers, working with international artists, working with crew from all over the country.  These festivals all involved miles and miles of cables, large-scale reinforcement systems, and logistical nightmares – requiring way more than audio skills. Operations and scheduling were organisational skills that I really enjoyed using and the beauty of these Arts festivals was more women on the crew!  The Australian rock and roll scene really was a man’s world for a very long time.

Schools Spectacular

Back in Sydney, the lead-up to the 2000 Olympic games was in full swing.  I was working as an assistant audio director with the Arts Unit of the education department – a department that provides large-scale performance opportunities for public school talent.  We would famously produce the Schools Spectacular every year in the Sydney Entertainment Centre – flying a massive PA, fully miked orchestra, dozens of radio mics, full broadcast split.

The Olympic Committee in conjunction with Norwest Audio was looking for as many large scale gigs as possible to practice fine-tuning the PA they would use for the opening ceremony, so our organisation was kept busy in the years leading up to the main event, staging events such as the Pacific School Games,  – so Norwest could get their specs right. During the actual Olympic event, I was seconded by the Olympic organising committee to be the Audio director of the Team Welcoming ceremonies. This was a great gig – pre-production involved going all over the country recording children’s choirs singing the national anthems of each country, that would be played at the ceremony each country has when they arrive in the athlete’s village.  For some countries, it is the only time they get to hear their anthem played.

In the 2000s I moved to Melbourne and started my own audio services business – Mind’s Eye Entertainment – writing and producing pop musicals for schools, sound design for theatre, and doing whatever else came along to pay the bills.   As much as I loved the life, I have always been an absolute realist with a pragmatic approach to survival, so when an opportunity to start up Staging Rentals in Melbourne came about, I took it. This was not audio, but it was events and high-end corporate events with large budgets.  So, I got to use the operations and logistics skills to full effect, as well as being account manager, truck driver and on the tools building stages as required. Again, the physicality of the job appealed to me. I met my husband at this time and loved working with him on gigs, but the inevitable question of age and babies started nagging.

I was 39 and decided to try and have a baby.  The male-dominated worlds I had been working in were not going to be conducive to a mature woman getting pregnant, so I changed jobs again and got an office job coordinating logistics in the exhibition industry.  At 41 after one round of IVF I produced a baby boy, and again was confronting how to shape my career while being a mother. A great fallback I always had was a teaching qualification, which I did as a matter of necessity way back when I finished uni.  I started looking for new career directions and discovered the world of vocational education – you could complete a Certificate III in sound production while at high school. This was an incredible discovery – all my qualifications and experience were perfect for a job like this.

Six months after having a baby I was teaching sound engineering to 16 and 17-year-old boys at a catholic school.  I loved it.

I continue delivering audio training to school kids at a private school in Melbourne. I teach part-time and spend the remaining time being technical production manager of the school’s large events. The school has a 1000 seat concert hall with flown Nexo array,  a multitude of incredible microphones and a generous production budget.

Discovering Soundgirls a couple of years ago was huge for me.  I was 50 and starting to question who I was – was I a sound engineer, a teacher, a manager?  I was middle-aged, grey hair, and still coiling cables – what kind of role model was I? How do you measure career success in the world of audio – FOH for a touring group?  Or simply having a workplace where you get to work and talk about audio all day?

After getting to meet the Melbourne Soundgirls and share stories, I found my personal story was finally validated – the fact that I am still here 25 years later thinking, talking, working and now inspiring young people to pursue a career in audio defines me as an audio professional.

New goals are to further my knowledge of acoustics.  I love the science of sound, how it behaves in a space, and I’ve taken very baby steps in studying acoustics – logarithms, logarithms, and more logarithms!

Stage Managers and Sound Designers

Together Forever

2020 is the year of the stage manager, so this is the perfect time to talk about how I get the most out of my Sound Designer/Stage Manager relationship!  The Stage Manager is the one person that probably knows the most about the show and the actors. They are also the one who is going to make sure your design is executed exactly as planned at each and every show.  Basically, the Stage Manager is someone you really want in your corner, so I want to go over just a few of the ways my relationship with Stage Managers has been beneficial.

First of all, I completely support listing the Stage Manager as a part of the creative team.  I’m stating this, maybe obvious (to some) fact, because it just doesn’t happen a lot. Frankly, I’m still beating the “LIST THE SOUND DESIGNER IN YOUR POSTS” drum loud and hard, because that title is also one that is often left off…. I guess because you can’t see that design in a photo.  So if I have to constantly remind people that Sound Designers are part of the creative team and need to be listed in posts, I can’t imagine how much harder that fight is for Stage Managers. Let’s just think about it for a minute though. What defines a creative team? Surprisingly, I couldn’t find a succinct “Theatrical Creative Team” textbook definition, but I did find this “Advertising Creative Team” definition from smallbusiness.chron.com, and honestly, it totally fits:

creative team is made up of several key members, starting with a creative director,  and including copywriters, editors, graphic designers and artists, and web developers.  In short, it’s the group of people that comes up with advertising ideas and brings those ideas into being.

This is basically the same for theatre, right?  The Director, Choreographer, Music Director, and Designers are the key members that come up with the ideas and bring those ideas to the stage.  But from the first concept meeting, the Stage Manager is also there. They are running the meetings, taking notes, and sending those notes out to the team.  The Stage Manager is keeping track of all of the action that’s going on in rehearsal and keeps the rest of the team updated daily. They will remind the director of Designers’ ideas, and likewise, let Designers in on things that might help or hurt their design idea—like informing a Sound Designer that a group of actors are constantly blocked to be in a place where a speaker was going to be.  They are the ones firing sound cues in rehearsal and reporting on how it was received by the director, and any good stage manager will practice calls over and over until their “GO” lands at that perfect swell in the music that will ensure every audience member leaves feeling all the feels. That’s art. Stage Management is an art form, and they have every right to be recognized as part of the creative team, and basically, what I’m saying is that the more we openly recognize that fact with our Stage Manager friends, the better the working relationship is going to be.

I mentioned that the Stage Manager probably knows more about the actors than anyone else.  This is really useful to the Sound Designer of a musical. For years, I would make my plans about which microphones to use, which lavs to put on actors, what I would use to change the color of the lavs if needed, what kind of tape or another attachment method to use, and which style of mic belts to assign well ahead of tech on my own.  Many times over the years, I would run into situations where I was changing tape on an actor because they were allergic to what I was using, or switching out a mic belt because of a blocking direction that was just given, or what have you. It was frustrating, and would often create a domino effect if I was short on equipment or supplies.  I soon learned that consulting the Stage Manager while I was preparing these plans alleviated a lot of those issues for me before I even met the actor. The Stage Manager would not only know the nuts and bolts information, like allergies and blocking, but also more personal things, like actor preferences: This actor likes to wear the lav on the left side of the face, that actor has their own mic belt, etc.  Once I realized that I could unlock that info ahead of time, it was a definite level up for me.

The Stage Manager is also very invested in protecting your design and maintaining its original intention throughout the run.  There are sometimes situations in which microphone and lav placement are very specific, and I’ll tell a Stage Manager that if this position moves an inch one way or the other, the sound will change.  Many of the Stage Managers I’ve worked within the past take that information very seriously and will note actors throughout the run for the sake of the design and the production. I’ve also worked with Stage Managers in the past who, during rehearsal, will bring up things I’ve said in the past about which circumstances give us the best sound quality if it looks like the Director is blocking actors to be somewhere or do something that is not conducive to excellent sound quality.  Because I like to keep a line of open communication between myself and my Stage Managers, I’m able to count on them to be my voice, even if I’m not in the room.

When it comes to theatre allies, Stage Managers are definitely a group of people I want on that list.  I want to know that they care as much about my design as I do, and will give their all every night to make sure that it is executed perfectly.  I think that as Designers, we can sometimes feel overprotective of our work, and it’s sometimes hard to remember that the questions, the emails, the regular check-ins from a Stage Manager are all in pursuit of the same goal as us—a perfectly crafted piece of theatre.


More Than Line-by-Line


Going Beyond the Basics of Mixing

When I started mixing shows in high school—and I use the term “mixing” loosely—I had no idea what I was doing. Which is normal for anyone’s first foray into a new subject, but the problem was that no one else knew either. My training was our TD basically saying, “here’s the board, plug this cable in here, and that’s the mute button,” before he had to rush off to put out another fire somewhere else.

Back then, there were no Youtube videos showing how other people mixed. No articles describing what a mixer’s job entailed. (Even if there were, I wouldn’t have known what terms to put in a Google search to find them!) So I muddled through show by show, and they sounded good enough that I kept going. From high school to a theme park, college shows to local community theatres, and finally eight years on tour, I’ve picked up a new tip or trick or philosophy every step along the way. After over a decade of trial and error, I’m hoping this post can be a jump start for someone else staring down the faders of a console wondering “okay, now what?”

Every sound design and system has a general set of goals for a musical: all the lines and music are clear and the level is enough to be audible but isn’t painfully loud. These parameters make a basic mix.

For Broadway-style musicals, we do what’s called “line-by-line” mixing. This means when someone is talking, her fader comes up and, when she’s done, her fader goes back down, effectively muting her. For example: if actresses A and B are talking, A’s fader is up for her line, then just before B is about to begin her line, B’s fader comes up and A’s fader goes down (once the first line is finished). So the mixer is constantly working throughout the show, bringing faders up and taking them out as actors start and stop talking. Each of these is called a “pickup” and there will be several hundred of them in most shows. Having only the mics open that are necessary for the immediate dialogue helps to eliminate excess noise from the system and prevent audio waves from multiple mics combining (creating phase cancellation or comb filtering which impairs clarity).

You may have noticed that I’ve only talked about using faders so far, and not mute buttons. Using faders allows you to have more control over the mix because the practice of “mixing” with mute buttons assumes that the actors will say each of their lines in the entire show at the same level, which is not realistic. From belting to whispering and everything in between, actors have a dynamic vocal range and faders are far more conducive than mute buttons to make detailed adjustments in the moment. However, when mixing with faders, you have to make sure that your movements are clean and concise. Constantly doing a slow slide into pickups sounds sloppy and may lose the first part of a line, so faders should be brought up and down quickly. (Unless a slow push is an effect or there is a specific reason for it, yes, there are always exceptions.)

So, throughout the show, the mixer is bringing faders up and down for lines, making small adjustments within lines to make sure that the sound of the show is consistent with the design. Yet, that’s only one part of a musical. The other is, obviously, the music. Here the same rules apply. Usually, the band or orchestra is assigned to VCAs or grouped so it’s controlled by one or two faders. When they’re not playing, the faders should be down, and when they are, the mixer is making adjustments with the faders to make sure they stay at the correct level.

The thing to remember at this point is that all these things are happening at the same time. You’re mixing line by line, balancing actor levels with the music, making sure everything stays in an audible, but not eardrum-ripping range. This is the point where you’ve achieved the basic mechanics and can produce an adequate mix. When put into action, it looks something like this:


A clip from a mix training video for the 2019 National Touring Company of Miss Saigon.


But we want more than just an adequate mix, and with a solid foundation under your belt, you can start to focus on the details and subtleties that will continue to improve those skills. Now, full disclosure, I was a complete nerd when I was young (I say that like I’m not now…) and I spent the better part of my childhood reading any book I could get my hands on. As an adult, that has translated into one of my greatest strengths as a mixer: I get stories. Understanding the narrative and emotions of a scene are what help me make intelligent choices of how to manipulate the sound of a show to best convey the story.

Sometimes it’s leaving an actress’s mic up for an ad-lib that has become a routine, or conversely, taking a mic out quicker because that ad-lib pulls your attention from more important information. It could be fading in or out a mic so that an entrance or exit sounds more natural or giving a punchline just a bit of a push to make sure that the audience hears it clearly.

Throughout the entire show, you are using your judgment to shape the sound. Paying attention to what’s going on and the choices the actors are making will help you match the emotion of a scene. Ominous fury and unadulterated rage are both anger. A low chuckle and an earsplitting cackle are both laughs. However, each one sounds completely different. As the mixer, you can give the orchestra an extra push as they swell into an emotional moment, or support an actress enough so that her whisper is audible through the entire house but doesn’t lose its intimacy.

Currently, I’m touring with Mean Girls, and towards the end of the show, Ms. Norbury (the Tina Fey character for those familiar with the movie) gets to cut loose and belt out a solo. Usually, this gets some appreciative cheers from the audience because it’s Norbury’s first time singing and she gets to just GO for it. As the mixer, I help her along by giving her an extra nudge on the fader, but I also give some assistance beforehand. The main character, Cady, sings right before her in a softer, contemplative moment and I keep her mic back just a bit. You can still hear her clearly, but she’s on the quieter side, which gives Norbury an additional edge when she comes in, contrasting Cady’s lyrics with a powerful belt.

Another of my favorite mixing moments is from the Les Mis tour I was on a couple of years ago. During “Empty Chairs at Empty Tables,” Marius is surrounded by the ghosts of his friends who toast him with flickering candles while he mourns their seemingly pointless deaths. The song’s climax comes on the line “Oh my friends, my friends, don’t ask me—” where three things happen at once: the orchestra hits the crest of their crescendo, Marius bites out the sibilant “sk” of “don’t aSK me,” and the student revolutionaries blow out their candles, turning to leave him for good. It’s a stunning visual on its own, but with a little help from the mixer to push into both the orchestral and vocal build, it’s a powerful aural moment as well.

The final and most important part of any mix is: listening. It’s ironic—but maybe unsurprising—that we constantly have to remind ourselves to do the most basic aspect of our job amidst the chaos of all the mechanics. A mix can be technically perfect and still lack heart. It can catch every detail and, in doing so, lose the original story in a sea of noise. It’s a fine line to walk and everyone (and I mean everyone) has an opinion about sound. So, as you hit every pickup, balance everything together, and facilitate the emotions of a scene, make sure you listen to how everything comes together. Pull back the trumpet that decided to go too loud and proud today and is sticking out of the mix. Give the actress who’s getting buried a little push to get her out over the orchestra. When the song reaches its last note and there’s nothing you need to do to help it along, step back and let it resolve.

Combining all these elements should give you a head start on a mix that not only achieves the basic goals of sound design but goes above and beyond to help tell the story. Trust your ears, listen to your designer, and have fun mixing!

There Really Is No Such Thing As A Free Lunch

Using The Scientific Method in Assessment of System Optimization

A couple of years ago, I took a class for the first time from Jamie Anderson at Rational Acoustics where he said something that has stuck with me ever since. He said something to the effect of our job as system engineers is to make it sound the same everywhere, and it is the job of the mix engineer to make it sound “good” or “bad”.

The reality in the world of live sound is that there are many variables stacked up against us. A scenic element being in the way of speaker coverage, a client that does not want to see a speaker in the first place, a speaker that has done one too many gigs and decides that today is the day for one driver to die during load-in or any other myriad of things that can stand in the way of the ultimate goal: a verified, calibrated sound system.

The Challenges Of Reality


One distinction that must be made before beginning the discussion of system optimization is that we must draw a line here and make all intentions clear: what is our role at this gig? Are you just performing the tasks of the systems engineer? Are you the systems engineer and FOH mix engineer? Are you the tour manager as well and work directly with the artist’s manager? Why does this matter, you may ask? The fact of the matter is that when it comes down to making final evaluations on the system, there are going to be executive decisions that will need to be made, especially in moments of triage. Having clearly defined what one’s role at the gig is will help in making these decisions when the clock is ticking away.

So in this context, we are going to discuss the decisions of system optimization from the point of the systems engineer. We have decided that the most important task of our gig is to make sure that everyone in the audience is having the same show as the person mixing at front-of-house. I’ve always thought of this as a comparison to a painter and a blank canvas. It is the mix engineer’s job to paint the picture for the audience to hear, it is our job as system engineers to make sure the painting sounds the same every day by providing the same blank canvas.

The scientific method teaches the concept of control with independent and dependent variables. We have an objective that we wish to achieve, we assess our variables in each scenario to come up with a hypothesis of what we believe will happen. Then we execute a procedure, controlling the variables we can, and analyze the results given the tools at hand to draw conclusions and determine whether we have achieved our objective. Recall that an independent variable is a factor that remains the same in an experiment, while a dependent variable is the component that you manipulate and observe the results. In the production world, these terms can have a variety of implications. It is an unfortunate, commonly held belief that system optimization starts at the EQ stage when really there are so many steps before that. If there is a column in front of a hang of speakers, no EQ in the world is going to make them sound like they are not shadowed behind a column.

Now everybody take a deep breath in and say, “EQ is not the solution to a mechanical problem.” And breathe out…

Let’s start with preproduction. It is time to assess our first round of variables. What are the limitations of the venue? Trim height? Rigging limitations? What are the limitations proposed by the client? Maybe there is another element to the show that necessitates the PA being placed in a certain position over another; maybe the client doesn’t want to see speakers at all. We must ask our technical brains and our career paths in each scenario, what can we change and what can we not change? Note that it will not always be the same in every circumstance. In one scenario, we may be able to convince the client to let us put the PA anywhere we want, making it a dependent variable. In another situation, for the sake of our gig, we must accept that the PA will not move or that the low steel of the roof is a bleak 35 feet in the air, and thus we face an independent variable.

The many steps of system optimization that lie before EQ


After assessing these first sets of variables, we can now move into the next phase and look at our system design. Again, say it with me, “EQ is not the solution to a mechanical problem.” We must assess our variables again in this next phase of the optimization process. We have been given the technical rider of the venue that we are going to be at and maybe due to budgetary restraints we cannot change the PA: independent variable. Perhaps we are carrying our own PA and thus have control over the design with limitations from the venue: dependent variable forms, but with caveats. Let’s look deeper into this particular scenario and ask ourselves: as engineers building our design, what do we have control over now?

The first step lies in what speaker we choose for the job. Given the ultimate design control scenario where we get the luxury to pick and choose the loudspeakers we get to use in our design, different directivity designs will lend themselves better in one scenario versus another. A point source has just as much validity as the deployment of a line array depending on the situation. For a small audience of 150 people with a jazz band, a point source speaker over a sub may be more valid than showing up with a 12 box line array that necessitates a rigging call to fly from the ceiling. But even in this scenario, there are caveats in our delicate weighing of variables. Where are those 150 people going to be? Are we in a ballroom or a theater? Even the evaluation of our choices on what box to choose for a design are as varied as deciding what type of canvas we wish to use for the mix engineer’s painting.

So let’s create a scenario: let’s say we are doing an arena show and the design has been established with a set number of boxes for daily deployment with an agreed-upon design by the production team. Even the design is pretty much cut and paste in terms of rigging points, but we have varying limitations to trim height due to high and low steel of the venue. What variables do we now have control over? We still have a decent amount of control over trim height up to a (literal) limit of the motor, but we also have control over the vertical directivity of our (let’s make the design decision for the purpose of discussion) line array. There is a hidden assumption here that is often under-represented when talking about system designs.

A friend and colleague of mine, Sully (Chris) Sullivan once pointed out to me that the hidden design assumption that we often make as system engineers, but don’t necessarily acknowledge, is that we assume that the loudspeaker manufacturer has actually achieved the horizontal coverage dictated by technical specifications. This made me reconsider the things I take for granted in a given system. In our design, we choose to use Manufacturer X’s 120-degree line source element. They have established in their technical specs that there is a measurable point at 60 degrees off-axis (total 120-degree coverage) where the polar response drops 6 dB. We can take our measurement microphone and check that the response is what we think it is, but if it isn’t what really are our options? Perhaps we have a manufacturer defect or a blown driver somewhere, but unless we change the physical parameters of the loudspeaker, this is a variable that we put in the trust of the manufacturers. So what do we have control over? He pointed out to me that our decision choices lie in the manipulation of the vertical.

Entire books and papers can and have been written about how we can control the vertical coverage of our loudspeaker arrays, but certain factors remain consistent throughout. Inter-element angles, or splay angles, let us control the summation of elements within an array. Site angle and trim height let us control the geometric relationship of the source to the audience and thus affect the spread of SPL over distance. Azimuth also gives us geometric control of the directivity pattern of the entire array along a horizontal dispersion pattern. Note that this is a distinction from the horizontal pattern control of the frequency response radiating from the enclosure, of which we have handed responsibility over to the manufacturer. Fortunately, the myriad of loudspeaker prediction software available from modern manufacturers has given the modern system engineer an unprecedented level of ability to assess these parameters before a single speaker goes up into the air.

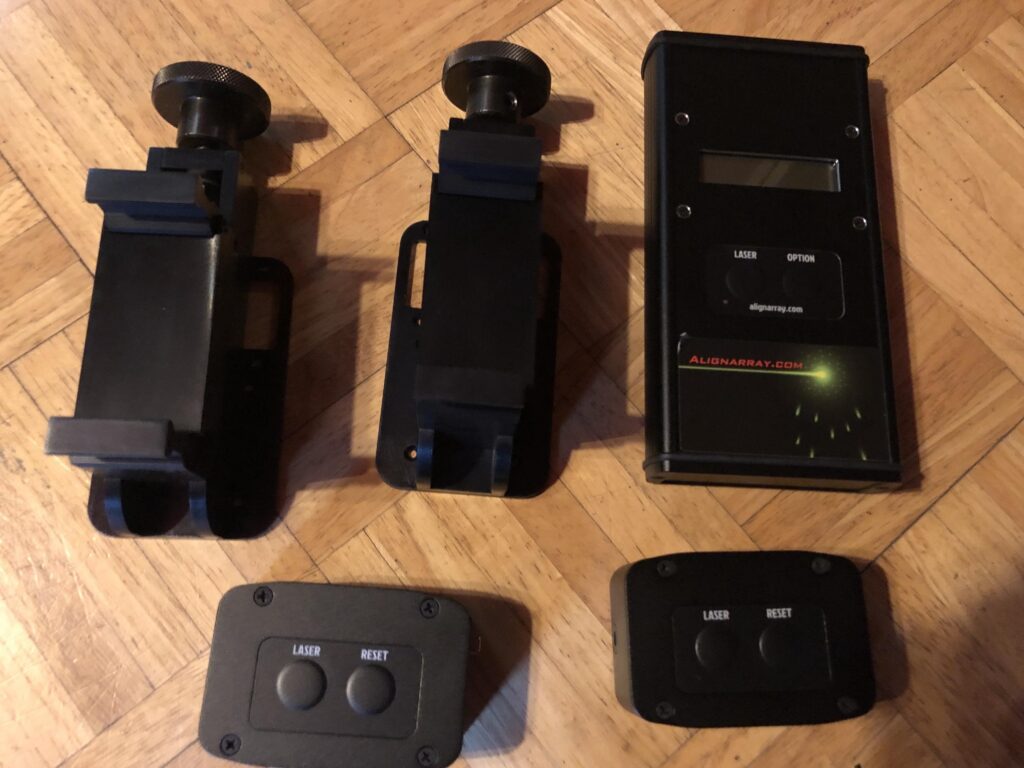
At this point, we have made a lot of decisions on the design of our system and weighed the variables along every step of the way to draw out our procedure for the system deployment. It is now time to analyze our results and verify that what we thought was going to happen did or did not happen. Here we introduce our tools to verify our procedure in a two step-process of mechanical then acoustical verification. First, we use tools such as protractors and laser inclinometers as a means of collecting data to assess whether we have achieved our mechanical design goal. For example, our model says we need a site angle of 2 degrees to achieve this result so we verify with the laser inclinometer that we got there. Once we have assessed that we made our design’s mechanical goals, we must analyze the acoustical results.

Laser inclinometers are just one example of a tool we can use to verify the mechanical actualization of a design

.

It is here only at this stage that we are finally introducing the examination software to analyze the response of our system. After examining our role at the gig, the criteria involved in pre-production, choosing design elements appropriate for the task, and verifying their deployment, only now can move into the realm of analysis software to see if all those goals were met. We can utilize dual-channel measurement software to take transfer functions at different stages of the input and output of our system to verify that our design goals have been met, but more importantly to see if they have not been met and why. This is where our ability to critically interpret the data comes in to play. By evaluating impulse response data, dual-channel FFT (Fast-Fourier Transform) functions, and the coherence of our gathered data we can make an assessment of how our design has been achieved in the acoustical and electronic realm.

What’s interesting to me is that often the discussion of system optimization starts here. In fact, as we have seen, the process begins as early as the pre-production stage when talking with different departments and the client, and even when asking ourselves what our role is at the gig. The final analysis of any design comes down to the tool that we always carry with us: our ears. Our ears are the final arbiters after our evaluation of acoustical and mechanical variables, and are used along every step of our design path along with our trusty use of  “common sense.” In the end, our careful assessment of variables leads us to utilize the power of the scientific method to make educated decisions to work towards our end goal: the blank canvas, ready to be painted.

Big thanks to the following for letting me reference them in this article: Jamie Anderson at Rational Acoustics, Sully (Chris) Sullivan, and Alignarray (www.alignarray.com)

New Decade – New Year

The New Year and a new decade have begun! Thoughts of reinvention and feelings of excitement fill the air. This time of the year can often feel overwhelming. For me, I am in between apartments, jobs, and I just finished up my bachelor’s and am headed into a master’s program. Life has been a roller coaster.

It is no secret that the audio and music industry can be challenging, but as a young woman, I have definitely been feeling the pressure to find work and be successful. Something I am sure we all feel. There has also been a lot of talk amongst my friends and peers about depression and seasonal depression. It seems to flourish in the cold, dark months. I myself have been struggling with it. I wanted to do something proactive to combat these negative thoughts and emotions and to welcome in the New Year in a positive way. So I looked to my community for support and ideas.

Now, one thing you may not know about me is that I am the founder of the Michigan Technological University SoundGirls chapter. It is something I am incredibly proud of and sad to have moved away from. It’s okay though, I left it in good hands.

A few weeks ago, I emailed some of the members of this organization and asked them to fill out a short set of interview questions. Many of these young women I consider my family, if not friends. One response in particular not only brought me joy, but hope for a brighter future for all of us in this amazing, yet challenging industry.

Izzy Waldie is a first-year Audio Production major and the newly elected secretary of the Michigan Tech SoundGirls chapter. She is not only incredibly creative but also very good at STEM classes. Something I have to admit, I am not good at. Because she is still in her first year, I asked Izzy a few ice breaker questions.

Sarah: “So Izzy, what are you excited for or looking forward to in your time here at Michigan Tech in the visual performing arts department?”

Izzy: “I’m just really looking forward to doing more projects with people, and making stuff I’m really proud of.”

When asked about the university chapter specifically, she responded with;

Izzy: “Next semester I really want to do some creative projects with SoundGirls. We will be finishing up our movie project which will be really cool, but I want to do more projects. I was thinking of maybe just us recording a song. Nothing fancy, it could be just for fun, and we could do it with all the musicians in the organization. Now that I’m on the management board I really want to help head up some of these projects.”

When I was in my first year at Michigan Tech, I was one of two female students out of the two audio programs. Now, those numbers have been multiplied by at least five. The fact that there is an organization where students can go, create things together, learn and refine their skills, all while being supportive of each other, makes my heart melt. It reminds me that life isn’t always a challenge. Their excitement makes me excited.

Sarah: “Recently you said you don’t know what you are doing and I wanted to talk to you a little bit more about that. It is my opinion that you don’t need to know exactly what you are doing and it is more important to know what you don’t want to do. By exploring different areas and avenues, you are figuring out what you are doing or at least what you want to do. What are some things that you are exploring, interested in, or new things you might want to try out?”

Izzy: “I’ve definitely realized that what you already know isn’t as important as how willing you are to learn. I still don’t know what I’m doing, no one ever knows 100% what they’re doing, but I definitely have learned a lot this semester. I’ve seen this the most working at the Rozsa (The Rosza Performing Arts Center), I had basically no experience at first, but now I’m working the sound and lighting boards pretty confidently. One thing I really want to get more into is recording. I’ve helped out with some other people’s projects and would like to work more creatively with it.”

Izzy made the observation that most students might overlook. What you already know isn’t as important as how willing you are to learn. Not only was she a student in the organization I was president of, but I was also a teaching assistant for one of her classes. This statement is a testament to how she is as a student and how she approaches learning situations. It is an excellent characteristic to have for the industry that she is headed into.

I was feeling revitalized by the end of our conversation. I had received new hope, excitement, and appreciation from talking with Izzy. To finish out the conversation I asked her something a little more personal.

Sarah: “Tell me something good that happened this semester in our department that you will remember for a while, that makes you smile?”

Izzy: “This semester was awesome. Never did I think I’d be so involved as a first-semester student. One of the best parts for me was working on the haunted mine. (A project that the visual performing arts department collaborates with the Quincy Mine owner on every Halloween). We were down there for a really long time but the idea was really cool and so were the people. I also really liked working in the different groups on the audio movie project. I made a lot of friends while working on this project and our Dr. Seuss The Lorax audio movie ended up being pretty fun to make. I remember one time, at like midnight a bunch of us were in Walker Film Studio working on one of the audio movies while passing around a 2-liter of Dr. Pepper.

Izzy’s responses were wholesome and honest. To me, she has a perspective that exceeds her age. It was a nice reminder when faced with the daunting challenges of moving to a new area, finding work, and starting anew. It was a reminder of why I chose this career field. I chose it for the exciting new projects, learning new things, and working late into the night with people you hardly know, but will soon feel like family to you.

Though our conversation had ended, I was feeling myself again and that was because of the connections and relationships I had made through our little SoundGirls chapter. At the core of SoundGirls, you will find this kind of understanding from its members. We are here to listen to one another, remind each other of why we are here and doing what we love, and create an environment that welcomes all who are seeking opportunities and support. I wish you all a prosperous and happy New Year.


Gain Without the Pain


Gain Structure for Live Sound Part 1

Gain structure and gain staging are terms that get thrown about a lot, but often get skimmed over as being obvious, without ever being fully explained. The way some people talk about it, and mock other people for theirs, you’d think proper gain structure was some special secret skill, known only to the most talented engineers. It’s actually pretty straightforward, but knowing how to do it well will save you a lot of headaches down the line. All it really is is setting your channels’ gain levels high enough that you get plenty of signal to work with, without risking distortion. It often gets discussed in studio circles, because it’s incredibly important to the tone and quality of a recording, but we have other things to consider on top of that in a live setting.

So, what exactly is gain?

It seems like the most basic question in sound, but the term is often misunderstood. Gain is not simply the same as volume. It’s a term that comes from electronics, which refers to the increase in amplitude of an incoming signal when you apply electricity to it. In our case, it’s how much we change our input’s amplitude by turning the gain knob. In analogue desks, that means engaging more circuits in the preamp to increase the gain as you turn (have you ever used an old desk where you needed just a bit more level, so you slowly and smoothly turned the gain knob, it made barely any difference… nothing… nothing… then suddenly it was much louder? It was probably because it crossed the threshold to the next circuit being engaged).

Digital desks do something similar but using digital signal processing. It is often called trim instead of gain, especially if no actual preamp is involved. For example, many desks won’t show you a gain knob if you plug something into a local input on the back of it, because its only preamps are in its stagebox. You will see a knob labelled trim instead (I do know these knobs are technically rotary encoders because they don’t have a defined end point, but they are commonly referred to as knobs. Please don’t email in). Trim can also be used to refer to finer adjustments in the input’s signal level, but as a rule of thumb, it’s pretty much the same as gain. Gain is measured as the difference between the signal level when it arrives at the desk to when it leaves the preamp at the top of the channel strip, so it makes sense that it’s measured in decibels (dB), which is a measurement of ratios.

The volume of the channel’s signal once it’s gone through the rest of the channel strip and any outboard is controlled by the fader. You can think of the gain knob as controlling input, and the fader as controlling output (let’s ignore desks with a gain on fader feature. They make it easier for the user to visualise the gain but the work is still being done at the top of the channel strip).

Now, how do you structure it?

For studio recording, the main concern is getting a good amount of signal over the noise floor of all the equipment being used in the signal chain. Unless you’re purposefully going for a lo-fi, old-school sound, you don’t want a lot of background hiss all over your tracks. A nice big signal-to-noise ratio, without distortion, is the goal. In live settings, we can view other instruments or stray noises in the room as part of that noise floor, and we also have to avoid feedback at the other end of the scale. There are two main approaches to setting gains:

Gain first: With the fader all the way down, you dial the gain in until it’s tickling the yellow or orange LEDs on your channel or PFL while the signal is at its loudest, but not quite going into the red or ‘peak’ LEDs (of course, if it’s hitting the red without any gain, you can stick a pad in. You might find a switch on the microphone, instrument or DI box, and the desk. If the mic is being overwhelmed by the sound source it’s best to use its internal pad if it has one, so it can handle it better and deliver a distortion-free signal to the desk). You then bring the fader up until the channel is at the required level. This method gives you a nice, strong signal. It also gives that to anyone sharing the preamps with you, for example, monitors sharing the stagebox or multitrack recording. However, because faders are measured in dBs, which are logarithmic, it can cause some issues. If you look at a fader strip, you’ll see the numbers get closer together the further down they go. So if you have a channel where the fader is near the bottom, and you want to change the volume by 1dB, you’d have to move it about a millimetre. Anything other than a tiny change could make the channel blaringly loud, or so quiet it gets lost in the mix.

Fader at 0: You set all your faders at 0 (or ‘unity’), then bring the gain up to the desired level. This gives you more control over those small volume changes, while still leaving you headroom at the top of the fader’s travel. It’s easier to see if a fader has been knocked or to know where to return a fader to after boosting for a solo, for example. However, it can leave anyone sharing gains with weak or uneven signals. If you’re working with an act you are unfamiliar with, or one that is particularly dynamic, having the faders at zero might not leave you enough headroom for quieter sections, forcing you to have to increase the gain mid-show. This is far from ideal, especially if you are running monitors, because you’re changing everyone’s mix without being able to hear those changes in real-time, and increasing the gain increases the likelihood of feedback. In these cases, it might be beneficial to set all your faders at -5, for example, just in case.

In researching this blog, I found some people set their faders as a visual representation of their mix levels, then adjust their gains accordingly. It isn’t a technique I’ve seen in real life, but if you know the act well and it makes sense to your workflow, it could be worth trying. Once you’ve set your gates, compressors, EQ, and effects, and added the volume of all the channels together you’ll probably need to go back to adjust your gains or faders again, but these approaches will get you in the right ballpark very quickly.

All these methods have their pros and cons, and you may want to choose between them for different situations. I learned sound using the first method, but I now prefer the second method, especially for monitors. It’s clear where all the faders should sit even though the sends to auxes might be completely different, and change song to song. Despite what some people might say, there is no gospel for gain structure that must be followed. In part 2 I’ll discuss a few approaches for different situations, and how to get the best signal-to-noise ratio in those circumstances. Gain structure isn’t some esoteric mystery, but it is important to get right. If you know the underlying concepts you can make informed decisions to get the best out of each channel, which is the foundation for every great mix.

 
X