Empowering the Next Generation of Women in Audio

Join Us

Radio Mics and Foley – UK SoundGirls Workshops with the ASD

On a warm day at the end of June, the UK chapter of SoundGirls had our first shared events with the Association of Sound Designers, in the form of two workshops about very different and equally fascinating sound skills.

First up “Pin the Radio Mic on the Actor,” given by sound engineer and expert “mic hider” Zoe Milton. A vital skill for anyone wanting to work in theatre sound, fitting radio mics is also important for film and TV location sound and in any situation where you want to conceal a body mic on a performer.

Zoe started by taking us through a brief history of the use of radio mics in the theatre. Back in the late 1990s and early 2000s, bandwidth restrictions limited the number of RF channels which meant that even large West End shows had far fewer transmitter packs than cast members. Les Miserable shared sixteen packs between their cast, which resulted in upwards of 100 pack swaps per night!

Fortunately, advancements in radio mic technology and a reduction in the costs of RF licensing in the UK means this doesn’t happen as much these days. Of course, Sound No. 2 and No. 3’s are still expected to be able to swap mic packs within a matter of minutes if necessary, especially on large shows.

Next, we had a closer look at some of the various mic techniques used to accommodate different hair lengths – including no hair – and performance types. Zoe reminded us that that fitting a radio mic is as much about teamwork and communication as it is about technique. You work in very close proximity with the performer, and you have to make both the experience and the position of the mic and pack comfortable for them. You also have to make final decisions on the mic position that will provide the best and most consistent sound for your Sound No. 1 or sound operator. There can be a big difference in the sound of a mic fitted at someone’s hairline, and one fitted over an ear.

As well as the performer and the Sound No. 1/sound op, radio mic fitters also have to take potential costumes, hairstyles, wigs, and hats into consideration. Zoe emphasized the importance of speaking with costume and wig designers as early in the production process as possible so that you know where you might be able to hide a mic and mic pack. We looked in detail at positioning mics within hats and discussed solutions for performers with no hair (creating an ear “hanger” works well). Zoe also talked us through how to hide mics and mic packs under wigs. I was particularly impressed with one solution that Zoe and a colleague devised for an opera singer who shed his clothing after his entrance, which meant it wasn’t possible to put his mic pack in his costume. Instead, they had a half-wig created to blend in with his natural hair and give them enough volume to hide his mic pack on his head, within his hairstyle.

After giving us a rundown of the best accessories to use, including the benefits of using wig clips over the tape and how to effectively colour a mic cable, we had the chance to get up close and personal with fitting a mic ourselves.

I came away from the workshop with a much clearer idea of the solutions available when fitting radio mics, as well as feeling slightly guilty about how much I rely on tape (more wig clips, I promise, Zoe!).

In the afternoon, Tom Espiner introduced us to the fascinating world of Foley sound creation. Tom is an actor, puppeteer, theatre practitioner, and Foley artist, who has provided Foley for film and TV as well as live opera and theatre.

With the technical assistance of Gareth Fry, Tom demonstrated the process of recording Foley, using various objects and textures to build up multiple layers of created sound effects. It was fascinating to see Tom take everyday objects such as twine and rubber bands and turn them into snakes sliding across rocks and flicking their tongues.

After we’d seen the expert do it, it was time for us to have a go. We had a lot of fun adding horse hooves (a classic) and saddle noises to a scene from The Revenant and learning what might have gone into making the sound of a dinosaur hatching from Jurassic Park.

Later on in the workshop, we looked at adding live Foley to stage plays, and I learned how difficult it is to keep one hand making the sound of a babbling brook while the other creates splashes in sync with another actor, as they mime washing their hands. In one of the most enjoyable exercises of the day, all of us contributed to creating a Foley soundscape to illustrate a particularly descriptive piece of text, creating the sounds of a deep underground lake in a mysterious land.

As well as being very informative, both workshops reminded me how important it is to get out from behind your computer or console, try something new and get your hands wet literally, as it happens. I think all attendees left inspired to try new techniques and find new ways to make sound.

Many thanks to the Association of Sound Designers for offering the opportunity to our members.


Ableton Show Control

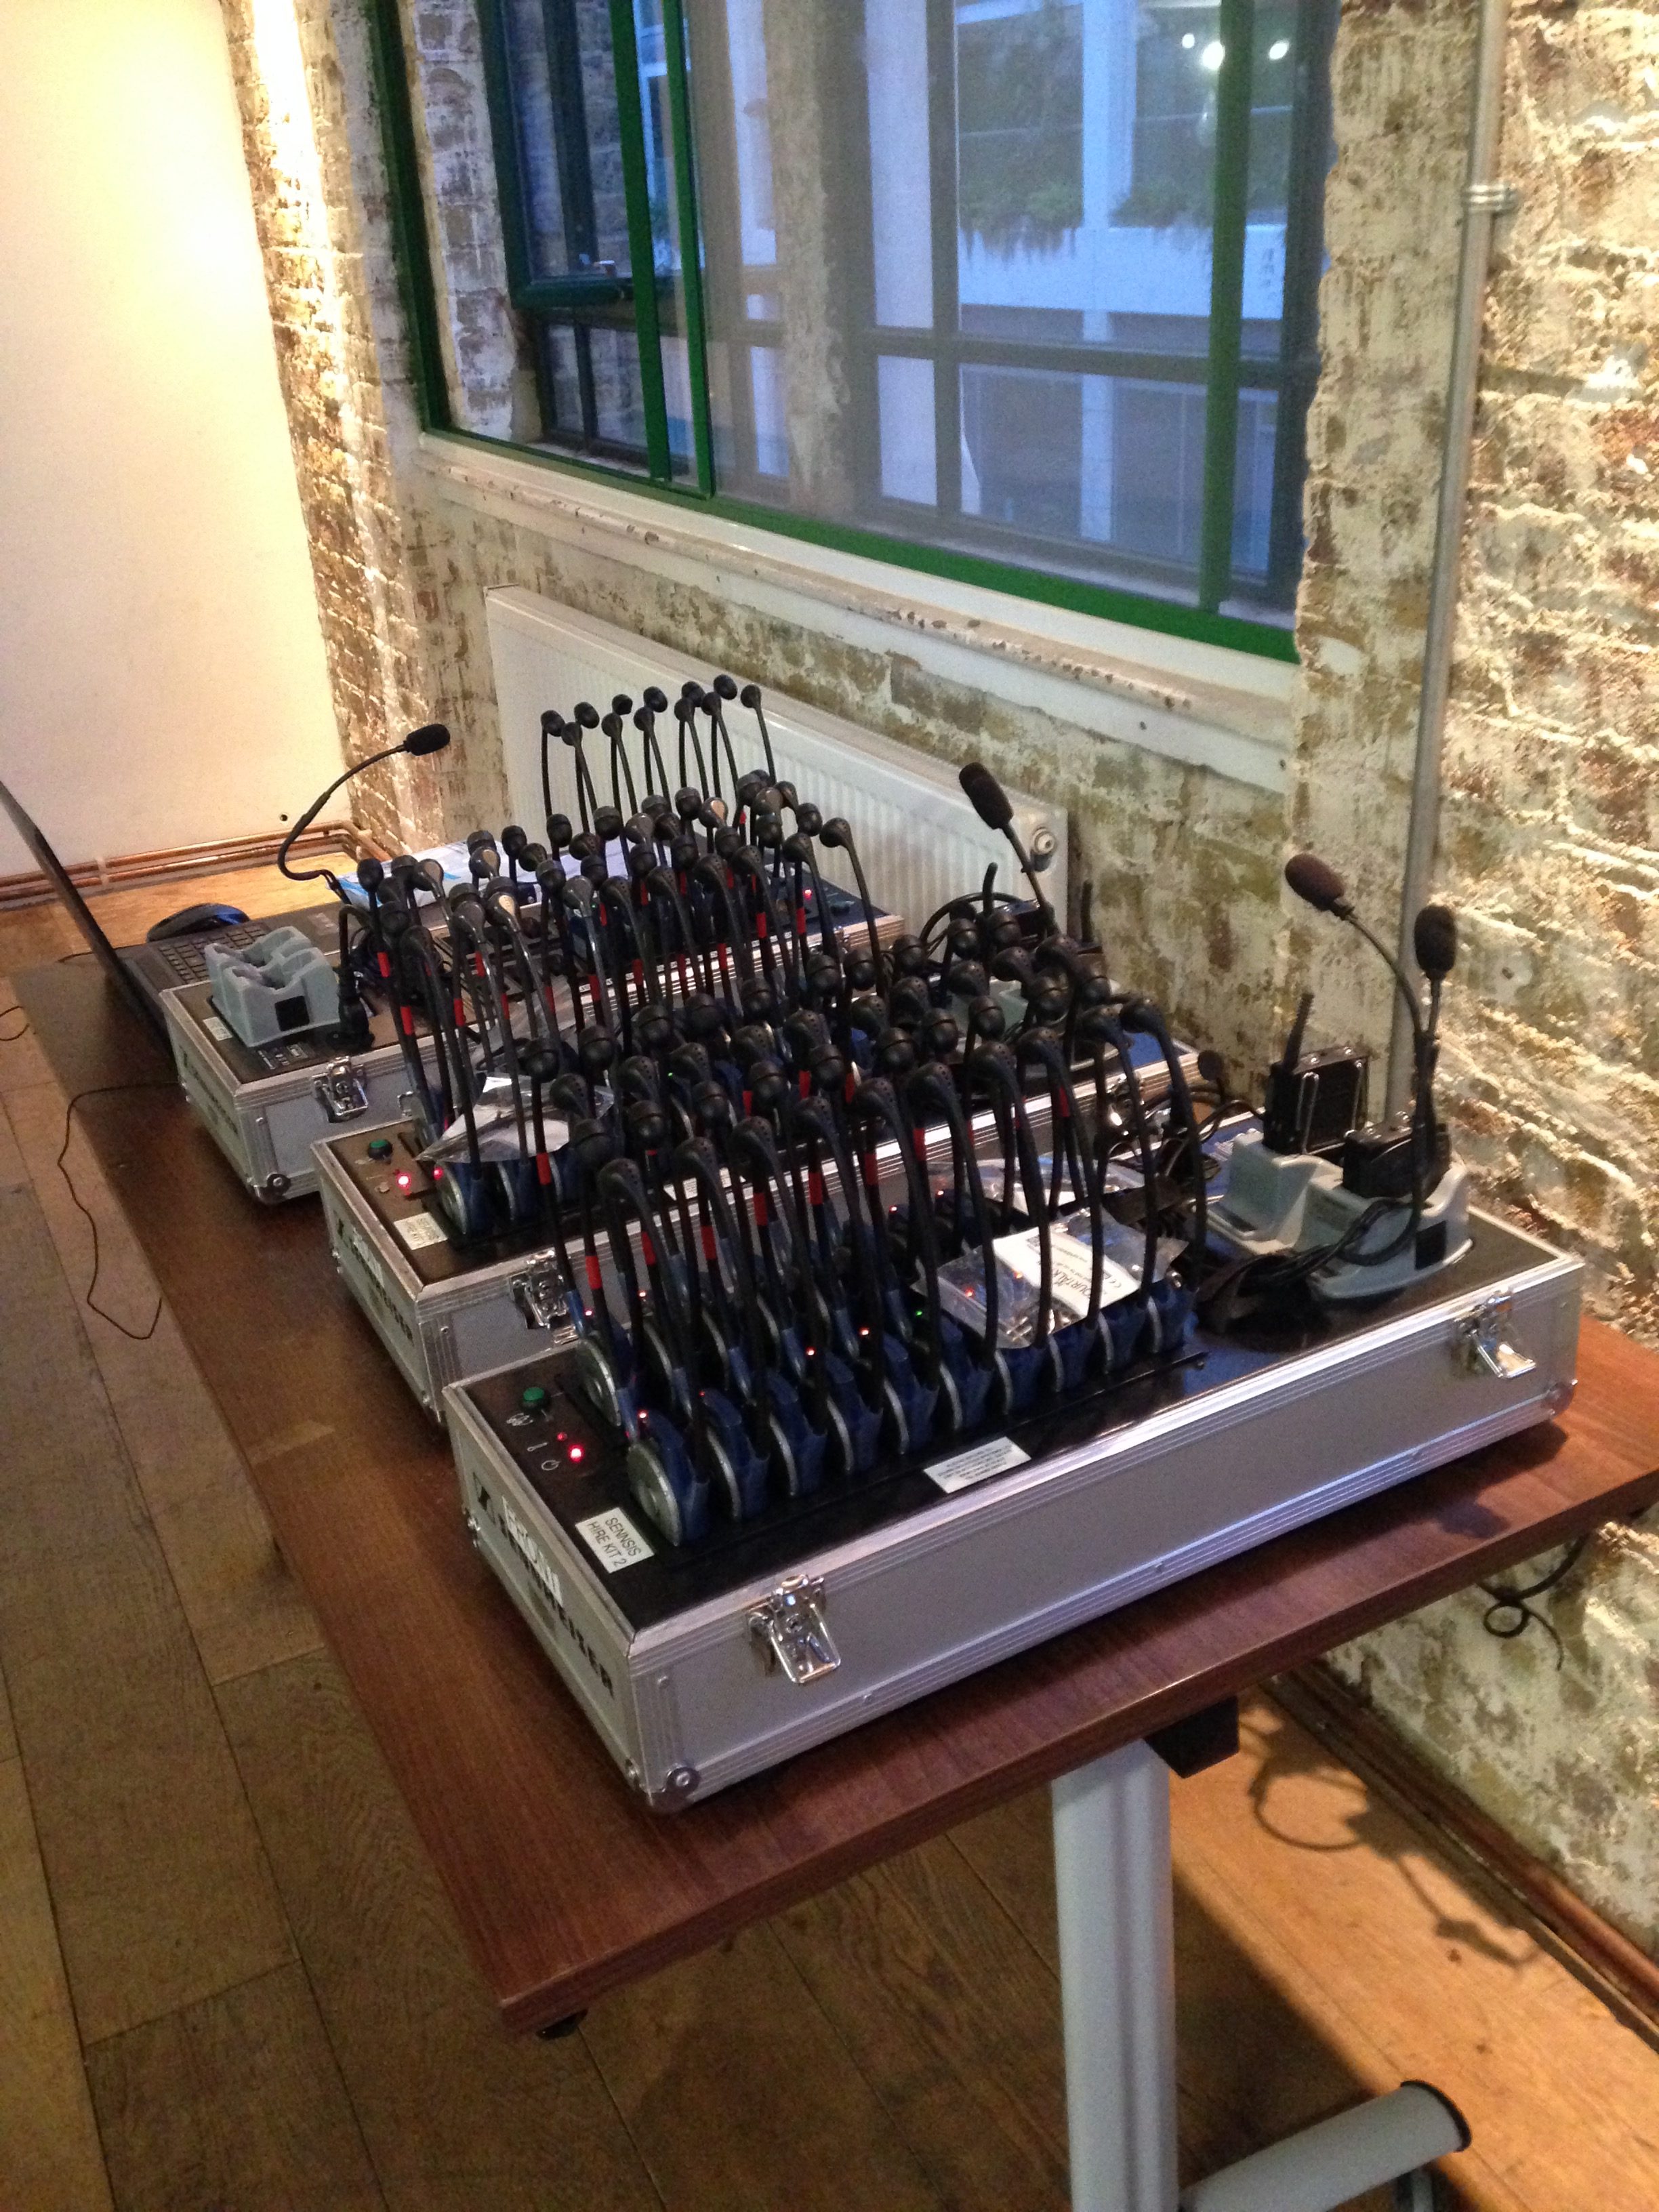
For a show not so long ago in RADA (Scuttlers, written by Rona Munro), it was my intention to use Ableton Live for the playback of a variety of songs, beats, and rhythms which the cast would create and interact with throughout the show.

As I have mentioned in my blog Choosing Software, I had decided to use Ableton Live in shows because it allows me the diversity to create my own sound palettes, add in effects, and take them away again easily. Crucially, I can control all of this via MIDI in Qlab, which adds important stability for the show, but still, retains a wide dynamic range of filters and features that can be blended and mixed.

*I’m using a Mac for all of the following features, coupled with Ableton Live 9 Suite, and Qlab 3 with a Pro Audio licence.

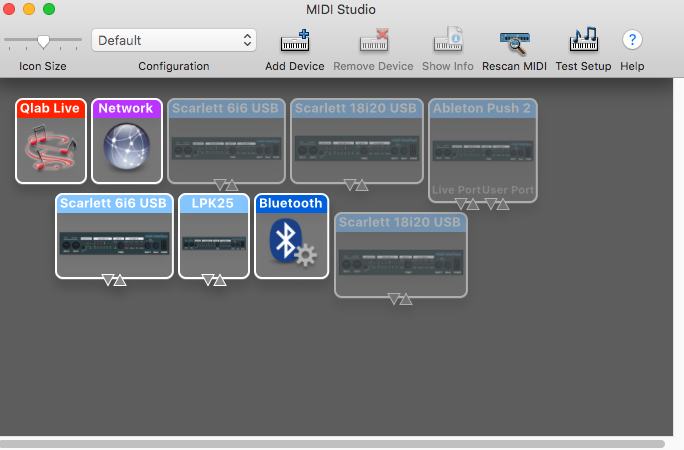
First things first, you’ll need to go into your computer’s Audio MIDI Setup, you’ll want to go to Window in the Finder bar, and select Show MIDI Studio.

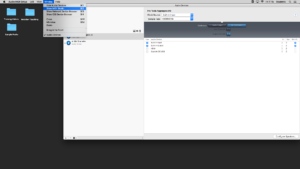
Show MIDI Studio in the Audio MIDI Setup Window in the Mac Mini


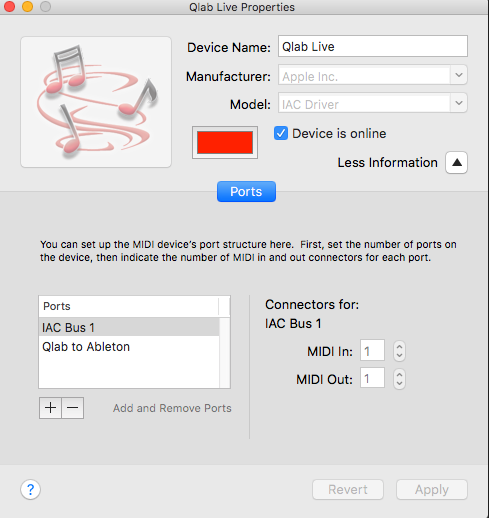
Qlab Live will pop up as an IAC Driver, and you’ll need to double-click the Qlab Driver to show the Qlab Live Properties.

Qlab IAC Driver in the MIDI Studio


In this new window, you’ll need to add a second Port such as below:

Creating a second bus under the Ports pane


These buses will be used to trigger Ableton from Qlab, and Ableton to trigger itself internally.

This then brings us to setting up Ableton MIDI. You’ll need to open a new Ableton file and open up the Preferences pane, from here you’ll need to set up the internal MIDI ports to transmit and receive MIDI via the buses to Qlab that we previously set up in the Mac Mini’s own Audio MIDI Setup. It should look something like below:

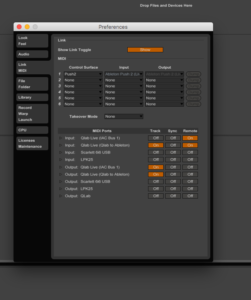
Ableton’s MIDI Preferences

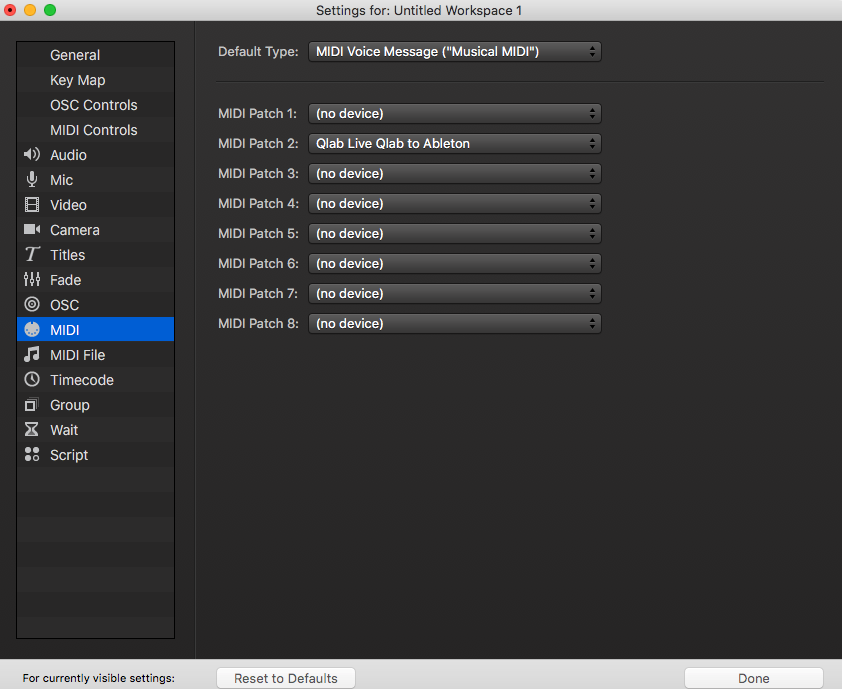
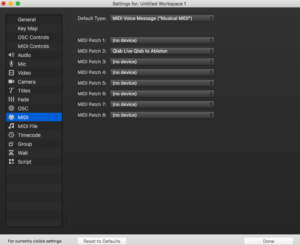
You can then open up Qlab and check the MIDI Port Routing in the MIDI preferences and ensure that MIDI is being sent to Ableton via one of the ports like so:

You’re probably going to want to leave at least one MIDI port before the Ableton bus free for a MIDI send to your sound desk, or even to Lighting or Video.

Once you’ve set up these initial steps, this is when it gets slightly more complicated. You’ll need to keep a strict record of the MIDI triggers that you’re sending, and indeed all of the values and channel numbers. These will eventually each do different commands so getting one value crossed with another could end up with not only a lot of confusion, but you could end up triggering cues before they’re supposed to Go!

In your Ableton session, look to the top right-hand corner, and you will see a small MIDI toggle button. This is your MIDI view button, and when clicked you’ll also be able to track your MIDI across your session and throughout the show. It will be generic Ableton colour until you click it, when it will become pale blue:


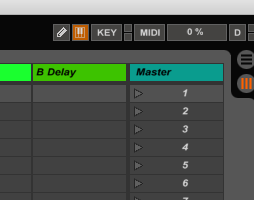
A portion of the rest of your Ableton session will also be highlighted in blue, and the highlighted sections are all of the features available for MIDI control. This can range from volume control on Ableton channels, changing the tempo, fading in/out effects, and starting ‘scenes’ on the Master channel bank.

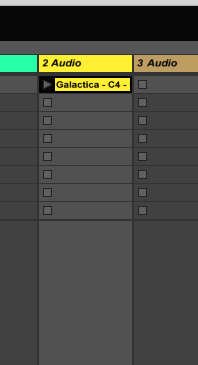
So I’m now dragging in a sample to the first Audio channel in Ableton

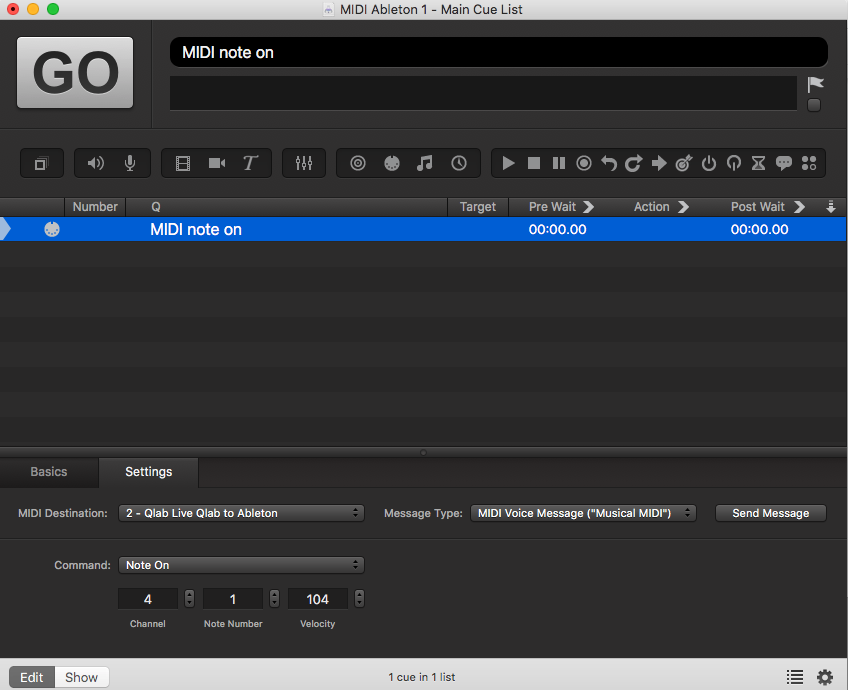
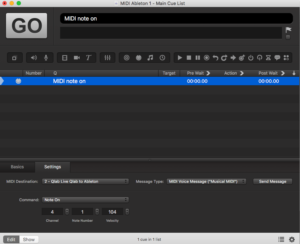
This is the first Audio track that I’d like to MIDI, so I set up a new MIDI cue in Qlab, and make sure that it’s a simple Note On MIDI command – Qlab will always default to Channel 1, Note Number 60, Velocity 64, but this can be changed depending on how you plan on tracking your commands. I’ll set this to Channel 4 (leaving the first 3 Channels free for desk MIDI, LX and maybe Video or spare in case something needs re-working during tech). I’ve then set it to Note 1, with a Velocity of 104 (104 is a key number here, this roughly works out at 0db within Ableton, so is handy to remember if MIDI’ing any level changes). Because all I’ve done here is send a simple ‘Go’ command to the Audio track, however, the Velocity number is sort of irrelevant – because the track is at 0db anyway, it will simply play at 0db.

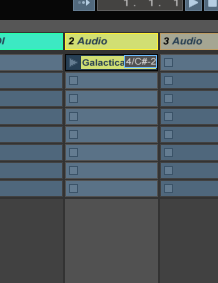
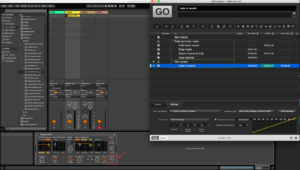
I’ll then ensure that MIDI output is enabled in Qlab, and open the MIDI window in Ableton, again, from the top right-hand corner, and select my track with my mouse (this might not necessarily be highlighted any more, but it will be selected). I’ll then jump back to Qlab, and fire off the MIDI cue. Ableton will recognise this, and not only will the programmed MIDI show up in the MIDI Mappings side of the session, but it will show up directly on top of the Audio cue, like thus:

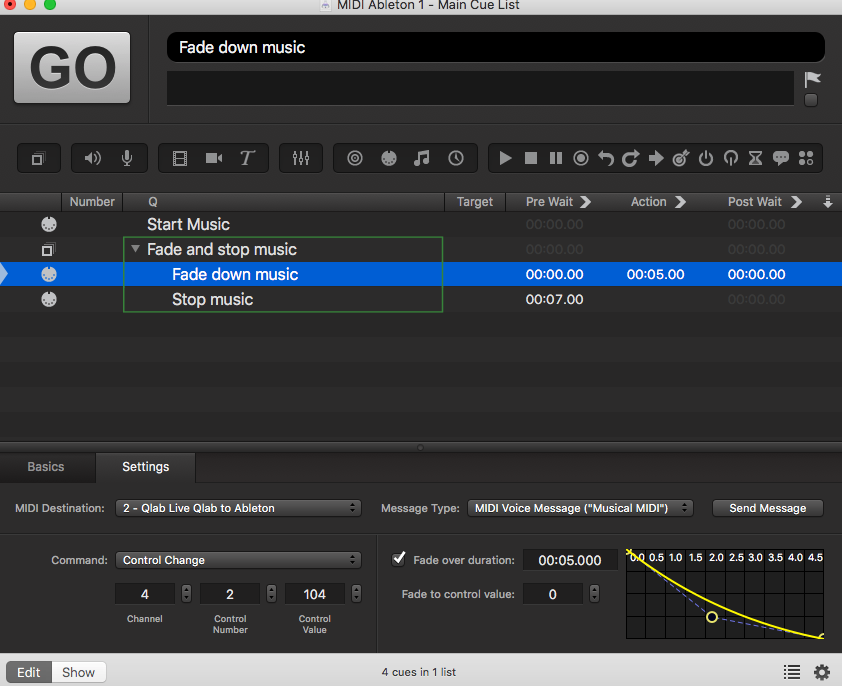
So now that we have an audio track playing and the action is happening on stage, you might have even fired through several other generic Qlab cues, but you want to stop the music and start the scene. There is no escape in Qlab for Ableton, so Ableton is going to keep going until we programme some more MIDI cues; So I’m simply going to programme a fade down of the music, and then a stop.

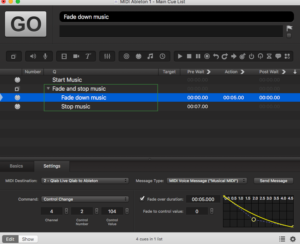
What I’ve done it programme a MIDI fade, which as you can see in the picture, it starts at the 0db value of 104, and then fades down over 5 seconds to 0, or infinity. You can also control the curve shape of the fade as usual in Qlab, and of course, the fade time is completely adjustable.

Once I’ve programmed the fade and added in the stop, my MIDI window looks a bit like this:

Ableton has accepted what ‘notes,’ or for Qlab, what values I’ve added in that complete different commands, and also given me a description of what these are doing. Something to note here is that the value to change the volume, whether you’re adding in fades up or down, will always be the same – it is the volume value in Qlab that will see the change.

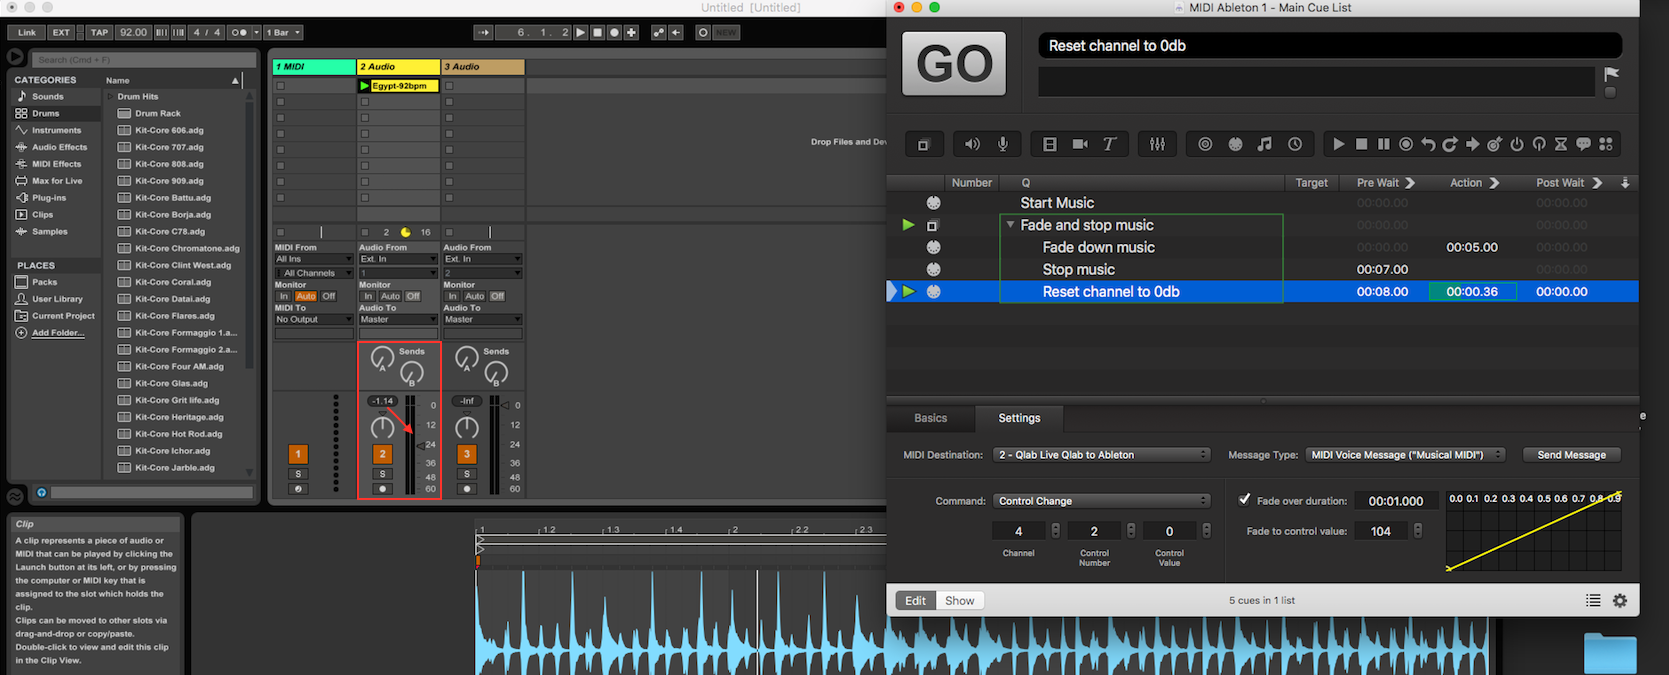
So now that I’ve stopped the music, I might want to start it again in a separate scene if it was a motif for a character, for example. This programming can be part of the same cue:

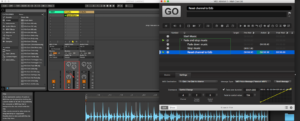
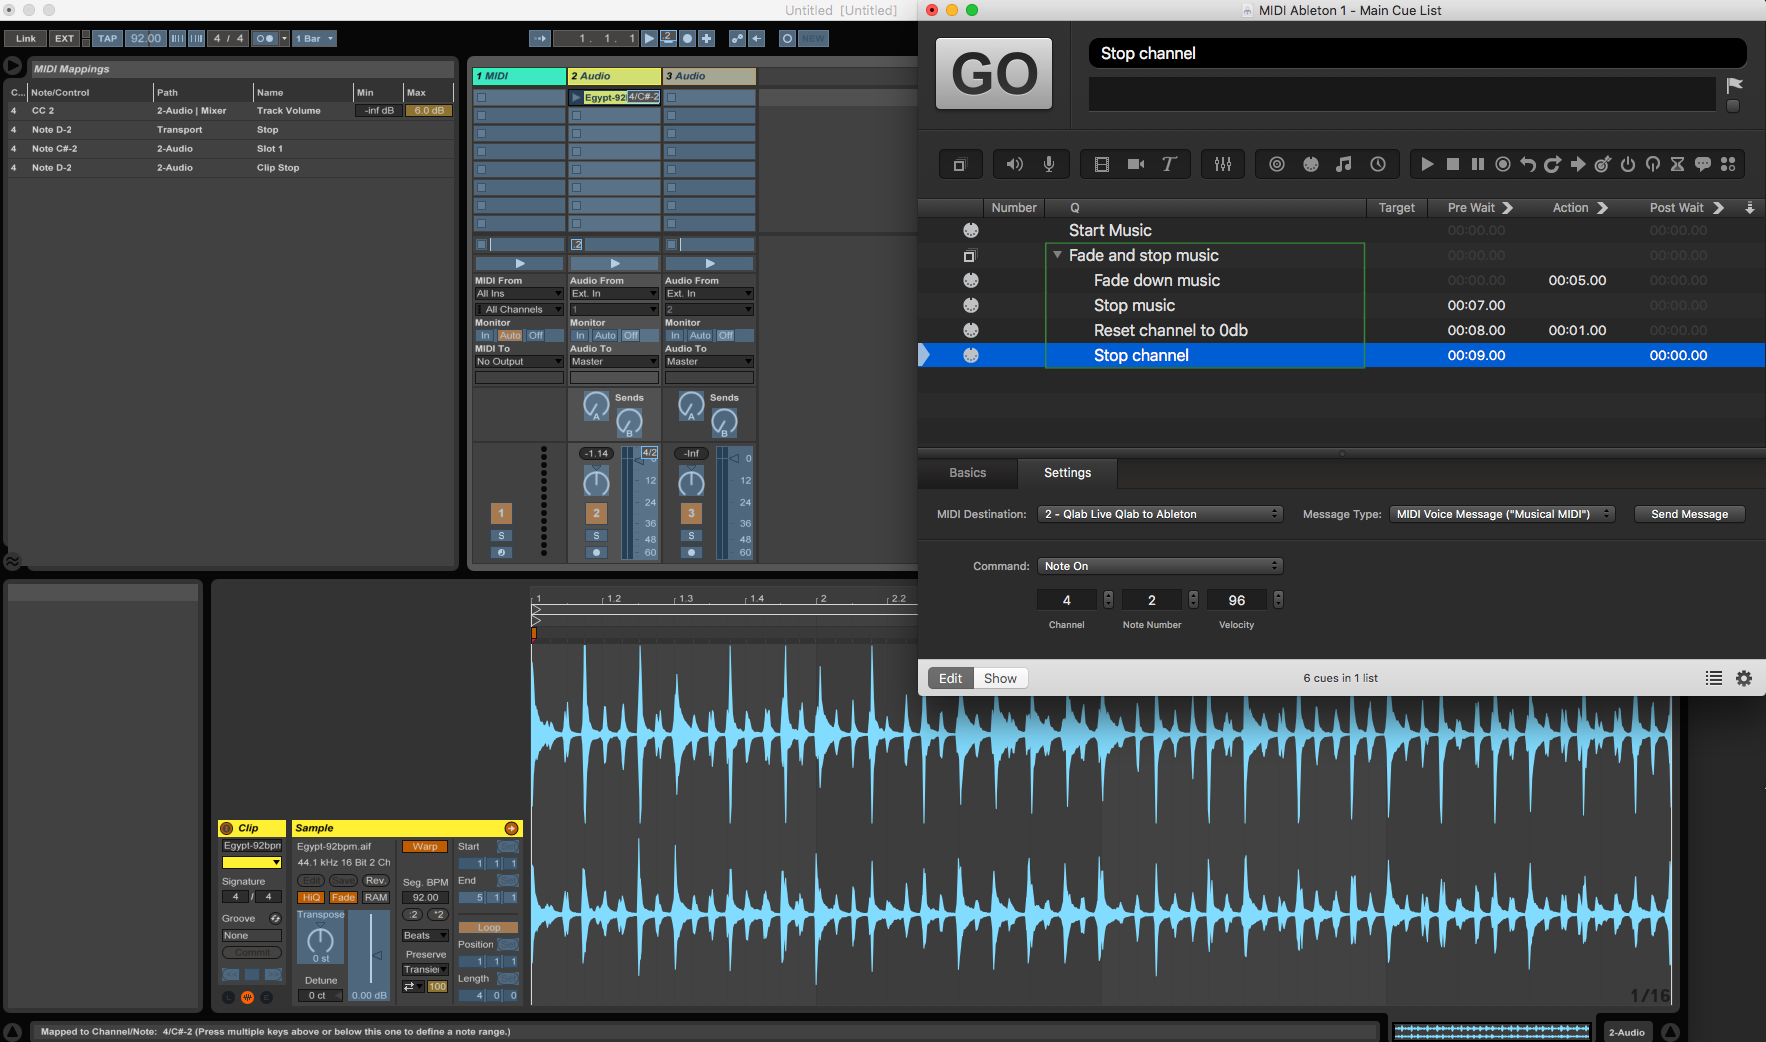
Again, you’ll notice that the Ableton fader is resetting back to 0db. Of course, this is just one channel, and just one track within Ableton, and the more you add, the more complicated the programming can get. I’ve also added in a channel stop to make sure that should we want to play something off a separate scene in Ableton; nothing else gets fired off with it (just in case).

In terms of MIDI’ing within Ableton, when in your MIDI pane, as a general rule, anything that shows up in blue is viable to receive and be altered by MIDI. This means that you can add in reverbs over a certain amount of time, take them away again, and alter any of the highlighted parameters completely to taste. You’ll then just need to go back and make sure that any fade ins have outs again and a reset.

This is a brief intro to having more control over Ableton during a show within Qlab, and of course the more effects and cues might get added, the more complicated the MIDI mapping becomes.

The great thing about using Ableton in a show is that there are certain parameters (also with MIDI control) that can be changed such as how long after receiving a stop should the track last (one bar, or half a bar, or a beat for example) to always ensure that music ends on beat and makes sense to the listeners. For me, Ableton allows you enough control over what it does, but enough flexibility.

When the Going gets Tough…

Sometimes things are tough. We are all strong and competent, but sometimes the circumstances we find ourselves in are tough. Even the strongest and most experienced of us have bad days. There is no nirvana level of badass that we reach where events can no longer bother us. But life, or at least working in a male-dominated industry, isn’t about how we get knocked down – it’s about how we get up again. Why would I allow my knockbacks to define me when I could choose to let my recoveries do so?

How do you recover from a knockback, from that awful gig, from finding out those you thought had your back didn’t? Firstly, stop. Stop, take a breath and think: Is there anything about what happened that you could learn from? Is there any responsibility you can take for any part of what happened? If there is, then you will become stronger by admitting it, if only to yourself, especially to yourself. Can you afford to let this one thing rock you?

Where to look for sources of strength

Ever since I was a girl, I have found books, both fictional and factual, to be a great place to mine for inspiration:

Fiction

‘Granny sighed. “You have learned something,” she said and thought it safe to insert a touch of sternness into her voice. “They say a little knowledge is a dangerous thing, but it is not one-half so bad as a lot of ignorance.’

Terry Pratchett, Equal Rites

‘Wisdom comes from experience. Experience is often a result of lack of wisdom.’

Terry Pratchett

‘If you trust in yourself….and believe in your dreams….and follow your star…you’ll still get beaten by people who spent their time working hard and learning things and weren’t so lazy.’

Terry Pratchett, The Wee Free Men

‘“The secret is not to dream,” she whispered. “The secret is to wake up. Waking up is harder. I have woken up, and I am real. I know where I come from and I know where I’m going. You cannot fool me any more. Or touch me. Or anything that is mine.”’

Terry Pratchett, The Wee Free Men
I’ve been a huge fan of Terry Pratchett since I was a girl. It struck me as magical that a grown man could know what it was like to be a teenage girl. He has written a whole cannon of works that have a variety of women in lead roles, overcoming obstacles, and not caring what the rest of the world thought.

Iain M Banks

I discovered the fiction of Ian M Banks when I was a teenager. He wrote both science-fiction and a strange (to me) type of mainstream fiction. The Wasp Factory was the first novel of his I read, and it changed the way I thought about a lot of things. I also spent a lot of time reading his science fiction novels as well.

Although fiction is stirring and often empowering, I find factual accounts to be more so. Knowing that the things I am reading actually happened, that other people have faced challenges greater than any I personally face – I find it especially humbling and it helps give me perspective.

I Write What I Like is a collection of works by Steve Biko, a journalist, and activist who was killed by the South African government for speaking out about Apartheid.

‘The greatest weapon in the hand of the oppressor is the mind of the oppressed.’

Steve Biko

‘You are either alive and proud, or you are dead, and when you are dead, you can’t care anyway.

Steve Biko

‘A people without a positive history is like a vehicle without an engine.’

Steve Biko

My Own Story is an account of the British Suffragette movement. It chronicles Emmeline Pankhurst’s struggles with the police and the British Government.

“As long as women consent to be unjustly governed, they will be.”
— from Pankhurst’s speech in Hartford, Connecticut on Nov. 13, 1913
‘Men make the moral code, and they expect women to accept it. They have decided that it is entirely right and proper for men to fight for their liberties and their rights, but that it is not right and proper for women to fight for theirs.’

Emmeline Pankhurst

Who do you surround yourself with? Are the people that you allow into your life supportive, or are they happy to give you a bit more grief when you are trying to push through a rough patch? There is a theory that the five people you spend the most time with will have a great influence on how you live your life. I don’t know how true that is but I do know it’s important to have people around you that make you feel supported.

‘You can’t change the people around you. But you can change the people around you.’
Joshua Fields Millburn.

Fix your own oxygen mask first – that is what you are told during the safety drill on an airplane. You can’t take care of anyone else if you are letting your own state slide. Taking good care of yourself is especially important when you have faced a setback. Even if it can feel indulgent to be extra nice to yourself, it is important to realize you need a bit of support from yourself at times.

We all have difficulties at times but, if you think back to the difficulties you have had in the past, you overcame them. There is no reason why you won’t overcome this as well.

The Role of an Associate Theatre Sound Designer

I’m at the beginning of my third week of a six-week contract as Sound Associate, otherwise known as an Associate Sound Designer, for a one-woman play with a complex score and sound design. Associate creative roles are quite common in UK theatre, but as I’ve had a few sound people in the past ask me what the role entails, I thought this would be a perfect opportunity to write about what you can expect if you take a job as a Sound Associate.

The basic role of a Sound Associate is to support the Sound Designer in realising the sound design for a show, when the Sound Designer has conflicting commitments or the volume of work required is too large for one person. A Sound Associate is more than an assistant. As well as often being a professional Sound Designer themselves, they have to be prepared to not only take on any sound design responsibilities that the Sound Designer can’t cover. These include standing in for the Sound Designer for when they can’t physically be at rehearsals, tech rehearsals, or a new venue.

I’ve hired Sound Associates in the past, because of this latter scenario: when a show I designed transferred to a different venue and I wasn’t available for the required dates. In these cases, I’ve entrusted my existing sound design to an associate, who then took on the responsibility of putting the show into the new venue. Their responsibilities included setting levels, making sure everything played out at the right time from the right speaker, and applying changes to cues requested by the director

Of course, all changes were fed back to me, because it was still my sound design. As it was the second run of an already successful production, I wanted my design altered as little as possible. I was aware that this didn’t allow my Associate to have much creative input, but then, the role of an Associate isn’t necessarily a creative one. A Sound Designer may ask you to source or create particular sound effects, and some sound designers may rely on an associate for a lot of creative input. However, it’s important to remember that the overall shape and realisation of the Sound design will always be the responsibility of the Sound Designer.

So why work as a Sound Associate? For one, if you’re at the start of your career, it’s an effective way to gain Sound Design experience or to work on a particular type of show. It’s also an opportunity to learn from more experienced Designers, and it’s a useful way to build relationships with production companies, directors, and creatives. For me, I wanted the opportunity to work on a unique production and immerse myself in a more practical, collaborative way of working with sound, which I hadn’t done for a while.

The responsibilities of a Sound Associate will differ from show to show, depending on what the Sound Designer needs. At a basic level, you should be prepared to do any of the following:

I think it’s this last point that separates a Sound Assistant from a Sound Associate. An excellent Sound Associate will protect the original design has much as possible and incorporate any changes without compromising the Designer’s overall aims. Whether an Associate is responsible for part of a show or from taking the show from rehearsals to the first preview, the Sound Designer has to trust that the show is in safe hands.

Radio Mics and Vocal Reinforcement, Part 2

Continuing from my last blog post, here is some more about the vocal reinforcement techniques I have learnt in relation to radio mics. Read Part 1 Here

Addams Family


This is a photo of a production of the Addams Family musical. This was the same setup, in principle, as Rent. The band is at the back of the stage – there is not much separation between the stage and the band. The mics are in the hairline; you can see the odd mic poking out but they are pretty well hidden. So, what is going on here? Why does this mic position work for The Addams Family musical and not for Rent?

It’s the score. The Addams Family is much more traditional in terms of musical theatre: the line-up of instruments is more traditional and there is room in the score for the vocals. The overall level of the show is quieter and that means we can get away the mics in a more discrete position.

Let’s look at the difference between the mic positions within the show, considering everything else is the same.

Ear hanger

In this photo, you can see Uncle Fester. Uncle Fester has no hair so the hairline isn’t an option at all. What can we do for uncle Fester? Uncle Fester needs an ear hanger.

You can’t see the ear hanger in this picture – I couldn’t find a shot of him from the correct angle. The ear hanger is quite long –  you would probably make it shorter and paint it to match the skin or hair tone.

Sometimes the hairline can’t be used because you have a hat situation that isn’t going to resolve itself in the way you’d hoped. So, what are the problems with this?

If you have to go for an ear hanger, it’s generally a step down in audio quality from the hairline position. Although they are omni-directional mics, there is a muddy quality to the audio when you put the mic over the ear. They are probably far more visible but they will keep a constant distance from the mouth. They can be liable to sweat-out, and if the actor is laying down, or head to head in profile with someone, then that can cause noise problems. But it can be a good solution if you can’t get the mic in the hairline.

It is common to use an HF boost cap on an ear hanger to try to help with the difference in EQ that it will need.


American Idiot


Boom mic

I did a production of American Idiot at the Bridewell Theatre. You can see they are all on boom mics here. American Idiot was a loud show and we had a great band who were up on a balcony at the back. Everyone in the cast was on a boom mic. It gave us the level we needed to get the vocals over the band and to have that great impact at the start of the show.

What are the downsides of boom mics? Well, they get in the way. Obviously, the actors lying on the floor is an even bigger problem here because there is more of the mic to crush. Any scenes where the actors have to kiss can be awkward. The mics move and, depending on where they are anchored, they may move relative to the mouth of the actor. They have to be anchored and fitted really well to not move about. Heavy breathing can be a problem and there is a very distinctive look to them. But they are worth it. So long as they are fitted properly, they will give you lots of level.

Chest mic

This is the least useful mic position for live sound. In theatre, it can bring all sorts of issues.

It is so difficult to make chest mics work as the actor can turn their head away from the mic – that will generate an inconsistent level. There can be loads of clothing noise and they really get in the way of costume changes.

Live effects on radio mics

Mic-ing every line of dialogue can you give you the opportunity to impose SFX on top of certain actors’ voices, so you’re not just restricted to amplification.

I was the sound designer for a production of Ghost.  One of the main characters in the show, Sam, is dead. He dies during the show and refuses to go away. He is not the only Ghost in the production.

The problem was one of how to make Sam otherworldly. There were some physical magic tricks to make that happen, but we wanted to give him that sudden transition into a ghost. We couldn’t do it visually – we couldn’t make him transparent, or black and white, or any of the other standard visual tricks used to represent a ghost – so I decided that whenever someone died they would have their own reverb. All their personal dialogue after they died would have its own reverb.

When they launched into song, the difference between the speaking effect reverb and the reverb needed for a number created a bit of a conflict, but subtle mixing fixed that.

I played with a similar thing on a version of the Nativity that I designed.

The play starts with the Book of Genesis, so before the world existed there was God and the angels and they all had a vocal reverb when they spoke as well.

The same actor that played God also played Death. I wanted to create something for Death that was different from the human characters in the play, but also something different than the reverb effect we had used for God and the angels. We used a pitch shift and, although you could still hear her acoustic voice, there was an undercurrent of something more menacing and subtle that gave enough of a difference to her voice to make an impact.

I’ve covered some of the things I have learned about radio mics here, but it’s a constant art of just doing what works and not being afraid to change the way things are done if they aren’t working the way you need them to for the job in hand.

Recap
In the last two posts I have covered five different types of mic-ing:

In the hairline: Looks good and sounds good, if you aren’t doing a very loud show. Minimal interference with the actor, unless they do a lot of forehead acting. Hair products and sweat can be a problem.

On the forehead: Still sounds great, but isn’t as discrete and is more prone to forehead acting.

Over the ear: Can sound muffled and needs some EQ work. It can get in the way if the actor is laying on their side. Sweat can be a problem. picks up costume noise, and doesn’t sound great.

Boom mic: Great for level, but can really get in the way physically.   Heavy breathing can be a problem. They are not at all discreet.

Chest mic: Can be very noisy, causes problems with costume changes.

Running Your Own Race

Over the past five years, I’ve been interviewed a couple of times for a “day in the life”-type feature for a magazine or blog. One of the more common questions, aside from “describe a typical workday for you” is “what has been the best day of your life so far?”

The answer is always the same: one of the best days of my life to date was the day I ran the London Marathon in 2009. I finished in a pretty good time (3:38), but it wasn’t my race time alone that made it a memorable day.

The 2017 London Marathon was last weekend and watching coverage of the race; I was reminded of why running the same race eight years ago was such an important day for me.

Every day I feel surrounded by reminders of competition and comparison, and I’m sure it’s the same for many of you. You can’t be an active social media user without seeing daily updates from friends and colleagues about great gigs they’ve just worked, accolades they’ve attained and life goals they’ve achieved. It’s often hard not to feel like you’re in constant competition with your peers.

I know that what we see on social media isn’t often an accurate reflection of a person’s life, thanks to algorithms and personal curation. I also know it’s very easy to feel envious when we see people moving ahead in their careers when we feel we’re treading water with our own.

At these times, several mantras spring to mind, like “trust the process” and “you are where you are meant to be.”  I’m not much of a mantra person, though I did use a slightly hyperbolic “pain is temporary, glory is forever” during marathon training, because it fitted my running rhythm, and it seemed to motivate me to keep running. Despite this, I’ve found a mantra that works for me at the moment: “you are running your own race.”

This phrase, to me, has two meanings. One, your journey is unique. Two, you should appreciate the mileage you have already done, as well as look forward to the challenges and milestones yet to come.

Comparing yourself with your colleagues won’t give you any magic answers about why they are where they are, and you are where you are because they’re not you. Maybe the friend who posted proudly about getting an enviable gig has carved out a niche in that particular area of sound, whereas you’ve worked across several sectors. Maybe the gig is the result of years of networking to get noticed. Or maybe they were just in the right place at the right time. Whatever the reason, all it means is that you won’t be working that gig this time around. It doesn’t mean that opportunity will never come your way. And by the time it does, maybe you’ll already be doing something better.

Focussing on one specific end goal, or career level, as being the be-all and end-all also ignores how much you’ve achieved so far. Making a career in sound, or in any creative field, takes sacrifice and determination. Appreciate how far you’ve come and the successes you’ve had. You don’t get to mile 26 without passing miles 1 to 25 first.

I had a friend and training partner who ran the London Marathon the year I ran it. He was a more experienced long-distance runner who expected to finish in a time under 3:30. We had both trained hard and were as prepared as humanly possible. On the day, less than halfway through, he tripped over a discarded water bottle, twisted his ankle and had to walk part of the way. He limped over the line after well over 4 hours. I had a dream run, did the first 9 miles faster than I ever expected and finished 7 minutes faster than my best-predicted time. The following year he ran again and smashed his best predicted time, and I decided not to compete altogether because I had already achieved what I wanted.

To my mind, both of us are winners of our own races. I had a great run in 2009 because I was well-prepared and nothing unexpected happened. The following year my training partner had a great race for much the same reasons. We both finished the race we wanted in the end, and it doesn’t matter much when it happened.

When I feel a tug of jealousy about someone else’s career or disappointment about my own, I remember why I trained for and ran the London Marathon and how I felt that day. I did it not to be faster than anyone else in particular, but because I had set myself a goal of running a marathon. I was ecstatic that I finished faster than my best-predicted time, but what made the day memorable was the proof that I made it happen myself.

You don’t have to compete to achieve your goals. Celebrate how far you’ve come. Run your own race.

The Important Art of Documentation in Theatre Sound Design

When you work on a production, you never really know what sort of life it’s going to have after that initial run or tour. A production you designed two years ago may suddenly get another run, and you realise you need to dig out all your sounds and designs and make them work in a different venue. Or, you need to hand it over to an associate to do the same. It’s at times like these that you discover the value of two things: accurate, detailed documentation and an organised filing system.

I know that documentation and filing are the least exciting aspects of a creative sound role, but I cannot overemphasize how much they will save your bacon when you need to recreate the sound design for a show. In the time-sensitive, pressured environment of theatre and theatrical productions, it’s very easy to let documentation lapse, so you need to either delegate the task or make time for it. You don’t want to be tearing your hair out the night before tech week kicks off because you have no idea where you put that crucial sound effects file you recorded four years ago.

Here’s a starter list of what you should be captured during the production of a show.

Rehearsals and production weeks before tech week

  1. Make sure you have copies of all your design drawings, whether you created them in CAD software or hand-drew them. If they’re hand-drawn, scan them so you have an electronic copy as well. Ask for model box photos as well (or take your own), so you have a visual reference point for this production.
  2. Make sure you have an electronic copy of the script, score, or both, and any additional material e.g. song lyrics, prologue/epilogue, as well as paper copies.
  3. Take photos of any pictures, sketches, diagrams, props, or anything else that were used in the rehearsal process or in your own creative time that directly influenced your sound designs. They may come in handy if you need to create any new files for subsequent runs.
  4. Label each sound file accurately as you create it, including documenting the recording process if you recorded it from scratch.
  5. Label and save all venue tech specs and sound hire quotes
  6. Label and save all photos taken during venue visits, including any notes about potential speaker/equipment positions

Tech week to press night

  1. Once speaker positions are set, take photos from multiple angles to accurately capture positions. If you have to hand a show over to an associate further down the line, it’s far easier to show them a picture of how you positioned a particular speaker in a venue than explaining it.
  2. Note positions of racks, microphones, processors, desks, screens, comms, cue lights, everything that’s specific to that show.
  3. If there’s anything particularly unique about this production that you may need to remember at a future date, write it down.
  4. Keep sound cue sheets and update them as necessary, including a record of deleted cues. They may be reinstated for future productions.
  5. Make sure you have an accurate list of hired sound equipment, including the hire company, any existing venue equipment used in the show, and any equipment purchased by the production
  6. Save all show and desk files

After press night

  1. Save copies of the final show files and desk files with copies of all final sound files.
  2. Save any sound files not used in the show to a separate folder. You may need them for subsequent productions
  3. Save all documentation, including sound design plans, final cue sheets, radio mic plans, scene maps, etc.
  4. Confirm where any sound equipment purchased by the production company will be stored following the end of the show’s run and save that information in a document
  5. Label everything clearly and put in a single folder so you can quickly find everything for that show
  6. Back up everything!

Managing your documentation should be an integral part of your sound design work, not an addition to it. Do it once and thoroughly for each production, and you’ll save yourself a lot of potential headaches in the future

Preconceptions in Human Hearing

As sound designers, we often have to fight against what something actually sounds like, and what audiences expect things to sound like. For example, an authentic phone ring might not necessarily fit the tone of the piece, and actually, a phone from a different era would suffice in creating urgency and tonality.

As a starter for ten, human hearing is fairly straightforward. Sound waves are transmitted through the cochlea which then eventually reach the Primary Auditory Cortex and the syntax processing areas of the brain. We can say that these processing areas of the brain share the sound waves and do their best to find some rhythm and harmony in what we are hearing. This is because of the linguistic processing tendencies we have, and our innate need for understanding and communication.

Our perception of sounds stems from our memories, and the human memory is typically untrustworthy. How many times have you shared a story and had someone remember a completely different version? We could argue that it’s the same premise for sound.

While it’s true that our echoic (hearing/auditory related) memory lasts longer and has a quicker processing time than our iconic memory (visual related), and could therefore be described as more reliable; our echoic memory can only hear things once, and things once heard cannot be unheard.

This is also where our short and long-term memories come into play. If you were sitting in a packed auditorium at front of house and heard an announcement (the quarter call, for instance), nine times out of ten we would hear the call, process it, and then completely forget about it. Should somebody then ask you, five minutes later, what that call was, you may just be at a loss as to what it was, but could probably remember the tone, the clarity, and more about the speaker’s voice than the actual message. There are a number of factors to blame here.

Upon recognising that there was no immediate danger, you would blend out the rest of the call, and continue your own conversation. This is our basic selective hearing, but what of the rest of the call? We attenuate the rest of the information and store it in case it becomes useful, but it’s not always remembered accurately. This is further because our memories store a lot of information, whether it be in the long-term or short-term, and intrinsically we link memories to other memories to aid said storage. Of course when talking about sound, and sound effects, it entirely depends on the context of how/when/where a listener has heard them before – no two natural sound effects will ever be the same, and nor will their memory recalls within individual human beings.

But what does all of this mean for sound design? And particularly sound design for theatre? If we are playing on audience perceptions of what sounds, atmospheres, or even conversations between actors should sound like, then it depends on the effect being sought. If we’re talking a straight play, then a doorbell from 1911 should probably be true to the text – this means a bell on a pull.

On the other hand, I have absolutely used a recorded shop doorbell because it fitted the tone of the piece better. The bell was, due to pitch, smaller than any of the real house bells we tried, which meant it was a slightly lighter sound, and therefore more whimsical. Of course, this steers us into the territory of scenes in a play, and their overall tones (not to be confused with musical tones). A big old rusty house doorbell would often seem too clanky and boisterous for the entrance of the next-door neighbour (unless, of course, this is the exact effect that you’re heading for).

Sound designers will often never use just one sound effect to attain the overall effect that they are seeking; this may be as part of a sequence or even underscore/atmosphere. As we can see below from my recent show A Little Night Music, I used multiple tracks to create two car arrivals:

It’s often the textures of the sounds that I aim to create when sound designing, and often they do end up being true to what authentic/real-life things sound like, but more often they do not. This can often be for the reasons stated above. It can also end up being that, again, they do not fit the set, tone, or overall direction of the piece.

This is where the overall direction, sound design, and artistic licensing come into play. We can, with our best intentions, want something to sound authentic, however realistically, as designers and artists, we will borrow from different genres and times to make happen what we want to happen. This again, however, can come back to our own personal memories and experiences of sound and effects, and the ideas that they give us in terms of what we want to create.

Ideas fuel other ideas, as do our memories and creative minds, so the more that we feed into said ideas and the ethos of our creations, the more we contribute to the expectations of what things should, or could, sound like.

Radio Mic Placement in Musicals

Introduction

This month I was asked to give a talk about radio mic placement and vocal reinforcement at the Association of Sound Designers Winter School. This month’s blog is the presentation.

I’ve been working in Theatre sound for over 20 years. First, in musical theatre as a no. 3 and an operator, then at the National Theatre where I was the sound manager for the Lyttelton. Now, I work primarily as a Sound Designer, designing productions for musicals and plays.

I’m here to talk about radio mic placement and how that will affect what you can achieve with the sound of your show. I’m going to talk about different productions I’ve worked on and how I’ve dealt with mic positions in different situations.

I have some pictures of mic placements from shows that I’ve designed, and we’ll talk about the situation for each one as we go.

In the last 40 years, sound technology has been quickly evolving. I think it all started with:

The Sony Walkman

I think we are in a different era for sound design, and it isn’t just because of the new tech that we use, it has to do with the Sony Walkman, invented in 1979. It changed the way we listen. The sound was now delivered to you. Sound was now a personal thing that had gone from mostly being listened to as ‘something over there’ to something that is very much up close and personal.


Noise and volume

Another factor in the changes in sound design is the fans in equipment in the auditorium. Most of the theatres we work in were designed for unamplified voices, but theatre lights, projectors, and air conditioners all make noise, so the background noise we have to compete with has increased.

We are in a noisier world than we use to be in general  Birds now singer louder to cope with being in a city.

Casts are used to wearing radio mics − they wear them at drama school. I don’t think actors project as much as they use to.

Grease

I started my West End career on Grease, at the Dominion Theatre, in 1993. That wasn’t my design, obviously. The Sound Designer was Bobby Aitkin. It was my first exposure to West End sound design, and I stayed backstage on that show for about two years. I learnt the importance of mic placement and how a good operator can hear if a mic has moved. I also learned that you don’t provide vocal foldback for lavalier mics.

You couldn’t see our radio mics. We were a little obsessive about that, considering we were at the Dominion. The stage is huge and most of the audience is quite far away − it does seem a little crazy now. But, we were serious about it, and the lovely wig people put in curls on foreheads so the mics were hidden underneath.

It was a big thing then, not to have the mics visible. We would go around and look at the posters of other shows, pointing out mics to each other if we could see them. We would judge the backstage staff on that.

There was a lot of pride attached to the mics being in a good position for audio, as well as you not being able to see them.

We had a couple of handheld microphones for Greased Lightning and for the mega-mix at the end. It does seem an odd concept not to give vocal foldback to the vocalist, but what they need to get through the number isn’t the same thing as the audience needs to enjoy a good show.  You often have to have a difficult conversation with the vocalist, but it is a good idea.


Why can’t you use Lavaliers in Foldback?

Why is that all the lavs that we use are omni-directional? Whatever the singer is hearing the mic is hearing too. It’s easy to see how that can lead to feedback.

On Grease, we had lavs in the hairline. This gave us a consistent distance between the mouth and the microphone, keeping incoming sound levels consistent. We didn’t have any hats, that I remember, so had no trouble there on this production.

Because lavs are omni-directional, putting them in the foldback causes all sorts of problems. In addition, sweat and hair products can get into the mics, causing issues, and they can move.

Loud numbers

There were some loud numbers in the show − Greased Lighting, and the mega-mix at the end − and they were done on handhelds. We had a handheld hidden in the Greased Lightning car and that would be whipped out at the appropriate moment. Then, at the end of the show, there were a couple of handhelds hidden behind the counter in the milk bar which would be whipped out and appear magically in the hands of the performers that needed to use them. We were told we could get away with that because Greased Lighting was a song within the story of the show, so we could get away with that as well.

Handhelds aren’t Omni so that meant we could use them in the foldback. We could turn the volume up for those numbers and get a bigger impact from them. There was also a scene at the prom where we used a Shure 55SH on a stand, plugged into a radio mic transmitter. Because it isn’t an omni-directional mic it could also go into the foldback and be treated like one of the handhelds.

Rent

Often, by the time we get to tech, we have had the band call and then we don’t have the band again until the dress rehearsal. The producers don’t want to pay for all that musician time so we get stuck with keys and, if we’re lucky, a drum kit.

We tech-ed without the full band, but we did have keys and tracks, so there was plenty of time to get to work on the vocals.

I usually start with a quick line-check for level with each cast member and then start the technical rehearsal. I enjoy this part of tech; finding out how hard you can push the mics, working with EQ, setting the compressors. It is a chance to get the vocal system set and working before the band turns up for the dress rehearsal.

And then the band arrives

The band was on stage, at the back, and, although there were some drapes, there wasn’t a great deal of separation between the band and the cast. It was a problem. We started tech and we weren’t getting enough level out of the mics on the cast. There wasn’t the option to hire a load of boom mics − this was a low-budget production at the University of Surrey, and a lot of the mics belonged to the University. So, what could I do? Well, we had to pull the mics down the forehead. You can see in the next photo that the mics are not in the hairline. What seems like a small movement in position made a huge difference to the amount of level we could get from the mics. It didn’t look great but if we had used booms then they would have been very visible as well.

Rent is a rock musical, there are some delicate moments in it, but it chugs along quite loudly at times. Moving the mics down an inch from the hairline helped to make the show work.

Next Month  I will share other types of mics and mic positions and how I have used them to problem solve.   

X