Empowering the Next Generation of Women in Audio

Join Us

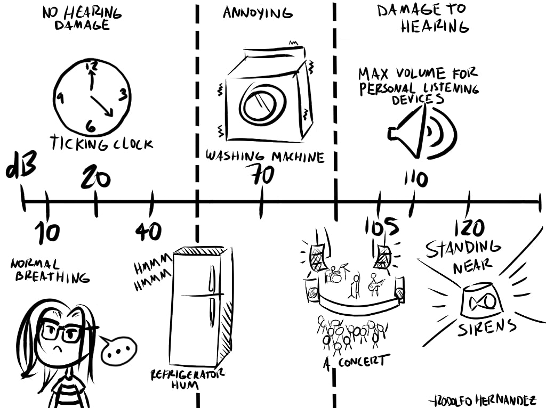
Confronting Bad Behavior

Let’s face it: it can be hard to stand up for yourself.

As women, we are socialized to be friendly, nice, helpful, informative – this works against us. We make up a tiny portion of the audio industry, which makes us more susceptible to disrespect and often means we are on our own (or at least, it feels that way). And in my case, the person I am confronting is practically guaranteed to be physically bigger than me, and probably older too.

I have been asked if I know anything about sound, aggressively quizzed on my resume and technical knowledge, told that I do not belong and have even been flat-out ignored countless times. More often than not, these situations come out of ignorance rather than an intent to harm. After I explain why I am upset they understand, and we are able to move on. But it is still extremely frustrating.

Below are some strategies that I have developed for setting boundaries and confronting these types of behavior head-on. Personally, I like to word my reaction so that the uncomfortableness I am feeling is reflected back onto the other person, but the sharpness of my response varies greatly depending on what was said and whether they are open to listening. Theoretically, you should only have to explain why a situation is not OK once.

Option #1: Play dumb and ask “why”

This strategy works best with offensive jokes and similar lines of questioning. Pretend that everything is a simple misunderstanding on your part and continue asking for more explanation as to their motivations for asking or telling you something. Repeat as many times as necessary.

Option #2: Shut it down

Word your response strongly and matter-of-factly. I like to use a polite but stern voice while making it clear that I’m upset. Ideally, the conversation will end there; if the person keeps pushing, I make it clear that I am done talking about the subject by changing the subject back to work (and sometimes explicitly stating so).

Option #3: Ignore it

Sometimes the potential consequences outweigh speaking up, or it just doesn’t feel like a battle worth fighting. Dealing with these situations can be exhausting, especially if they’re ongoing or recurring – there’s no shame in simply not feeling like fighting.

In some cases, it’s not even remotely clear what action would be useful. When the man you’re hoping will hire you goes on a 15-minute semi-incoherent rant about how racism doesn’t exist, where do you even begin? It’s been over a year since that happened, and I still have no idea what could have been said that wouldn’t have just extended it. In fact, sometimes ignoring a behavior is arguably the best way to go about things. (I’m thinking of the sound engineers who whistled at me like a dog and blinked their flashlights on and off at me whenever they wanted my attention, respectively).

Option #4: Involve more people

If addressing the matter isn’t working privately, sometimes calling the behavior out with others within earshot is enough to end it. Of course, that depends a lot on the attitudes of the people around you, and whether the perpetrator of the behavior has any shame.

If you aren’t having success, ask someone else to help you. Tell your coworkers what is going on and ask them to back you up or keep an eye out for you. Ask someone with more authority (or perceived authority) to help.

In extreme cases, you might have to find ways to physically deter the person from reaching you. I have kept security next to me to ward off a DJ who repeatedly came into the booth, took my decibel reader, made a reading, and refused to leave until I had turned it up to the unreasonably loud level he wanted. You do not have to handle things by yourself.

Option #5: Accept defeat

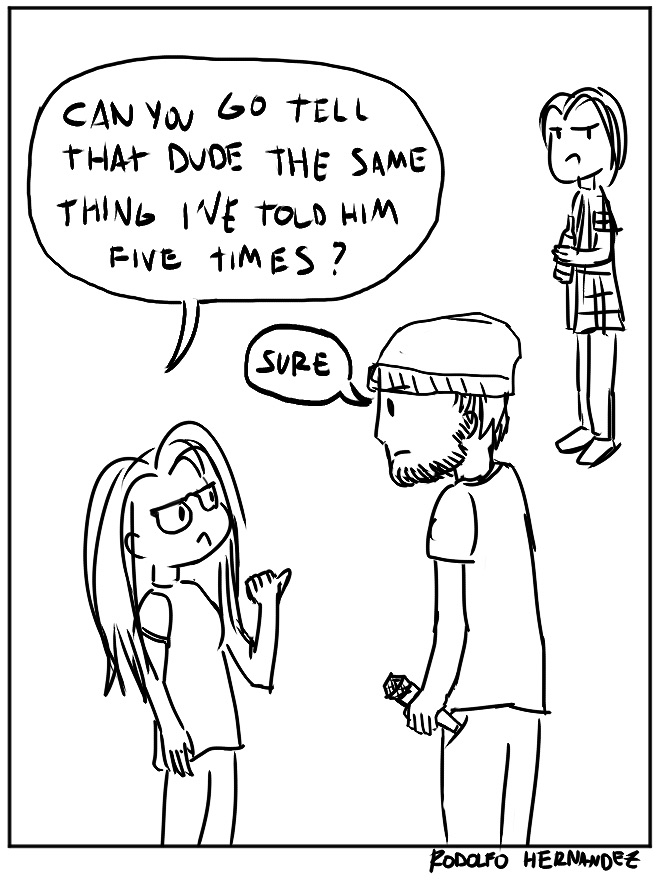
So you’ve shouted into the tour manager’s ear five times that you are not compressing the DJ mixes, the DJs themselves are triggering the speakers’ compression because their gain is so high. You’ve even shown him that you don’t even have the soundboard’s compressor enabled. But he’s still explaining to you that it’s your fault. At this point, it’s time to get a coworker to come over and repeat the exact same thing because repeating yourself into oblivion is an extremely inefficient way to get things done and irritating on all sides.

Unfortunately, sometimes it becomes clear that you will not get anywhere with a specific person. Whether they won’t let you get a word in, won’t listen to the words you are telling them, or act like you don’t exist, nothing is going to give. In this case, I find it useful to find a third person (at least older than me, usually male) to let my communication flow through, which is annoying is necessary to get things done first try. Obviously, this is my least favorite option, but it’s important to know when to cut your losses.


Introduction to LRADs

With the recent protests over the killing of George Floyd, the Long-Range Acoustic Device (LRAD) and other acoustic weapons used by police have been making headlines once again. Since these devices are most commonly deployed against nonviolent protestors for crowd control, I thought it would be useful to give a brief overview of their development, use, and most importantly, how to protect yourself.

A Brief History of the LRAD

The LRAD, like many other police devices, was originally a military weapon. Work on “sound cannons” began in 2000, after an al-Qaeda attack on the USS Cole [7]. The goal was to create a device that could be used to communicate with possible threats from a distance and disperse them with a high-pitched alarm sound if needed.

Developed by what is now Genasys Inc. (formerly the LRAD Corporation), the LRAD quickly spread from the Navy to the Army, before crossing over into law enforcement [6]. Since its adoption, the LRAD has been deployed domestically against protesters at protests such as Standing Rock, the Women’s March on DC, Occupy Wall St, and the Eric Garner protests. It has also been widely adopted by law enforcement worldwide [7]. Domestically, a Genasys Inc. press release from June proudly lists police departments in Portland Ore., San Jose, Colorado Springs, Phoenix, Columbus, Charleston, and Ft. Lauderdale as just some of the 250+ cities in which police have deployed LRADs recently [3], [6].

The LRAD 100x

The version of the LRAD that protestors are most likely to encounter is the LRAD 100x, although they may encounter other models affixed to vehicles or helicopters. A lightweight model marketed to police departments, the LRAD 100x may be standalone or worn by officers. The 100x peaks at roughly 137 dB, emits a 30˚ beam of sound with up to 5500 meters, and is loud enough to cause pain within 20 meters [5]. Like all LRAD devices, it operates within a limited frequency range of 200 Hz – 10,000 Hz, which means that the tones produced overlap with the most sensitive part of our hearing: the range of human speech [4]. This model may be used to communicate with targets directly, play pre-recorded messages, or emit painful tones intended to disperse people.

Questionable Safety

The peak volume of an LRAD can range from 140 dB to 160 dB, depending on the model. For context, according to the CDC, noise above 70 dB for a prolonged period of time is where your hearing begins to damage. Noise above 120 dB can cause immediate harm to your ears. 140 dB is where you may feel physical side effects along with hearing loss. 160 dB is where eardrums can burst [8].

Despite their widespread use against civilians, very little research has been done into the long-term effects of acoustic weapons. Temporary and permanent hearing loss, tinnitus, nausea, migraines, disorientation, ear damage, and lasting sensitivity to loud noises are just some of the reported symptoms [2]. The damage caused by LRADs can also be exacerbated by police who are not properly trained on how to manipulate dispersal tone characteristics, do not use them at the recommended distance, or simply do not care about their targets. The ACLU and Physicians for Human Rights are two of many groups that are calling for the suspension of LRAD use by police [1]. Several excessive force suits have been filed against various police departments regarding their use of LRADs and other sound cannons on protestors, including a successful one in Pittsburgh and an ongoing one against the New York Police Department [2].

Protecting Yourself and Your Hearing

Since LRADs have a peak volume ranging from 140 dB – 160 dB, it is extremely important to be informed. A small amount of exposure to such high-volume sounds can have lasting effects.


Sources

  1. “Acoustic Weapons Fact Sheet”. ACLU [Online]. Available: https://www.aclu.org/fact-sheet/acoustic-weapons-fact-sheet (accessed July 9, 2020).
  2. B. Kesslen. “’Plug your ears and run’: NYPD’s use of sound cannons is challenged in federal court.” NBC News [Online]. Available: https://www.nbcnews.com/news/us-news/plug-your-ears-run-nypd-s-use-sound-cannons-challenged-n1008916 (accessed June 29, 2020).
  3. ‘Genasys™ Inc. LRAD® Systems Deployed by First Responders and Law Enforcement for Critical Crowd Communications’, 2020 [Online]. Available: https://www.globenewswire.com/news-release/2020/06/04/2043685/0/en/Genasys-Inc-LRAD-Systems-Deployed-by-First-Responders-and-Law-Enforcement-for-Critical-Crowd-Communications.html (accessed Jul. 29, 2020).
  4. L. Peskoe-Yang. “How to Dodge the Sonic Weapons Used by the Police.” Popular Mechanics [Online]. Available: https://www.popularmechanics.com/military/weapons/a32892398/what-is-lrad-sonic-weapon-protests/ (accessed June 29, 2020).
  5. “LRAD 2018-2019 Product Guide”. Genasys Inc. [Online]. Available:
  6. N. Khan. “Defend and Protect”. The California Sunday Magazine [Online]. Available: https://story.californiasunday.com/long-range-acoustic-device (accessed June 30, 2020).
  7. W. Nicol. “What is LRAD? The ‘sound cannon’ used by police, explained.” Digital Trends [Online]. Available: https://www.digitaltrends.com/news/what-is-lrad-sonic-cannon-explained/ (accessed Jun. 29, 2020).
  8. “What Noises Cause Hearing Loss?” CDC [Online]. Available: https://www.cdc.gov/nceh/hearing_loss/what_noises_cause_hearing_loss.html (accessed June 29, 2020).


Making the Transition from Wedges to In-Ear Monitors


When you work in live sound, at some point you will find yourself in a similar position to me: mixing monitors in mid-to-large sized venues. You will begin encountering bands that have their own front-of-house engineers but no monitor engineer and manage in-ear monitors in many forms, ranging from tour-ready packages to a hodgepodge of cheap receivers to crappy gaming headphones used with an adapter (yes, that happened). And you will need to adapt your mixing style to the monitor combination of the day. This strange territory in the transition between mixing wedges and mixing IEMs can be tricky to navigate, so I thought I would share a few of the strategies I’ve developed.

Manage expectations. This might be the most important. Chat with the band while you’re setting up – introduce yourself, point out the monitor location, and try to get a feel for mix needs. After testing mix connections with pink noise I like to make an announcement restating my name and explaining that I’ll do my best to get them what they need as quickly as possible. If it’s a rushed soundcheck, I’ll explain that I’ll focus on levels and basic EQ first, to get through the line check quickly, and make higher-level tweaks as they check songs.

Use headphones. Relying on headphones or using a cheap pair of IEMs as your cue mix makes your listening experience much closer to that of the artists on stage. Headphones are especially useful with bands that are only on IEMs, since in this case listening to anything in the cue wedge may affect the mix you’re building onstage.

Ask questions. Don’t be afraid to ask for information you need or double-check things you aren’t sure of. Asking the musicians where they want something in their mix – ears, wedges, side fills – or if they have panning preferences is also useful, as some bands have a template they prefer their mixes to follow. I also like to confirm that everyone has what they need of a certain channel before moving on during soundcheck.

Set vocals first. This includes talkbacks! Ideally, you can set the talkback and vocals at a healthy level and bring the rest of the mix up around that. Keeping the levels at a comfortable volume matters even more now, with the mix going directly into someone’s ears. And from a practical standpoint, setting vocals first is a must so that you can communicate effectively with the band. Don’t forget to put a little of both talkbacks into the side fills so that you can communicate with front-of-house easily.

Watch your levels. Sound going directly to your ears is a much different experience than sound coming at you from a nearby speaker, so be extremely careful when setting and adjusting mix levels (especially if you do not have headphones or your own IEMS available for use). Whenever I adjust the levels of an IEM mix, I take care to go much slower and be extra aware of what dB level I am at.

Befriend front-of-house (if there is one).  It’s important to have a good working relationship with the front-of-house engineer. Make sure it is clear who will lead soundcheck, when you’re ready to move on within the soundcheck, etc. Generally, a touring engineer will also be able to give you some tips about the monitor mixes and the general preferences of the artist.


A Note on Saying Thank You

When I was 16, I was hired for my first front-of-house position. In my new role as “person in charge” I quickly began noticing all of the little obstacles that seemed to appear each night. They had been present before, of course, but never so obvious. The way that bands assumed anyone in the room except me was the sound engineer. The flashes of surprise that crossed their faces upon being pointed my way. The way I was talked over, dismissed, or needed repeated requests to get things accomplished when the same request from a male coworker was heeded immediately. The questions I faced about my knowledge of audio sometimes turned into full interrogations. I had known that I would face challenges like these, but the relentlessness was getting to me.

Then, a few months after being hired, I did sound for a math rock band called TTNG. They walked in, immediately accepted that I was the sound engineer, and didn’t question my competence. They listened to me and treated me kindly, as an equal. I didn’t feel like I needed to prove anything to them. It was refreshing. Although I didn’t realize it at the moment, after the show I started to see just how much their respect for me had meant. How it had given me hope. And I decided to send them a message saying exactly that.

This started a habit. I now do my best to acknowledge bands that stand out for being exceptionally nice or easy to work with. I want them to know that I noticed and appreciated their behavior, and tell them thank you for making my job that much easier. If I can’t do this in person, I’ll usually send a message a day or two after.

I feel very strongly that it’s important to pass on these thank-you notes because it’s often underestimated how much weight a band’s attitude can have. How simply being friendly and rolling with the punches makes or breaks stressful situations, and makes all the difference between a rushed soundcheck being doable or downright miserable. I’ve managed to make lasting connections, friendships and may have even gotten my foot in the door to touring by doing this.

So if someone has made a good impression on you, don’t hesitate to let them know. You never know what might come from it.


The Bad Buzz: Finding and Fixing Unwanted Noise

Of all the irritating things that happen when you’re rushing to finish a soundcheck, an unwanted buzz coming through the PA system is one of the worst. There are so many possible culprits, and it seems to happen all the time. Since it’s such a common issue, I wanted to walk through the process I use to find and eliminate unwanted noise, in an attempt to make troubleshooting less stressful.

Finding the Source

To begin, determine whether the buzz is coming from the audio system or something onstage by turning off the PA and monitors. If there’s silence, you know the problem is within the system itself. Turn them both back on and mute the PA system: do you still hear the buzz in the monitors? Use this information to narrow your focus area. If the buzz is solely in the monitors, for example, then you know to examine the channels and equipment that are being sent to the monitors only (such as a click track), and can consider the possibility of a bad channel on the monitor board.

Most likely the buzz is caused by a specific input. If it is unclear from the meters which channel is noisy, mute your inputs one by one until the noise stops. (If you are running monitors from front-of-house, make sure your aux sends are post-fader so that the send is muted along with the channel). Check for a bad channel on the board by hard patching the noisy input to another channel. If the buzz persists, check for a bad channel in the signal path by changing inputs on any snakes or sub snakes in use. Listen for any crackling, pops, or other giveaways that there may be a bad microphone or cable.

Most importantly, talk to the musicians! Ask them to stay quiet while you are troubleshooting and ask about their gear – they will be able to tell you any problems they have experienced at past gigs, and maybe even what solutions have worked.

Troubleshooting the System 

If the buzz is system-only, the issue is probably power. Check where everyone onstage is pulling power from and whether or not the circuit is used exclusively as audio power. Ideally, backline power will be on a circuit used only for the musicians’ gear, but often at smaller venues lighting and audio share power. Lighting dimmers, movers and fans may be audible if power is shared, so see if the buzz changes as lighting dimmers are moved. It may disappear when the lights are at 100%. In this case, there’s not much you can do besides try to reconfigure the power to be as separated as possible.

Next, check for cable crossing. Look at the paths of unbalanced cables. Do they cross paths or run along any cables carrying AC power? Electrical interference often arises when AC cables are in close proximity to unbalanced cables (for example, pedalboard cables), so it’s best to keep them as separated as possible.

There can also be grounding issues at play. If the hum sounds like it’s around 60 Hz, you probably have what’s called a ground loop. Ground loops occur when the ground connections from two or more separate sources (say, the system power and amplifier power) differ. Ideally, both pieces of equipment reference ground at 0 Volts. But nothing is ideal in real life, so it’s more likely that the ground readings differ slightly: say, 10 millivolts and 0 Volts. When this happens, the difference in electric potential can cause a small current loop that flows between the two connections, resulting in noise.

Here the quickest fix is to lift the ground switch on the channel or amplifier (if there is one) or use an adapter that accomplishes the same thing. But this workaround is not ideal since it removes a safety feature. Having the guitarist move around and angle the pickups differently may be enough to get rid of or at least lessen the hum.

Troubleshooting the Stage

If the noise is coming from one of the pieces of equipment on the stage itself, turn the PA system off and start with the simplest case. Here we’ll use the signal flow of a guitar as an example.

To begin, have the guitarist set their amp to clean. Have them unplug and re-plug their instrument cable at both ends – sometimes the problem is as simple as one end of the cable not being completely connected.

Next, have the guitarist plug directly into the amp, bypassing any pedals. Ask the guitarist to move around onstage, to see if the noise changes with location. If so, environmental noise is probably being picked up by the instrument cable, and there should be a spot on stage where the sound minimizes or even disappears altogether.

Connect pedals one by one and see if the buzz reappears with a specific pedal. Plug the guitarist directly into a DI box, and see if the hum disappears with the ground-lift switch flipped. If so, then you know it’s a grounding problem, with either a ground loop in place or an instrument grounding issue somewhere.

A buzz can also be the sign of tubes in a tube amp going bad. If so, there’s not much you can do beyond tolerating the buzz or switching amps. In the rare case that the guitarist is plugged into two amps and sending each amp one side of a stereo pedal, noise can result from a grounding issue between the two amps themselves.

The General Process

Buzzes, hums, and other unwanted noises only have a few likely sources: instruments, cables, and equipment. When unwanted noise occurs, stay calm and determine the general location of the buzz (system or stage). Then, continue narrowing in until you find the source. You may not always be able to find or fix the exact source, but the tips I have given should help you on your way.


X