Empowering the Next Generation of Women in Audio

Join Us

Basic Aspects of a Live Sound Mix

To work in live sound, it is essential to know how to use various types of equipment, as well as the workflow of the devices we use to work. Having theoretical knowledge on the basics of sound, acoustics, and signal flow will help us to understand much better the process of mixing for live sound. We must also have clear concepts such as gain structure, frequencies, dynamics, and time processors work and dedicate a lot of time to issues related to the phase, design, and optimization of systems. And yet, sometimes, we forget the one fundamental: The Mix.

Introduction to the mix.

In-studio recordings, mixing is a significant factor (obviously: first we record and then we mix). But in the live sound, sometimes the perspective is lost a bit: We design the sound system, we make predictions, it is assembled, it is optimized, the monitoring is installed, the chosen microphones are positioned carefully, the show is done, and we dismantle. Something as simple to say as “doing the show” is, really, a very complex mixing process that, like everything else, one must learn to develop. Also, you have to learn to mix quickly, because live sound tests tend to be quick.

In the studio, we have time to complete the mix (sometimes, in the studio, if we do not find the inspiration, we can cancel the session and continue mixing at another time). But in the live audio, there are no second chances: you have to take it forward.

Obviously, all the knowledge we have listed at the beginning of the blog will help us mix (if we do not know how our tools work, we do not know the basic principles of sound, and we do not have the system well adjusted, it will be difficult to get a good mix). But when we put ourselves in front of the console and we have the talent on stage, we have to be able to answer the following question: How should it sound? Here, multiple issues come into play.

The first is that sound is subjective. Put 100 sound engineers to mix the same group, and you will have 100 different mixes. Some you will like more and others less, but surely all will be valid, at least for the one who has made it.

In a concert with a large audience, it is difficult to satisfy the criteria of mixing for all the spectators. But we should try to satisfy the vast majority. If your mix (which is excellent for you) is not liked by most, you will not last long in this job.

You learn to mix, by mixing. Everyone must follow their own learning process, listen, correct, make decisions and make mistakes. As much as we read about sound practices and theories, we have to spend hours and hours mixing to improve our technique.

In this blog, we share some important aspects when considering a mix.

How should it sound?

To begin with, whenever we can, we should have information about what we will be mixing. Knowing what kind of music and the musical culture is essential. So, the first step is to listen to music of all types or at least have a mental concept of how different musical styles sound, it may seem silly, but it is fundamental.

Imagine mixing a kick drum with a lot of clicks (reinforcing the high frequency) for a jazz band, it probably would not work, on the other hand, that would work well for a metal band.

If you find yourself in a position where you do not know the genre of music that you were asked to mix, investigate their discography and style, it is an obligation to prepare as much as we can, otherwise, how can we get a proper mix?

Something fundamental is to listen to the source. Get close to the stage and listen. The essential principle of mixing is to capture the sound played by the musicians on the stage and transmit it to the listeners without significant changes in the sound source; Unless the musician asks for it.

Plans and frequencies

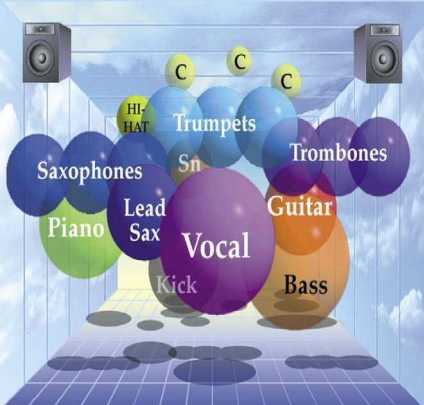
Okay, we already know what type of music the band plays, and we’ve even listened to the instruments from the stage. What do we do now? Perhaps it is a good time to consider the plans for the mix. If we have, for example, a rock band with drums, bass, guitar, and voice, in what plane are we going to put each one of those elements?

It is evident that we can not position everything on the same sound plane. The mixture deals, among other things, with that: Some elements have to be higher and others lower and in frequencies. We have, in the best of cases, from 20 Hz to 20 kHz to distribute our signals. If I pretend that they all share the same frequency range, the masking phenomenon will occur.

We must mix by making different volume decisions, as well as contemplating the dynamics of the songs, which musicians are usually in charge of nuances to generate these level changes from the source.

The next step is to balance and equalize by listening to the whole.

The distribution of frequencies is like making a mental map, where you have to visualize the different sound elements, with this they are distributed within the frequency spectrum. The experience will help you to delimit where each element can be with higher speed and agility, on the other hand, you have to review in detail the elements that can more easily collide with each other by sharing similar frequency ranges.

For example, a bass drum and bass.  Both share fundamental frequencies share the range of low frequencies, so we will try to get them to complement each other without getting confused.

For the balance, in addition to levels, equalization, dynamics, and reverberation are also used. The combination of all these processes is what will allow us to create better sound planes.

For more detail about the plans in the mix, one of the books you can consult is
The Art of Mixing“, by David Gibson, mainly for the graphics in which he explains the distribution of the sound elements according to the type of music.


The Effects

Finally, we began to prepare the mix with the effects processors are the final touch. As a starting point in basic questions, we can place a short and a long reverb to create planes; it is also recommended to use a reverb plate effect and a delay to give that little touch of magic, usually subtle and not very obvious, that nevertheless takes the mix to a higher level.

The effects change depending on the type of music and the acoustic space where we are or even depending on the song because not everything works for everything. Before the soundcheck, it is advisable to test the effects with a voice or with a recording that we have on the computer (virtual soundcheck), this will allow us to choose more precisely the type of effect we need according to the space where we meet, so we can adjust parameters such as the time of fall or the pre-delay.

Conclusions

I like to think that in most of the time our work of mixing in the live sound is as simple (and at the same time, as complicated) as capturing the signals of the stage in the most faithful way to the original and transmitting them to the public with a little bit of amplification.

The best results are obtained first by thinking about what we want to do and then acting and applying the necessary processes to reach our goal. It may seem obvious. If we manage to have an image of the sound we want to obtain in our mind, it will always be much easier to get a good mix.

Interfaz de Sonido

Es muy importante conocer más a fondo los diferentes componentes y equipo que necesitarás para montar tu home studio, y para ello nos adentramos en el mundo de las interfaces de audio.

Qué es una interfaz de sonido?

En primer lugar, vamos a aclarar qué son las interfaces de audio. Antes de meternos a fondo, una aclaración: es probable que hayas escuchado hablar de interfaz de audio, interfaz de sonido, tarjeta de sonido etc. ¡No te preocupes, es lo mismo! Tan solo son diferentes formas de llamarlas, pero el nombre más técnico y más extendido es interfaz de audio.

Explicado de una forma sencilla, una interfaz de audio es el hardware que te permite trasladar los sonidos que quieras grabar a tu DAW (recuerda, la estación de audio digital, o en otras palabras, el software de producción musical). Es decir, la interfaz de audio es lo que te permite pasar el sonido acústico, la señal analógica (por ejemplo, la que produce cualquier voz o instrumento), a señal digital, que es lo que tu ordenador puede leer y procesar.

Por qué necesitas una interfaz de audio?

Esta es siempre la pregunta que todo el mundo se hace al plantearse comprar una interfaz de audio. El motivo es precisamente el que ya hemos visto. La mayoría de los estudios de grabación en la actualidad (y mucho más los home studio), centralizan la producción musical a través de la computadora. Con el avance de la tecnología, hay una tendencia cada vez mayor de abandonar los equipos analógicos para pasar a lo digital. Por lo tanto, todo lo que queramos grabar debe poder ser procesado por la computadora y por el software de producción. Piénsalo así: una computadora no entiende el sonido, así que para que puedas trabajarlo, es necesario pasarlo a un lenguaje que pueda comprender, y este lenguaje es la señal digital. No te preocupes, de momento no necesitamos profundizar mucho más sobre esto. A medida que avancemos, ya habrá tiempo de entrar en más detalle sobre los tipos de señales y otros conceptos más técnicos. Pues bien, la interfaz de audio es el equipo que capta esas señales analógicas que emite un instrumento y las convierte en señales digitales, capaces de ser tratadas por la computadora. Por ese motivo, una interfaz es algo de lo que no podemos prescindir en nuestro estudio. Si queremos hacer música en casa, necesitamos una interfaz de sonido.

Siguiente pregunta: Por qué tengo que comprarme una interfaz, si en mi computadora ya viene integrada una tarjeta de sonido?  La respuesta es muy sencilla. Efectivamente, en tu computadora seguramente ya viene integrada una tarjeta de sonido. El problema es que las tarjetas de sonido que vienen incorporadas en las computadoras comunes no están preparadas para realizar ese tipo de procesamiento de sonido, que requiere mucha potencia y muchos recursos. Piensa que no estás montando un estudio de grabación para reproducir un par de canciones en Spotify. Lo que queremos es hacer nuestra propia música, y para ello no es suficiente el equipamiento común, sino que necesitaremos componentes de buena calidad que estén preparados específicamente para el tratamiento de audio.

En qué fijarte para comprar una interfaz de audio

Ya sabemos qué son las interfaces y por qué necesitamos una en nuestro estudio. Ahora la pregunta es: ¿cuáles son sus principales características?  ¿En que debo fijarme para comprarme una? ¿Cuál es la que mejor se adapta a mis necesidades?

No te dejes engañar. Todas las interfaces de audio tienen básicamente las mismas características y funcionan de la misma manera. Son estas:

Entradas y Salidas


Por una parte, debemos tener muy en cuenta el número de entradas y salidas de nuestra interfaz. Es fundamental que te preguntes lo siguiente: ¿Para qué la quiero? ¿Qué uso le voy a dar?

La regla es que necesitarás tantas entradas como líneas quieras grabar simultáneamente. Eso dependerá en gran medida de la forma en la que grabes.

Básicamente existen dos métodos principales de grabación:

Mi consejo, sobre todo si estás empezando, es que grabes por pistas. Es una forma más sencilla de iniciarse en la producción musical y de conocer cómo funcionan los flujos de sonido. También es una técnica increíble para potenciar la creatividad mientras compones. Además, necesitarás menos entradas, ¡por lo que podrás ahorrar mucho dinero y espacio!

El siguiente punto que hay que valorar es el tipo de entrada o salida. No todas las líneas necesitan del mismo tipo de entrada. En términos generales, existen dos tipos de entradas:

Las interfaces incorporan entradas híbridas, que gracias a su diseño permiten conectar tanto instrumentos como micrófonos.

Otro factor por tener muy en cuenta son las salidas de audífono. Hoy en día prácticamente todas las interfaces de sonido incorporan una salida de audífono. Es una característica fundamental para poder intercambiar de una forma sencilla entre escuchar tus producciones a través de los monitores y de los auriculares. Un consejo: si puedes, adquiere una interfaz que tenga más de una salida de audífonos. Te aseguro que te será muy útil cuando estés grabando a otra persona, ya que de esa forma los dos podrán escuchar cómodamente mientras graban.

  1. Preamplificadores

Los preamplificadores son probablemente el elemento más importante de las interfaces de sonido, ya que determinan la calidad de tus grabaciones. El objetivo es buscar una interfaz que lleve integrados unos buenos preamplificadores, fiables y, sobre todo, que transmitan un sonido claro y limpio. En la actualidad, la gran mayoría de las interfaces del mercado incorporan unos preamplificadores de una calidad suficiente.

  1. Conexión

Existen tres tipos de conexiones:

  1. Precio

Como siempre, es importante tener en cuenta el precio de los diferentes modelos. En Tu Home Studio, el objetivo es aprender a producir música y montar tu propio estudio de grabación con el presupuesto más ajustado posible.

Actualmente hay interfaces de audio para todos los presupuestos. Claro que, también hay opciones mucho más caras, que normalmente ofrecen más entradas y salidas y unos preamplificadores de la mejor calidad.

Conclusiones

En mi opinión, la mejor opción cuando adquieras una interfaz es que se ajuste a tus necesidades ya sea utilizando USB o Thunderbolt. Hablando de las conexiones con USB, la velocidad es más que suficiente y ha mejorado mucho con el USB 2.0 y 3.0. En cuanto al número de entradas, mi recomendación es que empieces con una interfaz de mínimo 2 entradas, con la que podrás grabar cómodamente por pistas e incluso grabar algunas interpretaciones en vivo.

Aunque siempre es recomendable tener más de una entrada. Lo mejor es que tengas una interfaz de 2 a 8 entradas, una para micrófono y otra para línea. Además de cuidar la calidad de los preamplificadores ya que algunas interfaces no son de tanta calidad y no ofrecen un sonido tan limpio.


Carolina Antón es especialista en diseño y optimización de sonido, así como ingeniera de sonido independiente. Ha trabajado con varias compañías de sonido como la producción de 2hands, Eighth Day Sound, Britannia Row, Meridian Pro audio y Ocesa. Ha realizado giras por los EE. UU., México y América Latina con Zoe, Cafe Tacvba, Natalia Lafourcade, HaAsh. Carolina también es propietaria de Hibiki Production que proporciona servicios para grabación y transmisión en vivo.


Sound Interface

It is very important to know more in-depth the different components and equipment that you will need to set up your home studio, and for that, we enter the world of audio interfaces.

What is a sound interface?

First, let’s clarify what audio interfaces are. Before getting to the bottom, a clarification: you have probably heard about an audio interface, sound interface, sound card etc. Do not worry, it’s the same! There are only different ways to call them, but the most technical and most extended name is the audio interface.

Explained in a simple way, an audio interface is hardware that allows you to transfer the sounds you want to record to your DAW (remember, the digital audio station, or in other words, the music production software). That is, the audio interface is what allows you to pass the acoustic sound, the analog signal (for example, the one produced by any voice or instrument), to a digital signal, which is what your computer can read and process.

Why do you need an audio interface?

This is always the question that everyone asks when considering buying an audio interface. The reason is precisely the one we have already seen. The majority of recording studios today (and much more home studio), centralize musical production through the computer. With the advancement of technology, there is a growing trend of abandoning analog equipment to become digital. Therefore, everything we want to record must be able to be processed by the computer and by the production software. Think of it like this: a computer does not understand sound, so for you to be able to work it; you need to pass it to a language that you can understand, and this language is the digital signal. Do not worry, at the moment we do not need to go into much more about this. As we move forward, there will be time to go into more detail about the types of signals and other more technical concepts. Well, the audio interface is the equipment that captures those analog signals that an instrument emits and converts them into digital signals, capable of being treated by the computer. For that reason, an interface is something that we cannot do without in our study. If we want to make music at home, we need a sound interface.

Next question: Why do I have to buy an interface if a sound card is integrated into my computer? The answer is very simple. Indeed, a sound card is already integrated into your computer. The problem is that the sound cards that come incorporated in common computers are not prepared to perform this type of sound processing, which requires a lot of power and many resources. Think you’re not setting up a recording studio to play a couple of songs on Spotify. What we want is to make our own music, and for this, the common equipment is not enough, but we will need good quality components that are specifically prepared for the audio treatment.

What to look for to buy an audio interface

We already know what interfaces are and why we need one in our study. Now the question is: what are its main characteristics? What should I pay attention to buy one? Which one best suits my needs?

Do not be fooled. All audio interfaces have basically the same characteristics and work in the same way. These are:

Inputs and Outputs

On the one hand, we must take into account the number of inputs and outputs of our interface. It is essential that you ask yourself the following: What do I want it for? What use will I give?

The rule is that you will need as many entries as you want to record simultaneously. That will depend to a large extent on the way you record.

Basically, there are two main methods of recording:

Recording by tracks: Nowadays, there are many people who record by tracks, that is, you record a track first (example, drums), then on that track you record the next one (eg the bass) and so on until you complete the track. It could also be called layer recording. The technique consists of adding layers until the final result is obtained. Therefore,  if you record by tracks (which is the most usual in a home studio environment), it will be enough to have an audio interface with few inputs.

Live recording: unlike recording by tracks, for live recording you will need as many inputs as there are sound lines being played at the same time. For example, if you want to record a group of 4 people simultaneously playing live, you will need as many inputs as you want to record: several entries for the voices and many others for the instruments. Keep in mind that there are instruments, such as the battery, that need several microphones to capture the different components (bass drum, snare, cymbals, etc.).

My advice, especially if you are starting, is that you record by clues. It is a simpler way to get started in musical production and to know how sound workflows. It is also an incredible technique to enhance creativity while you compose. In addition, you will need fewer entries, so you can save a lot of money and space!

The next point to assess is the type of entry or exit. Not all lines need the same type of entry. In general terms, there are two types of entries:

Line input: these types of inputs are used to connect instruments such as basses and electric guitars.

Microphone input: as its name suggests, it is used to connect microphones. However, we must bear in mind that condenser microphones require a different power to operate (48v). Most audio interfaces already have a built-in button to activate the 48v of power for when you want to connect your condenser mic, but I recommend that you make sure before buying it.

The interfaces incorporate hybrid inputs, which thanks to their design allow to connect both instruments and microphones.

Another factor to keep in mind is the hearing aid outputs. Nowadays practically all sound interfaces incorporate a hearing aid output. It is a fundamental characteristic to be able to exchange in a simple way between listening to your productions through the monitors and the headphones. A tip: if you can, get an interface that has more than one headphone output. I assure you that it will be very useful when you are recording another person, since that way you can both listen comfortably while recording.

Pre-amplifiers

The preamplifiers are probably the most important element of the sound interfaces since they determine the quality of your recordings. The objective is to look for an interface that has integrated good preamplifiers, reliable and, above all, that transmit a clear and clean sound. Currently, the vast majority of market interfaces incorporate preamps of sufficient quality.

Connection

There are three types of connections:

USB: is the most used currently, especially in the interfaces of medium quality. Although it is not the fastest connection of the existing ones, it is a very good option for home studios, especially for its easy connection to computers (all computers on the market have a way to connect to USB ports). In addition, with USB 2.0 and USB 3.0, the speed has increased considerably, making the USB connection preferred by both manufacturers and users.

Firewire: Formerly firewire connections used to be faster than USB, but today, the USB connection has nothing to envy to the firewire, getting to provide very good speed.

Thunderbolt: it is the fastest connection in the market, now more frequent in current computers. Normally only higher quality audio interfaces (and, therefore, higher price) incorporate thunderbolt connection.

Price

As always, it is important to take into account the price of the different models. At Tu Home Studio, the goal is to learn how to produce music and set up your own recording studio with the best possible budget.

Currently, there are audio interfaces for all budgets. Of course, there are also much more expensive options, which usually offer more inputs and outputs and preamps of the best quality.

Conclusions

In my opinion, the best option when you acquire an interface is that it suits your needs, whether using USB or Thunderbolt. Speaking of USB connections, the speed is more than enough and has improved a lot with USB 2.0 and 3.0. As for the number of entries, my recommendation is that you start with an interface of at least 2 entries, with which you can comfortably record tracks and even record some live performances.

Although it is always advisable to have more than one entry. The best thing is that you have an interface of 2 to 8 inputs, one for microphone and another for the line. In addition to taking care of the quality of the preamplifiers since some interfaces are not of such quality and do not offer such a clean sound.


Carolina Antón is a specialist in sound design and optimization as well as a freelance sound engineer. She has worked with several sound companies such as 2hands production, Eighth Day Sound, Britannia Row,Meridian Pro audio, and Ocesa. She has toured throughout the U.S, Mexico, and Latin America with Zoe, Cafe Tacvba, Natalia Lafourcade, HaAsh. Carolina is also the owner of Hibiki Production providing services for Live Recording and Streaming. Carolina is the Chapter Head for Mexico Chapter of SoundGirls.


X