Empowering the Next Generation of Women in Audio

Join Us

Post-Production Audio: Promo Mixing

One area of the post-production industry that goes under the radar when looking for jobs or career paths is advertising and promos. A promo is a form of advertising used in media/broadcast to promote a program or event. You’ve probably seen these a million times and never thought much of it. “Coming up next on the Simpsons!” or “Tuesday night right after the Voice!”


Mixing a promo is not terribly complicated. There’s usually voice-over, dialog, sound fx and music. The content is short – generally, you are given a “spot” which is 30 seconds (but could be other lengths). Then, there can be “cutdowns” of that spot – shorter spots that are usually derivative of the longest one. For a 30 second spot, the cutdowns might be 20, :15, and :10. Here’s an example of a 30-second spot and a basic cutdown version:


Once you mix the:30 it’s often a matter of conforming your mix/tweaking or applying settings from the original mix to the cutdown versions.

The main thing that makes promo mixing difficult is organization and file management. For one spot, you might have 3 cutdowns (4 mixes in total) plus “versions.” Versioning is taking your mix and changing the tag – the VO at the end of the spot that identifies the show, time, date, network, etc (“The Americans. All-New Next Tuesday. Only on FX”). Your average tv show that has a promo for next week’s new episode might have the following tags: Next Wednesday, Wednesday, Tomorrow, Tonight, Next. If they’re running a spot early there might be tags like “This summer,” “coming in May,” “premieres May 5.” Sometimes it gets specific like “Next Wednesday at 8” or “Wednesday at 9/8 Central.” There might be promotion across networks or platforms, too. For example, a mix I do for the cable network FXX might also air on FX, Fox, On Demand, and online streaming (FXNow). Some promos are also on the radio or play at movie theaters.
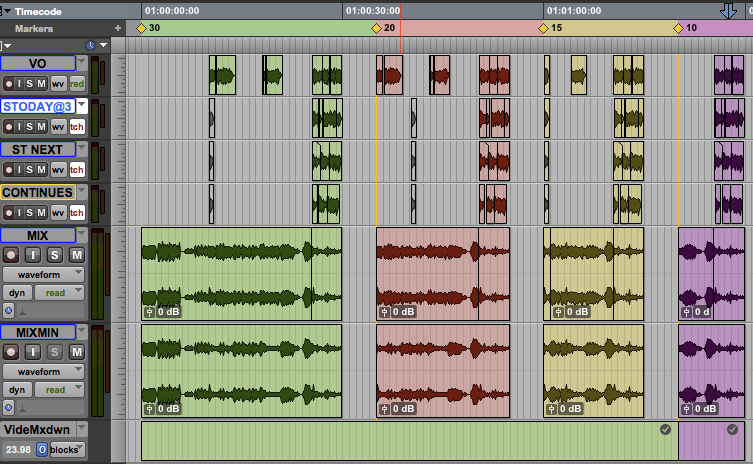
This basic Protools session shows tags for a :30 spot and 3 cutdowns (:20, :15, and :10). The three versions for each spot are “Starts Today at 3,” “Starts Next” and “Continues.” Sometimes it’s easier to do the mix and tags in separate sessions.

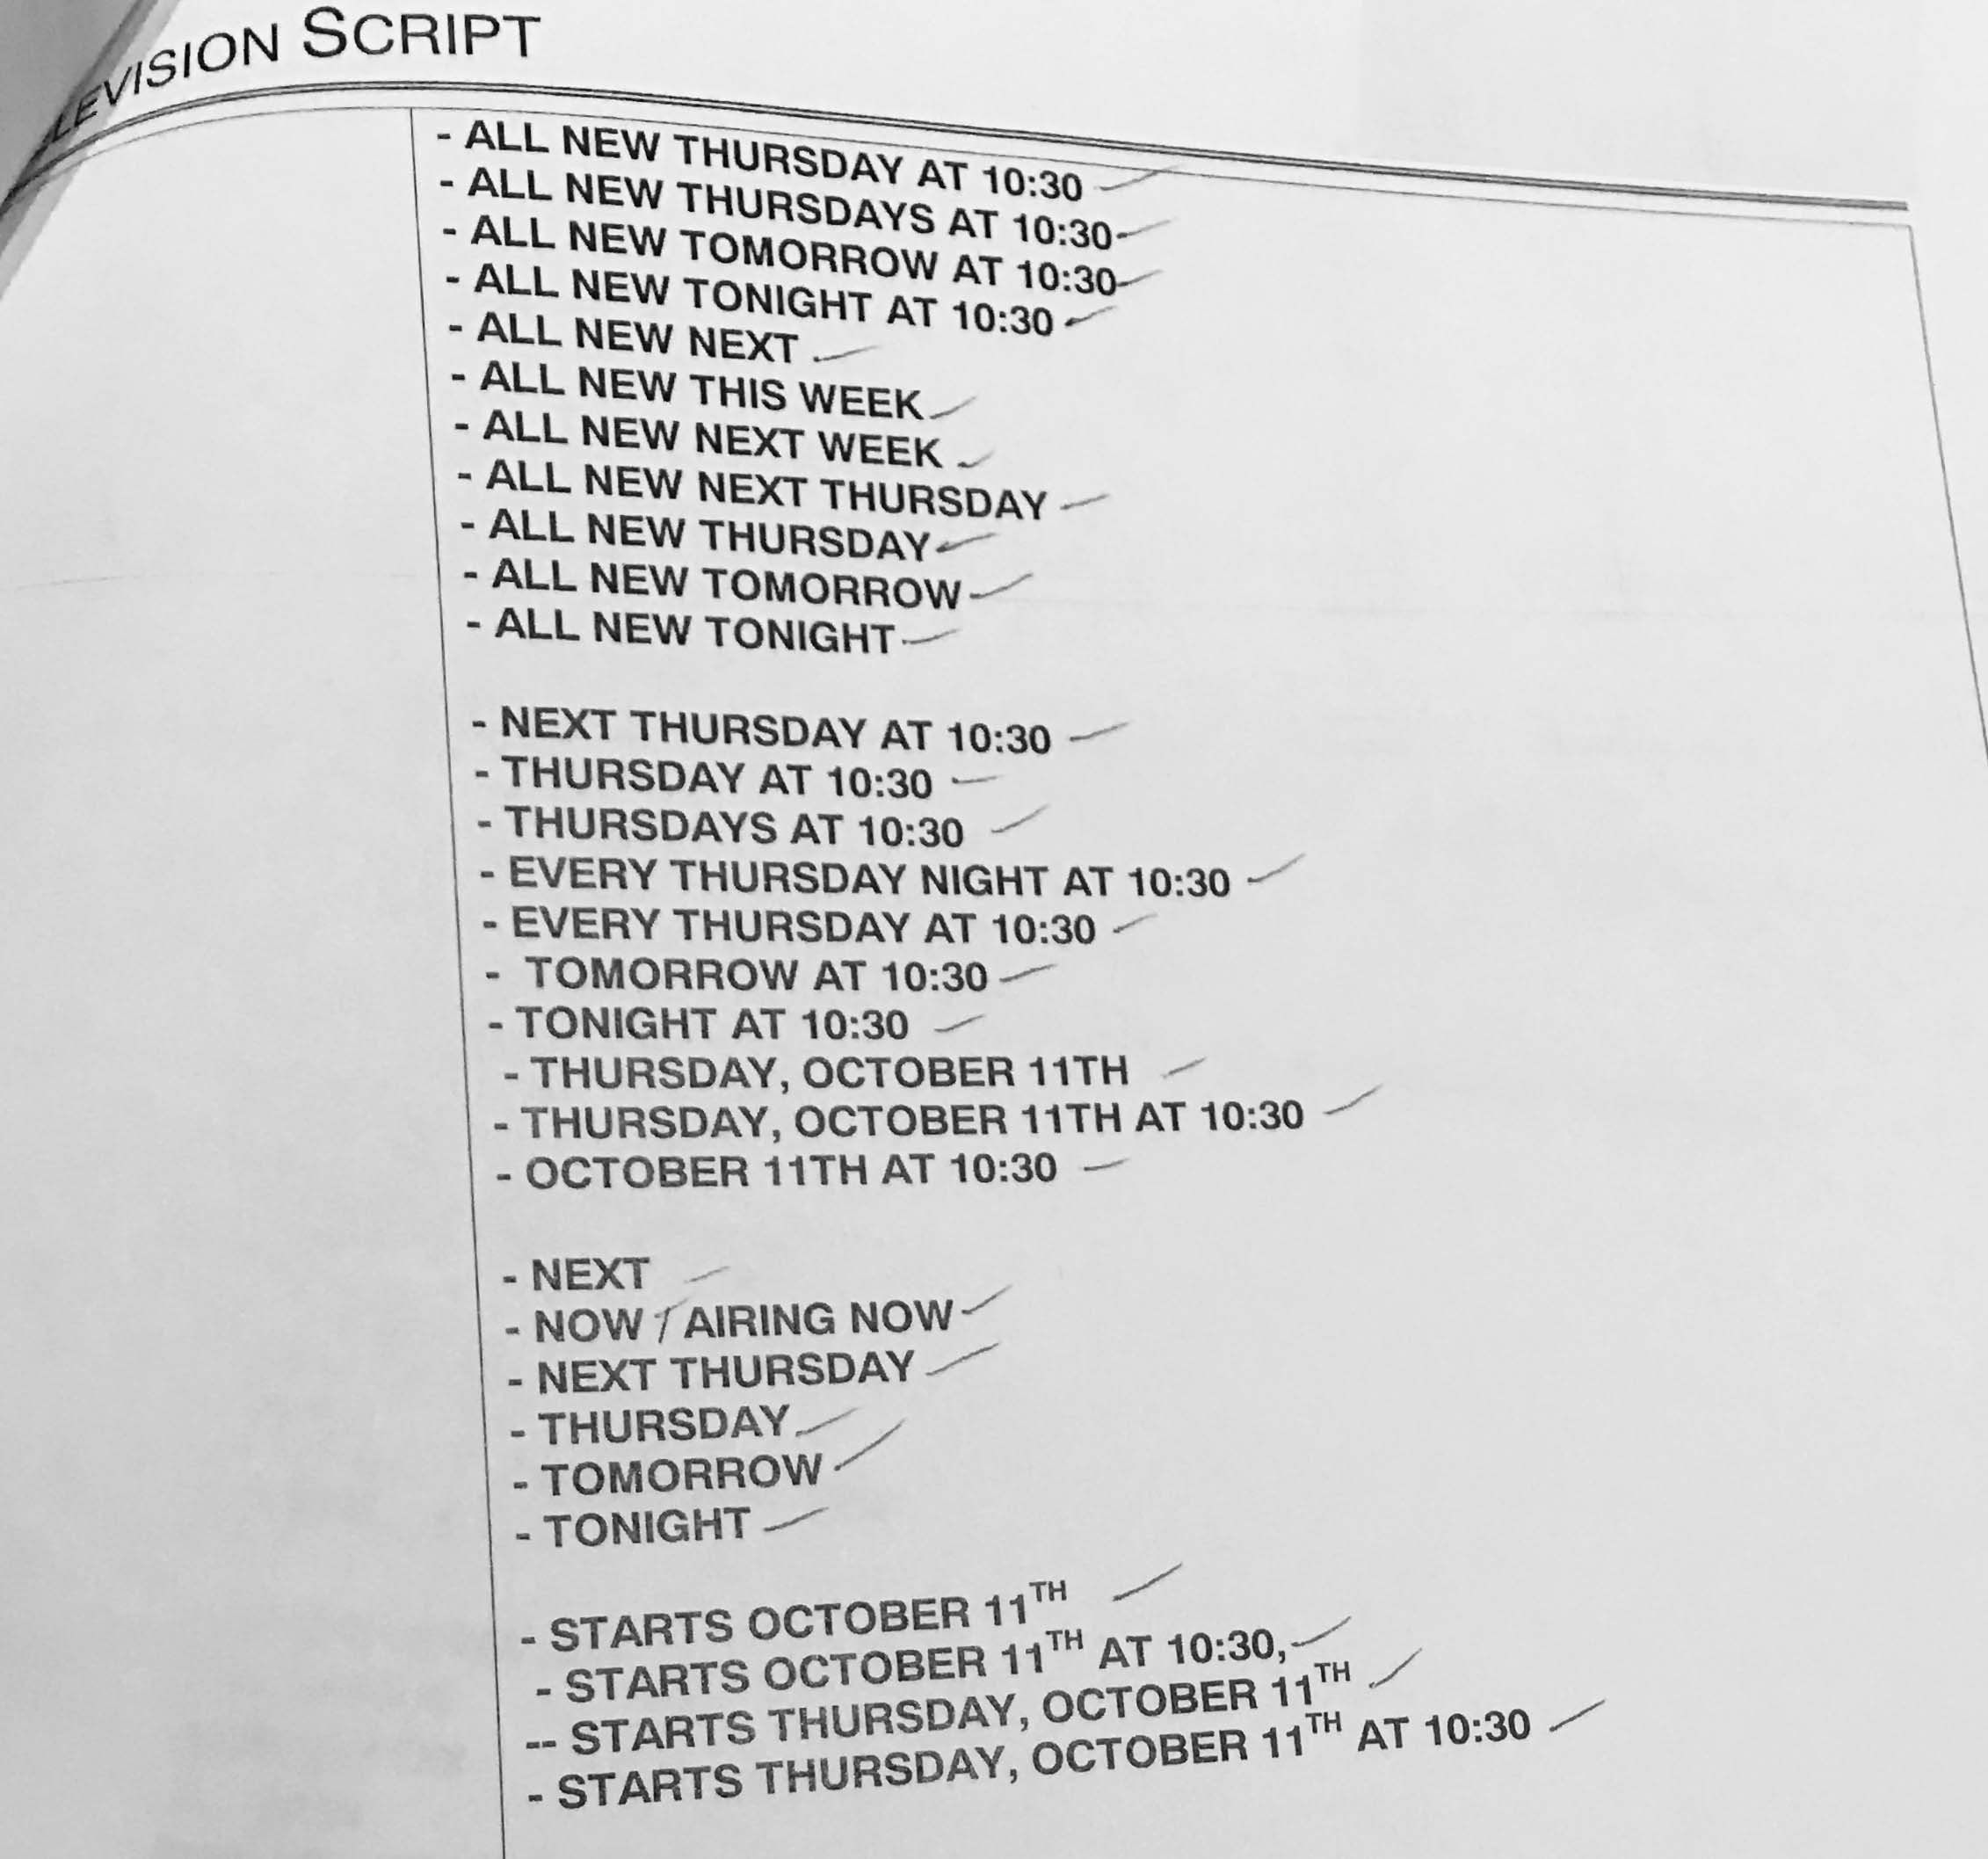
If you have a bigger session – say 10 tags for a spot and 3 cutdown versions – that means 40 total you have to edit voice-over (and mix), output and name files, double-check the file names match the mix and spot check the mixes. You may be asked for similar named versions like “premieres next” and “premiering next” so naming files correctly is very important. This is just one promo and you might be doing multiple in a day! This is why people who are detail-oriented do really well in promo.

Voice over script with many tags

As a promo mixer, you get to wear a lot of hats. You might be recording voice-over, editing dialog, sound design, recording Foley or walla (background voices), and music editing. Generally, you don’t get to wear so many hats working on movies or tv shows and definitely not on the same day.

There’s a nuance to promo mixing because there’s a lot of things happening at once that are all competing for your attention. Your job is to point the listener to what’s most important. There can be a lot of mood changes in a short period of time and a good promo mix can navigate these without calling attention to volume rides or overlapping audio. When an explosion happens in a promo you’re usually onto the next idea when the audio is barely starting to decay.

Promo mixing can be a great gig if you’re trying to pursue another interest, too. Mixers are usually booked by the day and there are opportunities to mix from home. It’s not as hard to break into as film mixing, for example. However, it’s not the type of gig you necessarily want to learn on the job because deadlines can be tight. Often a mix is booked the same day a spot needs to air so there’s not a lot of room for error. If you are good with details, organization, are a fast editor and mixer, enjoy wearing a lot of hats, and not looking for your name in the credits, promo mixing might be a good fit for you!


Asle Karstad – Mic Tips for Acoustic Instruments

On the last day in February, Soundgirls.org – in cooperation with KRETS (Norway) – arranged a day with Asle Karstad, who gave a lecture on the reinforcement of acoustic instruments.

Asle Karstad has worked for over 35 years in sound, and and refers to himself as a ‘sound producer’ – the person who guides the sound so the listener will get the most optimal experience. He has spent most of his time working with the Oslo Symphonic Orchestra, but is also very well known by Norwegian Jazz and folk musicians.

On this particular day Asle had been kind enough to invite some friends to join him – an acoustic guitar player, a quartet from Norwegian Radio Orchestra and a well known contrabass player by the name Ellen Andrea Wang.

We were very excited to meet Asle in this relatively new venue in Oslo.
Sentralen is only a year old and contains five separate and diverse concert rooms. (If you happen to visit Oslo, don’t miss out on visiting this very special venue.)

Asle’s first mission was to show us how you find the resonant frequency of an acoustic string instrument – or the ‘Crazy Note’ as he refers to it. (The resonant frequency is the natural ‘note’ that the instrument will create on it’s own as soon as you ‘put’ some energy into it, for example by tapping on it.) The reason Asle places importance on finding the ‘Crazy Note’ – is because he discovered that when six violin players put down their instrument at the same time, the little bump on the floor creates the resonant frequency, which could lead to feedback from the six violins in close proximity with each other. The resonant frequency of a violin will be around 275 Hz – 280 Hz. Their fundamental note is 94 Hz.

The method he used to find the ‘Crazy Note’ was to place the instrument on a table and close mic it where the resonant frequency was assumed to be found (Asle was using a DPA 4011 as microphone). He would then tap around the body of the instrument, and take a ‘snapshot’ of the frequency response.

By using this method we discovered that the instrument has one spectacular note in the lower range that stands out- the crazy note! (If you try this yourself, remember to dampen the strings so they don’t resonate – a towel works well)

It’s important to find this frequency because you may have to deal with other issues in the low end, like for example the low hum that likes to ‘sneak’ around your PA and end up in your mic’s on stage. If that ‘hum’ happens to be the same frequency as the ‘Crazy Note’ on one or more of the acoustic instruments in the orchestra, you could quite quickly end up with a problem.

Asle reminded us that it is always good to consider that the low end has a tendency to travel around the speakers and up on the stage, higher frequencies, as we know are more directional and therefore don’t have the same problem. This is also why we like to close mic, to eliminate ‘sneaky’ low end frequencies from PA and the room itself.

Whilst we are thinking about resonance – we also have to remember that any kind of resonant shell acts like an amplifier. You will do yourself a favor knowing the resonant frequencies of your acoustic instruments in advance to deal with any issues. For example the resonant frequency or ‘crazy note’ of an acoustic guitar will most likely be around 200 Hz. Asle suggested, when you pull that frequency out of your acoustic guitar that you add a little decay to it around 1,85 – 3,25 seconds to keep the natural sound to it.

Here are some other resonant notes to remember: Cello 80 – 90 Hz, Contra Bass 105 Hz (105 Hz goes for electric bass too). Asle suggest to ‘work’ a little around 65 – 105 Hz, since you will have the low end energy from the PA in this area as well.

Some other interesting tips from Asle are to put a compressor on the reverb send for your acoustic strings. And if you do not want ‘things right up in your face’ as he puts it, delay the whole mix 6 – 9 ms. We tried this and it made a huge difference, it somehow also made the mix sounds bigger and brighter.

Also to make your mix sound more natural you might want to put a high shelf cut on your strings from 1500 Hz and up – it sounds crazy, but if you think about it, higher frequencies die quickly over a distance. We felt this method worked.

Regarding string instruments – aim the capsule at the wood when you mic up – not for the strings!

KRETS is a part of the Norwegian music organization that was founded in 2013, as a tribute to the 100 year anniversary for the Women’s Right to Vote in Norway. The group is trying to connect female technicians across Norway by supporting events like this one with Asle Karstad. Soundgirls.org would like to thank KRETS for their co-operation and support.


The Important Art of Documentation in Theatre Sound Design

When you work on a production, you never really know what sort of life it’s going to have after that initial run or tour. A production you designed two years ago may suddenly get another run, and you realise you need to dig out all your sounds and designs and make them work in a different venue. Or, you need to hand it over to an associate to do the same. It’s at times like these that you discover the value of two things: accurate, detailed documentation and an organised filing system.

I know that documentation and filing are the least exciting aspects of a creative sound role, but I cannot overemphasize how much they will save your bacon when you need to recreate the sound design for a show. In the time-sensitive, pressured environment of theatre and theatrical productions, it’s very easy to let documentation lapse, so you need to either delegate the task or make time for it. You don’t want to be tearing your hair out the night before tech week kicks off because you have no idea where you put that crucial sound effects file you recorded four years ago.

Here’s a starter list of what you should be captured during the production of a show.

Rehearsals and production weeks before tech week

  1. Make sure you have copies of all your design drawings, whether you created them in CAD software or hand-drew them. If they’re hand-drawn, scan them so you have an electronic copy as well. Ask for model box photos as well (or take your own), so you have a visual reference point for this production.
  2. Make sure you have an electronic copy of the script, score, or both, and any additional material e.g. song lyrics, prologue/epilogue, as well as paper copies.
  3. Take photos of any pictures, sketches, diagrams, props, or anything else that were used in the rehearsal process or in your own creative time that directly influenced your sound designs. They may come in handy if you need to create any new files for subsequent runs.
  4. Label each sound file accurately as you create it, including documenting the recording process if you recorded it from scratch.
  5. Label and save all venue tech specs and sound hire quotes
  6. Label and save all photos taken during venue visits, including any notes about potential speaker/equipment positions

Tech week to press night

  1. Once speaker positions are set, take photos from multiple angles to accurately capture positions. If you have to hand a show over to an associate further down the line, it’s far easier to show them a picture of how you positioned a particular speaker in a venue than explaining it.
  2. Note positions of racks, microphones, processors, desks, screens, comms, cue lights, everything that’s specific to that show.
  3. If there’s anything particularly unique about this production that you may need to remember at a future date, write it down.
  4. Keep sound cue sheets and update them as necessary, including a record of deleted cues. They may be reinstated for future productions.
  5. Make sure you have an accurate list of hired sound equipment, including the hire company, any existing venue equipment used in the show, and any equipment purchased by the production
  6. Save all show and desk files

After press night

  1. Save copies of the final show files and desk files with copies of all final sound files.
  2. Save any sound files not used in the show to a separate folder. You may need them for subsequent productions
  3. Save all documentation, including sound design plans, final cue sheets, radio mic plans, scene maps, etc.
  4. Confirm where any sound equipment purchased by the production company will be stored following the end of the show’s run and save that information in a document
  5. Label everything clearly and put in a single folder so you can quickly find everything for that show
  6. Back up everything!

Managing your documentation should be an integral part of your sound design work, not an addition to it. Do it once and thoroughly for each production, and you’ll save yourself a lot of potential headaches in the future

Connections

During the time I spent teaching, one of the biggest areas I missed about the sound industry was the opportunity to network. It seemed to me that the drawing together of like-minded souls was one of life’s joys and I was missing out whilst in the classroom. Any chance for a course or extra CPD and I was there like a shot! It has to be said, we as sound engineers are particularly good at creating opportunities to get together and share experiences. And of course, this is the best way to pick up new ideas and expand our horizons.

Last week our Opera House received a touring production of West Side Story. The sound department had a UK touring background and our team took great pleasure in exchanging stories and experiences. For some of us this reflection reminded us where we had come from and how lucky we are to be involved in such a diverse career.

With this in mind, the Soundgirls Chapter of Muscat has started preparing for a workshop to promote the mission statement and to introduce the audio profession to a new, keen, and eager audience. It will be run at a local music school- The Classical Music and Arts Institute in area of Muscat called Qurum. General Manager, Thanae Pachiyanakis, a seasoned singer and teacher herself is keen to encourage young girls (particularly musicians) to take an interest in sound for performance.

Thanae and I first met last year during one of the Opera House’s ‘Open days’. These days are incredibly popular and involve local bands, handicraft and art exhibitions, and local school children. It all takes place in the spectacular front-of-house area. Several porches lend themselves to small staged areas for performers and tables are set up for artwork. We set up PA systems for the bands, projectors, and playback in each area as required.

It wasn’t until another chance meeting at an ‘Internations’ event that Thanae and I got chatting. We realised that although from totally different backgrounds and different experiences of the industry we were passionate about very similar causes. Hence the start of the Soundgirls chapter in Oman!

Despite a relatively small arena for audio networking Thanae and I have proved that no matter how remote you are feeling, there is always someone who will share your enthusiasm and passion. The support and encouragement we are able to offer each other is immeasurable. So next time you feel alone, know you are not. If you look hard enough there is always someone to lean on.


Weapons Up: Explorations into Radio Drama

Over the past six years, my main areas of work have been as a sound designer, voice actor, and producer for commercial, gaming and animation voice demos,

These disciplines often overlap and complement each other. I’ve provided voice-overs for plays that I’ve sound-designed, for example, and actors for whom I’ve produced voice demos have recommended me as a sound designer to directors. But sometimes an opportunity arises that is such a great combination of your skills and interests, you wonder why you didn’t think of exploring it earlier. My introduction to sound design for radio drama was this kind of opportunity.

Back in October last year, I received an email from a voice actor friend, who approached myself and two other actor friends with the idea of creating a showcase for our voice acting skills, in the form of an audio, or radio, drama. We would write a short script for four female actors, record and produce it and then send it out to radio drama directors and producers who we thought might be interested in hiring us.

The UK has a long history of radio drama, mainly thanks to the British Broadcasting Corporation (BBC), which broadcasts hundreds of radio dramas every year. The creative possibilities of radio dramas appeal to me both as a sound designer and an actor. For me, it’s about learning how to tell stories without relying on what you can see.

Initially, I planned on acting in one or more roles in our fledging radio drama and doing all the sound design and mixing. Then in a flash of inspiration one afternoon I drafted an initial synopsis for a dramatic science-fiction thriller, and after a few drafts, it became apparent that while everybody loved the story, nobody else in the team was keen to take on the task of actually writing a script based on it. And so I found myself writing, sound designing, mixing and acting in a sci-fi radio drama called The Converged.

Once the script was ready, we booked a studio that could accommodate four actors in the same studio, found an experienced director and recorded three takes of the script in an hour-long session.

My first task after I got the recordings back to my studio was more editorial role than sound design or mixing. I had to decide what take to use for each line. As our script was short and we weren’t under any pressure from a commercial publishing company, we had the luxury of having two hours of rehearsal time with our director beforehand, and being able to record three full takes plus pickups and efforts (grunts, groans, and other vocalisations). Rehearsals and multiple takes are pretty much unheard of in the commercial work of radio drama – most directors aim to record between 60 – 90 minutes of material per day, which doesn’t leave any time for rehearsals and limited time for multiple takes.

So it was a bonus to have three full takes of the script. The director had given me a few notes on his preferences, plus I had made notes during the recording session – one of the benefits of acting in the play as well. But I would still need to make the final choices of which take to use for each line.

Each character was recorded on a separate track during the recording session. The engineer had also kindly labeled the different takes, so I had three audio files per character, one for each take, which I could lay them out in Protools on separate tracks. I immediately discarded the first take, as a quick way to reduce my options. That left takes two and three, which I could A/B to find the take for each line that I thought worked the best. I did this for each character – fortunately, there are only five in total!

The next step was editing, made much easier by the fact that I didn’t have to do much cleanup, thanks to high-quality recordings, and processing on each vocal channel.

Then I left the voiceovers alone for a little while to concentrate on the next important piece in the process: planning the sound design.

My two main reasons for writing a sci-fi script were a mix of creative and purely practical.  There is a lot of scope for creative sound work within the sci-fi genre, and I already have an extensive library of sci-fi sound effects. Normally, I like to create as many sounds from scratch as possible, but I knew I would only have a short window to design and mix the first episode, hence wanting to stay within the boundaries of what I could already accommodate.

I also knew that if we wanted to produce more episodes of the drama (and we do – there’s a cliffhanger at the end of Episode 1 for this very reason), I would need to have a plan of the overall tone and style for the design.  Throwing in random sounds that sound impressive won’t work for an episodic drama where the sonic world needed to be consistent enough to be recognisable from episode to episode, and adaptable enough to sonically create a variety of environments.

I divided my overall sound design plan for The Converged into categories: atmospheres and drones, interface beeps and noises, weapons, explosions, foley (mainly footsteps, doors and operating various tools), mechanical sounds, vocal processing and miscellaneous.

Following a timeline of the script, I mapped out the important points for each category. These included: where we needed to hear a change of the base environment (for an atmosphere or drone), or a character used equipment or a weapon, where the Foley happened and when the vocal processing would change depending on the character.  For example, when characters needed to sound like they were in space suits.

The major choices I made about vocal processing were the sounds of the astronaut suits and the AI character. A plugin called Cosmonaut came to my rescue on the first, and I auditioned various modulation plugins until I found one that gave the detached, slightly jarring chorused quality that I wanted for the second.

Once I had my sound map, I started making decisions about the sounds themselves. How futuristic did I want the spaceship (the location for the episode) to sound? Ultra high-tech or a bit more organic? In the end, I went for a combination of processed organic electronic sounds (bell-like chimes for interface noises), and recognisable mechanical Foley sounds e.g. the sound of metal doors opening and closing on military ships and rifle handling sounds.

After I had all my sounds in place, it was time for track-laying and mixing.  Panning is particularly vital in a creative sense for audio drama. Without a picture to follow, it’s up to the sound designer to locate the action for the listener for each scene and make sure it makes sense with the script and the story. When you don’t have a picture as a reference point, it’s easy to forget that a character is a collection of sounds – footsteps, equipment beeps, clothing movement, gun movement – and not just a voice.

The teaser for Episode 1 was released last week with the full episode due to be released within the next month.

I’ve learned a lot from my first foray into radio drama, and I already know there will be some changes to the sound of Episode 1 of The Converged, and probably to the sound of the following episodes as well.

It would be interesting to incorporate binaural sound, especially in sci-fi drama. I’d also like to experiment with the ideas explored in the film Gravity, of only hearing sound in space when conducted through touch. Possibly a step too far for a radio drama? After this introduction to its creative possibilities, I’m keen to continue my explorations.


Radio Mic Placement in Musicals

Introduction

This month I was asked to give a talk about radio mic placement and vocal reinforcement at the Association of Sound Designers Winter School. This month’s blog is the presentation.

I’ve been working in Theatre sound for over 20 years. First, in musical theatre as a no. 3 and an operator, then at the National Theatre where I was the sound manager for the Lyttelton. Now, I work primarily as a Sound Designer, designing productions for musicals and plays.

I’m here to talk about radio mic placement and how that will affect what you can achieve with the sound of your show. I’m going to talk about different productions I’ve worked on and how I’ve dealt with mic positions in different situations.

I have some pictures of mic placements from shows that I’ve designed, and we’ll talk about the situation for each one as we go.

In the last 40 years, sound technology has been quickly evolving. I think it all started with:

The Sony Walkman

I think we are in a different era for sound design, and it isn’t just because of the new tech that we use, it has to do with the Sony Walkman, invented in 1979. It changed the way we listen. The sound was now delivered to you. Sound was now a personal thing that had gone from mostly being listened to as ‘something over there’ to something that is very much up close and personal.


Noise and volume

Another factor in the changes in sound design is the fans in equipment in the auditorium. Most of the theatres we work in were designed for unamplified voices, but theatre lights, projectors, and air conditioners all make noise, so the background noise we have to compete with has increased.

We are in a noisier world than we use to be in general  Birds now singer louder to cope with being in a city.

Casts are used to wearing radio mics − they wear them at drama school. I don’t think actors project as much as they use to.

Grease

I started my West End career on Grease, at the Dominion Theatre, in 1993. That wasn’t my design, obviously. The Sound Designer was Bobby Aitkin. It was my first exposure to West End sound design, and I stayed backstage on that show for about two years. I learnt the importance of mic placement and how a good operator can hear if a mic has moved. I also learned that you don’t provide vocal foldback for lavalier mics.

You couldn’t see our radio mics. We were a little obsessive about that, considering we were at the Dominion. The stage is huge and most of the audience is quite far away − it does seem a little crazy now. But, we were serious about it, and the lovely wig people put in curls on foreheads so the mics were hidden underneath.

It was a big thing then, not to have the mics visible. We would go around and look at the posters of other shows, pointing out mics to each other if we could see them. We would judge the backstage staff on that.

There was a lot of pride attached to the mics being in a good position for audio, as well as you not being able to see them.

We had a couple of handheld microphones for Greased Lightning and for the mega-mix at the end. It does seem an odd concept not to give vocal foldback to the vocalist, but what they need to get through the number isn’t the same thing as the audience needs to enjoy a good show.  You often have to have a difficult conversation with the vocalist, but it is a good idea.


Why can’t you use Lavaliers in Foldback?

Why is that all the lavs that we use are omni-directional? Whatever the singer is hearing the mic is hearing too. It’s easy to see how that can lead to feedback.

On Grease, we had lavs in the hairline. This gave us a consistent distance between the mouth and the microphone, keeping incoming sound levels consistent. We didn’t have any hats, that I remember, so had no trouble there on this production.

Because lavs are omni-directional, putting them in the foldback causes all sorts of problems. In addition, sweat and hair products can get into the mics, causing issues, and they can move.

Loud numbers

There were some loud numbers in the show − Greased Lighting, and the mega-mix at the end − and they were done on handhelds. We had a handheld hidden in the Greased Lightning car and that would be whipped out at the appropriate moment. Then, at the end of the show, there were a couple of handhelds hidden behind the counter in the milk bar which would be whipped out and appear magically in the hands of the performers that needed to use them. We were told we could get away with that because Greased Lighting was a song within the story of the show, so we could get away with that as well.

Handhelds aren’t Omni so that meant we could use them in the foldback. We could turn the volume up for those numbers and get a bigger impact from them. There was also a scene at the prom where we used a Shure 55SH on a stand, plugged into a radio mic transmitter. Because it isn’t an omni-directional mic it could also go into the foldback and be treated like one of the handhelds.

Rent

Often, by the time we get to tech, we have had the band call and then we don’t have the band again until the dress rehearsal. The producers don’t want to pay for all that musician time so we get stuck with keys and, if we’re lucky, a drum kit.

We tech-ed without the full band, but we did have keys and tracks, so there was plenty of time to get to work on the vocals.

I usually start with a quick line-check for level with each cast member and then start the technical rehearsal. I enjoy this part of tech; finding out how hard you can push the mics, working with EQ, setting the compressors. It is a chance to get the vocal system set and working before the band turns up for the dress rehearsal.

And then the band arrives

The band was on stage, at the back, and, although there were some drapes, there wasn’t a great deal of separation between the band and the cast. It was a problem. We started tech and we weren’t getting enough level out of the mics on the cast. There wasn’t the option to hire a load of boom mics − this was a low-budget production at the University of Surrey, and a lot of the mics belonged to the University. So, what could I do? Well, we had to pull the mics down the forehead. You can see in the next photo that the mics are not in the hairline. What seems like a small movement in position made a huge difference to the amount of level we could get from the mics. It didn’t look great but if we had used booms then they would have been very visible as well.

Rent is a rock musical, there are some delicate moments in it, but it chugs along quite loudly at times. Moving the mics down an inch from the hairline helped to make the show work.

Next Month  I will share other types of mics and mic positions and how I have used them to problem solve.   

How to Bid on a Project

One of the hardest parts of being freelance is knowing how to bid on a project. You want to be competitive but you don’t know who the competition is. If it’s a client you haven’t worked with before, you may have no idea what their expectations or budget are. “Small” budget for one gig could be $100 and for another, it’s $10,000. On top of it, bidding can be a game of poker where no one wants to be the first to throw out a number.

To give a good bid, you first have to understand who, what, when, where, why, and how. Some people will request a bid and give little or no information but it’s hard to give an accurate bid without knowing those details.

Approaching a bid

Here are some tips when approaching a bid. Never throw out a number or commit to any work without first having a conversation about it (whether it’s by phone or in-person). The main reason is to make sure what they’re asking for covers everything they need. At least half of the people who ask me for a quote need something different or additional from what they say (for example, a film mix may also need editorial or sound design).

Talking to someone also gives you a sense of how professional the project is and the temperament of the people you would be working with. I once had a singer inquire about a music mix and when we talked I learned she had no recordings, couldn’t play any instruments, no band-mates, and had no songs written (I passed on the gig). Sometimes you see red flags that someone is going to be really picky or difficult to work with which could mean extra hours that need to be factored into your costs (assuming you don’t pass on it – which is ok to do).

I always ask for materials to check out before giving a bid for a few reasons. One is to get a sense of sound quality, technical issues, organization, etc. Every project has unplanned time-suckers – tasks that take longer than you budgeted for (or didn’t budget at all). The more you can do to identify those time suckers beforehand the more accurate your bid will be.

Another reason for looking at materials is to evaluate content. Sometimes a project turns you off and you can afford to say no (like a boring movie or a band who’s music you don’t like). Sometimes there’s more to it – Years ago I bid on a film after only seeing the trailer. They told me it was a mystery/thriller but it was more like a horror film with a lot of graphic violence against women (two types of content I don’t like to work on). They were happy with my bid and willing to work around my schedule so it was awkward to back out.

If it’s a music mix, ask for a rough mix or for a sample session (which will give you a good idea of how many tracks/overdubs and organization). If it’s someone who needs a recording, ask for a demo or temp mix. For film, I ask for a rough cut (a video I can download or watch online) and maybe an output of a few minutes of the AAF/OMF to gauge how much time it’ll take to organize (more on that here)

The basic details to find out before giving a bid

Managing expectations

Part of this conversation is managing expectations. If a band expects a full album recording, overdubs, and mix in a weekend for $500 it’s a joke. If they’re willing to book a multi-room studio and crew, put up the cash to work around the clock, and accept it’s not going to be perfect, it’s a legitimate (but challenging) gig. It helps build trust if the client understands the limitations (what’s technically possible, the resources needed, and what you’re able to do or not do). It’s best, to be honest and only promise what you can actually deliver. If they are convinced they can find someone to do the impossible, then good luck to them!

Writing a bid

To write the bid, you’ll want to break down each element of the project and the time/resources necessary to do the job. I send some options based on the quality they are looking for. A low-budget “get ‘er done” job may cover the basics. Medium budget will be a solid job – taking a more in-depth look at everything and including some extras (if time/budget permits). High is going all out – spend as much time/money as it takes (within reason) to do an awesome job. You should have an idea already of what budget range they are in and what extras they might want from talking.

It’s a lot easier to estimate if you’ve kept track of these hours on past projects (if you don’t track hours, it’s a good reason to start!) For example, a 90-minute comedy film with a month deadline, a 5.1 mix (intended for theater), standard deliverables, and a moderate “indie film” budget the breakdown might be:

A recording/music mix of a band would have tasks like recording, studio time, overdubs, comping, tuning, editing, mixing, mastering.

I apply a day rate to each task (plus studio time) and tally up the total (keeping the optional items as separate add-ons). The exact numbers/dates are for my own reference and I usually send a condensed breakdown for the actual bid. I also like to pad hours a little bit in the bid because that helps cover unforeseen issues/changes without having to say “we’re going to be over budget” (unless it’s something major or time-consuming). Some people bid using a day rate but don’t mention that a day is calculated at 9 or 10 hours.

Once a bid is accepted it can be a legally binding contract so it’s important it’s accurate and includes details like when the work has to be done when you expect payment, what is included or not included. If you’re working on a project that might have updates/revisions (like a film or music mix) it’s important to clearly state what is included and what isn’t. For example, it’s common for indie filmmakers to make picture changes or ask for mix tweaks if their film gets into a festival or lands a distribution deal. This could happen as long as a year after finishing the film. I generally don’t include this work as part of the bid – I’ll have something written in the bid like “any conforms or audio changes after the final mix is delivered (or xx date) are considered a new version of the project and not included under this contract” or “any future changes after the mix is delivered will be billed at an hourly rate of xx”. It’s important to set limits so everyone knows what you’re going to do (or not do).

But, if the fixes they need later are minor (only take a couple of hours) I might comp the time (especially if I didn’t need all the buffer hours). Sometimes offering a small service for free can really benefit the relationship, which can bring in future projects and work.

Following up after sending a bid

Once I send a bid, I like to follow up with the client and feel out what they think of it. Is it in line with what they were expecting or do you sense sticker shock? If we’re in two totally different places and it’s a project I’m really interested in, I’ll be honest that I want to work on it and suggest ways to accommodate. Some ideas:

Bids become easier the more you do them. Sometimes you’ll land the gig and other times you’ll never hear from the client again. It’s not personal and maybe there’s nothing wrong with your bid – it might be that you’re not the right fit for the project. All of it is experience which makes it easier to do next time.

Practically Perfect

Recently for a RADA show that I was sound designing, it seemed that there was scope to make a practical radio. Practicals are some of the best fun in theatre without the audience knowing that there are little bits of trickery happening.

The show was Clybourne Park by Bruce Norris in RADA’s GBS Theatre, in-the-round, directed by Michael Fentiman and designed by James Turner. The story is told in two halves; the first Act being set in 1959 in a suburban Chicago house, and we are introduced to a married couple. As the Act goes on we learn that their son died, and that the remaining parents are moving to escape neighbourhood gossip; what follows is a heated discussion as to who should be allowed to move into the house after they’ve gone. Introducing Act 2, we have moved on 50 years and are now in 2009 in the same house. A group of people from the neighbourhood are discussing what should become of the house, and who exactly should move into it (which echoes Act 1). More arguments ensue and the play ends on a flashback to 1959, with a conversation between the deceased son and his mother. It’s a politically charged play full of dark humour and uncomfortable truths.

Here is the end product:

Clybourne Park 2016 – GBS Theatre, RADA)


I found that 1950’s-era replica in Deptford Market for a tenner, and it’s the best practical I’ve ever made (and I must confess that it functioned as a real radio before I destroyed the inside of it). I’d decided to go ahead and make the practical myself, by way of a challenge in between attending rehearsals and dealing with paperwork.

So I bring the radio back to the sound workshop, and I’ve ordered a mini-amp online that will sit inside the radio, along with an IEM, and I’d been hoping to hook it up to the speaker that came with the radio itself. Quite happily, my mini-amp arrived that same day so I can get started straight away.

One problem, however.

Now I don’t know what I was expecting, but I certainly didn’t expect that the amp would come in pieces and I’d have to solder it all myself.

So now I had to solder this thing having never really paid attention to circuit boards before. I dug out some instructions (all 2 pages of them) off the company’s website and set to work.

That said, this is probably the most common way to create a practical in theatre with the basic workflow as such: Qlab – Sound Desk – IEM Transmitter – IEM Receiver – Mini-Amp – Speaker

Most mini-speakers will simply be attached to the IEM because they’ll be self-powered, however, my system just so happened to need an amp because it was just the cone that sits inside the radio. Below is my system diagram for the show, so that we can see where the practical will sit in the larger scale of things (relevant signal flow is highlighted).

System diagram for Clybourne Park

Practical radios are almost two a penny in theatre amongst other fan favourites such as doorbells, telephones, intercoms, etc., all of which would have their own tried-and-tested ways of being produced.

For instance, we’ve had a couple of shows that require practical mobile phones, and for this we use an app called StageCaller that works over Midi/OSC – you’ll need an iPhone to do this and Dropbox, and for the best results, a stable WiFi connection that is used solely for the practical phone.

To get the sounds onto the StageCaller app you’ll need to download them from Dropbox and upload them in the app – all you’re doing in Qlab is sending OSC commands – all of the audio lives in the app. So from here you can trigger the sounds via OSC from your Qlab file (with relevant IP addresses) and in the most recent version, the app allows you to set up ‘heartbeat’ pings so that it doesn’t become completely inactive and triggers precisely when you want it to. There are various other little tricks that you can set up, too, including the sound cutting out as the character lifts the phone to their ear, or no sound at all and just a text vibrate.

You can find out more about the functionality of StageCaller on the Figure 53 website


The amp inside the radio hooked up to the internal speaker – IEM not pictured

Back to the radio, I powered through and soldered the entire circuit board and tested it by plugging my phone into the mini-amp via a mini jack-mini jack cable, and hooking up 2 other speakers (L/R) that also came free with the kit from the online shop. Miraculously – it worked!

So now I had a working system, and all I had left to do was to find a way to attach all of this inside the radio (lots of glue and velcro was involved here – not my finest prop-making) and plug up my IEM – for this I was using a Shure PSM300 System – and have a go at sending audio to it via Qlab.

It worked like a dream and was the most stable practical that I’ve used – of course, I had a backup in place just in case something went wrong with it, which is also quite common practice. The backup was simply an assigned key on my sound desk (a Yamaha 01V96i) which my operators could press, and the audio being sent to the radio would be internally reassigned to a JBL Control 1 speaker rigged above the stage, which would hopefully not interrupt the action! (As it was, the ops never had to use the backup, but it’s very good practice to have something in place anyway). My Operators, who took turns opping the show every day, then had the task of looking after the practical radio and changing the batteries before every show.

Practicals to me are little bits of fun that we can add in to a show to represent something that otherwise, a good few years ago, would have ended up being played from the nearest speaker, or being mimed. We’re quite fortunate that we now have such wide ranges of technology to play with, and again little tricks up our sleeves to truly create our own version of reality.

*all production photo credits belong to Linda Carter for RADA

Norway – SoundGirls Presents Sound Reinforcement of Acoustic Instruments

SoundGirls Presents Sound Reinforcement of Acoustic Instruments

With Asle Karstad – Oslo – Norway

Description:

Asle Karstad is a well know sound designer and engineer having worked with The Oslo Philharmonic Orchestra, The Norwegian Chamber Orchestra, and the Norwegian Jazz and Folk Music. Through his work, Karstad has found different ways of micing various acoustic instruments. Karstad will demonstrate different techniques and the results that can be achieved. Karstad will be joined by well-respected musicians (providing an all women string quartet) from The Norwegian Radio Orchestra,  to help demonstrate the techniques.

The workshop will be both theory and hands on.

Program:

10 am – 12 pm

Introduction to the work of Asle Karstad

Karstad will discuss resonance issues on the acoustic guitar and how to deal with these.

12:00 to 1:00 PM: Lunch (can be purchased at the venue)

1 pm – 5 pm –  Run-though of reinforcement of the brass, cello, violin and the contrabass.

Following the Workshop: Please join us for a woman in tech networking session with KRETS.

Billede1-e1484670716164-1000x600

X