Empowering the Next Generation of Women in Audio

Join Us

Re-Amping a Guitar Signal

Happy June everyone! I hope you enjoyed my three-part blog about “how to” record a four-piece band (drums, bass, guitar, and vocals). For this month I am going to be talking about the significance of re-amping a guitar signal.


I JUST re-amped a guitar signal for the first time in my life two days ago, and again yesterday. So, I’m no expert, but I will say that I did enjoy the process and I wanted to share my experience with SoundGirls! I’ve never “had” to do it before because I usually live track when recording a band. When I live track, I focus on getting the tone I want for the guitar right then and there, but I’ve always captured the DI signal from the guitar just in case I ever wanted or needed to change it later. The reason I am going to start re-amping more, and why I thought it would be an interesting blog post is because I see it as a more efficient way for my band to record guitar. Why is that you say? Well, this way we can just record a clean DI guitar at my house through my Focusrite 2i2, and then schedule a guitar session at one of the studios I intern out of to re-amp the signal we got from my home studio. It’s time-efficient, and to be honest- less stressful. Also, it can save you money! If you have a small home set-up but have always had trouble getting the right guitar tones, or don’t want to settle using an amp simulator (which I am NOT opposed to- there are some really great ones out there), capturing a DI signal at home, and scheduling time at a studio for a small amount of time instead of a giant block can save you money, and get you the right guitar tones!

Now that I’ve talked about the significance of re-amping, I’ll go over step by step how to do it.

The first step would be to record a clean DI. You don’t want to overdrive whatever pre-amp you may be using because you don’t want to “color” the tone of this clean DI. I suggest running your DI through a solid-state pre, not a tube pre. Let’s say you have a good signal. Record guitar with that clean DI signal until you settle on the takes you want for your guitar part. Make sure there are no clicks or pops in the audio. Go through and listen to each track you recorded in solo mode to make sure. You wouldn’t want to get to the studio, run the signal through an amp and then realize that there were comps needing to be faded or anything like that!

Now that you’ve got the takes you want & a clean DI signal let’s re-amp. Let’s assume you’ve already got your amp setup. In this case, you’ve placed it in an isolated room. You’ve already got mics picked out and set up, etc. Open pro-tools, and go to the first DI guitar you want to re-amp. Output the audio track for that guitar to a mono converter output.

The tricky part is patching. You’re going to want to patch from the converter’s output on the patch bay into the snake channels output for the room you put the amp in.

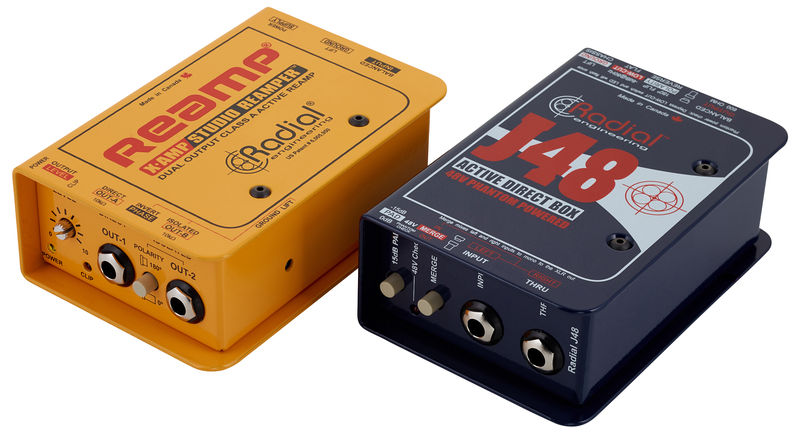
When re-amping you need a couple of different cables and boxes. You need a male-to-male XLR, a Re-Amp box (the Re-Amp box brings the line-level your sending the signal in back down to instrument level), a power supply for the re-amp box, and an instrument cable. Now let’s put all of those gadgets to use! Put the Re-Amp box, and its power supply in the iso room with your amp. Plug in the power supply. Take the male to male XLR cable, and plug it into the Re-Amp box, and then into the snake channel. Make sure the volume knob on the Re-Amp box is turned all the way down (you’ll use this sort of like a gain stage later on when you start to work on getting your tone). Now take the instrument cable out of the Re-Amp box and into the input of the amp. Hit play on Pro-Tools, and slowly turn up the volume knob on the box. You should start to hear signals. Now you can start working on getting your tone!

A couple of things to note:

Thanks for reading this month’s blog post! If you use this process for recording, let me know what your results are. I’m always interested in hearing other people’s processes, preamp/mic choices, etc. My email is virginia@backbeat365.com.

 

Recording a Four Piece Band – Vocals

For this month’s blog, we are going to finish recording our awesome 4-piece band, with vocals! I love recording vocals. Probably because I am a singer first before anything else, I find it interesting how there are so many ways you can make a vocal sound.

Let’s say the song we’ve been tracking with our band is a pop/rock song. I’ll go over what I’d do differently for a male and female vocal in this scenario. I wouldn’t do anything different between the two singers until we start EQ’ing. When we get there, I’ll specify what I’d do differently. To start, let’s pick a mic. For vocals, it’s usually smart to do a mic “shootout” if you have the time. A mic “shootout” is when you line up 3 (or more) different microphones, and you have the singer sing into each of them the same part of the same song into each mic. Record a snippet of each vocal on each mic. Listen back, and decide which one sounded best for that vocalist. We do this because every voice if different. Sure, you can have a favorite or a “go-to” when you’re running low on time- but I suggest if you have the time and the mic selection to do a shootout, do it. You never know, you could capture some magic with a microphone that you never would’ve thought to use before!

Since we can’t actually do a mic shootout, let’s just do a theoretical one. Let’s say we used a CM7 (Wunder), Neumann U67, and a Sony C-800G. Each of these mics are known for their specific sound. Also, another thing to note is that all of these mics are tube mics. Now, for our female and male singer- to avoid this blog being two pages long, we will decide to pick the same microphone for both of them. I think the microphone that would work for both a female and male vocalist without too many differences is the Sony.

Now that we’ve picked a mic let’s go over placement. First off, don’t ever forget your pop filter. The pop filter will catch those harsh P’s and some S’s. Paired with a good compressor, those P’s and S’s shouldn’t be a problem if you have a pop filter. How far does the singer stand away from the mic, you ask? A couple of inches back should be fine. Now for mic placement. You never want the singer singing UP into the mic. You want to place the mic in line with their lips, and then SLIGHTLY below. This is so you can capture the top end and low end of their voice.

The signal chain I like to use for vocals is usually a Voxbox for the pre-amp, followed by an EQ (if there is an EQ on the pre I am using, I’ll use that), and then slight compression either from the ELOP, or the CL1B. I’ve had great success with both of these compressors. Regarding the pre-amps, if I’m not using the Voxbox- I am probably going to be using some sort of Neve pre. Let’s say we are using the Voxbox as the pre and the ELOP as the compressor. Now what I would do differently between a male and female vocal is simple, but I still want to point it out. For a male vocalist, I would boost extra in the 1k-3k area and take out around 150 if his voice is a little boomy. I do like to do the typical, boost a little at 200 and 2k though. It usually evens out nicely. He is using the Sony, which is a very bright, and “polished” mic if I had to describe it. For a female vocalist, I would take out a little in the 1k-2k if it sounds a bit harsh, but if not I’ll leave the top end where it is. Boost around 3k if need be. I like to boost around 200 for a female vocalist, to round out the sound. Again, since we are using the Sony, we shouldn’t have to boost TOO much in the top end.

After EQ, I compress. I compress either (like I said earlier), with an ELOP, or the CL1B. Both compressors are amazing. In this scenario, we are using the ELOP. I don’t compress too heavily during tracking unless our goal is to have an apparent compressed vocal, or maybe if we are layering and wanted that sound underneath the main vocal. Since I’m not compressing heavily, I set my threshold at -2db, Ratio at 4:1, Attack can be a little fast because you can catch some of those P’s and S’s that way, Release- quick (I know that isn’t specific, but I want you to use your discretion because every vocal is different), and gain you would want to adjust so it can match your input level.

A couple of tips/tricks for getting a great vocal that aren’t technical.

Below is the finished mic sheet from our 4-piece band recording session.


Instrument Mic Wall Input Pre-amp Compressor Eq Pro-Tools Input
Kick In D112 1 API 1 DBX 1
Kick Out Fet47 2 API 2 2
Snare T Sm57 3 API 3 Chandler Little Devil 3
Snare B Km84 4 API 4 4
Rack Tom V421 5 Vintech 1 5
Floor Tom V421 6 Vintech 2 6
H.H SM7B 7 TubeTech 1 7
O.H Hat Coles 8 Gamma 1 (shadow hills) 8
O.H Ride Coles 9 Gamma 2 (shadow hills) 9
Room L Royer 121 10 UA 610 Distressor 10
Room R Royer 121 11 UA 610 Distressor 11
Bass DI J48 DI 12 Voxbox 12
Elec Dynamic SM57 13 Gamma 1 (shadow hills) 13
Elec Ribbon Royer 121 14 Neve 1073 14
Vox Sony 15 Voxbox ELOP Voxbox Eq 15


Alright, SoundGirls! That concludes our 4-piece recording session. I hope this gave you a couple of new ideas for recording that you may not have done before. If you use any of these techniques- email me! I’d love to hear about your results. My email is virginia@backbeat365.com. See you next month! 🙂

X