Empowering the Next Generation of Women in Audio

Join Us

Greta Stromquist: Dialogue Editor and Associate Producer

When I began blogging for SoundGirls in January of 2022, I had hoped to interview various audio professionals from marginalized genders, but none more so than Greta Stromquist. We met at WAMCon Los Angeles 2019. We were both early to the conference at Walt Disney Studios, struck up a conversation that morning, and reconnected throughout the day. Whereas I was new to the very idea of recording and mixing my own projects, Greta was established, having already developed a partnership with mentors to record audiobooks. We exchanged numbers and stayed in touch. And when I really needed help in the early months of the pandemic, she agreed to edit the episodes of a Wilco fan podcast I co-host with Mary MacLane Mellas. Without her, it may never have been released. And so it is with gratitude and admiration that I introduce you to Greta Stromquist in my last SoundGirls blogging venture for the foreseeable future. Cherish the friends you make in audio. Now meet one of mine.

You got started in audio through the support of mentors. Tell us about that. At the time, you were working as a barista, right?

Yes. Yeah, I was working in a coffee shop. I feel like I got into audio a little bit unconventionally. When I met my mentors, they sat me down and introduced me to the world of ProTools and post-production. Then I spent a few years working with them on audiobooks, recording people for audiobooks. I’d be working [at the coffee shop] then I would go to the studio and work with them. It was honestly kind of like going to school. It was a special time when I got to be creative and have the support to do it.

You always hear about people forming these relationships with regulars at their workplace, and this seems like the most notable example of that that I have ever heard, where it literally changed the direction of your whole life.

It truly did. I think about that often. They’re both super generous with their knowledge and continue to be incredibly supportive. I’m not sure what I would [have been] doing right now, but it definitely wouldn’t have been audio, because there’s a lot of gatekeeping. Unless you go to school or know somebody, it is something that you really don’t get access to.

How does your art background influence your craft as a dialogue editor?

I always have had so many different interests, whether it’s painting, drawing, taking pictures or editing videos. All your skills from everywhere, even if they seem unrelated, they do come together.

What are some of your favorite podcasts? And in what ways do they influence your own work?

Anything public radio storytelling. Like Code Switch. It’s a genius way of melding in the human experience with incredibly thoughtful sound design and scoring of the episode that just draws you in. You just come into your own little world. It’s something I grew up listening to that’s always been something I’ve really enjoyed.

Describe the arts community you belong to.

I think in LA it’s been hard for me to feel a part of any community, but I will say I’m endlessly inspired by the individuals I know who pave the way for themselves to make the art that is important to them. For me, it’s been hard to find community, group-wise, but the friends that I do have are incredibly creative, and I draw inspiration from that.

Which project has challenged you the most? And how did it alter your process moving forward?

For the past year and a half, I’ve worked on an audio-reality podcast series. It was my first time working on a large-scale project where we were dealing with hundreds of hours of tape and I had to keep everything organized. I also got to work a bit as a story editor, and it was one of those jobs that I didn’t think I was qualified to do. I was shocked to even get an interview. It’s very interesting being on the other side of it, thinking back [to] how anxious I was for the first few months and having constant impostor syndrome. But now I feel proud of the work I did, like I’ve [become] a better editor and walked away with excellent organization skills. I think the biggest challenge of it, though, was honestly just believing in myself. It’s really cheesy and stupid, but that was really the hard part.

What are your go-to tools for dialogue editing?

I carry with me what my mentors have taught me. I think a lot of it is just being okay with how the recording itself sounds. Sometimes less really is more. There are all the really cool plugins that serve their purpose, and I can make stuff sound really crisp and clean. But yeah, all the little things that give it life: that’s how it sounds. That’s how it is.

What advice would you give others who wish to become dialog editors? And are you someone who would be interested in mentoring someone down the road?

Yeah! Imposter syndrome is like, “I can’t mentor someone, I don’t know enough,” but I actually do really enjoy teaching. Inevitably, when you’re teaching someone something, you’re learning, too.

“What advice…” If you’re interested in audio, or in the editing world, start small, recording something and bringing it into whatever DAW or NLE you have, playing with it, editing it, and trying plugins. Just go from there. Start small, then bug anyone and everyone you know. Reach out to anybody you want to talk to.

What goals do you have for yourself in the coming year?

I definitely want to keep working on projects that challenge me. I have enjoyed working in the podcast world, but I’m still drawn to film and TV. I would love to get my foot in the door. There’s [an] overlay of skills, for sure. I’ve had a taste of story editing and loved it, however, re-recording mixing and ADR is something I would love to explore. I am open and excited to new opportunities and to see where my skills will take me next.

Thank you, Greta, and all of you SoundGirls readers. Now go make some noise (and/or record some).

Objective-Based Mixing

Guide the Viewer’s Attention

This is my guiding objective in every stage of the mix process and is arguably the most basic and important creative goal in the sound mix.  By manipulating the levels of the dialogue, sound effects, and music of each moment you can highlight or bury the most important things happening on screen.

Here’s an example:  Imagine two characters are having a conversation on screen.  They are standing in a ruined city block after a big battle or disaster.  The characters are positioned in the foreground of the shot, and in the background maybe there’s a fire burning and a couple of other people digging through some rubble.

In order to guide the viewer, we want to place the character dialogue in the foreground of the mix.  It should be one of the loudest elements, so the viewer can focus on it without distraction. The fire crackling or sounds of people walking through the rubble in the background can be played very low or left out if needed.

If we mix the scene so that we can hear every sound element equally, the viewer may become distracted or confused. The footsteps, rubble, and fire sound effects of the background will compete with the dialogue of the on-screen characters delivering the exposition. By keeping the dialogue clear and present we are telling the audience “this is an important piece of the story, pay attention to this.”
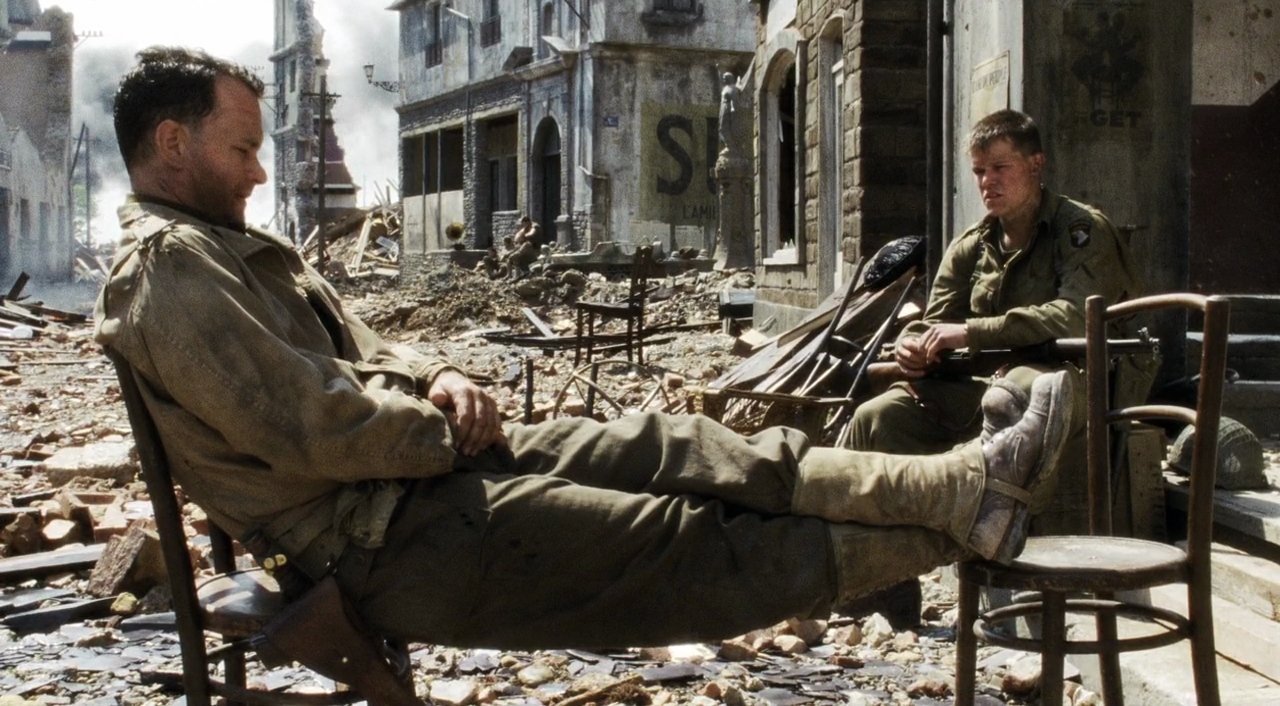
 

Depiction of a conversation in a distracting scene.

You can achieve the same guidance with sound effects and music if they are delivering important story information to the audience. Perhaps you need to showcase the rattling wheeze of an airplane engine as it begins to stall, causing the heroes to panic. Or maybe a wide sweeping shot of an ancient city needs the somber melody on the violin to help the audience understand that the city isn’t the vibrant, thriving place it once was.

Get the Mix in Spec

This is not a very exciting or fun goal for most, but it may be the most important one on this list.  Every network or streaming service has a document of specifications they require for deliverables, and as a mixer, it is very important that you understand and conduct your mix to achieve these specs.  If you breach these requirements, you will likely have to correct your mix and redeliver, not ideal.

The important requirements I like to keep in mind during the creative mixing process are the loudness specs.  These can vary depending on the distribution, but usually, they explain an overall LUFS measurement and a true peak limit, and in most cases, you will have about 4 dB of range you can land in (-22 to -26 for example).
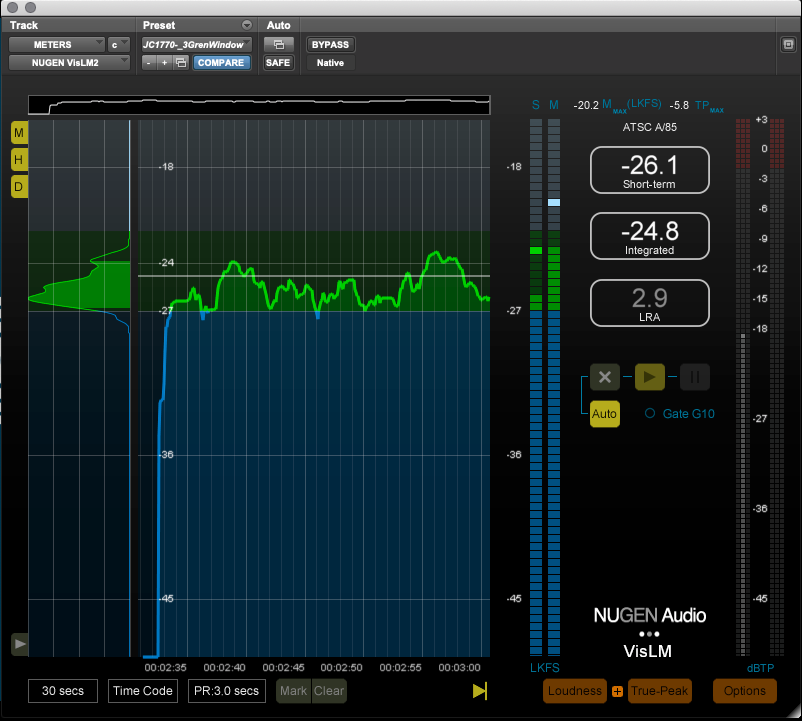
Depiction of LUFS measurement.

The key is to set yourself up for success from the start. I always start my mix by getting my dialogue levels set and overall reverbs applied. For a show that requires a mix in the -24db +/-2 range, I usually try to land my overall dialogue level around -25.  The dialogue is the anchor of the mix.  If I land the dialogue safely in the spec, in most cases the rest of the mix will slot in nice and clean, and my final loudness measurements will be right in the pocket.

I also try to keep in mind my peak limit, especially when mixing sound effects. In action-heavy scenes, it’s easy to crank up the sound elements you want to highlight, but if you aren’t careful you can run up against your limiters and in some cases breach the true peak limit requirement.

When In Doubt, Make it Sound Cool

It may seem like this goes without saying, but if I ever question how to approach a decision or process during my mix, I like to remember this mantra: “Make it sound cool!”  Sometimes this means adding that extra bit of reverb on the villainous laugh, or kicking the music up a bit louder than usual for a montage.  Other times it means digging in and spending that extra few minutes to really make a scene shine.

One “coolness” opportunity I run into often when mixing is a scene where music and sound effects both have impactful sounds happening. One straightforward way to enhance the coolness is to adjust the sync of the sound effects so they hit right on the beat of the music.  It may seem like a subtle change to knock each sound effect out of sync by a few frames, but when the moment hits just right the result makes the whole product feel so much more cohesive and cool.

Another fun opportunity is what I think of as “trippy freak-out scenes.”  Examples are a character having a nightmare where they are surrounded by floating, laughing heads, or a scene where a character takes powerful drugs which kick in and alter their reality.  It’s always worth it to go the extra mile in these moments to really pull the audience into the characters’ wacky world.  My favorite tricks in these times are reverse reverbs and lower octave doubles.
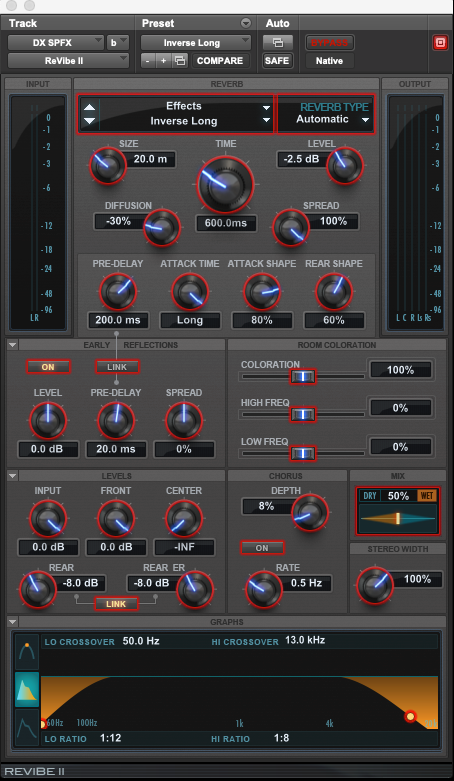
Depiction of ReVibe II plug-in set up for inverted reverb.

I could write a list with many, many items I consider as objectives when mixing.  There are so many competing goals and ideas bouncing around in each episode, but I always come back to these three.  Working with objectives in my mixing allows me to stay focused on the big picture rather than get sucked into the monotony of following a step-by-step process.  For me, it is the key to being creative on demand and ensuring that each mix has a personal touch.

This blog was originally featured on Boom Box Post

Designing Cinematic Style Sound Effects with Gravity

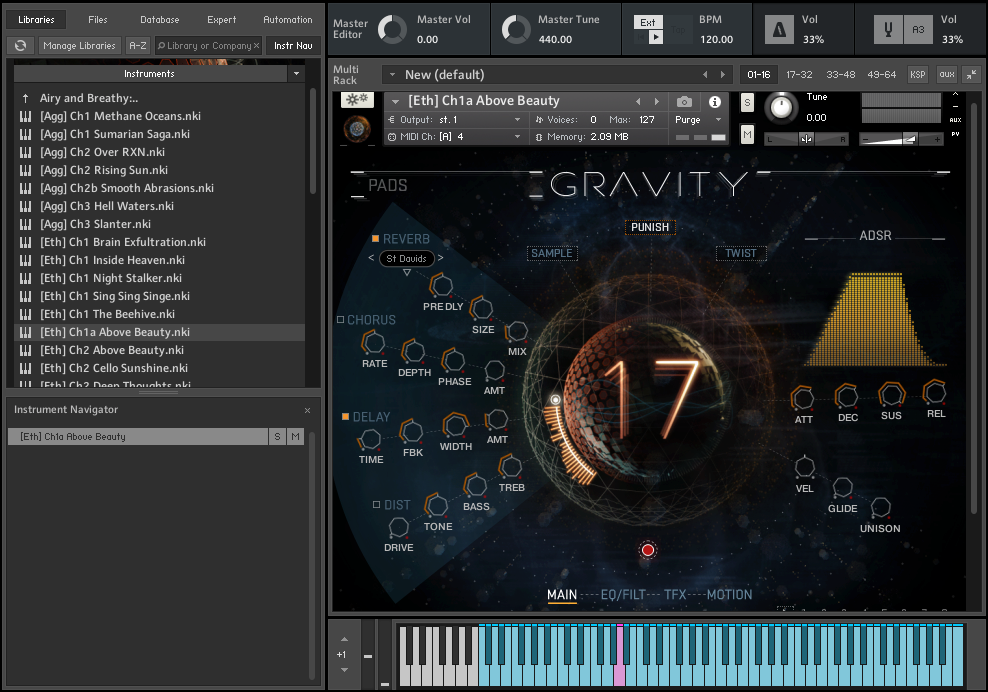
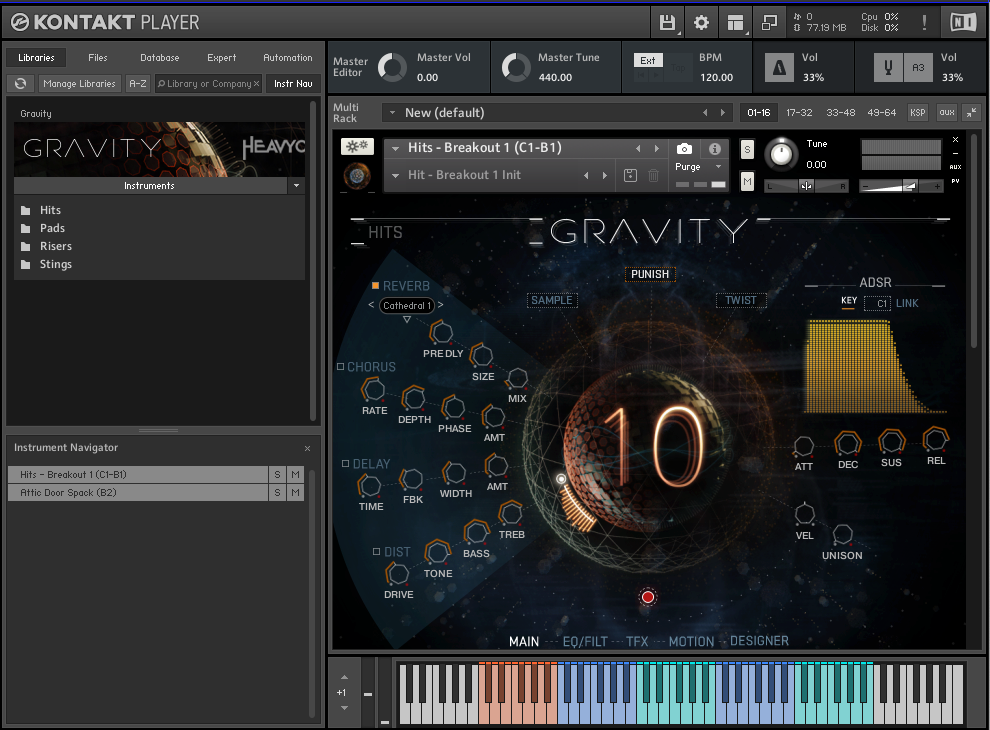
Today I’m going to be discussing a virtual instrument called Gravity by the folks at Heavyocity. It’s loaded into and powered by Kontakt Engine by Native Instruments. While Gravity itself doesn’t have a free version available, Kontakt is available as both a free version and full version. Gravity is an incredible, extensively customizable virtual instrument designed predominantly for use in modern scoring. It’s comprised of 4 instrumentation sections: Hits, Pads, Risers, and Stings. Each of these 4 main sections breaks down further into complex blends of the loaded-in beautiful, high-quality samples within the category as well as the simplified individual samples for additional customization with the effects and other adjustable parameters.

With these instruments, Gravity allows you to do a whole lot musically for composers who would like to utilize it in developing a full score, but it also can be used for some truly awesome sound designing purposes. Especially when it comes to cinematic style accents, hits, and synthy ambiances, which, as a sound editor, is what I personally have found myself using Gravity for the majority of the time.

Gravity’s MAIN User Interface For Pad Instrument Section

Gravity’s MAIN User Interface For Pad Instrument Section

After having initially selected which instrumentation element you want, each category of instrument breaks down into further categories to narrow down which instrument feels right for the moment. The only section that doesn’t do this additional categorical organization is the Hits partition. At the bottom of Kontakt, just below the UI, it also displays an interactive keyboard you can use if you don’t have a MIDI board to connect to your system, which you can also play by mouse click or by utilizing your computer keyboard. It highlights which keys are loaded with samples for each instrument selected as well as breaking down similar groups separated by color-coding.

There is a powerful and extensive variety of effects available to include (if desired) to whatever degree the user prefers, which are also broken down into multiple pages that you can flip between by clicking on the name of each page along the bottom of the UI (just above the keyboard).

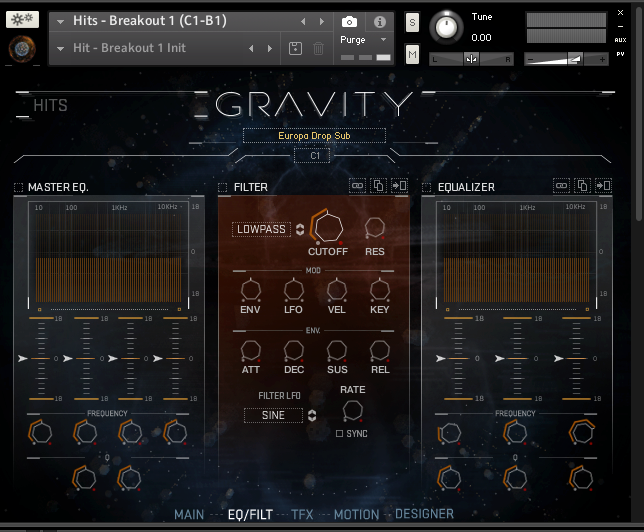
Gravity’s EQ/Filter

Gravity’s EQ/Filter

In the MAIN section, there is Reverb, Chorus, Delay, Distortion, and Volume Envelope with ADSR parameter controls (attack, delay, sustain, release), as well as a couple of Gravity specific effects. These include Punish – which is an effect combining compression and saturation adjusted by a single knob, and Twist – which manipulates, or…twists…the tone of the instrument which you can animate to give movement to the tone itself. There are also performance controls available like Velocity, to adjust the velocity of the notes, Glide, to glide between notes played, and Unison, which increases or decreases layers of detuned variations of the notes played to create a thicker, more complex sound.

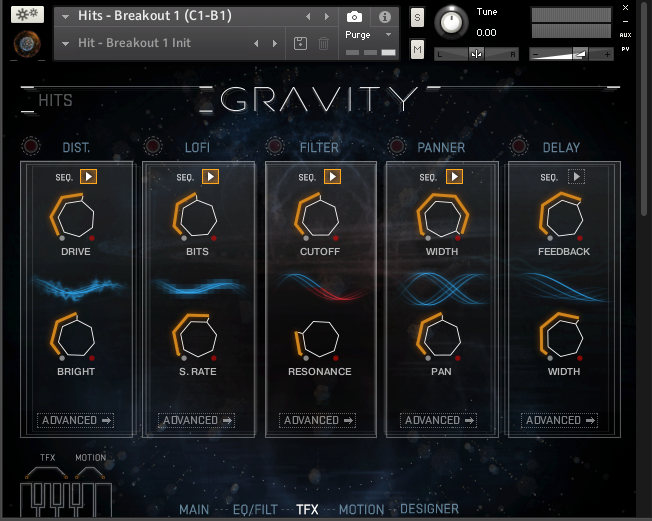
Gravity’s Trigger FX

Gravity’s Trigger FX

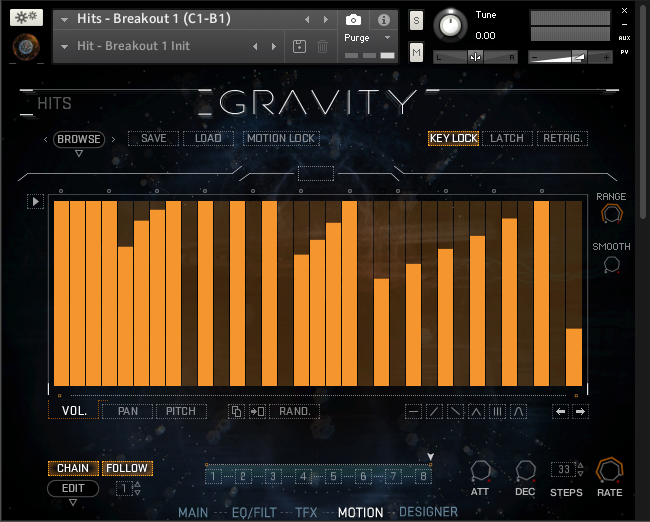
There is also an EQ/FILTER page which of course provides a complex equalizer and variety of filtering parameters, a TFX (Trigger FX) page to temporarily alter sounds by MIDI trigger with Distortion, LoFi, Filter, Panning, and Delay. Under each trigger effect is an “Advanced” button where you can further customize the parameters of each trigger effect. Lastly, there is a MOTION page that has a modulation sequencer that adjusts volume, pan, and pitch of the sound triggered over time, and a randomize button that randomizes the variety of motion control and motion playback parameters. With this variety of motion controls, you can create patterns of motion to either utilize as an individual setting or to link a chain of motion patterns. To add to all of that, there’s an editing sequencer, and each pattern contains a sequence of volume, panning, and pitch parameters. This series of adjustable bars allows you to create a sequence of patterns. With all of these parameters to manipulate as little or as much as you’d like, thankfully, they have the option to save, load, and lock motion controls for easy recall when you find a really cool means of motion manipulation that you’d like to bring back (without taking the time to fine-tune all of those parameters all over again).

Gravity’s Sequencer

Gravity’s Sequencer

There is one instrument section that’s a little bit different from the rest and has an additional page of customization options that the others don’t. That’s when you go diving into the Hits. In the Hits section, there are multiple options of what they call Breakouts, which are an extensive array of preloaded multi-sample triggers that implement a whoosh or synth rising element that builds and builds until slamming into a powerful, concussive cinematic impact before trailing off. You can use these individually or blend some of them together for a quick means of generating complex, powerful cinematic accents, and sweeteners. These are also all broken down separately into the individual samples to trigger the impacts themselves with each MIDI keyboard note, the sub-elements for a nice touch of deep BOOM to rock the room, the tails to let the concussive hit play out in a variety of ways, and the airy/synth whooshes to rise up into the booming impact. Included in the four Breakout Hits instruments, there’s the additional page of customizable elements added to the UI that I mentioned at the start of this paragraph called DESIGNER. Because the Breakout Hits instruments each trigger a combination of this aforementioned mix of cinematic elements with each keyboard key note, inside the Designer tab, you’ll find that it allows you to modify each of those elements/samples to customize the combinations of triggers.

Hits Instrument Section

Hits Instrument Section

Now, after that extensive technical dive into everything that this AMAZING virtual instrument has to offer, I must say, Gravity itself is actually surprisingly easy and user-friendly to navigate and play with. It has definitely become my personal favorite tool to create a variety of cinematic style elements and accents. In being so user-friendly, once you’ve got it loaded up and either connected your MIDI keyboard or setup your computer keyboard to use in its place… simply select an instrument from the menu and you’re good to go! Have fun playing and exploring the expansive additional effects and features I’ve detailed above!

WRITTEN BY GREG RUBIN
SOUND EFFECTS EDITOR, BOOM BOX POST

Critical Listening with Spatial Audio

When I began studying music production five years ago, I spent a lot of my hours working through critical listening techniques for records I found or ones that were recommended to me. The goal of this practice was identifying elements of arrangement, recording, programming, and mixing that made these particular records unique. At the time I was studying, I was introduced to immersive audio and music mixes in Dolby Atmos, but there was a strong emphasis on the technology’s immobility – making these mixes was pretty impractical since the listener needed to stay in one place relative to the specific arrangement of the speakers. Now that technology companies like Apple have implemented spatial audio to support Dolby Atmos, listeners with access to these products can consider how spatialization impacts production choices. Let’s explore this by breaking down spatial audio with AirPods and seeing how this technology expands what we know about existing critical listening techniques.

Apple AirPods Pro with spatial audio and noise cancellation features

It’s important to address the distinctions of spatial audio, as the listening experience depends on if the track is stereo or mixed specifically for Dolby Atmos. The result of listening to a stereo track with spatial audio settings active is called “spatial stereo,” which mimics the events of spatial audio on stereo tracks. When using the “head-tracking” function while listening to a stereo track, moving your head will adjust the positioning of the mix in relation to the location of your listening device via sensors in the AirPods.

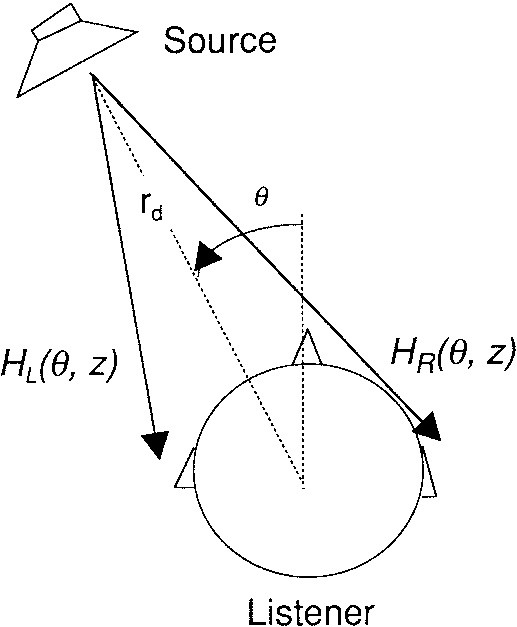
For a simplified summary of how this works, spatial audio and Dolby Atmos are both achieved with a model known as Head-Related Transfer Function (HRTF). This is a mathematical function that accounts for how we listen binaurally. It considers aspects of psychoacoustics by measuring localization cues such as interaural level and time differences, and properties of the outer ear and shape of the head. If you are interested in diving into these localization cues, you can learn more about them in my last blog.

A simplified layout of a head-related transfer function (HRTF)

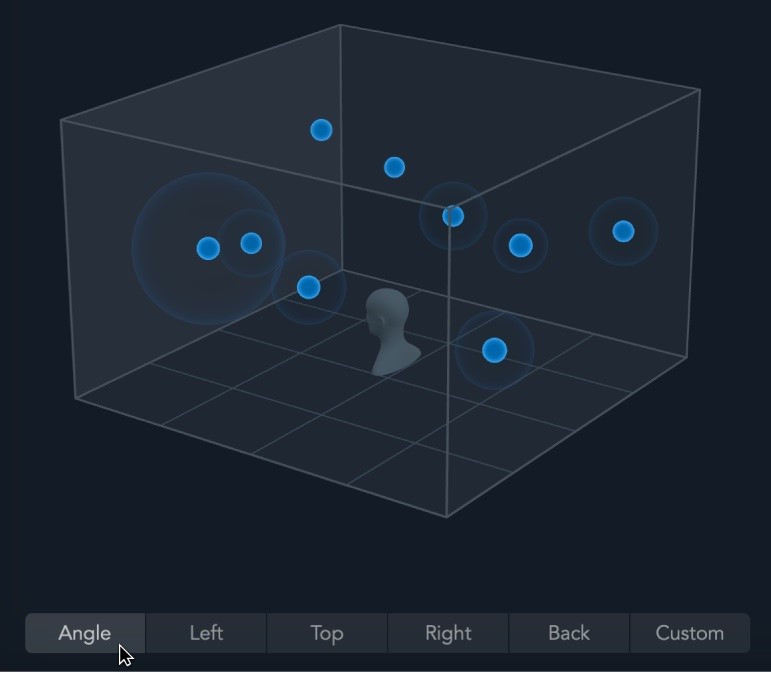
Ultimately, the listening experience of spatial stereo and Dolby Atmos mixes is different. For example, tracks that are mixed in Dolby Atmos involve different elements of the instrumentation that are placed as “objects” in a three-dimensional field and processed through a binaural renderer to create an immersive mix in headphones. Meanwhile, spatial stereo sounds like a combination of added ambience and filters and the AirPod’s sensors to form a make-shift “room” for the song. Using the head-tracking feature with spatial stereo can impact the listener’s relationship to the production of the song in a similar way to a Dolby Atmos mix, and while it doesn’t necessarily make the mix better, it does provide a lot of new information about how the record was created. I want to emphasize how we can listen differently to our favorite records in spatial audio, and not how this feature makes the mix better or worse.

An example of object-oriented mixing in Dolby Atmos for Logic Pro


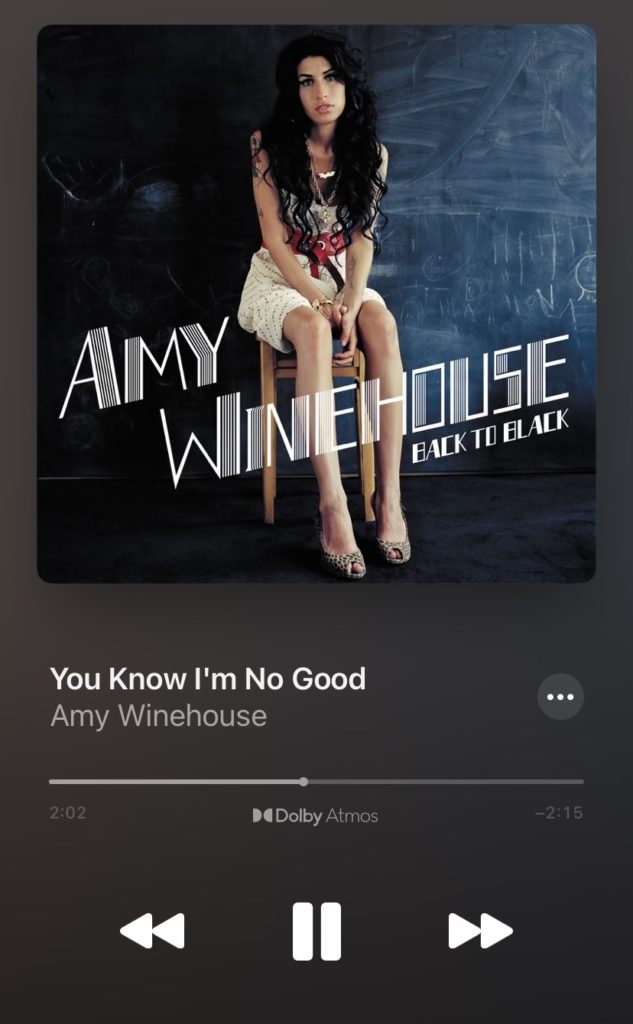
For this critical listening exercise, I listened to a song mixed in Atmos through Apple Music with production that I’m familiar with: “You Know I’m No Good,” performed by Amy Winehouse, produced by Mark Ronson, and recorded by members of The Dap Kings. It’s always a good idea when listening in a new environment, in this case, an immersive environment, to listen to a song that you’re familiar with. This track was also recorded in a rather unique way as the instruments were, for the most part, not isolated in the studio, and very few dynamic microphones were used in true Daptone Records fashion. The song already has a “roomier” production sound, which actually works with the ambient experience of spatial audio.

The first change I noticed with spatial audio head tracking turned on is that the low-end frequencies are lost. The low-end response in AirPods is already pretty fragile because the speaker drivers cannot accurately replicate longer waveforms, and our collection of harmonic relationships helps us rebuild the low-end. With spatial audio, much of the filtering makes this auditory perception more difficult, and in this particular song, impacts the electric bass, kick drum, and tenor saxophone. Because of this distinction, I realized that a lot of the power from the drums isn’t necessarily coming from the low end. This makes sense because Mark Ronson recorded the drums for this record with very few microphones, focusing mostly on the kit sound and overheads. They cut through the ambience in the song and provide the punchiness and grit that matches Winehouse’s vocal attitude.

Since a lot of the frequency information and arrangement in many modern records comes from the low end, I think this is a great opportunity to explore how mid-range timbres are interacting in the song, particularly with the vocal, which in this record is the most important instrument. When I move my head around, the vocal moves away from the center of the mix and interacts more with some of the instruments that are spread out, and I noticed that it blends the most with a very ambient electric guitar, the trombone, and the trumpet. However, since those three instruments have a lot of movement and fill up a lot of the space where the vocal isn’t performing, there is more of a call-and-response connection to these instruments. This is emphasized by the similarity in timbres that I didn’t hear as clearly in the stereo mix.

You know I’m No Good” in Apple Music with a Dolby Atmos label

Spatial audio makes a lot of the comping instruments in this song such as the piano more discernible, so I can allocate the feeling of forward movement and progression in the production to what is happening in these specific musical parts. In the stereo mix, the piano is doing the same job, but I’m able to separate it from other comping instruments in spatial audio because of how I moved my head. I turned my head to the right and centered my attention on my left ear, so I could feel the support from the piano. Furthermore, I recognized the value of time-based effects in this song as I compared the vocal reverb and ambient electric guitar in stereo and spatial audio. A lot of the reverb blended together, but the delay automation seemed to deviate from the reverb, so I could hear how the vocal delay in the chorus of the song was working more effectively on specific lyrics. I also heard variations in the depths of the reverbs, as the ambient electric guitar part was noticeably farther away from the rest of the instruments. In the stereo mix, I can distinguish the ambient guitar in the mix, but how far it is in perceptual depth is clearer in spatial audio.

Overall, I think that spatial audio is a useful tool for critical listening because it allows us to reconsider how every element of a record is working together. There is more space to explore how instrumentation and timbres are working together or not, and what their roles are. We can consider how nuances like compression and time-based effects are working to properly support the recording. Spatial audio doesn’t necessarily make every record sound better, but it’s still a tool we can learn from.

Using Localization Cues in Immersive Mixing

Whether you’re mixing for film in 5.1 surround or Dolby Atmos, it’s important to consider a key element of human auditory perception: localization. Localization is the process by which we identify the source of a sound. We may not realize it, but each time we sit down to watch a movie or TV show, our brains are keeping track of where the sound elements are coming from or headed towards, like spaceships flying overhead, or an army of horses charging in the distance. It is part of the mixer’s role to blend the auditory environment of a show so that listeners can accurately process the location of sounds without distraction or confusion. Here are some psycho-acoustical cues to consider when mixing spatial audio.

ILDs and ITDs, What’s The Difference?

Because we primarily listen binaurally or, with two ears, much of localization comes from interaural level and time differences. Interaural level differences depend on the variations in sound pressure from the source to each ear, while interaural time differences occur when a sound source does not arrive at each ear at the same time. These are subtle differences, but the size and shape of our heads impacts how these cues differ between high and low frequencies. Higher frequencies with shorter wavelengths can move around our heads to reach our ears, causing differences in sound pressure levels between each ear, and allowing us to determine the source’s location. However, lower frequencies with larger wavelengths are not impacted by our heads in the same way, so we depend on interaural time differences to locate low frequencies instead. Although levels and panning are great tools for replicating our perception of high frequencies in space, mixers can take advantage of these cues with mixing low end too, which we usually experience as engulfing the space around us. A simple adjustment to a low-end element with a short 15-40 millisecond delay can make a subtle change to that element’s location, and offer more space for simultaneous elements like dialogue.

Here is a visualization of how high and low frequencies are impacted by the head.

Here is a visualization of how high and low frequencies are impacted by the head.

Flying High

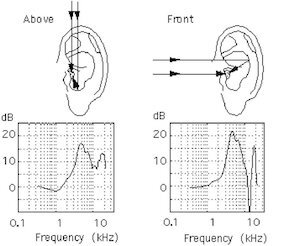
While a lot of auditory perception occurs inside the ear and brain, the outer ear has its own way of affecting our ability to locate sounds. For humans and many animals, the pinna defines the ridges of the human ear that are visible to the eye. Although pinnae are shaped differently for each individual, the function remains the same: it acts as a high-pass filter that tells the listener how high a sound is above them. When mixing sound elements in an immersive environment to seem like they are above the head, emphasizing any frequencies above 8000 Hz with an EQ or high-shelf can more accurately emulate how we experience elevation in the real world. Making these adjustments along with panning the elevation can make a bird really feel like it’s chirping above us in a scene.

See how the pinna acts as a “filter” for high frequencies arriving laterally versus elevated.

See how the pinna acts as a “filter” for high frequencies arriving laterally versus elevated.

The Cone of Confusion

A psycho-acoustical limitation to avoid occurs at the “cone of confusion,” an imaginary cone causing two sound sources that are equidistant to both ears to become more difficult to locate. In a mix, it is important to consider this when two sounds might be coming from different locations at the same time and distance. While it’s an easy mistake to make, there are a handful of steps to overcome the cone of confusion and designate one sound element as being farther away, including a simple change in level, using a low-pass filter to dull more present frequencies in one sound, or adjusting the pre-delay to differ between the two sounds.

This demonstrates where problems can occur when locating two equidistant sound sources.

This demonstrates where problems can occur when locating two equidistant sound sources.

With these considerations, mixers can maintain the integrity of our auditory perception and make a film’s sound feel even more immersive.

Written by Zanne Hanna
Office Manager, Boom Box Post

This blog originally was published on Boom Box Post

L&L: Less is More: A Lesson in Avoiding Over-Cutting

Over-cutting in your SFX editorial is a really easy mistake to make, and one that can be a real headache for your mixer. Today we’ll go over a quick tip to help you avoid adding too much to your FX builds.

When searching your library for interesting layers to add to a build, it’s very tempting to add every sound you hear that you think is appropriate and cool. But this can lead to bloated builds that make mixing pretty tricky. This is especially true if this build continues in a scene for a while, or dare I mention needs to be cut to perspective.

If you find yourself doing this, try out this tip to help thin out your sound without taking away from the quality. Once you’ve cut in all of the elements you want for your build, mute each layer. Then, one by one, unmute a layer and listen through. If any of the sounds don’t add something significant to your build, get rid of it! If it’s not cutting through in your editorial session, it certainly won’t cut through the mix once dialogue and music are added.


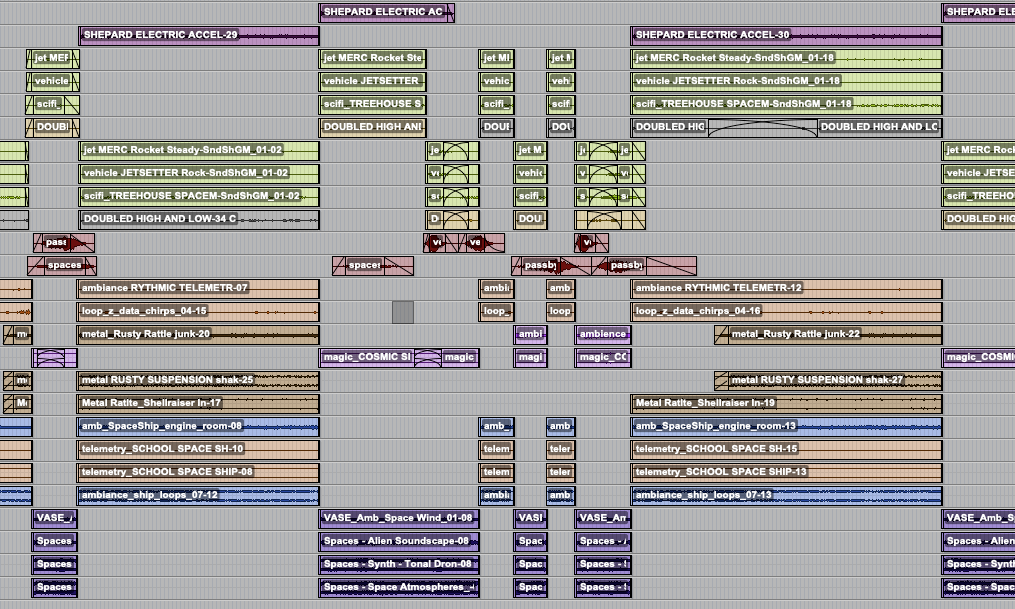
Here’s an example of over-cutting leading to cluttered layers that are counterintuitive to mix.

Here’s an example of over-cutting leading to cluttered layers that are counterintuitive to mix.

Additionally, it helps to keep frequency and texture in mind when creating your builds. Try and choose layers that are distinct from one another and serve a purpose within those categories. For instance, if you’re building an explosion, you’ll want to fill out the frequency spectrum with an LFE element, a mid-range boom, and maybe something like a firework whistle to round out the high-end. Then for texture, maybe you’ll want some rock debris or a big wooden crack at the beginning. It doesn’t make sense to just add layer upon layer of mid-range booming explosions because you can get a similar sound by just raising the gain on one well-selected mid-range file. Thinking about frequency and texture in your builds will help avoid adding unnecessary layers and also make your editorial a bit more interesting.


Department Heads,  Please Don’t Forget Your Sound Mixer


This year, I had the privilege of being back on a set during a time where set work still isn’t prevalent. Was I scared? Yes. A pandemic is still going on. But, this is the first film in a long time where I wasn’t a part of the sound department. Post or set! This was also the first feature I had ever worked on. A daunting task to be a part of the assistant director’s department as well! I learned some things about being back on a set. That included how much I could help the sound department when problems arose.

One of the main things I learned? The Sound Department is still overlooked (both post and set). Yes, a film is a visual medium but bad visuals don’t take you out of the moment as much as bad sound does.

I recently had a meeting with some department heads from the film and gave my own insight (what little I have) about the sound department and what they can change for their next feature. Our sound mixer wasn’t invited to the location scouts. Something I did not know until halfway through filming. He was just as new to each location as I was! Which meant he wasn’t always prepared for what sounds and problems the locations would bring. A noisy/echo-y locker room which most definitely will be looped later. Many consistent sounds at locations that couldn’t be turned off at all or weren’t thought of on the location scouts. When at the post-filming meeting, the department heads were genuinely surprised that a sound person should be brought on scouts or even thought of. I know I’ve had my share of location managers tell me “Don’t worry! The location is super silent!” only to get there and there’s a loud water boiler that can’t be turned off, chickens and roosters galore in the backyard, etc. I’ve even had weird high-pitched noises from set recordings that no one knew what it was and I was asked in post to fix it. Always better to fix it on set than in post. BUT, I do understand that some locations you just have to deal with. Could be due to budgets or any other number of reasons. I get it. It’s better to know what those problems are before even filming so you can save everyone the headaches or what could happen.

Why the emphasis to try and work with your sound person and get a clean recording instead of just fixing it in Post?

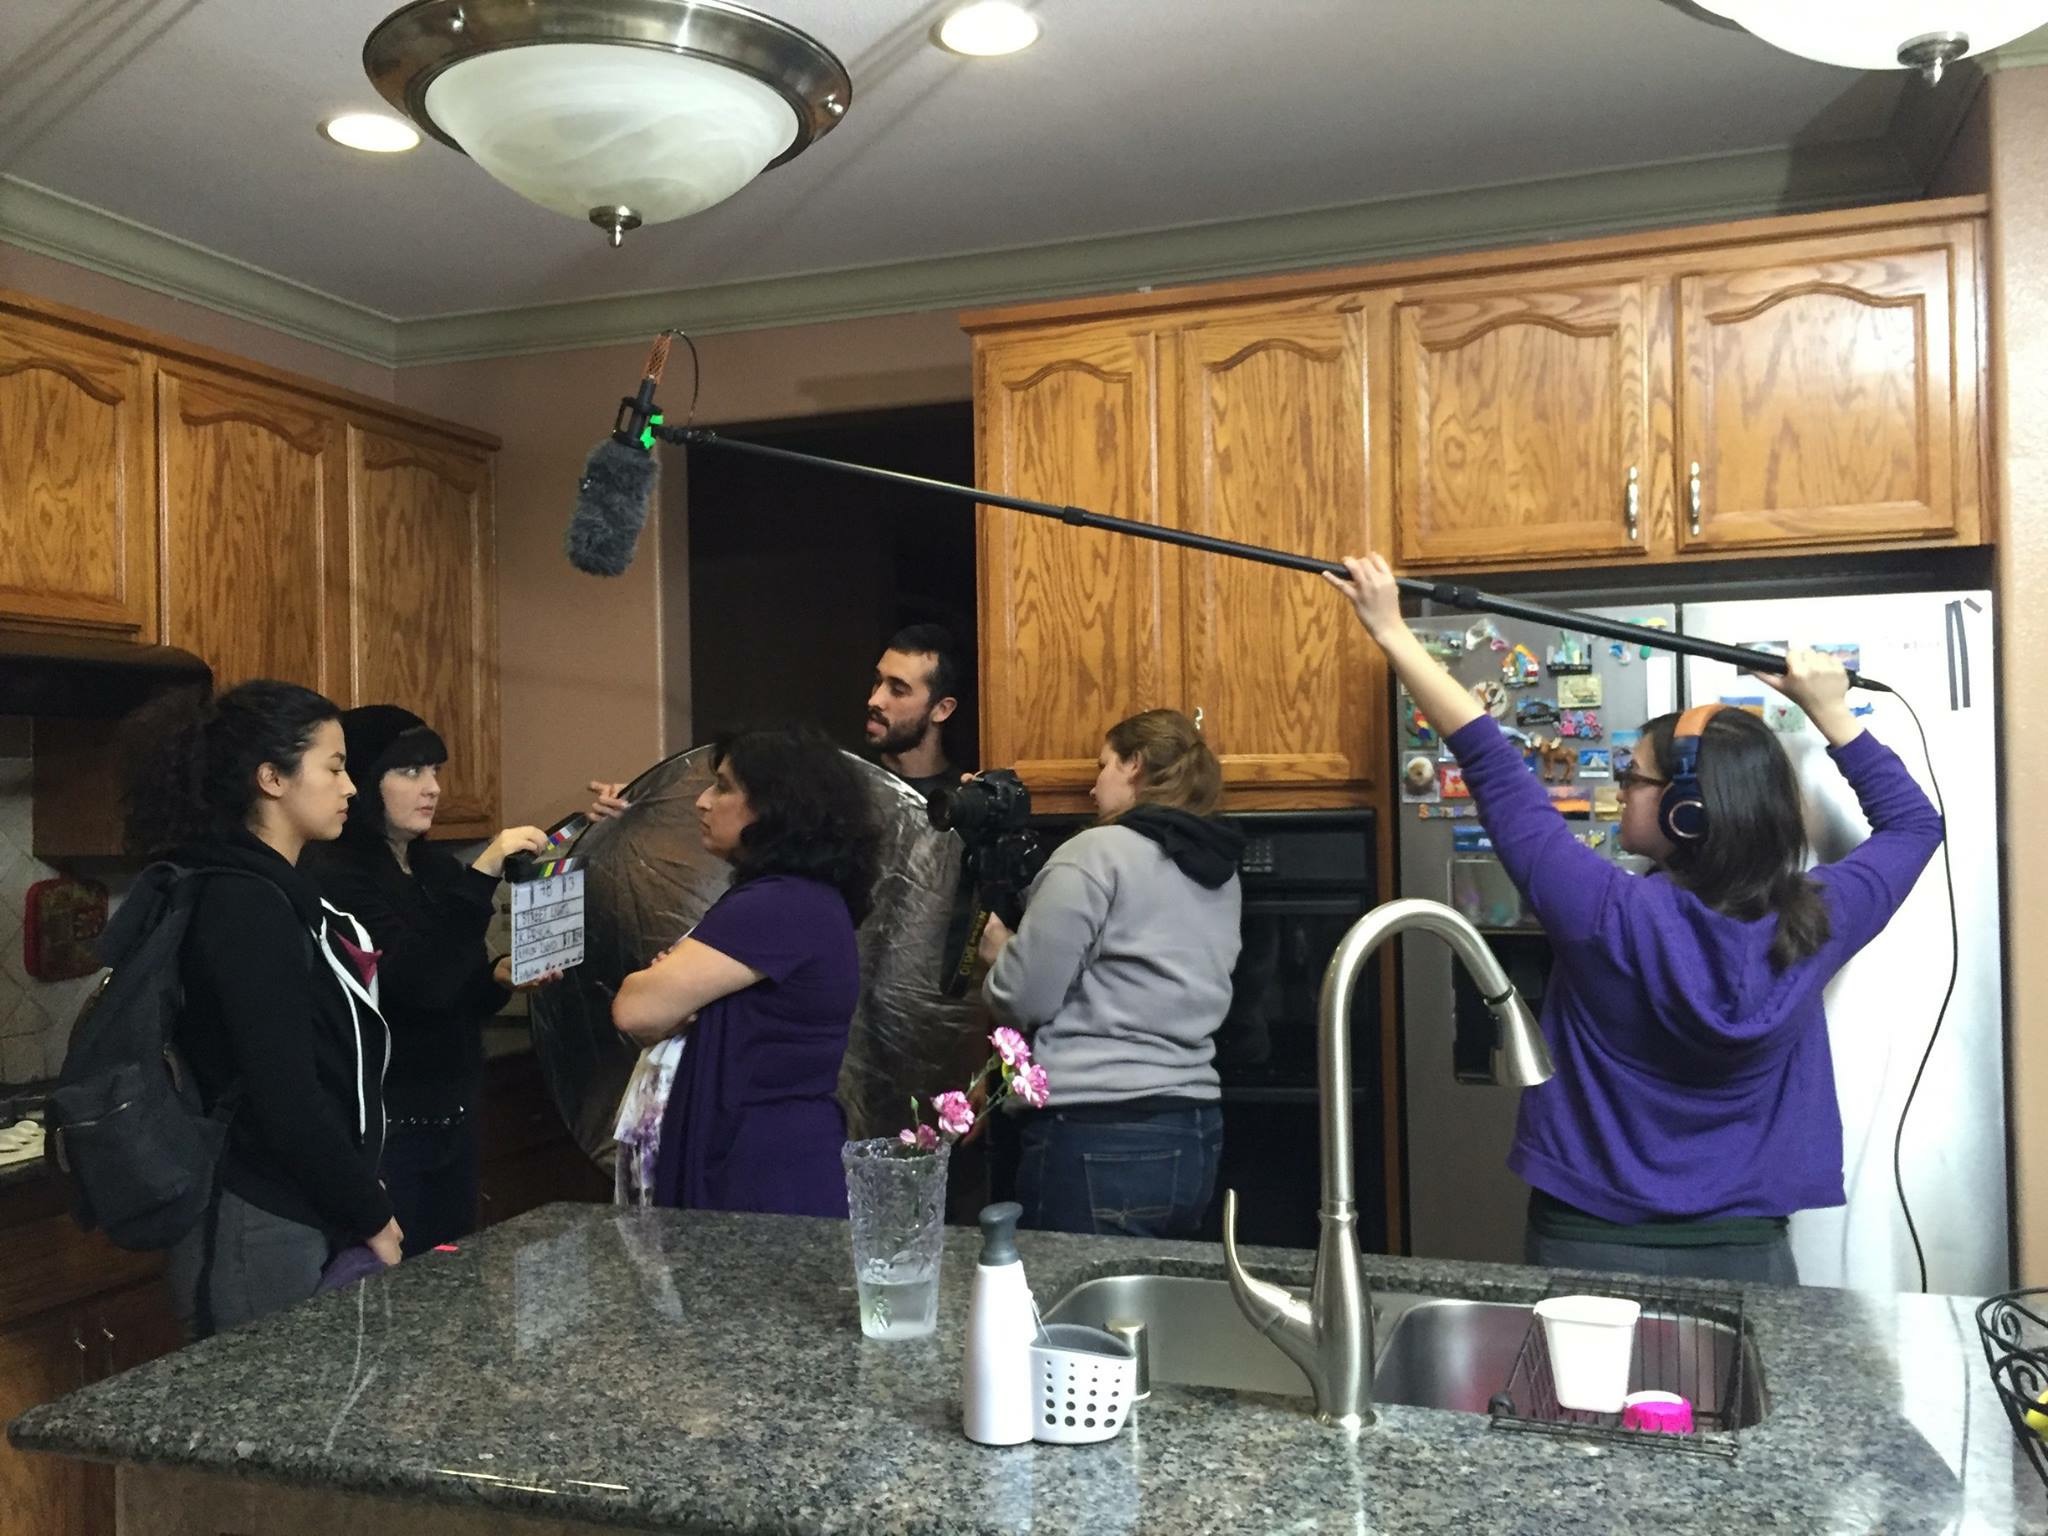
Well, you also want to preserve the actor’s performance as much as possible. Sometimes bringing them in for an ADR session won’t always give you back the performance they had on set. Since I worked as an assistant director on this feature, it was also my duty to help our sound mixer with whatever problems had arisen. That should always be the case with sound mixers. Different departments should be working together since a sound mixer or their team can’t fix or do everything by themselves. Another department sound mixers should work with are costume designers. Our sound mixer and costume designer didn’t have the time to chat with each other so they had to wire up actors without any prior knowledge of any problems that could have been fixed. I always had a production assistant ready to go on a run for things such as batteries or moleskin for the sound mixer. Though, we did work night shoots which also need to factor into production. Not a lot of places are open in those wee hours of the night. That means things need to be bought earlier or you’d have to wait till the next day and that can’t help anyone.

A simple way to start noticing the sound at a location is to stand in the middle of a room or area, close your eyes and listen to all that is around you. The refrigerator, the a/c blowing inside or the unit outside, walk around and hear how loud your footsteps will be on set, etc. Also, check to see what the power situation will be for different departments. A set I was on required us to run cables through windows which meant those windows had to stay open. Not ideal for sound at all. This also means you have to make sure all movement must be halted from other departments that are near set and that can be a tricky task when you’re limited by budget and time. Another thing is to allow the sound mixer to get that room tone in each place that is filmed. It doesn’t take long but it can be so helpful in the long run.

I can go on about things to be thought of when you, as a sound mixer, have to work with on a set. But, I truly hope that other departments can accommodate or help as much as they can because it’ll help. Let the other departments know that you’re not trying to be ‘fussy’ or the like. You’re trying to get the best sound possible for them. Support one another! I have no idea when this almost ‘anti sound mentality came into play on set but, we all need to work and support one another, or else the final product of a film won’t be as good as it could possibly be. We’re all working together to bring multiple peoples’ ideas to life and we genuinely want that final product to be the best it can be. So other departments, please work with and not against your sound team. It may just save you some money and headache later.

For a very detailed article about this topic.

Check out: “An Open Letter From Your Sound Department


The Lowdown On Mixing – Re-recording mixer Jacob Cook

DIALOGUE

When we mix an episode of animated TV, we always start with the dialogue. I usually start by setting reverbs for each scene, then mix the dialogue line by line to get it in spec and sounding natural throughout the show. Any panning, extra processing or additional reverb is also added at this time. The dialogue serves as the anchor for the rest of the mix, so it’s very important to get this locked in before adding any other elements!

MUSIC

Next, we add in the music and ride the levels throughout the show. I’ll dip it for dialogue when necessary and boost it to help keep the momentum and add excitement.

BACKGROUNDS/AMBIENCES

Then, I’ll mute the music again and mix the backgrounds and ambiences. By mixing these without the music we ensure the scene will sound natural when the music isn’t playing. Then I turn the music back on and foley is next, meaning footsteps, hand pats and movement tracks. Like music and backgrounds, the levels will vary show to show and client to client depending on preference. I’ll set an overall level and ride faders when needed throughout the show, adding panning when necessary.

SOUND EFFECTS

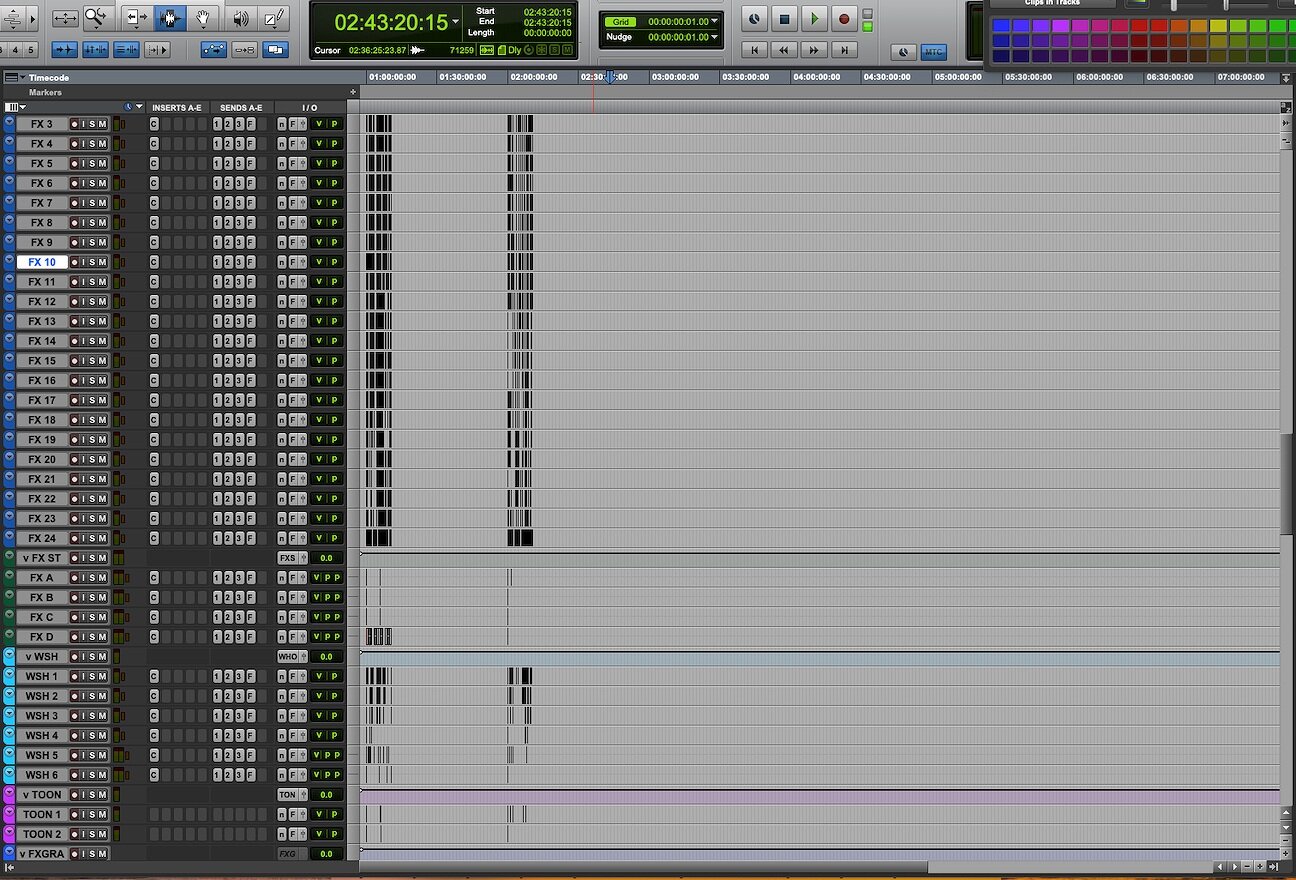
Lastly, I bring in the rest of the hard sound effects.  These are organized into food groups such as mono effects, stereo effects, whooshes, toon, etc (shown in the photo below). Again, how these are mixed varies show to show. This is an oversimplification of the process, but this is the basic sequence I follow.  I usually wrap up with a few watch downs in 5.1 and stereo to make adjustments and take one last look at mix notes from the client.

Screen+Shot+2020-09-16+at+3.13.46+PM.jpg

What do you look for in a good mix?

It is important that the mix supports the style of the show. Something with a lot of action should feel exciting and have a dynamic mix. An educational preschool show needs a mix that will help direct the viewer’s focus correctly and highlight the information being presented. I also think a good mix supports the story and doesn’t distract the audience. It is important that the sound is helping support the narrative and storytelling style.

Do you have any technical/creative prerequisites you think would be helpful for a mixer?

You definitely need to be an expert in Pro Tools. Understanding all of the ins and outs of writing automation through all the various parameters is essential. A strong basis as an editor is a good start here, but it helps to push into the mixing workflow and familiarize yourself with things like preview mode, latch prime in stop, surround panning, VCAs, grouping and plug-in automation. The best way to learn about these is get your hands dirty. Read the manual or some tutorials and start mixing.  You will quickly learn where you can speed things up and the benefits of the different automation modes.

Creatively, the best thing you can do to prepare is to watch a pro work and learn how they approach each mix. I learned all of my mixing skills and techniques from watching Boom Box Owners Kate and Jeff mix and adopting their methods. Once I understood what they were doing and why I worked to get faster and developed my own techniques and style!

Referencing other shows and films is also a great way to get ideas and help your mixing improve. Critically listening to a mix on TV or in a theater can really surprise you, and I would recommend paying close attention to how the music and sound effects levels change throughout a film.

What do you wish you would’ve known before becoming a mixer?

Probably that it’s OK to not be able to hear EVERYTHING all of the time. It took me a while to really understand this, and it’s definitely fundamental.  It’s important that the mix doesn’t sound cluttered through the whole show with an abundance of unnecessary sound. Editors cut for complete coverage, but as a mixer, it is your entire job to decide what sounds or music are most important for the audience to hear at each moment, and not overwhelm them with sounds that don’t support the story the filmmaker is telling in a scene.

Also Latch Prime in Stop, which lets you write automation without playing back. When I first started mixing I probably wasted a lot of time writing panning and volume automation in real-time that could have easily been done in a half a second when stopped.

What would you say the hardest obstacle is when it comes to mixing?

As I mentioned in the previous answer, the hardest obstacle is determining where to direct the viewer’s attention and how best to accomplish that. It can be extra challenging when you consider how much time, effort and creativity went into each sonic piece. The sound effects editor may have spent all day creating an amazing glowing steady for the magic orb in the background, but if the characters are having an important story conversation, it is not the time to feature those sound effects. You may really love the cello melody in this particular scene, but you know the audience needs to notice the distant explosions that draw the character’s attention off-screen. You make hundreds of these types of decisions during a mix and learning which direction to take things can really make or break the final product.


Hopefully, Jacob’s insight gives you a better understanding of mixing! If you enjoyed this post, you should also check out Jeff’s mixing post about the technical side of mixing:

DEMYSTIFYING THE TECHNICAL SIDE OF MIXING

WRITTEN BY JACOB COOK – RE-RECORDING MIXER, BOOM BOX POST


3 Easy Steps to Cutting Classic Cartoon Sound Effects

At Boom Box Post, we specialize in sound for animation.  Although sonic sensibilities are moving toward a more realistic take, we still do a fair amount of work that harkens back to the classic cartoon sonic styles of shows like Tom and Jerry or Looney Tunes.  Frequently, this style is one of the most difficult skills to teach new editors.  It requires a good working knowledge of keywords to search in the library–since almost all cartoon sound effects are named with onomatopoeic names rather than real words like “boing”, “bork”, and “bewip”–an impeccable sense of timing, and a slight taste for the absurd.

I used to think that you were either funny or not.  Either you inherently understood how to cut a sonic joke, or you just couldn’t do it.  Period.  But, recently, I began deconstructing my own process of sonic joke-telling and teaching my formula to a few of our editors.  I was absolutely floored by the results.  It turns out, you can learn to be funny!  It’s just a matter of understanding how to properly construct a joke.


WHAT NOT TO DO

Before I get into what to do, I think it’s important to point out what not to do.  When editors start cutting classic cartoon sound effects for the first time, they pretty much always have the same problem.  They stumble upon the Hanna-Barbera sound effects library and find some really funny sounds.  Bulb horns–those are always funny!  Boings–hilarious!  Splats–comic genius!  Then, one by one, they start sprinkling these in whenever they feel there’s a dull moment.

Let me say this once: A single funny sound effect is almost never funny.  It’s like blurting out the punchline of a joke without the setup.

Here’s an example of a joke: Someone stole my Microsoft Office and they’re going to pay.  You have my Word.  

I know this is a super lame joke… but it is a joke nonetheless and if you told it at a party, you’d probably be rewarded with an awkward groan/chuckle.  Cutting just a single bulb horn at a random moment is like yelling out “Microsoft Office!” in the middle of a party and expecting people to laugh.  It’s just not funny.  Cutting cartoon sound effects is not the artform of adding “funny” sounds randomly into a visual work, it’s the art of telling a sonic joke.  And to tell a joke, you need three parts: the introduction, the setup, and the punchline.  If you want to go one step further, you can add a bonus part: the tag.


AN EXAMPLE OF JOKE CONSTRUCTION IN PROGRESS

Love him or hate him, this video example of Jerry Seinfeld talking about his process in writing a Pop-Tart joke is very illuminating.  There are many different elements that go into how funny your joke will be perceived to be.  They are things like: how incongruous are the words (or sounds) to each other, how surprising is the punchline at the end, how well were elements from the setup woven back into the punchline, how well did you captivate your audience by the “story” of the joke.  With that in mind, it’s not hard to see why it would take two years to craft the perfect Pop-Tart joke.

Watch the video here.

ANATOMY OF A JOKE: THE INTRODUCTION

When telling a joke, this is your first sentence.  It lets the audience know where you’re starting.  In the case of Jerry’s Pop-Tart joke, this is when he starts talking about breakfast in the 1960s being composed of frozen orange juice and toast.  From this, we understand that this is going to be a joke about breakfast.

In sound, the importance of the introduction is all about timing. Take a Mickey and the Roadster Racers that one of our editors, Brad Meyer, and I worked on.  There was a sequence where all of the characters were driving around and Goofy was holding a stolen diamond.  It was incredibly valuable and he was nervous to be mistakenly caught with it and possibly taken for the thief.  At one point, he abruptly came to a stop, the diamond flew out of his car and landing in a Ferris wheel bucket.  The Ferris wheel then began to turn around, and the two characters (one good guy and one bad guy) scrambled to enter the bucket with it.  Up they went with the diamond to the top when it, of course, slipped from their hands, bounced down the spokes of the Ferris wheel one by one, and then landed neatly in Goofy’s car at the bottom.

In this sound design example, choosing the point at which we kick off the joke is key. Like I mentioned earlier, if we just sprinkle cartoon sound effects in whenever anything slightly “toony” happens in the visual, it’s not really a joke.  We’re just shouting funny-sounding words at a party.  Instead, we need to choose an exact moment to begin the joke.  That moment would be when the diamond flies out of Goofy’s car.  We chose a simple sail zip whistle to kick this off, and a glass clink when the diamond landed in the bucket. Those two sounds were our introduction to the joke. Keep in mind that from this moment, our goal is to make all of the following cartoon sound effects create anticipation leading up to the final “punchline” effect.

ANATOMY OF A JOKE: THE SETUP

In Jerry’s Pop-Tart joke, after introducing us to the idea that he’s talking about breakfast, he continues his setup by us about the downside of all of the prevailing breakfast foods of the 1960s.  Then, he announces the arrival of the Pop-Tart, likening it to the arrival of an alien spacecraft, and he and his friends were like “chimps in the dirt playing with sticks.”  As he points out–in that phrase alone, there are four very funny words: chimps, dirt, playing, sticks.

The setup is the story.  It takes us on a journey and gives us all of the elements we need to pull together the punchline.  But, notice that the more incongruous the elements of the setup, the better the punchline comes off.  What do breakfast, aliens, chimps, dirt, and sticks have in common?  Nothing.  Absolutely nothing.  This is exactly why it’s a great setup.

In sound, the idea is the same.  You kick off the joke with something that makes sense (like a sail zip for an item flying into the air).  In the example of the scene from Mickey and the Roadster Racers, we cut completely incongruous cartoon sounds for the landing of the hero and villain in the bucket (timpani hits), followed by a spin whistle for them scrambling to grab the diamond.  Then, when they got to the top, we cut different pitched glass “tinks” (ascending in pitch with each one) for the diamond falling and hitting spokes of the Ferris wheel along the way. Not only are all of these sounds funny on their own, but they are funnier because they are so different from one another.  Also note that these sounds, although different from one another, continue to build tension leading to the next moment.

ANATOMY OF A JOKE: THE PUNCHLINE

In the Pop-Tart joke, Jerry gives the punchline of wondering how they knew that there would be a demand for “a frosted fruit-filled heatable rectangle in the same shape as the box it comes in, and with the same nutritional value as the box it comes in.”  And he goes on to wrap it up by telling us that in the midst of hopelessness, the Pop-Tart appeared to meet that need of the people.  This punchline works because it harkens back to the introduction when Jerry tells us of the dire state of breakfast choices in America.  The people were in need, and a savior appeared.

In our sonic cartoon example, we did the same thing.  We started with an introduction of a sail zip, then lead to a whole batch of incongruous sounds that built anticipation, and then, as a punchline, we used a reversed sail zip to lead us to the final glass clink of the diamond falling into Goofy’s car.  Thus, the joke was bookended.

ANATOMY OF A JOKE: THE TAG

In Jerry’s example, he talks about wanting to develop an additional end to the joke when he ties in the “chimps in the dirt playing with sticks” with the Pop-Tart punchline.  This would be the tag.  In a cartoon, it might be one final sound at the end of the gag that really finishes it off, like two slow eye blinks from another character who just watched the joke take place.  When you see these visual “tags,” be sure that you always consider them part of the joke as a whole and keep the sounds part of the same family.


FINALLY, FARTS

Because you made it to the end of this incredibly long blog post, you shall be rewarded!  So, here is a video of my favorite comedian, George Carlin, telling fart jokes.  Being that we work in animation, we at Boom Box Post love nothing more than a good old-fashioned fart joke.  If you want extra credit, you can analyze this bit to see how the intros, setups, and punchlines work together.  Or, just sit back and enjoy the smell….

Watch the video here. 

This blog is a repost for Kate Finan at boomboxpost.com. Check out the original post here which includes audio clips.


X