Empowering the Next Generation of Women in Audio

Join Us

The Psychoacoustics of Modulation

Modulation is still an impactful tool in Pop music, even though it has been around for centuries. There are a number of well-known key changes in many successful Pop songs of recent musical decades. Modulation like a lot of tonal harmonies involves tension and resolution: we take a few uneasy steps towards the new key and then we settle into it. I find that 21st-century modulation serves as more of a production technique than the compositional technique it served in early Western European art music (this is a conversation for another day…).

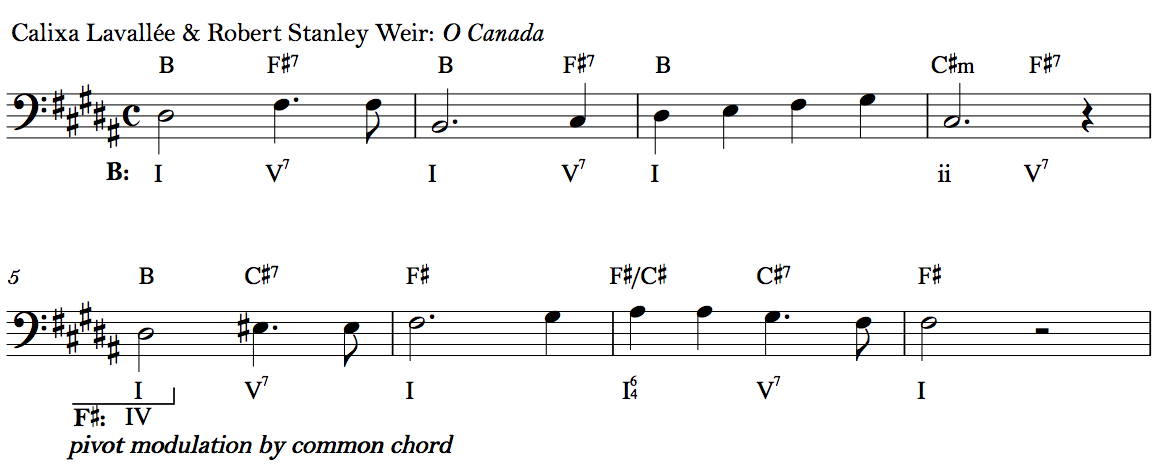
 Example of modulation where the same chord exists in both keys with different functions.


Nowadays, it often occurs at the start of the final chorus of a song to support a Fibonacci Sequence and mark a dynamic transformation in the story of the song. Although more recent key changes feel like a gimmick, they are still relatively effective and seem to work just fine. However, instead of exploring modern modulation from the perspective of music theory, I want to look into two specific concepts in psychoacoustics: critical bands and auditory scene analysis, and how they are working in two songs with memorable key changes: “Livin’ On A Prayer” by Bon Jovi and “Golden Lady” by Stevie Wonder.

Consonant and dissonant relationships in music are represented mathematically as integer-ratios; however, we also experience consonance and dissonance as neurological sensations. To summarize, when a sound enters our inner ear, a mechanism called the basilar membrane response by oscillating at different locations along the membrane. This mapping process called tonotopicity is maintained in the auditory nerve bundle and essentially helps us identify frequency information. The frequency information devised by the inner ear is organized through auditory filtering that works as a series of band-pass filters, forming critical bands that distinguish the relationships between simultaneous frequencies. To review, two frequencies that are within the same critical band are experienced as “sensory dissonant,” while two frequencies in separate critical bands are experienced as “sensory consonant.” This is a very generalized version of this theory, but it essentially describes how frequencies in nearby harmonics like minor seconds and tritones are interfering with each other in the same critical band, causing frequency masking and roughness.


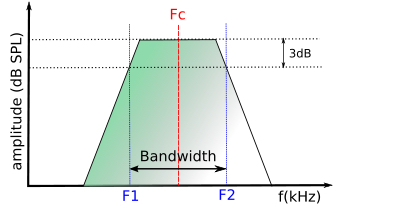
Depiction of two frequencies in the same critical bandwidth.


Let’s take a quick look at some important critical bands during the modulation in “Livin’ On A Prayer.” This song is in the key of G (392 Hz at G4) but changes at the final chorus to the key of Bb (466 Hz at Bb4). There are a few things to note in the lead sheet here. The key change is a difference of three semitones, and the tonic notes of both keys are in different critical bands, with G in band 4 (300-400 Hz) and Bb in band 5 (400-510 Hz). Additionally, the chord leading into the key change is D major (293 Hz at D4) with D4 in band 3 (200-300 Hz). Musically, D major’s strongest relationship to the key of Bb is that it is the dominant chord of G, the minor sixth in the key of Bb. Its placement makes sense because previously the chorus starts on the minor sixth in the key of G, which is E minor. Even though it has a weaker relationship to Bb major which kicks off the last chorus, D4 and Bb4 are in different critical bands and if played together would function as a major third and create sensory consonance. Other notes in those chords are in the same critical band: F4 is 349 Hz and F#4 is 370 Hz, placing both frequencies in band 4 and if played together would function as a minor second and cause sensory roughness. There are a lot of perceptual changes in this modulation, and while breaking down critical bands doesn’t necessarily reveal what makes this key change so memorable, it does provide an interesting perspective.

A key change is more than just consonant and dissonant relationships though, and the context provided around the modulation gives us a lot of information about what to expect. This relates to another psychoacoustics concept called auditory scene analysis which describes how we perceive auditory changes in our environment. There are a lot of different elements to auditory scene analysis including attention feedback, localization of sound sources, and grouping by frequency proximity, that all contribute to how we respond to and understand acoustical cues. I’m focusing on the grouping aspect because it offers information on how we follow harmonic changes over time. Many Gestalt principles like proximity and good continuation help us group frequencies that are similar in tone, near each other, or serve our expectations of what’s to come based on what has already happened. For example, when a stream of high notes and low notes is played at a fast tempo, their proximity to each other in time is prioritized, and we hear one stream of tones. However, as this stream slows down, the value in proximity shifts from the closeness in timing to the closeness in pitch, and two streams of different high pitches and low pitches are heard.

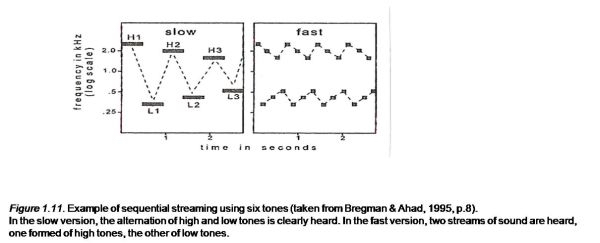
 Demonstration of “fission” of two streams of notes based on pitch and tempo.


Let’s look at these principles through the lens of “Golden Lady” which has a lot of modulation at the end of the song. As the song refrains about every eight measures, the key changes by a half-step or semitone upwards to the next adjacent key. This occurs quite a few times, and each time the last chord in each key before the modulation is the parallel major seventh of the upcoming minor key. While the modulation is moving upwards by half steps, however, the melody in the song is moving generally downwards by half steps, opposing the direction of the key changes. Even though there are a lot of changes and combating movements happening at this point in the song, we’re able to follow along because we have eight measures to settle into each new key. The grouping priority is on the frequency proximity occurring in the melody rather than the timing of the key changes, making it easier to follow. Furthermore, because there are multiple key changes, the principle of “good continuation” helps us anticipate the next modulation within the context of the song and the experience of the previous modulation. Again, auditory scene analysis doesn’t directly explain every reason for how modulation works in this song, but it gives us ulterior insight into how we’re absorbing the harmonic changes in the music.

Whose Job is It? When Plug-in Effects are Sound Design vs. Mix Choices.

We’ve reached out to our blog readership several times to ask for blog post suggestions.  And surprisingly, this blog suggestion has come up every single time. It seems that there’s a lot of confusion about who should be processing what.  So, I’m going to attempt to break it down for you.  Keep in mind that these are my thoughts on the subject as someone with 12 years of experience as a sound effects editor and supervising sound editor.  In writing this, I’m hoping to clarify the general thought process behind making the distinction between who should process what.  However, if you ever have a specific question on this topic, I would highly encourage you to reach out to your mixer.

Before we get into the specifics of who should process what, I think the first step to understanding this issue is understanding the role of mixer versus sound designer.

UNDERSTANDING THE ROLES

THE MIXER

If we overly simplify the role of the re-recording mixer, I would say that they have three main objectives when it comes to mixing sound effects.  First, they must balance all of the elements together so that everything is clear and the narrative is dynamic.  Second, they must place everything into the stereo or surround space by panning the elements appropriately.  Third, they must place everything into the acoustic space shown on screen by adding reverb, delay, and EQ.

Obviously, there are many other things accomplished in a mix, but these are the absolute bullet points and the most important for you to understand in this particular scenario.

THE SOUND DESIGNER

The sound designer’s job is to create, edit, and sync sound effects to the picture.


BREAKING IT DOWN

EQ

It is the mixer’s job to EQ effects if they are coming from behind a door, are on a television screen, etc.  Basically, anything where all elements should be futzed for any reason.  If this is the case, do your mixer a favor and ask ahead of time if he/she would like you to split those FX out onto “Futz FX” tracks. You’ll totally win brownie points just for asking.  It is important not to do the actual processing in the SFX editorial, as the mixer may want to alter the amount of “futz” that is applied to achieve maximum clarity, depending on what is happening in the rest of the mix.

It is the sound designer’s job to EQ SFX if any particular elements have too much/too little of any frequency to be appropriate for what’s happening on screen.  Do not ever assume that your mixer is going to listen to every single element you cut in a build, and then individually EQ them to make them sound better.  That’s your job!  Or, better yet, don’t choose crappy SFX in the first place!

REVERB/DELAY

It is the mixer’s job to add reverb or delay to all sound effects when appropriate in order to help them to sit within the physical space shown on screen.  For example, he or she may add a bit of reverb to all sound effects which occur while the characters on screen are walking through an underground cave.  Or, he or she may add a bit of reverb and delay to all sound effects when we’re in a narrow but tall canyon.  The mixer would probably choose not to add reverb or delay to any sound effects that occur while a scene plays out in a small closet.

As a sound designer, you should be extremely wary of adding reverb to almost any sound effect.  If you are doing so to help sell that it is occurring in the physical space, check with your mixer first.  Chances are, he or she would rather have full control by adding the reverb themselves.

Sound designers should also use delay fairly sparingly.  This is only a good choice if it is truly a design choice, not a spatial one.  For example, if you are designing a futuristic laser gun blast, you may want to add a very short delay to the sound you’re designing purely for design purposes.

When deciding whether or not to add reverb or delay, always ask yourself whether it is a design choice or a spatial choice.  As long as the reverb/delay has absolutely nothing to do with where the sound effect is occurring, you’re probably in the clear.  But, you may still want to supply a muted version without the effect in the track below, just in case, your mixer finds that the affected one does not play well in the mix.

COMPRESSORS/LIMITERS

Adding compressors or limiters should be the mixer’s job 99% of the time.

The only instance in which I have ever used dynamics processing in my editorial was when a client asked to trigger a pulsing sound effect whenever a particular character spoke (there was a visual pulsing to match).  I used a side chain and gate to do this, but first I had an extensive conversation with my mixer about if he would rather I did this and gave him the tracks, or if he would prefer to set it up himself.  If you are gating any sound effects purely to clean them up, then my recommendation would be to just find a better sound.

PITCH SHIFTING

A mixer does not often pitch shift sound effects unless a client specifically asks that he or she do so.

Thus, pitch shifting almost always falls on the shoulders of the sound designer.  This is because when it comes to sound effects, changing the pitch is almost always a design choice rather than a balance/spatial choice.

MODULATION

A mixer will use modulation effects when processing dialogue sometimes, but it is very uncommon for them to dig into sound effects to use this type of processing.

Most often this type of processing is done purely for design purposes, and thus lands in the wheelhouse of the sound designer.  You should never design something with unprocessed elements, assuming that your mixer will go in and process everything so that it sounds cooler.  It’s the designer’s job to make all of the elements as appropriate as possible to what is on the screen.  So, go ahead and modulate away!

NOISE REDUCTION

Mixers will often employ noise reduction plugins to clean up noisy sounds.  But, this should never be the case with sound effects, since you should be cutting pristine SFX in the first place.

In short, neither of you should be using noise reduction plugins.  If you find yourself reaching for RX while editing sound effects, you should instead reach for a better sound! If you’re dead set on using something that, say, you recorded yourself and is just too perfect to pass up but incredibly noisy, then by all means process it with noise reduction software.  Never assume that your mixer will do this for you.  There’s a much better chance that the offending sound effect will simply be muted in the mix.


ADDITIONAL NOTES

INSERTS VS AUDIOSUITE

I have one final note about inserts versus AudioSuite plug-in use.  Summed up, it’s this: don’t use inserts as an FX editor/sound designer.  Always assume that your mixer is going to grab all of the regions from your tracks and drag them into his or her own tracks within the mix template.  There’s a great chance that your mixer will never even notice that you added an insert.  If you want an effect to play in the mix, then make sure that it’s been printed to your sound files.

AUTOMATION AS EFFECTS

In the same vein, it’s a risky business to create audio effects with automation, such as zany panning or square-wave volume automation.  These may sound really cool, but always give your mixer a heads up ahead of time if you plan to do something like this.  Some mixers automatically delete all of your automation so that they can start fresh.  If there’s any automation that you believe is crucial to the design of a sound, then make sure to mention it before your work gets dragged into the mix template.

X