Empowering the Next Generation of Women in Audio

Join Us

The Best Free Drum Machines and Sounds

Drums are usually an integral part of any commercial track. No matter the genre, drums can play an important part in the groove of a song and can completely alter the style and mood if you programme the sounds in different ways. It’s also an easy sound to get right considering even the most basic of DAWs usually come with a decent-sounding drum pack. However, it’s worth exploring the different options out there and changing up the flavour of your track by adding in some fresh-sounding drums.

For that Vintage Sound –  BPB Cassette Drums

The plugin comes with a set of three drums ranging from warm, clean, and hot. The website states the clean sounds were based on unprocessed recordings whereas the warm and hot kits have been resampled using an audio cassette deck. This plugin works with windows and mac and it should be compatible with any DAW that accepts VSTs.

For EDM Drums – 99 Sounds 99 Drum Pack

It has over 450,000 downloads, the 99 Drum Samples pack has some quirky sounds to try out and is perfect for writing EDM or dance music. The pack is Royalty-Free and has been recorded using an array of techniques from sampling to synthetisation and is available in 24-bit Wav format.

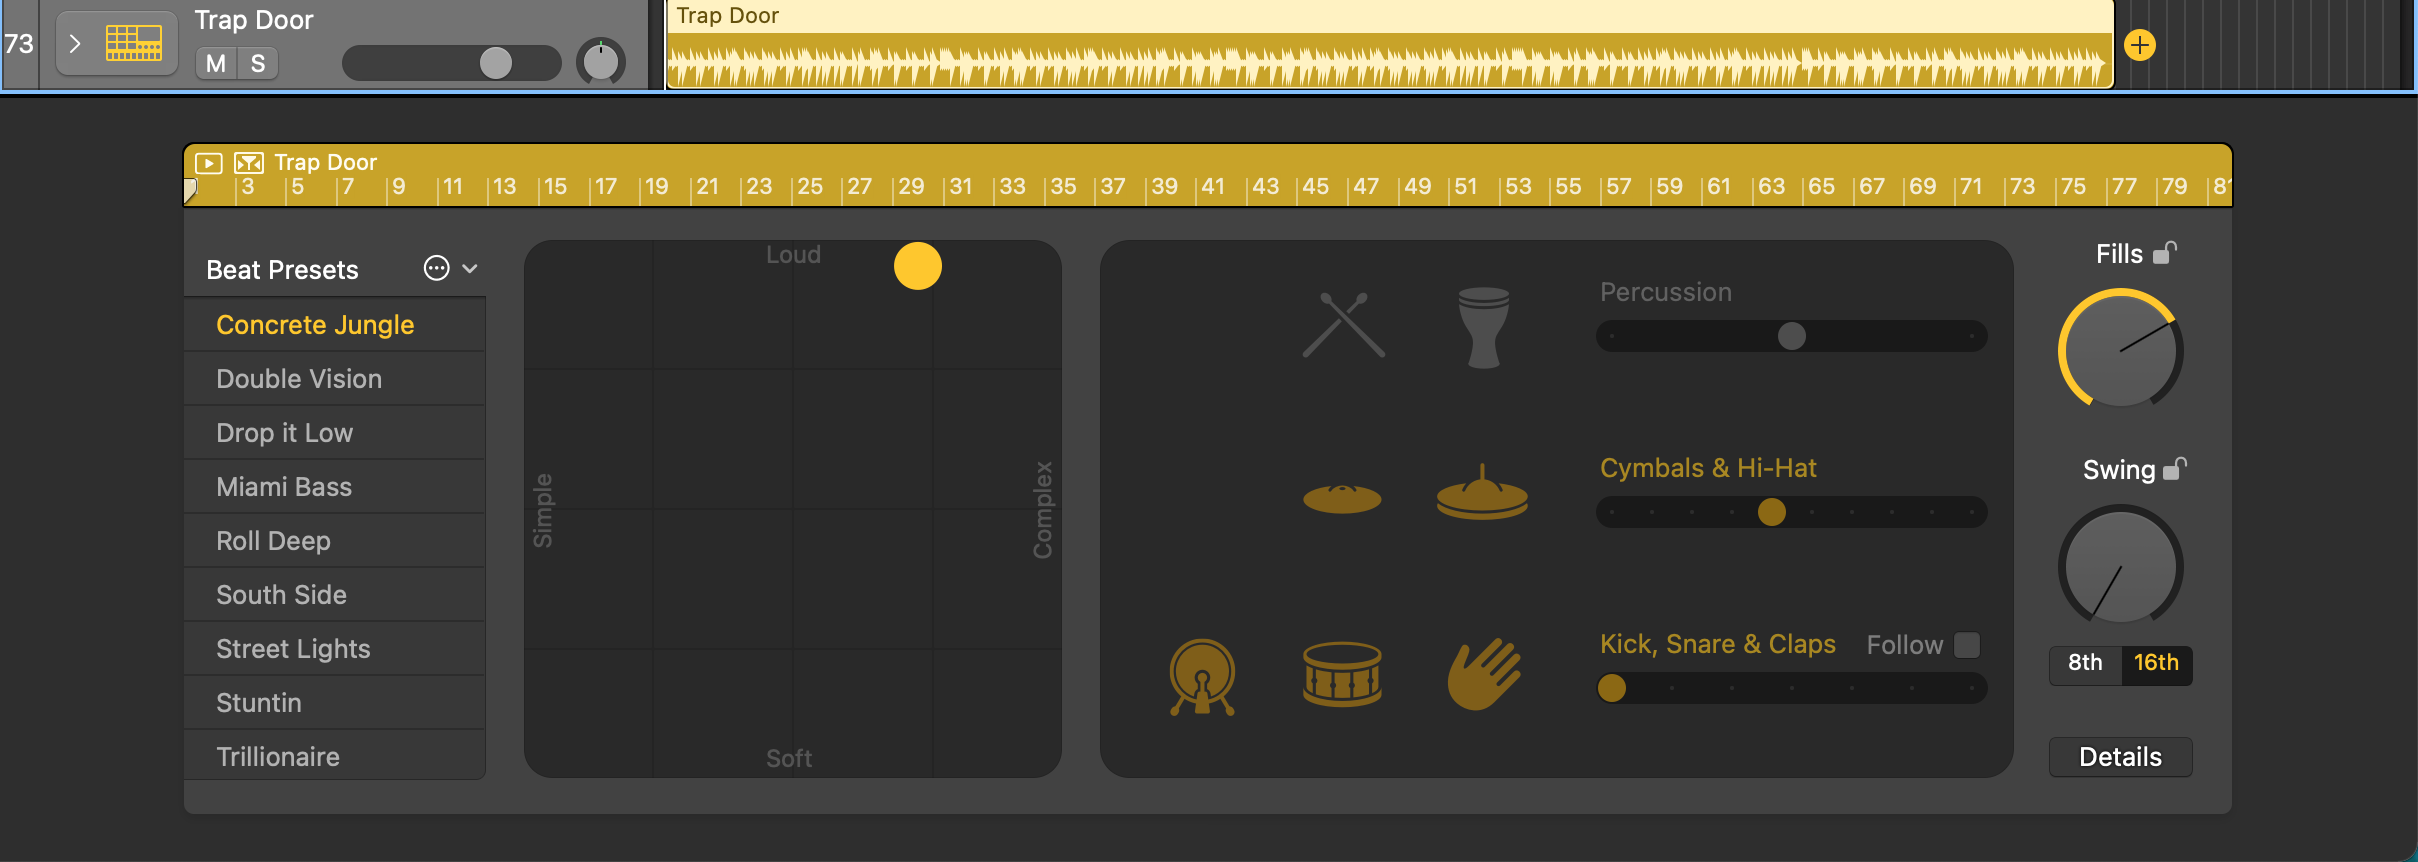
For Beginners –  Logic Pro X Drummer

For those that are just getting started with music production or have little experience programming drums, the Logic ‘Drummer’ function is ideal. It essentially writes and creates a drum pattern for you. It takes into consideration the tempo of your track and you can select a drummer from a wide range of different genres and styles and alter their drumming pattern, fills, and loudness. Unfortunately, it only comes with Logic, but for those who have the DAW, it’s worth looking into, even if it’s just for some inspiration.

Acoustic Drums – Spitfire Audio LABS Drums

If you’re in the market for great quality sounds look no further than LABS, and their drum sounds are no exception. They are perfect for those that want an authentic sounding kit that can be added to any project and the interface is relatively easy to use and manipulate.

Obviously, there are an entire plethora of options out there and I do recommend searching the web if you are interested in expanding your drum sounds library. But these are just a few to get you started! Like all collections, it can be quite fun to gather different sounds and add them to your roaster but I also encourage you to have a go at making your own drum sounds. Who knows maybe your drum pack will feature in someone else’s creation one day!

Prepare your Track for Mastering

Getting a track mastered can be a daunting experience if you’ve never done it before. You may be asking yourself, what file type should I send? How much headroom should I leave? How will I know when the mix is done? You will be your mastering engineer’s best friend if you spend a little time making sure your track is properly prepared for mastering – and this guide is here to help!

Be Happy with the Mix

Now, this may seem like an obvious one. But being happy with a mix doesn’t necessarily mean that you like the way it sounds. It needs to meet certain criteria so that your mastering engineer can work their magic. This could mean checking your mix in Mono and crossfading track edits if you hear any pops or artifacts. Also, check the levels on each individual channel and make sure they’re not too hot.

Label, Label, Label

It’s good practice to label your tracks correctly and to keep your mix organised. One example of doing it is TrackName_Artist Name_MixVersion.wav

How much Headroom?

This can sometimes depend on your engineer and what they would like. Some prefer working with no peaks over -3dB or -6dB and some ask for peaks to be below -1dB. The best thing to do is ask. If you can’t find the answer on their website, shoot them an email and ask what their preference for headroom would be.

It Will Sound Good In the Master.

Never subscribe to this way of thinking. Make sure you are as happy as can be with your mix, as mastering isn’t a quick fix to solve a bad-sounding mix. My general rule is if the mix is bad – the master will be also.

Metadata

Make sure you send your mastering engineer all of your Metadata that you would like embedded in the track. This can include correct spellings of your Artist Name, Track Name, Album Title, ISRC code (if you know it).

What to send

Send a .wav file with a sample rate of 44.1 or higher and the ideal bit rate of 24bit.

Notes are Your Friend

It’s good to give notes early in the process of what you want. I would also include some examples of songs that are similar to your track to give the engineer a clearer idea of what you want.

At the end of the day, it will make the mastering process a lot smoother if you have done the preparation work beforehand. This will lead to fewer issues and hopefully a wonderful experience for both engineer and artist.

Reverb Hacks to Make Your Tracks Sparkle

Reverb is a great tool to help bring a bit of life and presence into any track or sound. But why not make it sound even more interesting by applying a plug-in such as an EQ or a compressor to the reverb. It can often give your sound a unique spin as well as being quite fun just to play around with the different sounds that you can achieve.

EQ

The first EQ trick helps with applying reverb to vocals. Have you ever bussed a vocal to a reverb track but still felt like it sounds a bit muddy? Well, try adding an EQ before the reverb on your bus track. Sculpt out the low and high end until you have a rainbow curve. Play around with how much you take out and find what sounds great for your vocals. I often find by doing this you can the clarity of the lyrics as well as achieving a deep, well-echoed sound.  This tip also helps if you’re a bit like me and can’t get enough reverb!

Creating a Pad Sound

If you’re interested in making ambient or classical music, or even pop music that features a soft piano, you might be interested in creating a pad effect. What this does is essentially elongate the sound and sustain it so it gives this nice ambient drone throughout the track.

You can achieve this by creating a bus track and sending your instrument to it. Then open your reverb plugin making sure it is set to 100% wet. You can then play around with setting the decay to around 8.00s to 15.00s. Then send about 60% of your dry instrument track to this bus, making sure to adjust it if it sounds too much. Play around with these settings until you achieve a sound that you like.

In conclusion, Reverb is one of my favourite plugins to play around with and alter. It offers an incredible amount of versatility and can be used in conjunction with many other plugins to create unique and interesting sounds. This can be used on a wide variety of different music genres and comes in handy when you want to add a bit of sparkle to a track.

Expanding and Building Your Creativity


For many of us in the creative industry, our passion and drive for creating new art can come and go. It is therefore important to give yourself the space and time to recharge and reset before returning to your practice. If you are stuck and looking for new ideas, however, I have created a list of a few things that can help break you out of a creative block and perhaps challenge you to think and work differently.

Find a Loop

Do you ever find yourself playing the same chord patterns or reaching for that same instrument? Using a Loop or sample can help break this pattern and allow you to build upon something that perhaps you wouldn’t have created before. Obviously, make sure to get the correct permissions to use the samples especially if you’re going to be releasing your new work. You could always take a song you’ve previously worked on and rework it, chop it up, speed it up, etc. The options are limitless!

Word Generator

If you’re stuck for song inspiration or just need some lyrical ideas, try a word generator. If you want more of a challenge, try setting a timer for five minutes and writing everything you associate with the word you’ve been given. You can then create a song using only the words you’ve written down during the exercise.  It can be very freeing and even if you don’t like the full song you’ve made, you are most likely going to have some words or phrases you can use in another track.

Sample Your Surroundings

If you produce and write a lot of music, it can get very mundane using the same sounds and sample libraries all the time. So why not create your own! This not only aids your recording skills but it can help grow your library. It also provides your tracks with unique and interesting sounds that have never been heard before.

Using effects

Another great tip to spice up your sound is to use different effects on your instruments and vocals. Perhaps pitch down and reverse a guitar, distort and warp an acapella recording, add reverb to drum sounds, and loop the reverb tail. It’s up to you how creative you want to get with this tip, but from my experience, the crazier the better!

Use your voice

If you’re struggling to find lyrical ideas, words or just don’t know where to start. Try using your voice. Hum or sing whatever comes to your head in that moment. If you want to, you can record it and play it back and find a mix of melodies you like and then build something from there. Bonus if you chop and sample the vocal recording and add it into the production!

I hope these tips can help you break out of a creative funk or at least let you expand your ideas and try something new in the future. Just remember that stepping out of your comfort zone isn’t always a bad thing and you never know what you might create!

5 Free Essential Plugins for Music Production


Often with music production, external plugins and software instruments can get quite expensive. There is a vast number of synths, vocoders, compressors, etc. on the market but I’ve decided to list my top 5 essential plugins that are FREE!


LABS by Spitfire Audio

Spitfire audio makes some incredible virtual instruments that sound extremely realistic although they can be more on the expensive side. However, they have released a virtual instrument collection called LABS that is completely free to download and new sounds and instruments get uploaded regularly. LABS is super easy to use and there is a huge range of different instruments available and they are compatible with any DAW so I recommend checking them out.

Komplete Start by Native Instruments 

On the topic of virtual instruments, Native have released their own package called Komplete Start.  They have over 2000 sounds and you get everything from drums and synths to unique sounds and textures. It’s a really great deal if you’re just starting out or even just want some more instruments and sounds on your roster

Valhalla DSP

Valhalla makes some incredible reverbs and delays but did you know they also offer some free stuff? The Valhalla Space Modulator, Freq Echo, and SuperMassive can be downloaded instantly from their website and they are super easy to use. Each with its own unique quality sound you can definitely add this to any track to add space and depth to your mix.

Iota Mini by AngelicVibes

Now if you’re into beat making or even producing electronic or hip hop music this is the plug-in for you. It’s really easy to use and comes with some remarkable pre-set sounds. You can make an entire track just from this one plugin as it contains drums, keys, guitars and more.

Fresh Air by Slate Digital 

The final free plug-in is from Slate digital and it’s called Fresh Air. Now Slate says that this is a high-frequency processor and it really does give your track a bit of air and lift in the higher frequencies. I like to use it on vocals it can sound very nice. It has a great way of just opening up the sound so definitely give it a try.

Hopefully, you will find at least one if not all of these plugins useful. Happy producing!


How to Use iPhone Synth Apps in Logic Pro X


Synths are one of my favourite things to use when creating a track or soundscape and they can help you experiment with different sounds. However, the downfalls are they’re not cheap and can often take up a lot of space in your studio. Luckily I have found a solution after experimenting with different synth apps designed for smartphones.

When I started playing around with the Minimoog Model D I loved the idea of a Moog Synth being able to fit in the palm of my hand. However, I wanted to record it into the tracks I was making but wasn’t sure how. But, I believe I have found the solution.

For this, I used my iPhone, the lightning to USB charging Cable, and my iMac running Logic.

To start off with I plugged my iPhone into the iMac using the lightning to USB charging cable. I then went into the Audio/Midi settings on the iMac and Enabled my iPhone to be recognised as a device.

I then opened the Minimoog app on the iPhone and configured the input and output settings to IDAM MIDI Host.

I then opened Logic and created an external MIDI track and made sure the Use External Instrument Plug-In was checked and the Audio Input device selected was ‘iPhone’. You also want the MIDI Destination to be the iPhone as well. Then hit Create.

You should now be able to hear and play your iPhone Synth app in Logic.

Using this is a great way to experiment with Synth sounds and is a fantastic solution if you want a portable Synth in your pocket. Happy creating.


The Power of Using Reference Tracks

When finalising your track, you want it to sound as good as possible. Perhaps you even want it to emulate what you listen to on the radio or like some of your favourite songs. So, here’s a quick way to help you do that – using reference tracks.

A reference track is pretty self-explanatory – it’s a track you use to reference your mix against. For my own work, I tend to use about 2 reference tracks that have the same sort of style and sound that I want to emulate.

There are a couple of different ways that you can use reference tracks, for example, I know of producers that import them into their DAW, volume match the reference track, and then use the reference track to guide them and influence the way they EQ the mix. This is done completely by ear and can really help your critical listening skills.

The other way of doing it is by Match EQ’ing your track against the reference track. This involves analysing the EQ of your final mixing, and then analysing the EQ of your reference track and then matching them together. There a few plugins out there that do this for example Izotope Ozone 6 Equaliser, FabFilter Pro Q 3, and Logic Pro X has an inbuilt plugin called Match EQ.

Overall this tends to be a great way to sonically lift and reshape your track. You can also adjust the parameters after matching the EQ to get your desired sound.

If you’re new to using reference tracks start off by just critically listening to a few songs you like and acknowledging what you hear (does it have a smooth high end? Is the bass really prominent? etc.) Then you can try to add those elements to your own mix. You can then start using Match EQ to emulate a certain sound.

Trust yourself though, if it sounds good to you then you’re probably onto a winner.


The Importance of Gain Staging and Automation

Gain Staging is the act of managing the levels of your track. Automation can then give you the control to increase or decrease the volume so that it sounds equal and at a similar level throughout. By implementing gain staging and automation in your mix, you can immediately make your track sound more professional. So, here’s how to do it.

I personally like to focus on Gain Staging and Automation on vocal tracks as it creates a radio-ready sound. If you have an instrumental track it can work well with a lead instrument. In this case, it’s best to trust your ears as you don’t want to diminish any dynamics being performed.

The first step in good Gain Staging technique is creating a good recording level. Ideally you want your levels coming in at -18 dBFS but no more than -12 dBFS

I tend to apply some EQ on the main vocal channel and then send the signal to a vocal bus for compression etc. You want the automation to be on the main vocal channel NOT the bus channel.

Once you’ve got a good take you can then start automating your vocal paying attention to the level of each word and syllable and turning it up or down so that the sound is level with the rest of the recording. You basically don’t want any loud peaks or very quiet sounds the goal is to have each word and syllable at roughly the same level. If it helps you can insert a loudness meter just to keep an eye on your levels.

Once you’re done, the automation on your track can look a bit crazy but that’s perfectly fine. Hopefully, now you have a great vocal performance that levels out the loudness and quietest parts of your track to create an engaging performance. The great part about automation is that it leaves less work to do for the compressor so I’ve often found vocals sound a bit more vibrant.

I hope this technique helps even out your recordings and helps you craft that radio-ready track!


Finishing a Song and Workflow

What finishing a song a week taught me about workflow?

I’m a bit of a perfectionist, and for a long time, I thought this was a good thing. That was until I read a quote recently that stated:

Done is Better than Perfect

Initially, I was skeptical. When I applied it to music-making I thought to myself I would rather have things perfect than simply completed. Who wants a mediocre piece of work that is done over an intricately detailed piece that might not be completed?

I realised at this moment that I have hard drives full of unfinished work simply because I have deemed it ‘imperfect’.  Yet I have very few finished pieces of work in comparison.

So, I set myself a challenge to start writing and FINISHING a song a week. The rules were it didn’t have to be perfect, I didn’t have to like it, it just had to be DONE.

A month later and many songs completed I realised that I was wrong.

Before I would spend days EQ’ing a kick drum and weeks getting the perfect balance of reverb only to be exhausted with the song months later.

Writing and finishing a song in a week has given me the boundaries I need to prioritise what needs done and limited the amount of time I work on everything. Resulting in the feeling of accomplishment having seen something through to the end.

I ultimately have started liking my one-week songs over the ones I spent four months writing the verses for!

So, if you’re like me and spending an unhealthy amount of time trying to make something ‘perfect’ may I suggest putting a time limit on it and remember –  it doesn’t have to be polished, it just has to be done.


X