Empowering the Next Generation of Women in Audio

Join Us

Creating Spacious Mixes with Panning

Panning in a musical context is the act of distributing the sound signal into a stereo or multi-channel sound field. Most DAW’s will have a Pan Knob that you can use to send the audio hard left, left, centre, right, hard right, and everything in between. The benefit of panning is that it can create space and width inside your mix and allow the listener to have a broader listening experience.

So how do you pan your mixes? Well here are a few top tips that will help create space and depth in your mixes.

Vocal Tracks

Music that features a voice in it, no matter the genre, typically follows this panning method. The Vocals should be panned centre, as well as any kick or snare tracks (although if you don’t want that hard-hitting sound you can always pan the snare and kick just off centre). If you have a couple of harmony vocal tracks, you can pan them hard left and hard right so that they’re not competing with the main vocal. If you have a lot of different harmonies pan the strongest hard left and right and then pan the others in opposite directions with each other. For example, if you have two of the same harmony takes pan one 90° left and the other 90° right.

Frequency Zones

If you have a few instruments or sounds that are occupying the same frequency, a nice trick can be to pan them on opposite sides of each other. This will create space and alleviate some of the muddiness.

Song Structure

Another useful trick with panning is it can allow you to diversity the sound of your song structure. For example, you could keep your intro and verses very tight, and then when the chorus begins you can open up the sound by panning certain voices and instruments out. This will create a wider sound and ultimately make it feel like a bigger chorus.

Keep it Balanced

The most important thing to remember is to keep your mix balanced! Once you start diving into panning it can become quite easy to just start panning everything. This is not recommended. The best use of panning comes from using the technique just to open up your mix. You don’t want to be left with a track that sounds too loud and muddy in the right ear and brittle in the left.

Check Your Mix

Make sure you are checking your mix on a variety of different sources. From headphones, monitors, cellphone speakers, etc. This is important as listening on only one source can give you an altered listening experience and what sounds good on your mix headphones might not sound great on a pair of cheaper in-ears. So, make sure to check check check!

Overall panning is an incredible tool to open up the sound of your music. There is no right or wrong way to do it and my advice would be to just trust your ears.


Basics of EQ for Vocals


The best thing you can do whilst mixing is cleaning up the recording so that frequencies don’t clash with one another. An EQ on the vocals can help sculpt the sound and really clean up and make a good recording sound great! Here are some basics tips to help you get started.

The first thing I do is roll off the low end. You can do this from around 90-100Hz depending on the persons’ vocal range. If they have a higher range, you can scoop out a bit more of the low end just make sure to use your ears and find a sweet spot so that you can still hear the tones of the voice clearly.

A slight tight boost around 800-1k HZ can boost the clarity of the lyrics. You can also reduce these frequencies to help with a nasality in the vocals.

If sibilance is a problem in your recording and you can prominently hear a lot of P and B sounds you can remove them around 4k-9k.

Boost between 1k-2k to open up the vocal.

You can then add a high shelf around 7k to brighten up the recording. Make sure to roll off the high end at around 18kHz.

It’s also important to remove any room noise so the easiest way to do that is to increase an EQ parameter by several dBs and sweep across the EQ to find any prominent frequencies. Once these have been discovered you can remove them by decreasing the dBs.

Just like most techniques in music production, just remember to use your ears to find what makes the track really sing. A good EQ can really help boost a vocal and help give it its own place in the mix.

After I EQ the vocal I then move on to compression and adding on effects like reverb, delay, etc.

I hope these quick tips helped get you started with vocal EQ but just remember every vocal is different and some singers will need their voice highlighted and altered in different places. This is completely normal and ok but these fundamental EQ points are a great way to get you started!


An introduction to FlexPitch in Logic Pro X

A great way to make your vocals stand out is to make sure each note is in pitch and the volume is consistent throughout. A simple and inexpensive way of doing this is by using Logic Pro X’s built-in Flex Pitch and Time.

To start with click on the show/hide flex when your vocal is opened.

Once you’ve enabled Flex you want to select Flex Pitch from the list of options.

Once this has been selected you will now see the vocal take appear as a range of blue rectangles which corresponds with the note being sung or played. To make sure the note is in perfect pitch double click on the blue rectangle. If you want to make sure multiple notes are tuned at the same time highlight multiple sections and double click on a note.

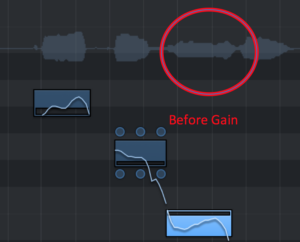
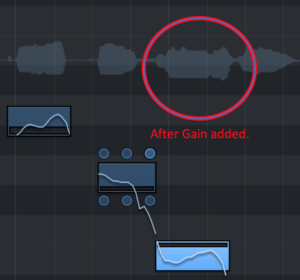
With Flex Pitch you not only can adjust the pitch of a note but its Gain, Vibrato and Pitch Drift. You can do this by hovering the mouse over a note and dragging up or down on one of the circles that appear above and below the note.

The Gain adjustment in particular is a useful tool. For instance, if there is a note/word that is quieter in a phrase than the others you can easily adjust the gain to make that particular note louder.  See examples below.

Once you have tuned your vocal to your particular taste, hopefully, you will now be able to hear a smoother, more in tune vocal performance. Flex Pitch is a great tool if you have limited time to record perfect vocals but still want that precision in the take.


Parallel Compression


Have you ever wondered how to get your vocal to punch through the mix? Or a kick drum to achieve a punchy sound? Or give clarity to a solo instrument? Well I have a technique that does just that and it’s called Parallel Compression, or as it sometimes referred to, New York Compression.

Parallel Compression is the art of mixing a (usually) dry signal with a heavily compressed one. The benefit of this is that you can achieve a very tight and compressed sound without it affecting the dynamics of the actual performance.

I will preface that it should be used sparingly and not on every track as it can sometimes sound harsh and brittle on the ears if used too aggressively.

To achieve parallel compression, create an aux track and send the signal to it from the audio track you want to use.

Then load up a compressor on the aux track.

The settings below are a rough guide for a punchy sound but feel free to adapt them if you want a more subtle sound.

Ratio: I personally like to set my ratio between 8:1 to 12:1.

Threshold: On a few tracks, the threshold is between -30dB to -40dB. I usually want around 10dB gain reduction.

Attack Time: You want a fast attack so nothing above 5 ms.

Release Time: I found the sweet spot to be around 50 – 100 ms.

Gain: Boost the gain if it is needed (sometimes I like the way mix without boosting the gain).

The next step is to play the track and blend the Parallel Compression in with the original audio. This is where you can make a few tweaks to the settings to get your ideal sound.

After these steps, hopefully, by now your track should be punching through the mix.

My final tip would be to trust your ear and experiment with this technique as much as possible until you find a variation that suits your style of music.

Happy producing!


Reviewing Fender Play 

I’ve been a self-taught guitar player for many years now having learnt to play chords from charts found online and riffs and songs from videos on YouTube. However, when I saw that Fender Play had an offer for a free 3-month trial I was interested in what I could learn.

Fender Play is essentially an online learning platform to help budding musicians learn to play Guitar, Bass, and Ukulele. The videos are extremely well produced and they use musical language that everyone can understand no matter what stage you are at.

When I signed up I had a bit of an advantage. I had played the guitar before so chord positions and playing came naturally. I was also classically trained so things like scales, chords, and theory were things I knew about. However, I discovered very quickly that there were still things I could learn.

For example, basic posture and positioning were something I took for granted before, but, after spending several weeks practicing these skills, my accuracy and sound have most certainly improved.

The lessons are set out in levels ranging in difficulty and there are a variety of great practice exercises and well-known songs that can be found in each one.

Overall I really recommend Fender Play to anyone wanting to learn the guitar. Of course, it doesn’t replace one-to-one teaching but it can help you navigate the basics and build your confidence in the instrument. Who knows, you might become the next Nita Strauss!

Stay safe and happy playing!


Navigating through Coronavirus

The outbreak of coronavirus is impacting us all. Whether you’re a freelance musician or salaried employee the virus has shut down multiple sectors leaving many worried about the future ahead. In spite of this, and I by no means want to make light of a very serious situation, I have prepared some links to some things that can help those working in the music industry.

Moog + Korg 

These companies have offered up some free apps for a limited time and both are available on the App store.

AVID

If you use products like Pro Tools and Sibelius, Avid has said ‘As an added measure to assist our community in adjusting their workflows to accommodate COVID-19 virus precautions, Avid will be providing temporary licenses of our creative tools to customers at no charge.’ 

Spotify

Spotify has pledged $10 million dollars to musicians impacted by the coronavirus. Spotify has said to have created a feature for artists to link donation pages to their profiles.

Musicians Union, PRS, MusiCares 

These companies have all released financial support to those severely struggling in some way or another. If you are a member, you will have likely received an email. If not more information can be found on the respective sites.

Alternative Work + Training

If you are able to, there are a lot of online courses and SoundGirls has a great directory. Sites like Fiverr and People Per Hour are a great way to offer services whilst stuck at home.

You can find a detailed list of financial, educational, and jobs here

I hope some of these small ideas can help and remember the important thing is to stay safe. This too shall pass.


An Interview with SWIM 


The music scene here in Scotland is one of the most vibrant. But behind the scenes, the figures for women in music aren’t always encouraging. Hoping to change that is a charity organisation called SWIM – or Scottish Women Inventing Music. I caught up with them to discuss their work, experiences and goals to help women in music.

Could you tell me a bit about SWIM? 

SWIM is a charity organization. It stands for Scottish Women inventing Music. It was set up to try and address the gender imbalance that’s currently in the music industry as well as be a space for women where they can network and to also advocate for women in the music industry.

What are the services that SWIM offer?

We have informal networking nights usually once a month and this is a chance for members to come and meet each other in person and can discuss current work situations and any issues they’re having. We also have a database on our website where as a member you can input your skillset and then you can search the database for other members and their skills and you can connect with them that way as well. We also have an initiative called GirlPool which is a full day of workshops for young girls between the ages of 12-17. Throughout the day they get the chance to look at all aspects of the music industry. So not just pay they get to perform what they’ve done that day.

Is there a cost of joining? 

There is a minimal cost of £5 a year for membership which runs from September to August each year. For that, you get a newsletter full of information from all our fantastic members and things that are happening, opportunities, collaborations, etc. There are also monthly casual meetups for members as well.

SWIM are doing a lot to help women in music in Scotland. If you would like more information on SWIM you can visit the website at www.scottishwomeninventingmusic.com


Combatting Nerves

Being nervous happens to us all. Whether we like it or not, nerves are a very common part of life.

If you have a job in music, whether that be as a performer, live sound technician, etc. there can often be a lot of pressure for things to be right and to run smoothly. Therefore, creating a considerable amount of stress to get the job right.

So, as the feeling of being nervous is inevitable, I’ve compiled a few essential tips to help calm those nerves in a time of need.

Breathing

As a performer, it’s common to start second-guessing yourself moments before a gig. For example, I’ve stood many times at the side of the stage asking myself, ‘What on earth are my first few lyrics’!

What helps in these moments of sheer panic is to remember to Breathe.

Focus on taking long breaths in and out.

I watched a clip of Beyoncé warming up before a show where she and the crew all stood in a circle reciting ‘Breathe in positivity, exhale anxieties’ and just repeating it several times. So, if it’s good enough for Beyoncé, it’s good enough for me.

Make Sure you have Spares 

As a performer, producer, or live technician It’s always useful to carry spares of your essential kit.

I’ve worked many jobs where a microphone cable has stopped working, or a performer has forgotten to change the battery in their guitar.

To avoid unnecessary stress, I like to keep spares of almost every essential item I’ll be using on the job. This means extra leads, extra batteries, spare microphones you name it.

This leads me on to my next point…

Be prepared

No matter what your role is on the day. The best thing you can do is be prepared.

Whether that means practicing your set until you know it by heart or preparing all the equipment a few hours before the show and checking if everything is in working order.

This I find really helps with the nerves, as it removes the pressure of the unknown. When you trust your equipment and your preparation, you can trust yourself.

These are just a few tips I find to be very helpful when on different jobs and hopefully can be of some help no matter the job.


X