Empowering the Next Generation of Women in Audio

Join Us

Up Close and Personal

Last month I talked about the nuts and bolts of how I run monitors at the Glastonbury Festival. This month, I’ll share some tips about how I mix monitors at the other end of the spectrum – a solo artist and their band.

Running a large festival requires a different set of ‘soft’ skills from working closely with an artist. They both take a great deal of preparation, but whilst at Glasto, that means collating tech specs, session files and stage plots for 24 bands, with solo artists it’s more to do with rehearsals and relationships. And whilst at Glasto, I have the artistic input of making sure that the house EQ and any necessary time alignment on sidefills and wedges mean the stage sounds fantastic, with an artist it gets a lot more refined, particularly if I have a long working relationship with them. My two current artists are both fantastic singers whom I’ve been working with for nine years and seven years respectively, so by now, I have a fairly intuitive understanding of what they want to hear. Both have excellent bands playing with them, are lovely people, and I enjoy their music, so it’s a very nice position to be in.

Relationship

The quality of the relationship between the monitor engineer and artist is an important part of the job, and as with people in any walk of life it doesn’t always click. You can do a great technical job of mixing, but if the artist doesn’t feel a connection with you, you may not get a second run. As I’ve said before, they need to feel that you’ve got their back, because they really are reliant on you. Put yourself in their shoes – it’s a vulnerable position, standing on stage in front of thousands of people, and their ability to hear what they need is totally in your hands. That goes for all bands, but is amplified for a solo artist – the backing musicians are a big part of the show, but the audience is watching the star most of the time, so they’re very exposed and they have to trust you. Part of it is down to personalities – you might gel and you might not – but you can help build rapport by being reliable, consistent, calm, professional, prepared and confident.

Hierarchy

Being friendly with the artist, but not overly so, is important – you want to establish an easy working relationship with them, whilst remembering that they are still your boss. I’ve found that balancing friendliness with a little professional distance is a wise move. Friendly, not friends.

Of course, in most cases, you’re not just mixing for the artist but for the band too. I’ll always soundcheck with the band by themselves first, so that I can make sure they’re happy before turning my attention to the artist – and often an artist will stop soundchecking when they’re comfortable with the engineer. I never stop watching the artist once they’re on stage – you can guarantee that the moment you look away is the moment they’ll look over!

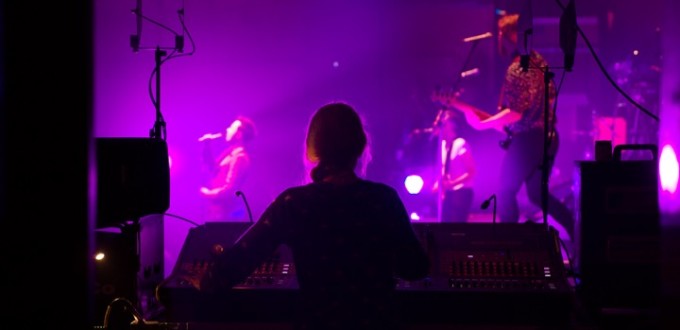
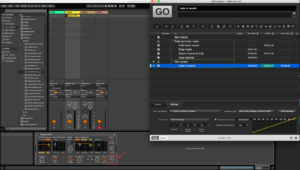
During the show, I keep half an eye on the band, but my main focus is the artist. So how to make sure that the band feels taken care of too? I ask the stage tech and backline techs to keep an eye on the musicians and alert me if I miss anyone trying to get my attention. I also give every band member a switch mic, so that they can talk directly to both me and the techs. I set up a ‘talk to me’ mix on my console, and I feed my own IEM pack off a matrix, pulling in that talk mix as well as the PFL buss. In that way I never miss someone talking to me, even when I’m listening to the artist’s mix.

Sometimes there’s a request that comes at a critical point in the performance; for example, the drummer wants a little more hat overall, but I have a show cue. I’ll nod to let them know that I’ve seen them and hold up one finger to say that I’ll be with them in just a moment. Then, when I’ve made the change for them, I’ll glance over and catch their eye to check that they’re happy. I encourage musicians to give me immediate feedback when they’ve asked for something – it’s no use finding out after the gig that something wasn’t quite right!

Avatar

Mixing artist monitors is like being an avatar. I need to develop a real understanding of what they pitch to, time to, what they’re used to hearing, and what helps them to enjoy the gig. I don’t usually alter the backing band’s mixes unless asked to do so, but I’ll subtly ride elements of the artist’s mix as necessary during the show, once I have a good understanding of their preferences – if an element of the mix sounds too loud or quiet to me, then it probably does to them as well. I tend to tap along with my foot, which keeps me aware of whether they are wandering off the beat and might need a little more hat or snare.

My latest trick

In rehearsals for my current tour, I had a few days alone with the band first, as usual. Once they were happy I set up my artist’s mix and dialed her vocal mic in. Then I tried something new – I sang along! BEFORE I sent the mic to anyone else, and I ‘may’ have temporarily pulled the XLR split to FOH so only I could hear it, but wow it’s a helpful exercise! It really helped me to get a feel for how easy the mix was to sing with. A more discreet way is simply to keep one IEM in, close off the other ear with your finger, and see if you can pitch reasonably easily. If you can’t find the note you need, what can go up in the mix to help your singer out?

Audience mics

Whilst we never needed these when wedges were the only option (showing my age!), with the widespread use of IEMs they can help the artist feel the vibe of the show. Currently, I’m using three mics on each side of the stage (near, wide and rifle), mixed down to a stereo channel to give a nice spread of audience sound to the ears. I hi-pass them at around 600Hz to keep the low-end out and have them on a VCA which I ride up between songs and when there’s audience participation. On the subject of VCAs, I also use one for the vocal reverb, backing it down during chat between songs.

Split vocal

With solo artists, I always split the vocal down two channels: one to themselves and one to the band. That means that I can keep the mic live in the artist’s ears the whole time, so they can hear themselves after a costume change (when jacks can get pulled and volume pots knocked), without disturbing the band. If we’re using both IEMs and wedges, as one of my artists does, I’ll actually split the vocal three ways to allow for a different wedge EQ and muting when he goes off stage. I always safe the ‘vocal to self’ out of all snapshots, but keep the ‘vocal to band’ within snapshots so those mutes are programmed in.

Keep it clean

Finally, I do a little in-ear and mic housekeeping every day. It’s the monitor engineer’s job to keep the artist’s molds clean and wax-free, so I carry wipes and a little poky tool to make sure they’re always in good condition. Alcohol swabs are great for cleaning the vocal mic, which I do right before handing it over – apart from the fact that a stinky mic is gross if the artist gets sick and can’t perform the whole tour could be in jeopardy, so hygiene is really important.

I hope you’ve found something useful here – every engineer will do things slightly differently, but a can-do attitude, hard work, and attention to detail are great foundations for any engineer, no matter what you’re mixing!

Fundamentals of Live Sound 101

SoundGirls.Org Presents The Fundamentals of Live Sound 101

Six Classes  at The Ventura Theater

SoundGirls.Org Fundamentals of Live Sound is a six class workshop for teens and adults (16+ all genders and non-conforming genders welcome) who want to learn about live music production. The curriculum was designed by industry veteran Fedj Sylvanus and teaches the basics for working in live sound. Working in small, collaborative and hands-on groups, the attendees learn:

October 1 –  Live Sound Fundamentals

October 15 – Stage Fundamentals

October 29 FOH Fundamentals

November 12 Fundamentals of Monitors

December 3 Fundamentals of Business and FX/Processing

December 17th The “Fun” of Working a Show

* Syllabus is subject to change – due to time constraints.

* Dates and Times are subject to change due to this being a working venue. We currently do not forsee any changes and we will keep all particpants updated.


About the instructor: Fedj Sylvanus is an old road dog from the way back machine. Fedj got his start in the Los Angeles punk rock scene, working with Fishbone and The Red Hot Chili Peppers and moving on to  the likes of Aretha Franklin, Patti LaBelle, George Benson, just to name a few. When not on tour he worked almost every club in town to pay the rent, House Of Blues, The Roxy, The Whiskey, The Key club, etc. and has an extensive knowledge of all things technical.

Fedj has a love for sharing his knowledge through teaching and spent years teaching Live Audio at the Musicians Institute in Hollywood. This series is a modified version of the program he taught at Musicians Institute.


You Don’t Need to Know it All

I’ve been wanting to say this for a long time: nobody needs to know everything!

Since I joined the world of live sound, in 2003, I have seen many technicians feeling bad at the end of a job because they should have done one or another task better among the many that were assigned to them, or because they were fired for not fulfilling the requirements.

This discomfort is even more common for women technicians because more is demanded of them: When something goes wrong, inevitably someone will put the blame on gender.

No, it’s not your fault.

It is established here in Brazil (God knows why), that a good technician or audio engineer is the one who does everything. There´s a veiled expectation that the band´s engineer will unload the truck, set up equipment on stage, line up the PA and monitor systems, play a quick jam as Roadie, will make line check (sometimes PA and monitors from the same console), mix during the show and, if any equipment is broken, become a super-electronic technician and fix it.

What often happens is that after about 12 hours of this marathon, in which you didn´t eat properly or even sit down, it’s showtime. By then we´re so tired that we can´t always do a good show. In the end, the purpose of the exercise is lost.

We know that some positions or functions within a live production have their specifics and require different skills; such as wireless systems, sound system alignment, and audio mixing. So, wouldn’t it be ideal if each person gets to work on things they do best?
I realize that there´s a change in this direction, here in Brazil. Some technicians have been specializing in some of the many audio skills. But there´s still resistance from the labor market, especially in live audio, in understanding this change.
Equipment rental companies don´t invest in know-how. It´s economically more interesting to have fewer people to do everything, even though the quality is being reduced considerably. And because many producers simply ignore any technical concept, they copy that format expecting, not to mention demanding, excellence at low cost. I think all producers should be reading this.

The technicians, also, often sabotage themselves. They treat people who do one thing very well with disdain. They call those who study and refine their skills arrogant. They accept the work of three people for just one fee. Full of themselves, they praise manual work and exalt the famous “Brazilian way”. All these behaviors reinforce the false idea that audio is an easy thing that anyone is able to do.

Old thoughts need to be recycled. Time moves forward, and technology and knowledge are there to help us. You don´t even need to know everything. You don´t need to do everything any which way. Be the best at the things that you do well.

If you don´t want to get your hands dirty or be, as we say in Brazil – a “grease” worker, then don´t do it. Or do it if you want to do it. Be who you want to be – there’s nothing wrong with that.


Maria Rosa Lopes – A singer and sound engineer, she has been working in the live sound industry for the past 15 years. She has worked as a recording assistant for Osesp (São Paulo Symphonic Orchestra), joined the technical team at Pina Bausch Brazilian tour, and worked at some music festivals as a PA and monitor engineer. Rosa graduated in music and has studied audio too. Now, she teaches music and works as a sound designer and audio engineer for theatre and live shows.

Summer Season

Unbelievably, I celebrated two years in Muscat last month! Time is flying by and our dark time in the Opera House over the summer is coming to an end. Working regular hours is somewhat of a novelty to those of us used to working in commercial theatre, so we are all keen to make use of the evenings and weekends. Finding activities to avoid the searing temperatures of summer in the desert is all part of the fun!

Recording in ‘Tunes’ music shop in Ruwi and ‘The Guitar Centre’ in Al Khuwair.

Recording with ‘Pulse and Soul’ -a local band

At the end of Ramadan, I was asked to do some recording for a local band, ‘Pulse and soul.’ The musicians are all teachers at the ‘Classical Music and Arts Institute.’ Using their show equipment and a newly purchased Focusrite Scarlett 2i4 we produced several tracks that can be used for promotional purposes. We also filmed the recordings.

The live music scene in Oman is complicated to understand as an outsider. Laws carefully regulate where and when live music can be performed. International hotels and private ceremonies such as birthdays and weddings are the main platforms away from the Royal Opera House.

After the first set of recordings, it was decided that we should also produce some tracks recorded in a more intimate setting. The drum room at the private music school in Qurum was transformed into a recording studio, and we started recording some different combinations of performances. Using the larger Focusrite Clarett 8 Pre X we started recording multi-track for more post-production flexibility. Of course, this produced much better results regarding audio quality but the downside of this being that more time was required for editing. Trying to fit this around all of our work commitments started becoming increasingly challenging!

Renaissance Day in Salalah

On the 23rd of July, Oman celebrates ‘Renaissance day.’ This is the day that the Sultan of Oman, Qaboos bin Said al Said, came to power in 1970. Various events take place across the Sultanate and the day is a public holiday. To celebrate in style, my friend and Education Manager of the Royal Opera House, Lisa Navach, visited Salalah in the South of Oman.

The trip takes about 1.5 hours by plane or 12 hours by road. We opted for the flight!


Salalah is famous for its yearly tourism festival. This takes part during a season called ‘Khareef.’ The lush green landscape and cooler temperatures are a welcome break from summer in Muscat. Hiring a car meant that we could easily get around and do some off roading to find empty beaches with pure white sand. Bliss!

Back in Salalah, the festival was a complete cultural submersion into traditional music and dance of the Dhofar region. Slightly more conservative than Oman, there were few Western tourists, and we really felt that we were experiencing a true insight into a region that feels very in touch with its traditional roots.

All Men, women, and families have different seating areas in the audience for these displays of traditional music and dance. All performances were being transmitted live on television across the Sultanate!

Next week I will travel back to the UK for my annual leave. I’m preparing myself for the reverse culture shock that I am bound to experience back in London! The season at the Royal Opera House commences in September with an exciting programme of Ballet, Opera, and music from around the world.


Helping Filmmakers Tell a Story – Deb Adair – Re-Recording Mixer

Deb Adair is a freelance re-recording mixer. Deb has been nominated for an Oscar (for the film Moneyball), has won three Emmys and nominated for an additional five, and has won two Golden Reel awards as Sound Supervisor. In the past couple of years, her film credits include Entourage, Pele, and Keanu.

Deb earned a degree from Syracuse University where she studied film production. She worked in the music industry in Nashville before moving to Los Angeles to pursue a career in sound for film.

April Tucker interviewed Deb about her career

Are you primarily mixing dialog/music? Are you ever in the FX chair?

I have been primarily mixing dialogue and music for the last nine or ten years but have also had the opportunity from time to time to work alongside very talented colleagues as the effects mixer.

What’s the difference between these roles?

Being the dialogue mixer, you are the person who guides the flow of the mixing process.

Give us a little background on how you got into sound, where else you’ve worked, went to school, training background, etc.

I attended Syracuse University in the TV, Radio, and Film Production program, wanting to be involved in filmmaking is some capacity.  The classes that focused on sound immediately became my favorites. I started recording bands and mixing live music at some local venues.

Why did you move from music to film?

 How did you transition from tv work to film? Was it something you were seeking out?


I had always wanted to be involved in filmmaking, so music recording was a good way for me to learn the equipment. I started mixing in TV but had always wanted to work on feature films, and I told this to my manager at Sony at the time, Richard Branca. When an opportunity to do additional mixing on a film came up, like helping pre-dub or updating pre-dubs, Richard would bring my experience up to the clients and with the appropriate approvals I was able to participate in the completion process.

Oscar Luncheon 2012

Can you explain what a re-recording mixer is, the workflow, who is generally on the stage at your mixes, etc.?

There are usually two mixers on the dub stage. Each handles hundreds of tracks of material whether it be dialogue, music or sound effects.  We work with the sound supervisor and the picture editor or the director or both (depending on the project) to balance all elements to shape the soundtrack of the film.  At some point producers usually come in for playback.

Can you explain the advantage of having two (or more) mixers on a film? How does it make things easier or harder?

Mixing a motion picture is a collaboration of talent and experience learned over many years by both mixers.

Are you usually on the same stage and mixing with the same partner? If not, what dictates who you work with?

Every project is different.  We could be predubbing on separate stages at the same time on each of our assigned disciplines and then come together for several weeks of a final mix. I have worked with various partners and on various stages based on client requests.  The crew is usually chosen based on past working relationships with the director, picture editor, sound supervisor or post-production supervisor.

What’s your system working with multiple mixers (especially early in the mix or trying to EQ)? Taking turns, using headphones, etc.? 

Most of the time we pre-dub the material simultaneously on separate stages then work together on the final stage to blend everything together.

How many stage days do you usually get on a film? How often do you see the director and how much time do you get with him/her? How long do you spend on Atmos, 7.1 vs. 5.1, or stereo mix?

The number of stage days varies based on the release date and the budget of the project. At the time of the final mix, there are so many things happening simultaneously for the director like color timing and D.I. so we will get to spend time with them based on their schedule.  Atmos adds some time for deliverables, but a native Atmos mix doesn’t necessarily take longer than 7.1 or 5.1.

Do you do your own pre-dubs or how many people are involved with a mix before it gets to you?

I prefer to do my own pre-dubs. The number of people depends on the project.  There is usually one music editor and one or two dialogue/ADR editors.

Favorite plugins? 

I’m a big fan of Spanner because it provides a lot of flexibility to adjust separate channels of a single multichannel track.

Any other favorite gear? Are you usually working on the same console?

I’m mostly working on the Avid S6 these days.  It’s a great tool. Very intuitive.

Do you think you have to do anything different from your male counterparts on the stage? How about with clients?

No. I think some clients appreciate having a variety of points of view in the room.

Any advice you have for other women and young women who wish to enter the field?

Pursue your true passion. If a new opportunity comes up, volunteer.  Be ready to step out of your comfort zone and tackle new challenges.

What path do you see for someone today to get to the type of job you are in?

As a matter of fact, the Academy recently started the Gold program, which is a mentoring program for people interested in film careers.  Beyond that, I would say start with an entry-level position and work your way up.

What are must-have skills to do your job?

Being a good listener for the client and understanding what they need. Helping the filmmaker tell a story and achieve their vision is the most fulfilling part of the job.

Are you mixing continuously throughout the year? How many films do you do on average and how much time off?

I’ve been very fortunate to have been busy the past several years, working on four to six films on average.

What is the average time you are working on a project?

Anywhere from one week to eight or nine weeks usually depending on budget.

Is there a time you would be working on two at once?

Schedules sometimes overlap if you are doing temp dubs for previews or creating deliverables like the home theater mix.

What is the difference between mixing for film vs. TV?

Mostly schedule, TV also has strict parameters for levels and compression, etc. for broadcast and streaming.

Any comments on work/life balance? How do you not burn out or keep things interesting?

I love my job, and I get to work with a great variety of really talented people. I have a husband who is very supportive and understanding. When I have time off, I do lots of yoga.

What do you like most about being a re-recording mixer?

 What do you like least?

What I love most about my job is collaboration. What I like the least is traffic!!


What is your favorite day off activity? Any other hobbies or interests?

When I’m off, I love traveling with my husband, and we love snow skiing and motorcycle riding.

What has been one of the most challenging or rewarding films you have worked on?

One of the most challenging films I’ve worked on is also the most rewarding.  While mixing MONEYBALL, there were many vintage and archival recordings from real broadcasts and baseball games. There were also new recordings with specific information to help tell the story that was much “cleaner” than the archival recordings so we needed to blend the two seamlessly so that the audience wouldn’t notice the difference.  This was a challenge, but it also landed my team an Oscar nomination for sound mixing.

Deb Adair – IMDb


Find More Profiles on The Five Percent

Profiles of Women in Audio


Denmark – Sound System Optimization Training Seminar

Sound System Optimization Training

Come learn best practices for tuning sound systems with measurement and operational concepts through a FFT-based (dual-channel) acoustical analysis software platform. The seminar will be taught by

2016 Seminar

Theis Romme – Freelance engineer for several companies with Meyer Sound Inventory. Theis is a most appreciated member of the Meyer Sound family and is also considered an expert on SIM3 as well as Smaart V7 & V8.

Rasmus Rosenberg – Freelance sound engineer and a super user on Smaart, as well as beta tester for Smaart products before they hit the market.

We recommend participants to download ‘Smaart V8 User Guide’ and read before attending the training. Please bring PC/notebooks for both dates. Participants will learn  to measure and analyze the frequency content of audio signals, study timing and frequency response of electro-acoustic systems, and perform basic room acoustics analysis. Everybody regardless of experience are welcome to participate! This includes students and newcomer’s in the industry

The maximum number of attendees will be 20. Be sure to sign up early as our events tend to sell out. If you require financial aid please contact us at soundgirls@soundgirls.org

  Register Here

How to get to the venue:

Airport: Take the metro to ‘Lergravsparken’, walk 100 meters south of Østrigsgade, take a right turn on Øresundsgade. The venue will come up on your left hand side after 500 metres.

Centrale station: Use the exit to Tivoli. Take bus no. 5A towards Sundbyvester Plads/Airport. Get off after 9 stops at Øresundsvej. Continue 50 metres. on Amagerbrogade. Take a left turn at the intersection and Amager Bio will come up after 50 metres.

Accommodation:

For any practical questions on logistic or accommodation, please send an email to either mallekaas@gmail.com or aiste.baltraityte@gmail.com

This is an exclusive offer to members of SoundGirls. If you are not already a member, please visit our website to sign up.


Radio Mics and Foley – UK SoundGirls Workshops with the ASD

On a warm day at the end of June, the UK chapter of SoundGirls had our first shared events with the Association of Sound Designers, in the form of two workshops about very different and equally fascinating sound skills.

First up “Pin the Radio Mic on the Actor,” given by sound engineer and expert “mic hider” Zoe Milton. A vital skill for anyone wanting to work in theatre sound, fitting radio mics is also important for film and TV location sound and in any situation where you want to conceal a body mic on a performer.

Zoe started by taking us through a brief history of the use of radio mics in the theatre. Back in the late 1990s and early 2000s, bandwidth restrictions limited the number of RF channels which meant that even large West End shows had far fewer transmitter packs than cast members. Les Miserable shared sixteen packs between their cast, which resulted in upwards of 100 pack swaps per night!

Fortunately, advancements in radio mic technology and a reduction in the costs of RF licensing in the UK means this doesn’t happen as much these days. Of course, Sound No. 2 and No. 3’s are still expected to be able to swap mic packs within a matter of minutes if necessary, especially on large shows.

Next, we had a closer look at some of the various mic techniques used to accommodate different hair lengths – including no hair – and performance types. Zoe reminded us that that fitting a radio mic is as much about teamwork and communication as it is about technique. You work in very close proximity with the performer, and you have to make both the experience and the position of the mic and pack comfortable for them. You also have to make final decisions on the mic position that will provide the best and most consistent sound for your Sound No. 1 or sound operator. There can be a big difference in the sound of a mic fitted at someone’s hairline, and one fitted over an ear.

As well as the performer and the Sound No. 1/sound op, radio mic fitters also have to take potential costumes, hairstyles, wigs, and hats into consideration. Zoe emphasized the importance of speaking with costume and wig designers as early in the production process as possible so that you know where you might be able to hide a mic and mic pack. We looked in detail at positioning mics within hats and discussed solutions for performers with no hair (creating an ear “hanger” works well). Zoe also talked us through how to hide mics and mic packs under wigs. I was particularly impressed with one solution that Zoe and a colleague devised for an opera singer who shed his clothing after his entrance, which meant it wasn’t possible to put his mic pack in his costume. Instead, they had a half-wig created to blend in with his natural hair and give them enough volume to hide his mic pack on his head, within his hairstyle.

After giving us a rundown of the best accessories to use, including the benefits of using wig clips over the tape and how to effectively colour a mic cable, we had the chance to get up close and personal with fitting a mic ourselves.

I came away from the workshop with a much clearer idea of the solutions available when fitting radio mics, as well as feeling slightly guilty about how much I rely on tape (more wig clips, I promise, Zoe!).

In the afternoon, Tom Espiner introduced us to the fascinating world of Foley sound creation. Tom is an actor, puppeteer, theatre practitioner, and Foley artist, who has provided Foley for film and TV as well as live opera and theatre.

With the technical assistance of Gareth Fry, Tom demonstrated the process of recording Foley, using various objects and textures to build up multiple layers of created sound effects. It was fascinating to see Tom take everyday objects such as twine and rubber bands and turn them into snakes sliding across rocks and flicking their tongues.

After we’d seen the expert do it, it was time for us to have a go. We had a lot of fun adding horse hooves (a classic) and saddle noises to a scene from The Revenant and learning what might have gone into making the sound of a dinosaur hatching from Jurassic Park.

Later on in the workshop, we looked at adding live Foley to stage plays, and I learned how difficult it is to keep one hand making the sound of a babbling brook while the other creates splashes in sync with another actor, as they mime washing their hands. In one of the most enjoyable exercises of the day, all of us contributed to creating a Foley soundscape to illustrate a particularly descriptive piece of text, creating the sounds of a deep underground lake in a mysterious land.

As well as being very informative, both workshops reminded me how important it is to get out from behind your computer or console, try something new and get your hands wet literally, as it happens. I think all attendees left inspired to try new techniques and find new ways to make sound.

Many thanks to the Association of Sound Designers for offering the opportunity to our members.


The Songwriter’s Secret: The Circle of Fifths

The skills involved in producing and engineering music are different to the ones required to write and play it, but that does not say there is no overlap.  Even the simplest recording job requires you to be able to capture the feel of the music, and the vision of the musicians, on record.  All of the technical know-how in the world won’t matter if you have a tin-ear for the music, and so it’s helpful to make sure your knowledge of producing and engineering is backed up by an understanding of musical theory.

One of the most common examples of musical theory that is crucial to the creation of music is the circle of fifths.  You may have read, or heard, someone say of a song: ‘It uses the classic I-IV-V-I progression.’ Unless you are already familiar with intermediate musical theory, this may well have baffled you; after all, you know that the scale runs from ‘A’ to ‘G’, and you know that between the notes are ‘sharps’ and ‘flats’, but that’s it.  The answer to this is that ‘I-IV-V-I’ is a progression, not from one specific note or chord to another, but a pattern that repeats in terms of spacing, whatever the ‘root’ note or chord of the sequence. This progression can be explained by the concept of the circle of fifths, and in a recording situation, this could be vital knowledge.  The reason is that music is written to evoke or elicit certain feelings and emotions, and there are methods for doing so, compositionally speaking; an engineer’s job is to ensure that the recording matches the vision, and an understanding of how the music works makes that job easier.

I-IV-V-I

Music is basically maths- that’s the first thing to remember.  Notes sound pleasant, or consonant, together because of the mathematical ratios between them.  A ‘fifth’ is the term for a specific interval between notes.  To stay with the example of ‘I-IV-V-I’- mainly because it is the most common progression in popular western music, with literally thousands of songs based up in it- imagine that the starting chord of your song is a C-major; that is ‘I,’ your ‘root’ chord.  ‘IV,’ your next chord, is F-major and ‘V’ is G-major.  If however, the key of ‘C’ is not right for your voice, be it either too low or too high for you to sing comfortably, the ‘I-IV-V-I’ pattern can be easily transposed.  If you want to sing in the key of E-major (I), then the next chord will be A-major (IV), followed by B-major (V).  The progression will sound the same, only in a higher or lower key; this is because the intervals between the notes are the same.  The same goes for other common progressions, such as I-V-VI-IV; if it is denoted by Roman numerals, then it is all about the intervals and can be transposed into any key.


The circle of fifths is so called because the nature of the musical scale, running from A to G, means that you can start on one note and run through a sequence of ‘perfect fifths’ which will take you through each note and back to the beginning, in a circular motion, without experiencing any dissonance.  It is also because this relationship can place, visually, on a circle; this diagram makes it easy to locate both the relative minor chords as well as the ‘IV’ and ‘V’ of any root note or chord. A simple trick to remember is that, on the circle of fifths diagram, the ‘IV’ of any root note is one step anti-clockwise, and the ‘V’ is one step clockwise.

There’s a great deal more theory behind this, and it becomes increasingly complex and esoteric, but if you want to understand how songs have been put together,- an important part of the recording process- then a basic understanding of the circle of fifths will be beneficial.  The diagram, in particular, will show you consonant choices about chord progression, whilst also showing you the relative minor chord, which is always a favorite option for a middle-8 or B-section.  As you better understand how the music works, your abilities to successfully capture its spirit will also increase.


By Sally Perkins

Ableton Show Control

For a show not so long ago in RADA (Scuttlers, written by Rona Munro), it was my intention to use Ableton Live for the playback of a variety of songs, beats, and rhythms which the cast would create and interact with throughout the show.

As I have mentioned in my blog Choosing Software, I had decided to use Ableton Live in shows because it allows me the diversity to create my own sound palettes, add in effects, and take them away again easily. Crucially, I can control all of this via MIDI in Qlab, which adds important stability for the show, but still, retains a wide dynamic range of filters and features that can be blended and mixed.

*I’m using a Mac for all of the following features, coupled with Ableton Live 9 Suite, and Qlab 3 with a Pro Audio licence.

First things first, you’ll need to go into your computer’s Audio MIDI Setup, you’ll want to go to Window in the Finder bar, and select Show MIDI Studio.

Show MIDI Studio in the Audio MIDI Setup Window in the Mac Mini


Qlab Live will pop up as an IAC Driver, and you’ll need to double-click the Qlab Driver to show the Qlab Live Properties.

Qlab IAC Driver in the MIDI Studio


In this new window, you’ll need to add a second Port such as below:

Creating a second bus under the Ports pane


These buses will be used to trigger Ableton from Qlab, and Ableton to trigger itself internally.

This then brings us to setting up Ableton MIDI. You’ll need to open a new Ableton file and open up the Preferences pane, from here you’ll need to set up the internal MIDI ports to transmit and receive MIDI via the buses to Qlab that we previously set up in the Mac Mini’s own Audio MIDI Setup. It should look something like below:

Ableton’s MIDI Preferences

You can then open up Qlab and check the MIDI Port Routing in the MIDI preferences and ensure that MIDI is being sent to Ableton via one of the ports like so:

You’re probably going to want to leave at least one MIDI port before the Ableton bus free for a MIDI send to your sound desk, or even to Lighting or Video.

Once you’ve set up these initial steps, this is when it gets slightly more complicated. You’ll need to keep a strict record of the MIDI triggers that you’re sending, and indeed all of the values and channel numbers. These will eventually each do different commands so getting one value crossed with another could end up with not only a lot of confusion, but you could end up triggering cues before they’re supposed to Go!

In your Ableton session, look to the top right-hand corner, and you will see a small MIDI toggle button. This is your MIDI view button, and when clicked you’ll also be able to track your MIDI across your session and throughout the show. It will be generic Ableton colour until you click it, when it will become pale blue:


A portion of the rest of your Ableton session will also be highlighted in blue, and the highlighted sections are all of the features available for MIDI control. This can range from volume control on Ableton channels, changing the tempo, fading in/out effects, and starting ‘scenes’ on the Master channel bank.

So I’m now dragging in a sample to the first Audio channel in Ableton

This is the first Audio track that I’d like to MIDI, so I set up a new MIDI cue in Qlab, and make sure that it’s a simple Note On MIDI command – Qlab will always default to Channel 1, Note Number 60, Velocity 64, but this can be changed depending on how you plan on tracking your commands. I’ll set this to Channel 4 (leaving the first 3 Channels free for desk MIDI, LX and maybe Video or spare in case something needs re-working during tech). I’ve then set it to Note 1, with a Velocity of 104 (104 is a key number here, this roughly works out at 0db within Ableton, so is handy to remember if MIDI’ing any level changes). Because all I’ve done here is send a simple ‘Go’ command to the Audio track, however, the Velocity number is sort of irrelevant – because the track is at 0db anyway, it will simply play at 0db.

I’ll then ensure that MIDI output is enabled in Qlab, and open the MIDI window in Ableton, again, from the top right-hand corner, and select my track with my mouse (this might not necessarily be highlighted any more, but it will be selected). I’ll then jump back to Qlab, and fire off the MIDI cue. Ableton will recognise this, and not only will the programmed MIDI show up in the MIDI Mappings side of the session, but it will show up directly on top of the Audio cue, like thus:

So now that we have an audio track playing and the action is happening on stage, you might have even fired through several other generic Qlab cues, but you want to stop the music and start the scene. There is no escape in Qlab for Ableton, so Ableton is going to keep going until we programme some more MIDI cues; So I’m simply going to programme a fade down of the music, and then a stop.

What I’ve done it programme a MIDI fade, which as you can see in the picture, it starts at the 0db value of 104, and then fades down over 5 seconds to 0, or infinity. You can also control the curve shape of the fade as usual in Qlab, and of course, the fade time is completely adjustable.

Once I’ve programmed the fade and added in the stop, my MIDI window looks a bit like this:

Ableton has accepted what ‘notes,’ or for Qlab, what values I’ve added in that complete different commands, and also given me a description of what these are doing. Something to note here is that the value to change the volume, whether you’re adding in fades up or down, will always be the same – it is the volume value in Qlab that will see the change.

So now that I’ve stopped the music, I might want to start it again in a separate scene if it was a motif for a character, for example. This programming can be part of the same cue:

Again, you’ll notice that the Ableton fader is resetting back to 0db. Of course, this is just one channel, and just one track within Ableton, and the more you add, the more complicated the programming can get. I’ve also added in a channel stop to make sure that should we want to play something off a separate scene in Ableton; nothing else gets fired off with it (just in case).

In terms of MIDI’ing within Ableton, when in your MIDI pane, as a general rule, anything that shows up in blue is viable to receive and be altered by MIDI. This means that you can add in reverbs over a certain amount of time, take them away again, and alter any of the highlighted parameters completely to taste. You’ll then just need to go back and make sure that any fade ins have outs again and a reset.

This is a brief intro to having more control over Ableton during a show within Qlab, and of course the more effects and cues might get added, the more complicated the MIDI mapping becomes.

The great thing about using Ableton in a show is that there are certain parameters (also with MIDI control) that can be changed such as how long after receiving a stop should the track last (one bar, or half a bar, or a beat for example) to always ensure that music ends on beat and makes sense to the listeners. For me, Ableton allows you enough control over what it does, but enough flexibility.

X