Empowering the Next Generation of Women in Audio

Join Us

How to Make Tech Easier: Be Prepared


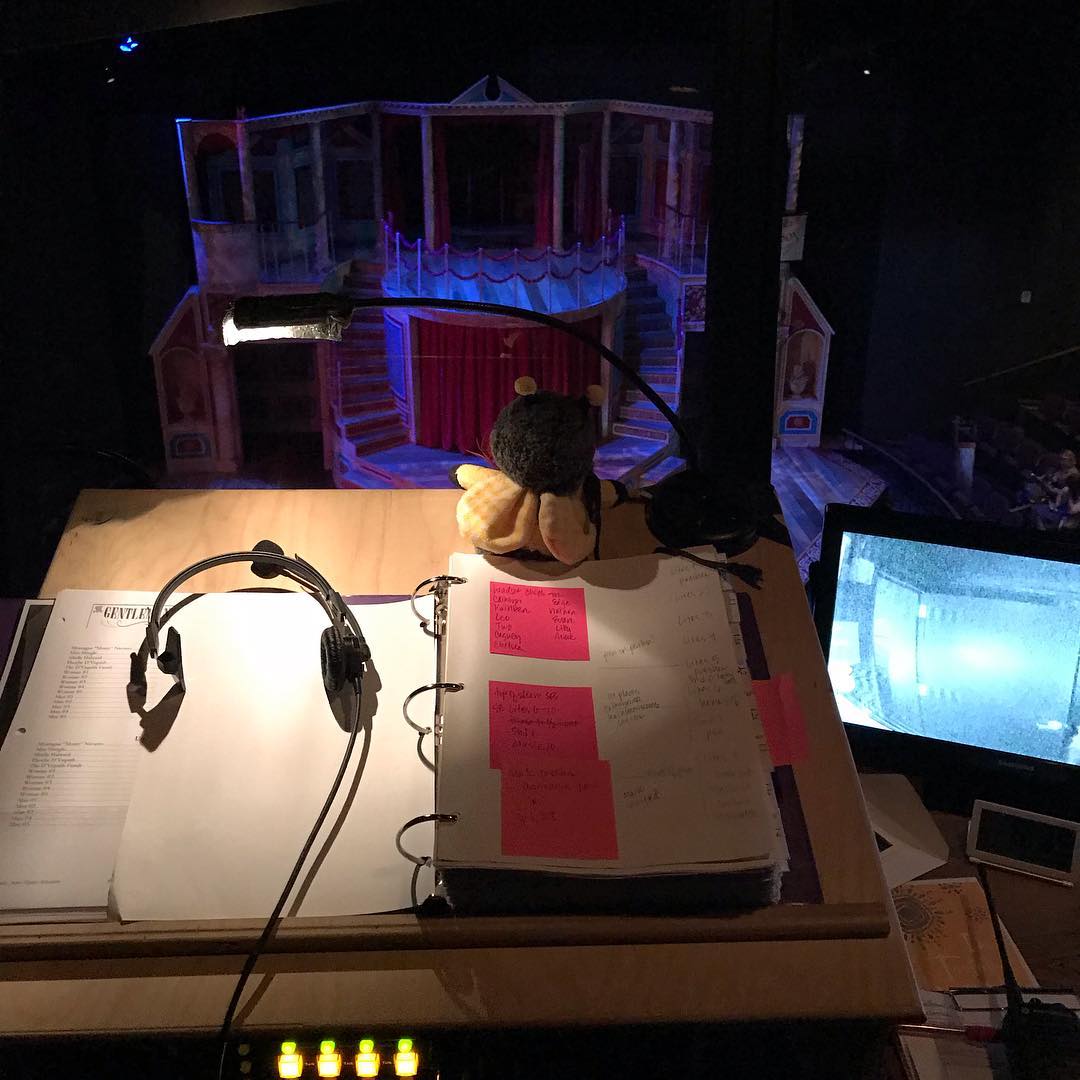
In my last blog, I talked about what goes into mixing a Broadway-style musical, and there’s a lot to do. For almost every production you work on, you’ll be expected to mix the show mostly line-by-line with some dynamics and (hopefully) few mistakes from day one. Having a smart layout for your DCAs and a clear script can be the difference between an incredibly stressful or a delightfully smooth tech process.

Once you have the script, first things first: read it. The entire way through. If you don’t have a good idea of what’s going on from the beginning, the rest of the process is going to be guesswork at best. Next, go through the script again, this time with an eye out for where scenes might go; either where a natural scene change happens in the script, or where there are more actors talking than you have faders. (The number of DCAs you’ll have is usually 8 or 12, determined by the console you’re using. DCAs are faders in a programmable bank that can change per scene so you only have the mics you need or can consolidate a group, like a chorus, down to one or two faders.)

There are two common ways of programming DCA’s. The first is a “typewriter” style where you move down the faders in order for each line and if you run out of faders, you take a cue and go back to the first fader, then repeat (i.e. 1, 2, 3, 4, 5, CUE, 1, 2, 3, etc). This is very useful in larger scenes where characters have shorter one-off lines and you quickly move from one character to the next. The second approach is where each principal actress and actor is assigned to a constant fader (Dorothy is always on 1, Scarecrow on 2, Tin Man on 3, Lion on 4, etc), and will always be on that fader when they have dialogue. In shows where you mostly deal with a handful of reoccurring characters, this is friendlier to your brain as muscle memory brings you back to the same place for the same person each time.

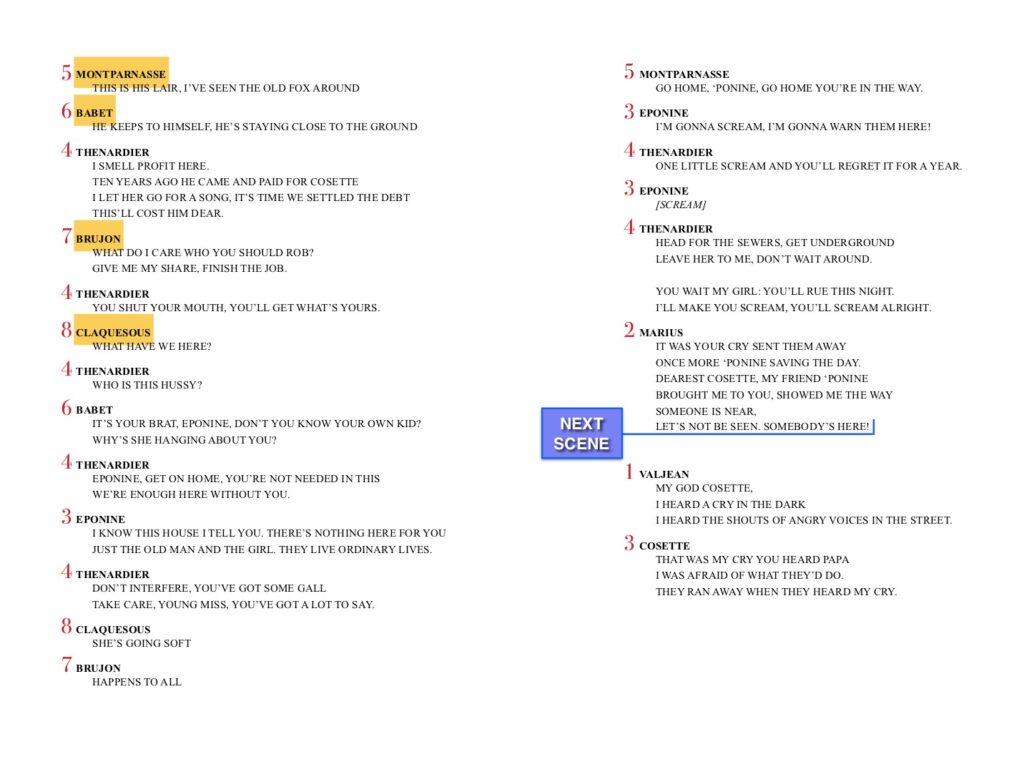
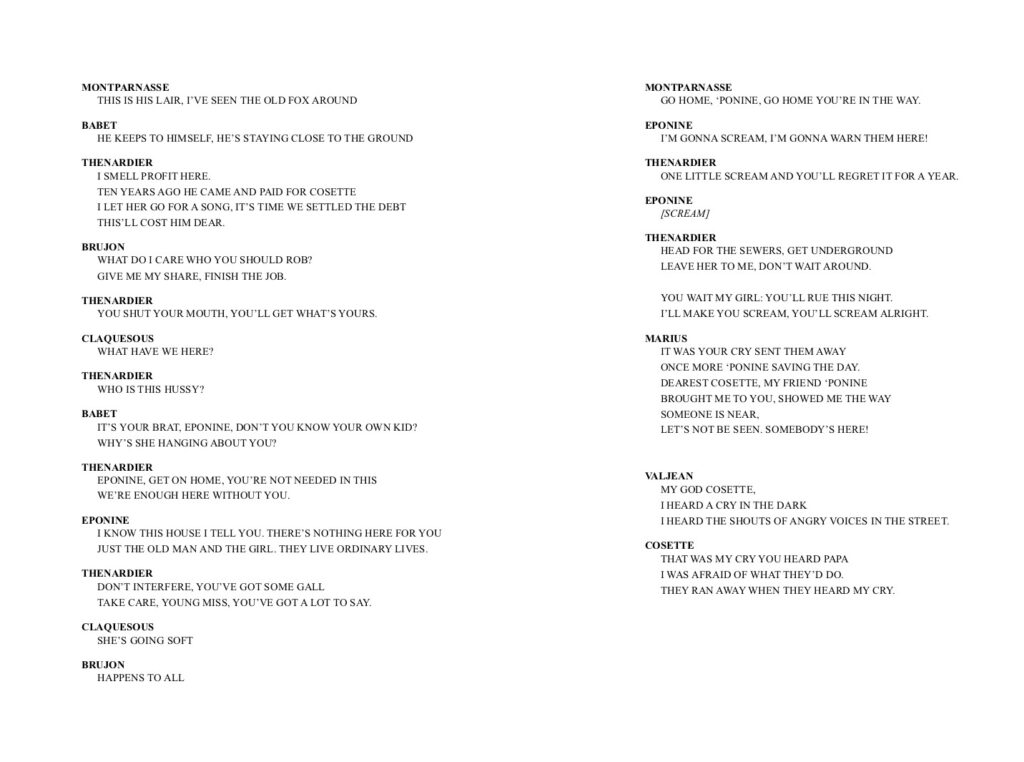
As an example, let’s say we have 8 faders for dialogue and take a look at “The Attack on Rue Plumet” from Les Mis (if you want to listen along, it’s the dialogue from the 2010 Cast album for the 25th Anniversary production):


A typewriter approach to mixing would assign DCAs in increasing order each time a new character speaks (first lines are highlighted):

By the time we get to Marius, we’re almost out of faders, and there’s a natural change in the scene when Thenardier’s gang runs off and Valjean enters, so it works to take a cue between those two lines and start over with the DCAs.

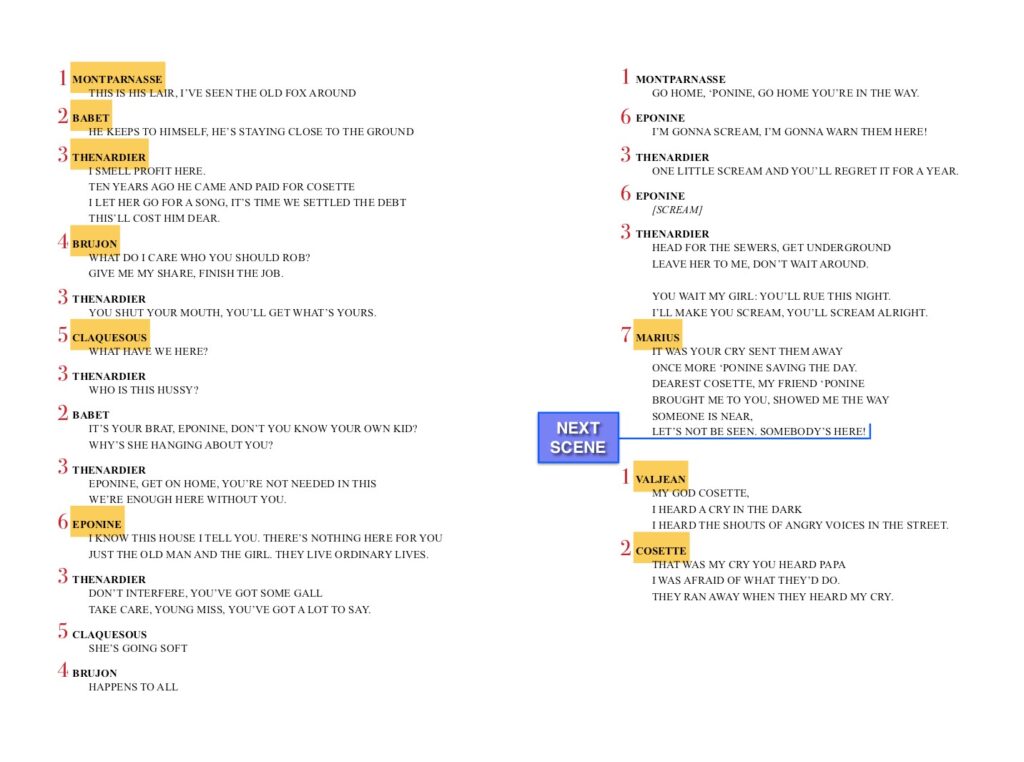
But Les Mis is an ensemble show that’s centered around a core group of principals, so assigning characters to designated fader numbers is another option. If we’re mapping out the entire show, we find that Valjean, as the protagonist, ends up on (1), Marius, the main love interest, on (2),  and Cosette and Eponine can alternate on (3) as they interact with Marius most frequently, but usually aren’t in scenes together. Thenardier could go a couple of places: he leads in scenes like “Master of the House” and “Dog Eats Dog,” but in scenes with the other principals, he typically takes a secondary role, so we’ll put him on (4) in this scene. The chorus parts, Montparnasse, Claquesous, Brujon, and Babet (first lines are still highlighted below), are easiest to put in typewriter style after Thenardier since they only appear once or twice in the show, so don’t have a designated fader number.

The mix script for this approach would look like this:


Here, Thenardier (4) is still right next to his cronies (5), (6), (7), and (8), but is also right next to Eponine (3) for their bits of back-and-forth. The scene change still ends up after Marius’s line, as it’s a natural place to take it, and Cosette replaces Eponine on (3), getting ready for the next scene “One Day More,” where Marius (2) and Cosette (3) will be singing a duet, with Eponine (4) separated, singing her own part.

With this particular scene, neither approach is perfect, as all the characters have multiple lines (and not in the same order every time), but either one would be a legitimate way to set it up.

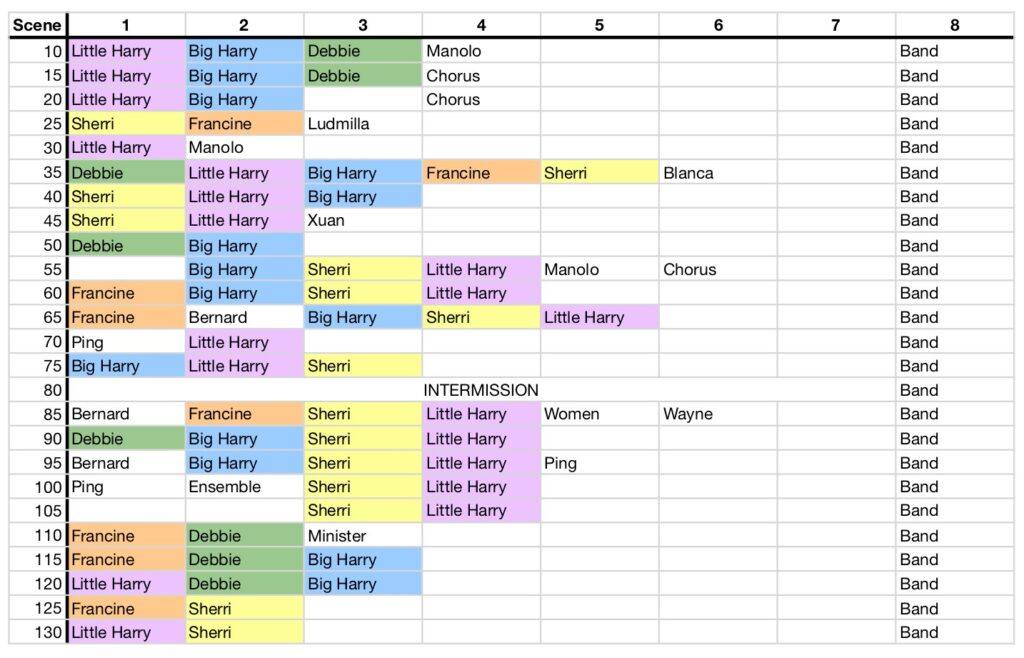
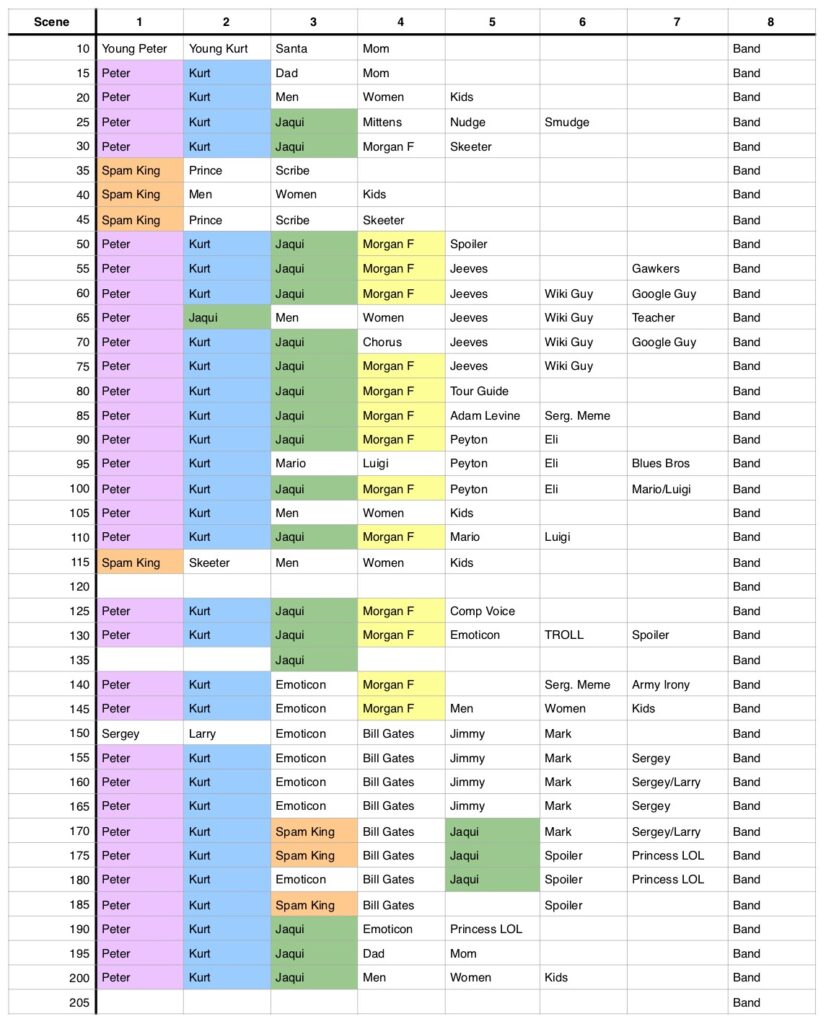
Typically, you’ll use a combination of both approaches over the course of a show, with one that you default to for scenes that could go either way, like the example. Personally, I like to use a spreadsheet where I can see the entire show and get an overview of what the mix will look like. This makes it easier to spot patterns or adjust potentially awkward changes in assignments. (The colors for major characters in the examples are just visual aids that I added for this blog.)

For example, here’s a layout that’s mostly typewriter. Characters may stay on the same fader for connected scenes, but overall the assignments go in order of lines in a scene:


As another example, there is a core group of four actors that are in almost the entire show and a couple of reoccurring supporting roles, so using a designated fader for those characters works much better. There are times that the pattern breaks for a scene or two to switch to typewriter, but largely everyone stays in the same place:


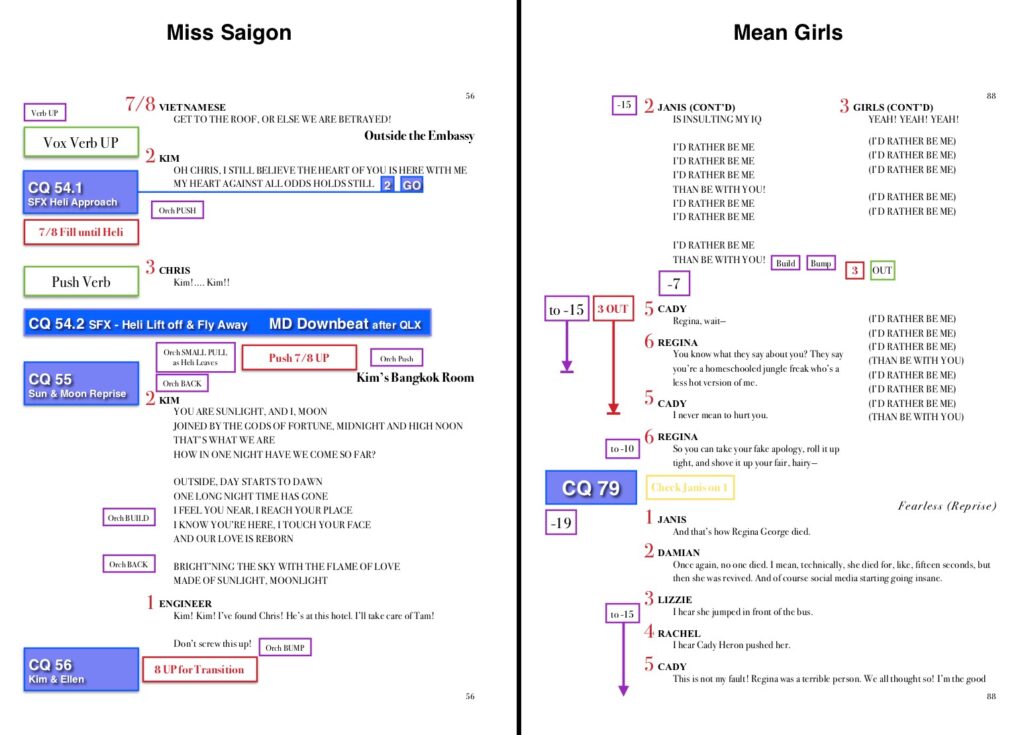
Once you have the DCAs planned out, you can start to format a mixing script. The first example from Les Misérables gives a basic version of that: putting numbers next to lines for the DCA assignments, notes for where cues will go, but you will also eventually add in-band moves, effect levels, and other notes.

Personally, I like the majority of my information to be in the left margin, and if I have enough time I’ll retype the script into my own format so I can mess with it as much as I want. My scripts look like this (I thoroughly enjoy color coding!):


Each show might have slight differences, but the broad strokes are always the same: cues are in lavender boxes with a blue border (for cues taken off a cue light, the colors are inverted, so blue box with lavender border), band moves are in purple, vocal verb is green, red are mic notes as well as DCA numbers, and yellow is anything that I need to pay attention to or should check.

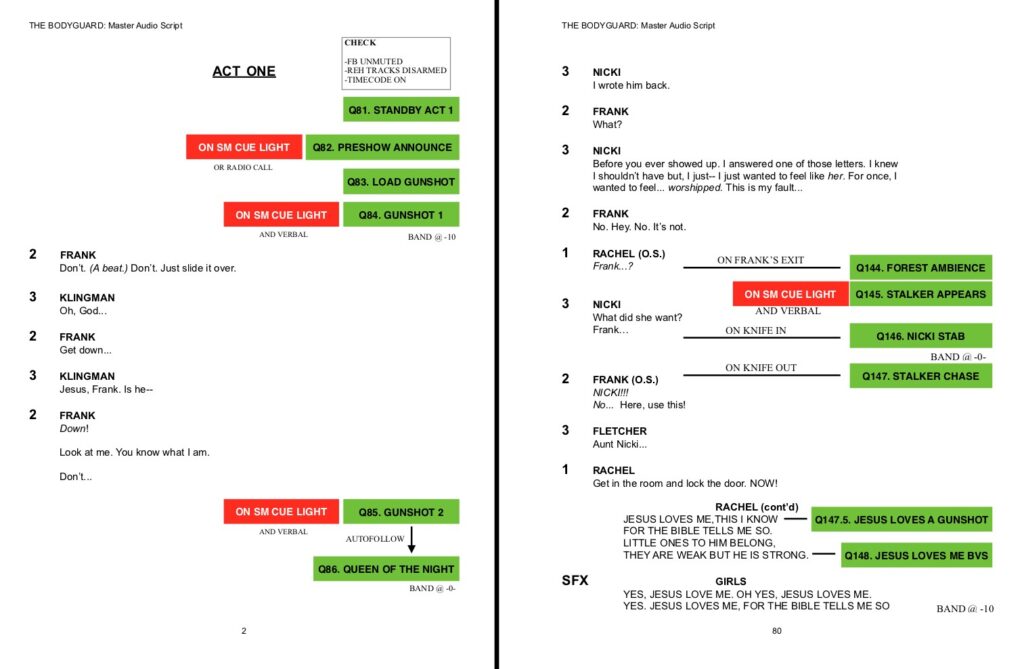
Here’s another example and an explanation from Allison Ebling from her script for The Bodyguard tour (she’s currently the Head Audio on the 1st National Tour of Anastasia):


“One is the top of show sequence which had to be verbally called and on Qlite due to the fact that it was a bit jarring for audiences. (LOUD gunshots and all the lights went off without warning, our preshow announce was played at the scheduled start and downbeat was 5 [minutes] after.) 

The other is a sequence in the second act where I took one cue with the SM, and the rest were on visual. It also has my favorite Q name ever… ‘Jesus Loves a Gunshot.’

I also like reading my script left to right, so I usually end up reformatting them that way.”

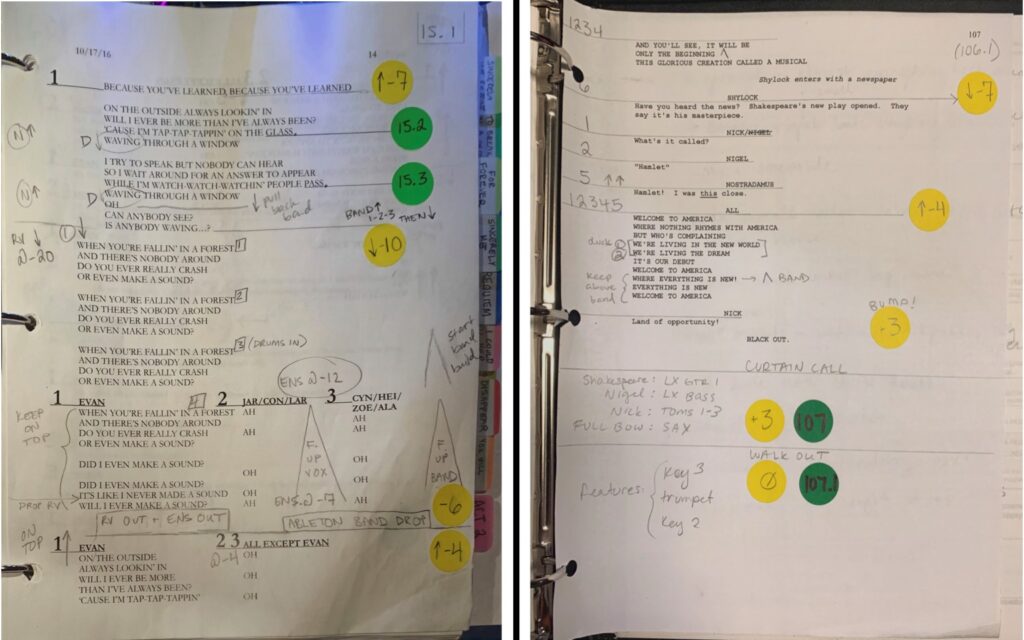
And another example and explanation from Mackenzie Ellis (currently the Head Audio on the 1st National Tour of Dear Evan Hansen):

“Here are some from my DEH tour script [Left], and some from the Something Rotten [Right] first national tour, both of which I am/was the A1 for. Both scripts were adapted from the Broadway versions, created by Jarrett Krauss and Cassy Givens, respectively. 

Notes on my formatting:


As you can see, there are different styles and endless ways to customize a mixing script. How you arrange or put notations in your script is purely a personal preference, and will constantly evolve as you continue to work on shows. As a note: not only should you be able to read your script, but to be truly functional, it should be clear enough that an emergency cover can execute a passable show in a pinch.

At this point, you have your script ready and a solid plan for how the show will run. If there’s still time before tech, you can start practicing. Practice boards are becoming more and more popular and are incredibly helpful to work out the choreography of a mix. Casecraft makes one that is modeled after the DiGiCo SD7 fader bank. Scott Kuker (most recently the mixer for Be More Chill on Broadway) made a custom, travel-size board for me a couple of years ago that I absolutely love. It immediately became an integral part of learning the mix for both me and my assistants!

I highly recommend getting one if you’re career plans involve mixing theatrical shows, but if you don’t have one, there’s the tried and true option of setting up coins to push as makeshift faders (pennies tend to be a good size, but some prefer quarters). Whatever method you use, the point is to start getting a sense of muscle memory and timing as you work through the show. It also gives you an opportunity to work through complicated or quick scenes, so you get a feel for the choreography or can even look at adjusting the DCA programming to make it easier.

After prepping a script and getting in some practice, walking up to the console in tech doesn’t seem as daunting. If you’re well prepared, you’re able to keep up and adapt to changes faster. Plus, if you’re self-sufficient at the board, your designers can trust you to mix the show and take more time to focus on their job of getting the system and the show the way they want it, which will help you in the long run.
 

Gain Without the Pain:  Gain Structure for Live Sound Part 2


In my last blog, I outlined the basics of gain structure, and how to get to a good starting point for your mix. This time I want to discuss a few situations where you might take different approaches to how you set your gain, and why.

I like to think of gain as a tennis ball growing out of the mic if it’s omnidirectional, or a peach for cardioid mics, with the stalk-socket (is there a word for that?) at the point of most rejection. Bidirectional/figure eight mics always remind me of Princess Leia’s famous hair buns in Star Wars. Whatever you imagine it as don’t forget that the pick-up pattern is three-dimensional. There can be a bit of a subconscious tendency to think of pick-up patterns as the flat discs you see in polar plots, so don’t fall into that trap! The main thing to remember is that as you increase the gain, you’re expanding the area in which the mic will pick noise up in every dimension, not just in the direction of what you want to amplify. This will be more of an issue in some circumstances than others, so they can benefit from different approaches.

Quiet singer, noisey stage

My first example is the one I encounter most often and causes me the most issues. You have a loud band on a reverberant, noisey stage, and you’re trying to get the vocals audible, or even nice! This can be a bit of a challenge even with a strong singer, but a quiet vocalist can seem impossibly lost in the mix. Thinking back to my previous post, the problem in this situation is that the other instruments, the crowd and everything reflecting back off the walls is keeping the noise high in the signal-to-noise ratio. Turning the gain up will just bring more of that noise into your board and muddy the mix. Upping the gain for monitors will increase the likelihood of frequencies in the monitor mix being picked up by the mic, which feeds back to the monitor, which feeds back to the mic… which creates feedback!

In an ideal world, the other players would set their instruments at reasonable levels, and the vocalist would sing loudly, close to the mic. This would increase the signal-to-noise ratio naturally. Unfortunately, this often doesn’t happen for one reason or another, and you need to fix it at the board. In these situations I try to keep the gain as low as possible while still picking the vocalist up. I use high and low pass filters to get rid of the unnecessary noise in ranges away from the vocalist’s frequencies. I might EQ a few bits out of the vocal channel where other instruments are being picked up more than the singer, and might EQ out some vocal frequencies from other channels to give them some more space to be heard. I then try to have the fader as high as possible while still leaving some headroom. Setting your master fader or monitor mixes at +5 instead of 0 can give you the extra volume you need, while keeping the gain as tight as possible. I very rarely find myself needing to turn an entire mix-up mid-show, and if it comes to it I can just turn up all the sends from the channels instead. There are plenty of other tricks to get vocals to stand out in your mix, but that is beyond the scope of this post.

Wandering keynote speaker

On the other end of the noisey gig spectrum is the classic corporate speaker who won’t stay near the lectern mic. I think one of the most misunderstood aspects of live sound by people outside our industry is that the mics pick everything in their field up, in every direction, whether the sound is intentional or not. For example, I had someone loudly shuffle their notes and bang them on the lectern, cough and say something privately to an assistant right by the mics as they were supposed to start their speech. They then fully wandered the 20 metre (roughly 60 feet) wide stage, talking at normal conversational volume, expecting the mics to pick them up perfectly, no matter where they were. Quickly muting the channel when it’s apparent the speaker is still preparing solves the first issues, but there’s not much you can do about audibility when they’re metres away from the mics. This is an extreme example. However, it is very common for people to stand at a lectern but talk quite far away from the mics, turning their heads repeatedly to gesture towards their presentation.

Hopefully, the stage at a conference isn’t as noisy as a rock band in a club, and the audience are mostly quietly paying attention rather than screaming and cheering. It’s less common to have stage monitors, and with any luck, the PA is quite far away from the mics. In this case, you can get away with turning the gain up, to catch more of what they’re saying. Just remember to add a pretty strong compressor for when they inevitably lean in and suddenly talk loudly, directly into the mics. This can also help if you have several people using the lectern without soundchecking. You can set the mics to as high a gain as is stable, so even if they’re quiet you’re covered. If they’re loud you can always turn them down.

Popping lavalier or headset mics

You don’t always want your sound source as close to the mic as possible. Plosives in speech; the consonant sounds made with a burst of air, like p’s and b’s, can sound horrible on sensitive mics like lavaliers or headsets. These mics can also pick up too much sibilance. In these cases, it’s best to move them slightly further away or off-axis (by a matter of millimeters) so they aren’t in the firing line of the speaker’s breath, then turn the gain up to compensate. You might have noticed that lavaliers are often attached completely upside down for recording or TV. This stops the mic capsule being battered by those plosives and reduces sibilance, and the recording engineer can turn the gain up as much as needed without worrying about feedback because there are no speakers in the room.

I hope these examples have helped you to see how gain structure is just another tool in your mixing bag of tricks. There are good rules of thumb to follow for getting a decent signal-to-noise ratio quickly, but they aren’t written in stone. If you need to move the balance around or adjust different aspects of the channel strip to make your particular situation work, just try it (gradually if the show is already live!). It’s easy to talk about what the correct approach is in a textbook situation, but real life is very rarely ideal. Do what you need to do to get it working. If it sounds good in the end, that’s all that matters.

Mix With the Masters Scholarships Marcella Araica and Producer Danja

SoundGirls Members have the chance to receive a 1000€ (euro) scholarship provided to SoundGirls members from Mix With The Masters. There are three scholarships available for the week-long session with award-winning engineer Marcella Araica & Producer Danja.

This is a week-long seminar valued at 4,000€ and includes lectures and workshops, accommodation within the mansion, catering (breakfast, lunch, dinner) the fitness room, swimming pool and shuttles from Avignon to the studio.

You must have an advanced understanding of audio and work as producer/mixer/engineer to attend Mix with the Masters.

Session Dates: March 24 -30, 2020

Apply for the scholarships here

Deadline to apply is March 6, 2020

You are responsible for Travel to France and the remainder of the balance to Mix with the Masters.

Session Includes

  • private bedroom, on-site within the mansion for 6 nights
  • Full-board accommodation with meals prepared by gourmet chefs on-site
  • Return shuttle services from Avignon to Studios La Fabrique
  • Unlimited drinks and snacks throughout the week
  • Approximately 50 hours in the studio with the guest speaker
  • One-on-one time between you and the master to assess and work on your own material
  • Professional photography done throughout the week, including portrait shots of you with the Master
  • Hundreds of full-resolution photos shared with you afterward via a download link, to keep and use as you please
  • A certificate of completion issued on behalf of Mix With the Masters and Studios La Fabrique, signed by the Master if you wish
  • Exclusive MWTM merchandise given only to seminar attendees: embossed Moleskine notepads, pens, mugs, t-shirts, USB keys, and stickers.
  • Use of the La Fabrique swimming pool, garden, fitness centre, and scenic walks
  • Nearby access to the enchanting town of St. Rémy de Provence

     Marcella “Ms. Lago” Araica, has swiftly burgeoned into a towering beacon of talent as one of the music industry’s hottest, most prolific sound engineers. Credited for mixing over one hundred chart-topping tunes, Marcella has had the opportunity of working with world-renowned musical icons such as Beyoncé, Britney Spears, Madonna, Nelly Furtado, Usher, Joe Jonas, and Missy Elliot, along with super producers Timbaland, Danja, and Polow Da Don. In just a few short years, this musical mastermind has already accomplished what most strive to achieve in a lifetime.

    Nate “Danja” Hills is one of the most sought after writers and producers in pop music today and is a two-time Grammy Award winner, four-time Grammy nominee and SESAC “Songwriter of the Year” in 2007, 2008 and 2010. Danja boasts a catalog that features twelve #1 Billboard Singles including “SexyBack,” “My Love,” “Lovestoned” and “What Goes Around Comes Around” by Justin Timberlake, “Promiscuous” and “Say It Right” by Nelly Furtado, “Give It to Me” and “The Way I Are” by Timbaland, “Gimme More” by Britney Spears, “4 Minutes” by Madonna, “Sober” by Pink and “Knock You Down” by Keri Hilson. In addition, Danja has written and produced songs for a who’s who of popular music including, among others, 50 Cent, Bjork, Ciara, Diddy, DJ Khaled, Duran Duran, Jennifer Lopez, Jo Jo, Katherine McPhee, Mariah Carey, Rick Ross, Snoop Dogg, T.I., T-Pain and Usher


Program

The process of greatness fostering greatness has long been recognized and is the reason why masterclasses are organized. The Mix With The Master’s seminars is part of this tradition, offering an exchange of in-depth first-hand studio experience and knowledge that is unparalleled and not available anywhere else. Each seminar is conducted by one of the world’s top music mixers and producers, ready to share their professional secrets with a select group of a maximum of 14 carefully-screened, professional-level participants, who come from all over the world.

One factor that contributes to the enormous success of the seminars is that all tutors support the general MWTM ethos, which is about the love of music, music technology and wanting to help others. Participants also are in part selected on displaying similar, positive attitudes. The fact that the seminars last a full week is another major contributory factor because it offers tutors the time and space to go into real depth, and the participants the opportunity to spend a prolonged time watching a master at his peak, and to ask any question they can think of.

The tutors share exclusive, insider-information on any subject: detailed technical knowledge, how to run sessions, how to handle artists, how to manage a career, the right attitude, how to remain successful, and more. The tutors also assess the work of the participants, by listening to their mixes and mixing recording sessions that they bring, and providing extensive feedback to each participant on where they are at, and how they can get to where they want to be. This is invaluable and offers participants wanting to become world-class professionals in their own right a unique advantage.

Another primary factor in making the MWTM seminars exceptional is that they take place at La Fabrique, a large, comfortable, high-end recording studio located in a picturesque historic building, surrounded by huge, lush grounds, and set in the south-east for France in one of the world’s most beautiful environments. The secluded and idyllic location offers the participants and tutors a lot of space to relax and recharge, far away from the hustle and bustle of daily life and the all-demanding intensity of their regular professional environments.

Because the courses are residential, the participants and tutor work, eat, socialize, and sleep in the same environment. While tutors, and participants, will at times opt to retire to their private quarters, there is ample opportunity for social interaction outside of the studio environment. Participants interact extensively with each other and the tutor, making it easier to assimilate the intangible qualities necessary to be successful at the highest level—presence, focus, social skills, intelligence, creativity, the right attitude, and so on.

In short, for seven days participants can experience mixing with a master in both senses of the phrase, mixing and interacting with them. Get more information about Studio La Fabrique


How to Push your Sound Design to the Max

While Not Stepping on your Mixer’s Toes

We get a lot of questions about how much you should do in your sound design pass versus how much to leave to your mixer. So, although I’ve written a few posts on this topic (such as Whose Job Is It: When Plugin Effects Sound Design vs Mix Choices and Five Things I’ve Learned about Editing from Mixing), I thought it was time for another brush-up.

As some of you may know, I’m a long-time sound designer and supervising sound editor, but I just started mixing a few years ago. While attending mixes as a supervisor definitely gave me a window into best practices for sound design success (aka how to make sure your work actually gets played…audibly), I got a whole new vantage point for what to do (and not do) once I started having to dig through sound design sessions myself! So, while I am a fledgling mixer and you should always speak directly to the mixer working on your project before making decisions or altering your workflow, I feel that I am qualified to share my personal preferences and experiences. Take this as the starting point for a conversation—a window into one mixer’s mind, and hopefully, it will spark great communication with your own mixer.

Below, I’m sharing a few key concepts that there seems to be confusion surrounding in the “who does what” debate. I’ve personally come across these questions or situations, and I’m hoping to spare you the headache of doing any work over due to a lack of communication. Here they are!


EQ

What Not to Do

I was recently the supervisor and mixer on an episode that was almost entirely underwater. My sound effects editor EQ’ed every single water movement, splash, drip, etc. that occurred underwater with a very aggressive low-pass filter. While this made total sense from a realistic sound point of view, it completely demolished any clarity that we might have had and muddied up the entire episode. It was very hard to locate the sound effects in the space and even harder to get them to cut through the dialogue, more or less the music! Unfortunately, this was done destructively with audio-suite on every single file (and there were thousands of them probably). Every single one had to be recut by hand from the library, which was an insanely arduous task.

What to Do Instead

I’m going to say this once, and then please just assume that this is step one for everything below (I’ll spare you the boredom of reading it over and over): STEP ONE IS ALWAYS ASK YOUR MIXER BEFORE YOU START APPLYING ANY EQ.

I think you can safely assume that there’s, at best, an 80% chance that your mixer does not want you to EQ anything. Ever. So always ask before you destructively alter your work. With EQ’ing it’s especially important that the right amount is added given what else is happening in the scene, and clients often have opinions about how much is too much for their sense of clarity in the mix.

The better way to approach EQ is to ask your mixer (again, asking because this may require a change to their mix template which requires their approval) if it would work to place any FX that you think should be EQ’ed on a separate food group with no other FX mixed in. Having all underwater movements on one set of tracks clearly labeled UNDERWATER FX gives your mixer the ability to quickly EQ all of them with just a few keystrokes and knob turns. And then he or she can also very easily change that EQ to mesh well with the music and dialogue or to satisfy a client note. It also means that he or she can put all of those lovely water effects on one VCA and ride that if the clients ask for any global changes to the volume of water FX. Win-win!

The same is true for any batch EQ’ing of FX. I like the “split onto a separate food group of clearly labeled tracks” method for other things, too, like: action happening on the other side of a door or wall, sound effects coming from a TV or radio, or any other time that you would imagine EQ should be applied to a large selection of files. So yes, split it out to make it easy and obvious for your mixer, but no, don’t do it yourself.


Reverb

What Not to Do

Don’t add any environmental reverb. Just don’t do it. Keep in mind that your sound design doesn’t exist in a vacuum. It’s layered on top of dialogue, music, BGs, ambiances, and probably more! What sounds right as a reverb setting to you while working only on your FX definitely won’t be the right choice once everything else has been placed in the mix.

What to Do Instead

Let your mixer decide. If you do it as an effect for one singular moment (I’m thinking something like a hawk screech to establish distance), only process individual files and also provide a clearly marked clean version in the track below. That way, your mixer has the option to use your version, or take it as an indication of what the clients like and redo it with the clean one. But before you go ahead and use reverb as an effect in your sound design, always check in with your supervisor first. He or she will be able to draw on all of their experience on the mix stage, and will be able to let you know if it’s a good idea or not. From my experience, the answer is that it’s almost always NOT a good idea.


Trippy FX

What Not to Do

Say you’re designing the sound for a super trippy sequence like the POV shot for a drugged up character. You may be tempted to add a phaser, some crazy modulation, or any other trippy overall effect to the whole sequence. Don’t do it! That takes all of the fun out of your mixer’s job, and furthermore really ties his or her hands. They need the ability to adjust any effects to also achieve mix clarity when the music and dialogue are added. So it’s always best to let them choose any overall effects!

What to Do Instead

Go for it with weird ambiences, off-the-wall sound choices, and totally different BGs to make it feel like you’re really inside the character’s head. Feel free to process individual files if you think it really adds something—just be sure to also supply the original muted below and named something obvious like “unprocessed.”


Panning

What Not to Do

Don’t spend hours panning all of your work without first speaking to your mixer. Your understanding of panning may be wildly different from what he or she can actually use in the mix. I’ve seen a lot of editors pan things 100% off-screen to the right or left, and I just have to redo all of it. Panning isn’t too difficult or complicated, but it’s really best to be on the same page as your mixer before you start.

What to Do Instead

Some mixers love it if you help out with panning, especially if they’re really under the gun time-wise. Others prefer you leave it to them—so always ask first. If you want to be sure that your spaceship chase sequence zooms in and around your clients during your FX preview, just make sure to ask your mixer first about his/her panning preferences. How far to the L/R do they prefer that you pan things? What about how much into the rears? Do they mind if you do it with the panning bars, or will they only keep it if you use the 5.1 panner/stereo pot?


LFE Tracks

What Not to Do

Don’t cut your LFE tracks while listening on headphones. You may not realize that what you’re putting in the LFE should actually go in our SFX track because it is low in pitch, but not in that rumble-only range. It’s nearly impossible to cut your LFE track without a subwoofer, since true LFE sweeteners in your library will look like they have a standard-sized waveform, but will sound like almost nothing in headphones!

What to Do Instead

Keep in mind that any files that live on the LFE tracks are going to be bused directly to the low-frequency effects generator which can output approximately 3- 120 Hz. That is super low!  So only cut sound effects that have only that frequency information in them, or that you only care to hear that part. Any other mid-range “meat” to the sound will be lost in the mix.


A Beginners Guide to Wireless Frequencies 

Learning about and using wireless equipment can be overwhelming – there are a lot of differences from traditional gear and rather importantly there are strict rules around using radio frequencies that vary from country to country.

How does wireless equipment work?


Wired microphones convert sound into an electrical signal. This is sent through the wire to the sound system. Wireless microphones, however, convert sound into radio signals. This signal is then sent from a transmitter to a receiver which sends it to the sound system. The transmitter is a device that converts the audio signal into a radio signal and broadcasts it through an antenna.

Transmitters are small clip-on packs or in the case of handheld wireless microphones, they are built into the design of the handle. All wireless transmitters generally use a 9-volt battery. The receiver is tuned to receive the radio waves from the transmitter and convert it back into an audio signal. This means that the output of the receiver is just like a traditional wired signal. The balanced audio signal from the receiver output is then connected via an XLR to a typical input in a sound system.

There are a few different kinds of antennae on receivers – single and diversity. Single antenna receivers have one receiving antenna and one tuner but these can be prone to dropping out or getting interruptions in the signal. Diversity receivers, however, perform better as they have two separate antennas and two separate tuners. This means the receiver will automatically choose the best of the two signals, sometimes using a blend of both. This reduces the chance of a drop out because the likelihood is high that one antenna will be receiving a clean signal.

What frequency should I use for my equipment?

This is one of the trickiest areas to cover with wireless equipment because it depends on a lot of factors. Some frequency bands work brilliantly for speech but not for music, and some bands are simply too small to fit in lots of audio channels for a larger group. Some are prone to interference due to being license-free, popular bands and it can be a minefield working out where to begin.

When deciding what band to use, firstly it is good to know that each performer/person that is using wireless in the same location needs to be using a different frequency. It’s good practice to set up the receiver with a blank channel in between or a spacing of 0.25Hz increments on the receiver. Secondly, it’s important to know which spectrum band is suitable and legal to use for your venue – this will depend on the number of wireless devices you’re using, where you are in the world, and if you are moving around or touring with the same equipment. Wireless devices include “low power auxiliary station” equipment such as IEMs, wireless audio instrument links, and wireless cueing equipment, which all have the same rules as wireless microphones. Though not fully extensive, a guide to the available frequency rules of most countries can be found at Frequencies for wireless microphones

There are different areas of the radio frequency spectrum that we are allowed to use for wireless equipment but some are more suitable and better than others, and these are constantly changing, which makes it a hot topic for discussion. It’s useful to remember that the frequency spectrum works in the same way as physical space, in that it has a finite amount of room to be shared. The company Shure has strong concerns, particularly about the ever-decreasing UHF band in the Netherlands and has set up a site to raise awareness at www.losingyourvoice.co.uk


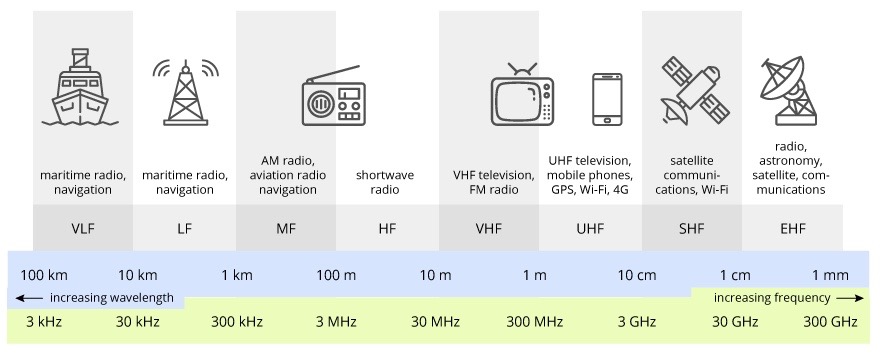
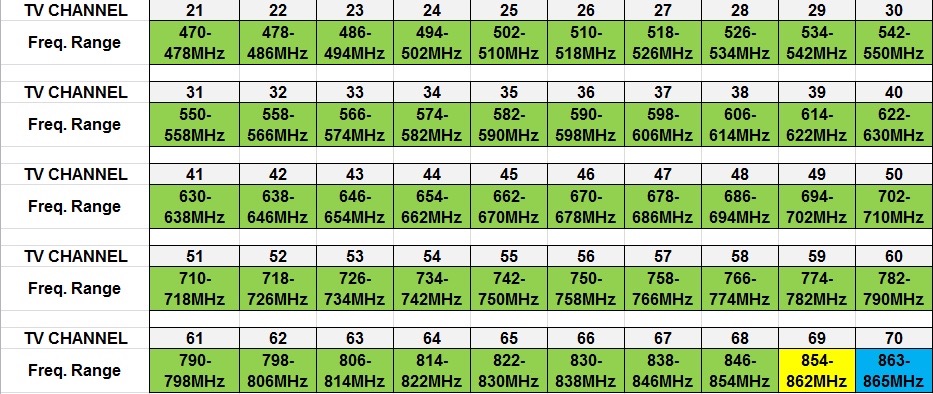
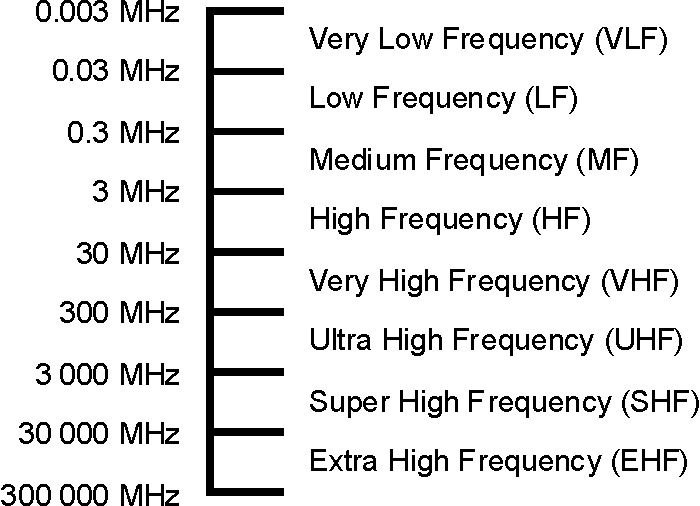
The UHF band is the preferred spectrum for wireless equipment however this is getting smaller for wireless use all the time. Ultra-high frequency (UHF) is the ITU designation for radio frequencies in the range between 300 megahertz (MHz) and 3 gigahertz (GHz), also known as the decimetre band as the wavelengths range from one meter to one-tenth of a metre (one decimetre).

Most places including the UK and the USA have overhauled their UHF frequency ranges in recent years due to the digitisation of television, freeing up the old analogue frequencies. Originally analogue television transmitted in the 400-800MHz range had been separated into 8MHz “channels” and these refer to a particular frequency range.

Channel 38 is the spectrum of 606.5 – 613.5MHz and is a popular choice in the UK. Governing body Ofcom requires customers to purchase a yearly UHF UK Wireless Microphone Licence to use Channel 38. A flexible license means that owners are allowed to use radio microphone systems in any location. Channel 38 is a shared space and is large enough for 12 radio microphone systems, however, the downside is that if wireless equipment is tuned to the alternative Channel 70 it cannot then return to Channel 38.

Channel 70 is the band of 863 – 865MHz and this is free to use for radio microphone equipment in the UK. This spectrum is so small that it can be difficult to fit many systems into this space. Additionally, if other users nearby are also trying to use this space it can cause interference. Another issue with Channel 70 is that there is no “buffer” range at the lower end as 4G transmission lives immediately below 863MHz which can cause interference.

The band of what used to be Channel 69 (833-862MHz) is illegal to use since its’ digital auctioning in 2013 and it was replaced with Channel 38 for wireless equipment. Because of these challenges, Channel 70 may not be the best solution for larger setups requiring more space.

In the USA there are similar changes coming into place courtesy of the FCC which is the US governing body. The latest changes include the bands 617 – 652 and 663 – 698MHz which will be banned from wireless use as of July 13 2020. The move away from the 600MHz band is due to channels 38-51 in this spectrum being auctioned to television stations. This means that after July 2020 the available frequencies for wireless will include some frequencies on TV channels 2-36 below 608MHz, 614 – 616MHz, 653 – 657MHz, and 657 – 663MHz. Though this may seem like a current transition, this has been in progress for some time – the use of band 698 – 806MHz has been prohibited by the FCC since 2010 as this was repurposed for licensed commercial wireless services and public-safety networks.

What other frequency options am I allowed to use if the UHF range isn’t right for me?

Again, the list of available space is specific to each country, license and equipment tuning limitations however utilising either side of the UHF range can work, with the VHF (very high frequency) spectrum often making a good and practical backup solution.

The VHF band is classed as 30 – 300MHz, with a differentiation given between low and high VHF:

“Low-band VHF range of 49 MHz includes transmission of wireless microphones, cordless phones, radio controlled toys and more. A slightly higher VHF range of 54-72 MHz operates television channels 2-4, as well as wireless systems defined as “assistive listening.” VHF frequencies 76-88 MHz operate channels 5 and 6.

Band III is the name of the range of radio frequencies within the very high frequency (VHF) part of the electromagnetic spectrum from 174 to 240 megahertz (MHz). It is primarily used for radio and television broadcasting. It is also called high-band VHF, in contrast to Bands I and II.”

The Shure website explains the pro points of using the high-band VHF range, saying:

“The high-band VHF range is the most widely used for professional applications, and in which quality wireless microphone systems are available at a variety of prices. In the U.S., the high-band VHF range is divided into two bands available to wireless microphone users. The first band, from 169 – 172 MHz, includes eight specific frequencies designated by the FCC for wireless microphone use by the general public. These frequencies are often referred to as “traveling frequencies,” because they can theoretically be used throughout the U.S. without concern for interference from broadcast television. Legal limits of deviation (up to 12 kHz) allow high-quality audio transmission.”

Other than the UHF and VHF bands, if we look to the higher end of the spectrum the WiFi frequency range at 2.4GHz is another option, however, this also has its limitations due to it being a small shared space and the fact that a lot of WiFi networks in the area can cause interference.

So what does this mean in practical terms to get started?

If you are purchasing new wireless equipment it’s very important to understand its limitations in what frequencies you will be working with at any given venue, and this is multiplied tenfold if you intend to travel with the same equipment. Many modern receivers do not allow the tuning options to change ranges once they have been set – as previously mentioned, the UK channels 38 and 70 cannot be swapped once they have been tuned, and similarly, radio microphones that can tune to Channel 38 will not tune to the “Duplex Gap” of 823 – 832MHz or the shared space of 1785 – 1805MHz. This means that equipment needs have to be very well researched prior to purchasing and that pre-loved second-hand gear will need extra investigation for this reason.

What are the power restrictions for my wireless equipment? 

As a general rule the power must not be in excess of 50 milliwatts when operating in the television bands, and no more than 20 milliwatts when operating in the 600MHz band or the Duplex Gap.

So to recap what questions should I ask first to get setup?

To get started with wireless equipment the key starting questions are:

While it may seem like a lot of questions to ask and elements to consider, most wireless manufacturers will state the capabilities and limitations of their equipment, and keep you up to date with changes that may affect its’ use. With a bit of research and preparation, it’s possible to find wireless equipment to meet a variety of audio needs and budgets, that works within the law and sounds great wherever you may be.


The Bad Buzz: Finding and Fixing Unwanted Noise

Of all the irritating things that happen when you’re rushing to finish a soundcheck, an unwanted buzz coming through the PA system is one of the worst. There are so many possible culprits, and it seems to happen all the time. Since it’s such a common issue, I wanted to walk through the process I use to find and eliminate unwanted noise, in an attempt to make troubleshooting less stressful.

Finding the Source

To begin, determine whether the buzz is coming from the audio system or something onstage by turning off the PA and monitors. If there’s silence, you know the problem is within the system itself. Turn them both back on and mute the PA system: do you still hear the buzz in the monitors? Use this information to narrow your focus area. If the buzz is solely in the monitors, for example, then you know to examine the channels and equipment that are being sent to the monitors only (such as a click track), and can consider the possibility of a bad channel on the monitor board.

Most likely the buzz is caused by a specific input. If it is unclear from the meters which channel is noisy, mute your inputs one by one until the noise stops. (If you are running monitors from front-of-house, make sure your aux sends are post-fader so that the send is muted along with the channel). Check for a bad channel on the board by hard patching the noisy input to another channel. If the buzz persists, check for a bad channel in the signal path by changing inputs on any snakes or sub snakes in use. Listen for any crackling, pops, or other giveaways that there may be a bad microphone or cable.

Most importantly, talk to the musicians! Ask them to stay quiet while you are troubleshooting and ask about their gear – they will be able to tell you any problems they have experienced at past gigs, and maybe even what solutions have worked.

Troubleshooting the System 

If the buzz is system-only, the issue is probably power. Check where everyone onstage is pulling power from and whether or not the circuit is used exclusively as audio power. Ideally, backline power will be on a circuit used only for the musicians’ gear, but often at smaller venues lighting and audio share power. Lighting dimmers, movers and fans may be audible if power is shared, so see if the buzz changes as lighting dimmers are moved. It may disappear when the lights are at 100%. In this case, there’s not much you can do besides try to reconfigure the power to be as separated as possible.

Next, check for cable crossing. Look at the paths of unbalanced cables. Do they cross paths or run along any cables carrying AC power? Electrical interference often arises when AC cables are in close proximity to unbalanced cables (for example, pedalboard cables), so it’s best to keep them as separated as possible.

There can also be grounding issues at play. If the hum sounds like it’s around 60 Hz, you probably have what’s called a ground loop. Ground loops occur when the ground connections from two or more separate sources (say, the system power and amplifier power) differ. Ideally, both pieces of equipment reference ground at 0 Volts. But nothing is ideal in real life, so it’s more likely that the ground readings differ slightly: say, 10 millivolts and 0 Volts. When this happens, the difference in electric potential can cause a small current loop that flows between the two connections, resulting in noise.

Here the quickest fix is to lift the ground switch on the channel or amplifier (if there is one) or use an adapter that accomplishes the same thing. But this workaround is not ideal since it removes a safety feature. Having the guitarist move around and angle the pickups differently may be enough to get rid of or at least lessen the hum.

Troubleshooting the Stage

If the noise is coming from one of the pieces of equipment on the stage itself, turn the PA system off and start with the simplest case. Here we’ll use the signal flow of a guitar as an example.

To begin, have the guitarist set their amp to clean. Have them unplug and re-plug their instrument cable at both ends – sometimes the problem is as simple as one end of the cable not being completely connected.

Next, have the guitarist plug directly into the amp, bypassing any pedals. Ask the guitarist to move around onstage, to see if the noise changes with location. If so, environmental noise is probably being picked up by the instrument cable, and there should be a spot on stage where the sound minimizes or even disappears altogether.

Connect pedals one by one and see if the buzz reappears with a specific pedal. Plug the guitarist directly into a DI box, and see if the hum disappears with the ground-lift switch flipped. If so, then you know it’s a grounding problem, with either a ground loop in place or an instrument grounding issue somewhere.

A buzz can also be the sign of tubes in a tube amp going bad. If so, there’s not much you can do beyond tolerating the buzz or switching amps. In the rare case that the guitarist is plugged into two amps and sending each amp one side of a stereo pedal, noise can result from a grounding issue between the two amps themselves.

The General Process

Buzzes, hums, and other unwanted noises only have a few likely sources: instruments, cables, and equipment. When unwanted noise occurs, stay calm and determine the general location of the buzz (system or stage). Then, continue narrowing in until you find the source. You may not always be able to find or fix the exact source, but the tips I have given should help you on your way.


Rising Star – Carolyn Slothour Live Sound Engineer

Carolyn Slothour is an up-and-coming independent FOH and Monitor engineer, who has been working in the industry for just over five years. She works as an A1 and A2 at a few production companies based in Pittsburgh and Philadelphia, including a company called Zero Fossil which is a clean energy/solar-powered production company. She is the house engineer at a local venue called Brillobox and fills in at several other local venues while not on the road. The past year she has been touring as FOH, tour manager, and playing flute with a variety of artists including Mija, !!! (Chk Chk Chk), Alison Sudol, & a rock theatre group called Squonk Opera. She has several tours planned for 2020 as well.

Carolyn has always been passionate about playing & performing music and decided to move from New Jersey to Pittsburgh to attend college at the California University of PA to follow her love of music, while not really knowing what path she would ultimately take within the industry. The Music Technology Bachelor’s degree she received covered a wide range of things, including music performance & theory, music business, and recording & live sound technology. During her time in college, she interned at a recording studio and production company. While interning, Carolyn discovered she was most passionate about live sound. Having attended and performed in live concerts throughout her life, she says “I realized it made sense for me to work in an environment I’ve always loved and felt at home in from the start.” From there she started picking up freelance sound gigs and has been building her diverse resume of audio work since.

Her current goals are to mix at more large-scale festivals and continue to grow in many different ways. “I have always loved to attend festivals, and working them has become some of the best times of my life, despite the usual “throw-and-go,” high-stakes style mixing at them tends to be. I enjoy the rush and the feeling of accomplishment when it all comes together. I also hope to continue to grow in several different areas of the music industry – including live sound, performance, studio engineering, sound design, composition, and production. I love to learn and I don’t plan on stopping anytime soon.”

Can you tell us about a tour or show that you’re proud of? A challenge that you pulled off?

My last FOH tour with !!! (Chk Chk Chk) was one that I’m very proud of because I was able to combine my two passions – mixing FOH & playing the flute. When I first met the band, they asked if I would be interested in playing flute with them on a couple of songs of theirs. I was absolutely interested and ended up playing flute on 2-3 songs every night from FOH. It could be a little challenging at times to take my focus away from mixing and put it on performing, but playing the flute is like second nature to me and it felt great to play in front of large audiences with such a great group of musicians. I’m a huge fan of their music, so it was definitely the most fun I’ve ever had at work. I also recently mixed FOH for Mija at Corona Capital Music Festival in Mexico City, along with some extremely talented musicians & engineers. The festival brings in around 146,000 people, so that was a pretty special gig for me as well.

Can you tell us about failure and what you learned from it?

I wouldn’t necessarily call this a failure, but one mistake I made recently was creating a show file at a venue while on tour within someone else’s show structure. It all worked fine until I loaded it up at the next venue with that same console, & there was a lot of basic setup that did not work for the new venue. The house engineer and I spent a while trying to figure out why a variety of things did not work correctly and I ended up finding that certain settings were set very strangely when the show file was initially created. After all that trouble, the show ended up sounding great and it was a good night. But I definitely learned the hard way to only travel with show files that I personally created from the start.

What do you like best about touring? 

My favorite thing about touring is that every day is never exactly the same as the last. There are always different challenges & different people, in a different place, so it’s never boring. It’s taught me to take life one day at a time – not only in my career but in all aspects of my life. It can be a stressful job, but it also takes a certain amount of ‘letting go’ and just going with the flow. And I feel really lucky that my career enables me to travel around the globe and see places that many people only dream of.

What do you like least? 

My least favorite part about touring is being away from my cat, & not being able to focus on playing music & my other interests as much as I’d like. I try to make time for my hobbies on the road as much as possible though.

What is your favorite day off activity? 

My favorite day off activities is finding crystal shops & beautiful nature spots where I can relax and spin poi or play the flute. I also enjoy searching for good vegan restaurants in whatever city I’m in.

What, if any, obstacles and barriers have you faced? 

Freelance audio is a competitive industry, and every engineer has to prove themselves in order to build a reputation. Sometimes it’s a little harder to prove myself to those who may not have faith in women to do a great job, but it’s to be expected when less than 5% of audio engineers are not men. Women tend to be held to a higher standard, but that is a blessing in many ways. We work harder and better in order to make it. If you’re truly passionate about your job & have a solid work ethic, you won’t have trouble finding gigs.

How have you dealt with them? 

I’ve grown a thicker skin since I started freelancing. As in any job, there are people who are unpleasant to work with or don’t believe you will do well. The key is to focus on your own work & put in 100% effort so that they have nothing negative to say after seeing/hearing you do your job well. It’s important not to compare yourself to other engineers because everyone is on a different path and will come across opportunities at different points. Having a positive attitude helps immensely.

The advice you have for other women who wish to enter the field? 

Take the time to learn the basics and do prep work – read manuals, ask questions, & have the initiative to figure things out on your own. Then when you’re put in front of a new console, or any new piece of hardware or software, you’ll have some base knowledge to figure out how it works quickly. Never be discouraged by your lack of knowledge. Most of the learning you’ll do will be on the job, so try not to worry too much about what you do & do not know. No engineer knows EVERYTHING. It’s also very important to not have an ego about your knowledge and experience because it will keep you from learning and is generally just a bad attitude to have. There’s always something to be learned from a situation, as well as from fellow engineers. Plus, the more knowledge you have, the more you’ll realize how much more there is to learn. As long as you keep the drive to learn & adapt, you will go far.

Must have skills? 

Communication & social skills are a must – those were honestly the hardest ones for me starting out because I was always a fairly withdrawn & antisocial child. But it’s the key to getting a lot of gigs. You must be friendly, understanding, easy to get along with, and able to stay calm in stressful situations and never place blame. Generally, people will hire someone they like before someone they don’t, even if they’re a little less competent. Adaptability is also a very important skill – when you work with different people & different sound systems every day, you have to be able to work with many types of personalities and limitations.

Favorite gear? 

I’m a huge fan of analog consoles and gear in general because it tends to sound really great right off the bat. I always enjoy mixing on the classic Midas H3000, and I’m a sucker for good outboard compressors. As for digital consoles, my favorite brand is DiGiCo because they have the power to do pretty much anything I want. I’m a firm believer that if something sounds bad through a sound system while completely flat, you should change the mic first – so great mics are very important to me. I’m currently in the process of building my personal mic closet, so I enjoy testing out different mics that venues have in-house. My favorite combination of microphones varies from artist to artist depending on the sound I’m going for, but it’s usually a mixture of Sennheiser & Audix microphones. My favorite kick drum mic combination is a Shure Beta 91a inside, and an Audix D6 outside.

The SoundGirls Podcast – Carolyn Slothour: FOH Engineer and Flutist

Find More Profiles on The Five Percent

Profiles of Women in Audio

How Do You Measure Career Success?


Written By: Erica D’Angelo


I’ve been working as an audio engineer in Australia since 1997.  When I meet young sound engineers starting out, particularly women,  I am inspired by their passion and fearless attitude towards forging a career in this very challenging industry, particularly in a country like Australia where the market for audio professionals is pretty small.  The same questions and fears that I faced working in a male-dominated industry still confront women today. I want to share my story to illustrate how a career in sound can take many paths, but the key ingredients for longevity are the same today as they were 25 years ago.

I started life as a classical musician completing a Bachelor of Music majoring in Clarinet in Adelaide, South Australia.  In the classical world, it was rare to come across audio reinforcement, only on the odd occasion of being part of a recording, but when I finished my studies and started gigging as a sax player and with pops style orchestras I started to notice the microphones, the miles of cables, and how there were only ever guys running the sound.  That all looked way cool compared to hanging out with the middle-aged people sitting in symphony orchestras.

Teaching music in the UK a few years later – the early 90’s, when techno/jungle and drum and bass were coming up from the underground in London,  kids were bringing cassette recordings to the class of pirate radio techno raves and asking how to make that music. I didn’t know, but I wanted to learn.  Each school had bits and pieces of gear – 4 track recorders, microphones, outboard gear, mixing desks – so I started to teach myself. Eventually, I enrolled in the SAE Diploma of Audio Engineering course and embarked on a new career at the age of 26.

Studying in London brought great opportunities.  I was resident FOH at my local Latin bar, mixing salsa bands that actually came from South America, which for an Australian was a new experience.  The guy that owned the PA became my first mentor – a generous Ghanaian man called Tito, who was happy to teach me everything he could. Other opportunities arose in film and TV but overwhelmingly I found live sound to be the most exciting.

Early days at Adelaide Festival

Eventually, the lure of the sun and the beach called me back home, where I landed in Sydney as an experienced live sound engineer, but with no idea of how the Australian industry operated.  I talked to every FOH engineer at every gig or festival I went to and found a lot of great advice was freely offered. It became clear that to be a working sound engineer in Australia you had to mix rock and roll.

So far, I had never crossed paths with any other women working in the industry.

I went and got a job with Jands – who at the time was the biggest PA company in Sydney that provided the production for all the touring acts, had a huge inventory of Clair Bros, Meyer, and JBL, and employed dozens of audio and lighting technicians for both touring and local shows.  Finally, I met two women employed as lighting techs, but working for Jands was as masculine an environment as was possible. These guys were (notoriously) hardcore roadies, in the days when OH&S concerns were laughed at, and you proved your worth by being able to lift the most, party the hardest and work the longest hours.

Despite the prevailing attitudes, I earned respect from my colleagues, and again was mentored by a couple of the guys, gaining invaluable training on large-scale sound reinforcement systems.   I liked the job, the loading in and out, the long hours, the banter – the physicality of it all. I learned quickly that you don’t need to be able to lift as much as the guys – there are plenty of other jobs to do and if everyone is working together no one has an issue.

Jands was going through one of their many restructure, which saw them sack all their permanent staff and invite back half of them as casuals.  I took this opportunity to get out and keep looking / learning. A couple of years in TV followed – working on entertainment shows which showcased live bands, as well as some very well-paid hell in the Shopping Network channels.

My next major achievement was being part of the Adelaide International Arts and Fringe Festivals for eight years.  These gigs were so much fun, working in crazy purpose-built venues, or parks, or rivers, working with international artists, working with crew from all over the country.  These festivals all involved miles and miles of cables, large-scale reinforcement systems, and logistical nightmares – requiring way more than audio skills. Operations and scheduling were organisational skills that I really enjoyed using and the beauty of these Arts festivals was more women on the crew!  The Australian rock and roll scene really was a man’s world for a very long time.

Schools Spectacular

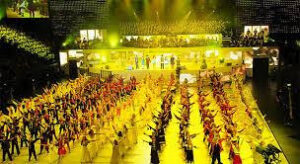
Back in Sydney, the lead-up to the 2000 Olympic games was in full swing.  I was working as an assistant audio director with the Arts Unit of the education department – a department that provides large-scale performance opportunities for public school talent.  We would famously produce the Schools Spectacular every year in the Sydney Entertainment Centre – flying a massive PA, fully miked orchestra, dozens of radio mics, full broadcast split.

The Olympic Committee in conjunction with Norwest Audio was looking for as many large scale gigs as possible to practice fine-tuning the PA they would use for the opening ceremony, so our organisation was kept busy in the years leading up to the main event, staging events such as the Pacific School Games,  – so Norwest could get their specs right. During the actual Olympic event, I was seconded by the Olympic organising committee to be the Audio director of the Team Welcoming ceremonies. This was a great gig – pre-production involved going all over the country recording children’s choirs singing the national anthems of each country, that would be played at the ceremony each country has when they arrive in the athlete’s village.  For some countries, it is the only time they get to hear their anthem played.

In the 2000s I moved to Melbourne and started my own audio services business – Mind’s Eye Entertainment – writing and producing pop musicals for schools, sound design for theatre, and doing whatever else came along to pay the bills.   As much as I loved the life, I have always been an absolute realist with a pragmatic approach to survival, so when an opportunity to start up Staging Rentals in Melbourne came about, I took it. This was not audio, but it was events and high-end corporate events with large budgets.  So, I got to use the operations and logistics skills to full effect, as well as being account manager, truck driver and on the tools building stages as required. Again, the physicality of the job appealed to me. I met my husband at this time and loved working with him on gigs, but the inevitable question of age and babies started nagging.

I was 39 and decided to try and have a baby.  The male-dominated worlds I had been working in were not going to be conducive to a mature woman getting pregnant, so I changed jobs again and got an office job coordinating logistics in the exhibition industry.  At 41 after one round of IVF I produced a baby boy, and again was confronting how to shape my career while being a mother. A great fallback I always had was a teaching qualification, which I did as a matter of necessity way back when I finished uni.  I started looking for new career directions and discovered the world of vocational education – you could complete a Certificate III in sound production while at high school. This was an incredible discovery – all my qualifications and experience were perfect for a job like this.

Six months after having a baby I was teaching sound engineering to 16 and 17-year-old boys at a catholic school.  I loved it.

I continue delivering audio training to school kids at a private school in Melbourne. I teach part-time and spend the remaining time being technical production manager of the school’s large events. The school has a 1000 seat concert hall with flown Nexo array,  a multitude of incredible microphones and a generous production budget.

Discovering Soundgirls a couple of years ago was huge for me.  I was 50 and starting to question who I was – was I a sound engineer, a teacher, a manager?  I was middle-aged, grey hair, and still coiling cables – what kind of role model was I? How do you measure career success in the world of audio – FOH for a touring group?  Or simply having a workplace where you get to work and talk about audio all day?

After getting to meet the Melbourne Soundgirls and share stories, I found my personal story was finally validated – the fact that I am still here 25 years later thinking, talking, working and now inspiring young people to pursue a career in audio defines me as an audio professional.

New goals are to further my knowledge of acoustics.  I love the science of sound, how it behaves in a space, and I’ve taken very baby steps in studying acoustics – logarithms, logarithms, and more logarithms!

Stage Managers and Sound Designers

Together Forever

2020 is the year of the stage manager, so this is the perfect time to talk about how I get the most out of my Sound Designer/Stage Manager relationship!  The Stage Manager is the one person that probably knows the most about the show and the actors. They are also the one who is going to make sure your design is executed exactly as planned at each and every show.  Basically, the Stage Manager is someone you really want in your corner, so I want to go over just a few of the ways my relationship with Stage Managers has been beneficial.

First of all, I completely support listing the Stage Manager as a part of the creative team.  I’m stating this, maybe obvious (to some) fact, because it just doesn’t happen a lot. Frankly, I’m still beating the “LIST THE SOUND DESIGNER IN YOUR POSTS” drum loud and hard, because that title is also one that is often left off…. I guess because you can’t see that design in a photo.  So if I have to constantly remind people that Sound Designers are part of the creative team and need to be listed in posts, I can’t imagine how much harder that fight is for Stage Managers. Let’s just think about it for a minute though. What defines a creative team? Surprisingly, I couldn’t find a succinct “Theatrical Creative Team” textbook definition, but I did find this “Advertising Creative Team” definition from smallbusiness.chron.com, and honestly, it totally fits:

creative team is made up of several key members, starting with a creative director,  and including copywriters, editors, graphic designers and artists, and web developers.  In short, it’s the group of people that comes up with advertising ideas and brings those ideas into being.

This is basically the same for theatre, right?  The Director, Choreographer, Music Director, and Designers are the key members that come up with the ideas and bring those ideas to the stage.  But from the first concept meeting, the Stage Manager is also there. They are running the meetings, taking notes, and sending those notes out to the team.  The Stage Manager is keeping track of all of the action that’s going on in rehearsal and keeps the rest of the team updated daily. They will remind the director of Designers’ ideas, and likewise, let Designers in on things that might help or hurt their design idea—like informing a Sound Designer that a group of actors are constantly blocked to be in a place where a speaker was going to be.  They are the ones firing sound cues in rehearsal and reporting on how it was received by the director, and any good stage manager will practice calls over and over until their “GO” lands at that perfect swell in the music that will ensure every audience member leaves feeling all the feels. That’s art. Stage Management is an art form, and they have every right to be recognized as part of the creative team, and basically, what I’m saying is that the more we openly recognize that fact with our Stage Manager friends, the better the working relationship is going to be.

I mentioned that the Stage Manager probably knows more about the actors than anyone else.  This is really useful to the Sound Designer of a musical. For years, I would make my plans about which microphones to use, which lavs to put on actors, what I would use to change the color of the lavs if needed, what kind of tape or another attachment method to use, and which style of mic belts to assign well ahead of tech on my own.  Many times over the years, I would run into situations where I was changing tape on an actor because they were allergic to what I was using, or switching out a mic belt because of a blocking direction that was just given, or what have you. It was frustrating, and would often create a domino effect if I was short on equipment or supplies.  I soon learned that consulting the Stage Manager while I was preparing these plans alleviated a lot of those issues for me before I even met the actor. The Stage Manager would not only know the nuts and bolts information, like allergies and blocking, but also more personal things, like actor preferences: This actor likes to wear the lav on the left side of the face, that actor has their own mic belt, etc.  Once I realized that I could unlock that info ahead of time, it was a definite level up for me.

The Stage Manager is also very invested in protecting your design and maintaining its original intention throughout the run.  There are sometimes situations in which microphone and lav placement are very specific, and I’ll tell a Stage Manager that if this position moves an inch one way or the other, the sound will change.  Many of the Stage Managers I’ve worked within the past take that information very seriously and will note actors throughout the run for the sake of the design and the production. I’ve also worked with Stage Managers in the past who, during rehearsal, will bring up things I’ve said in the past about which circumstances give us the best sound quality if it looks like the Director is blocking actors to be somewhere or do something that is not conducive to excellent sound quality.  Because I like to keep a line of open communication between myself and my Stage Managers, I’m able to count on them to be my voice, even if I’m not in the room.

When it comes to theatre allies, Stage Managers are definitely a group of people I want on that list.  I want to know that they care as much about my design as I do, and will give their all every night to make sure that it is executed perfectly.  I think that as Designers, we can sometimes feel overprotective of our work, and it’s sometimes hard to remember that the questions, the emails, the regular check-ins from a Stage Manager are all in pursuit of the same goal as us—a perfectly crafted piece of theatre.


X