Empowering the Next Generation of Women in Audio

Join Us

Recording an Orchestra


Recording an orchestra, whether for a live concert or a studio recording, can be a thrilling experience, as you have a huge range of instruments, sounds, textures, and dynamics. Your aim is to capture the orchestra’s natural sound and the surrounding acoustics and to optimise it for the listening experience. Orchestral recording is of course something that takes time to learn and obtain good results from experience. Here’s an introduction and overview of some basic aspects that are useful as a starting point.

Pre-production

It’s important to know the space that you will be recording in, as the size, shape, and acoustics of the hall or room will affect the sound and your microphone choice and placement. It’s very helpful for planning if you can find out any details in advance from the orchestra about the pieces, instrumentation, and player seating information such as stage diagrams. The type of music will also inform your microphone setup, as the sound you aim to produce will vary depending on whether it’s a concert recording, film scoring session, album recording, early music with period instruments, contemporary music with unusual instruments, etc. Getting copies of the score will be helpful to examine the instrumentation, follow along and make notes during the rehearsals and recording, and aid in editing later.

You should find out if you can hang microphones from the ceiling or if there is an existing system of hanging mic cables. There might be limitations on where you can place mics and stands if it’s a concert, or if there will be video recording. If it is a concert recording, find out if there are any other elements such as spoken presentations on handheld microphones or video projections that should be recorded. Think about whether you’ll need to move or adjust microphones between pieces. For a studio recording, a talkback system should be set up to communicate with the conductor, and you should be ready to carefully mark your takes and write notes on the score. As you’ll often be working with a large number of microphone channels, creating an input sheet is essential. For a location recording, making a list of gear to bring could be very helpful. An orchestra recording often requires 2 to 3 people, one of whom might take on a producer role to follow the score, make musical decisions and communicate with the conductor and musicians.


Instrument sections

The sections of the orchestra are as follows, and the number of players will vary depending on the piece:

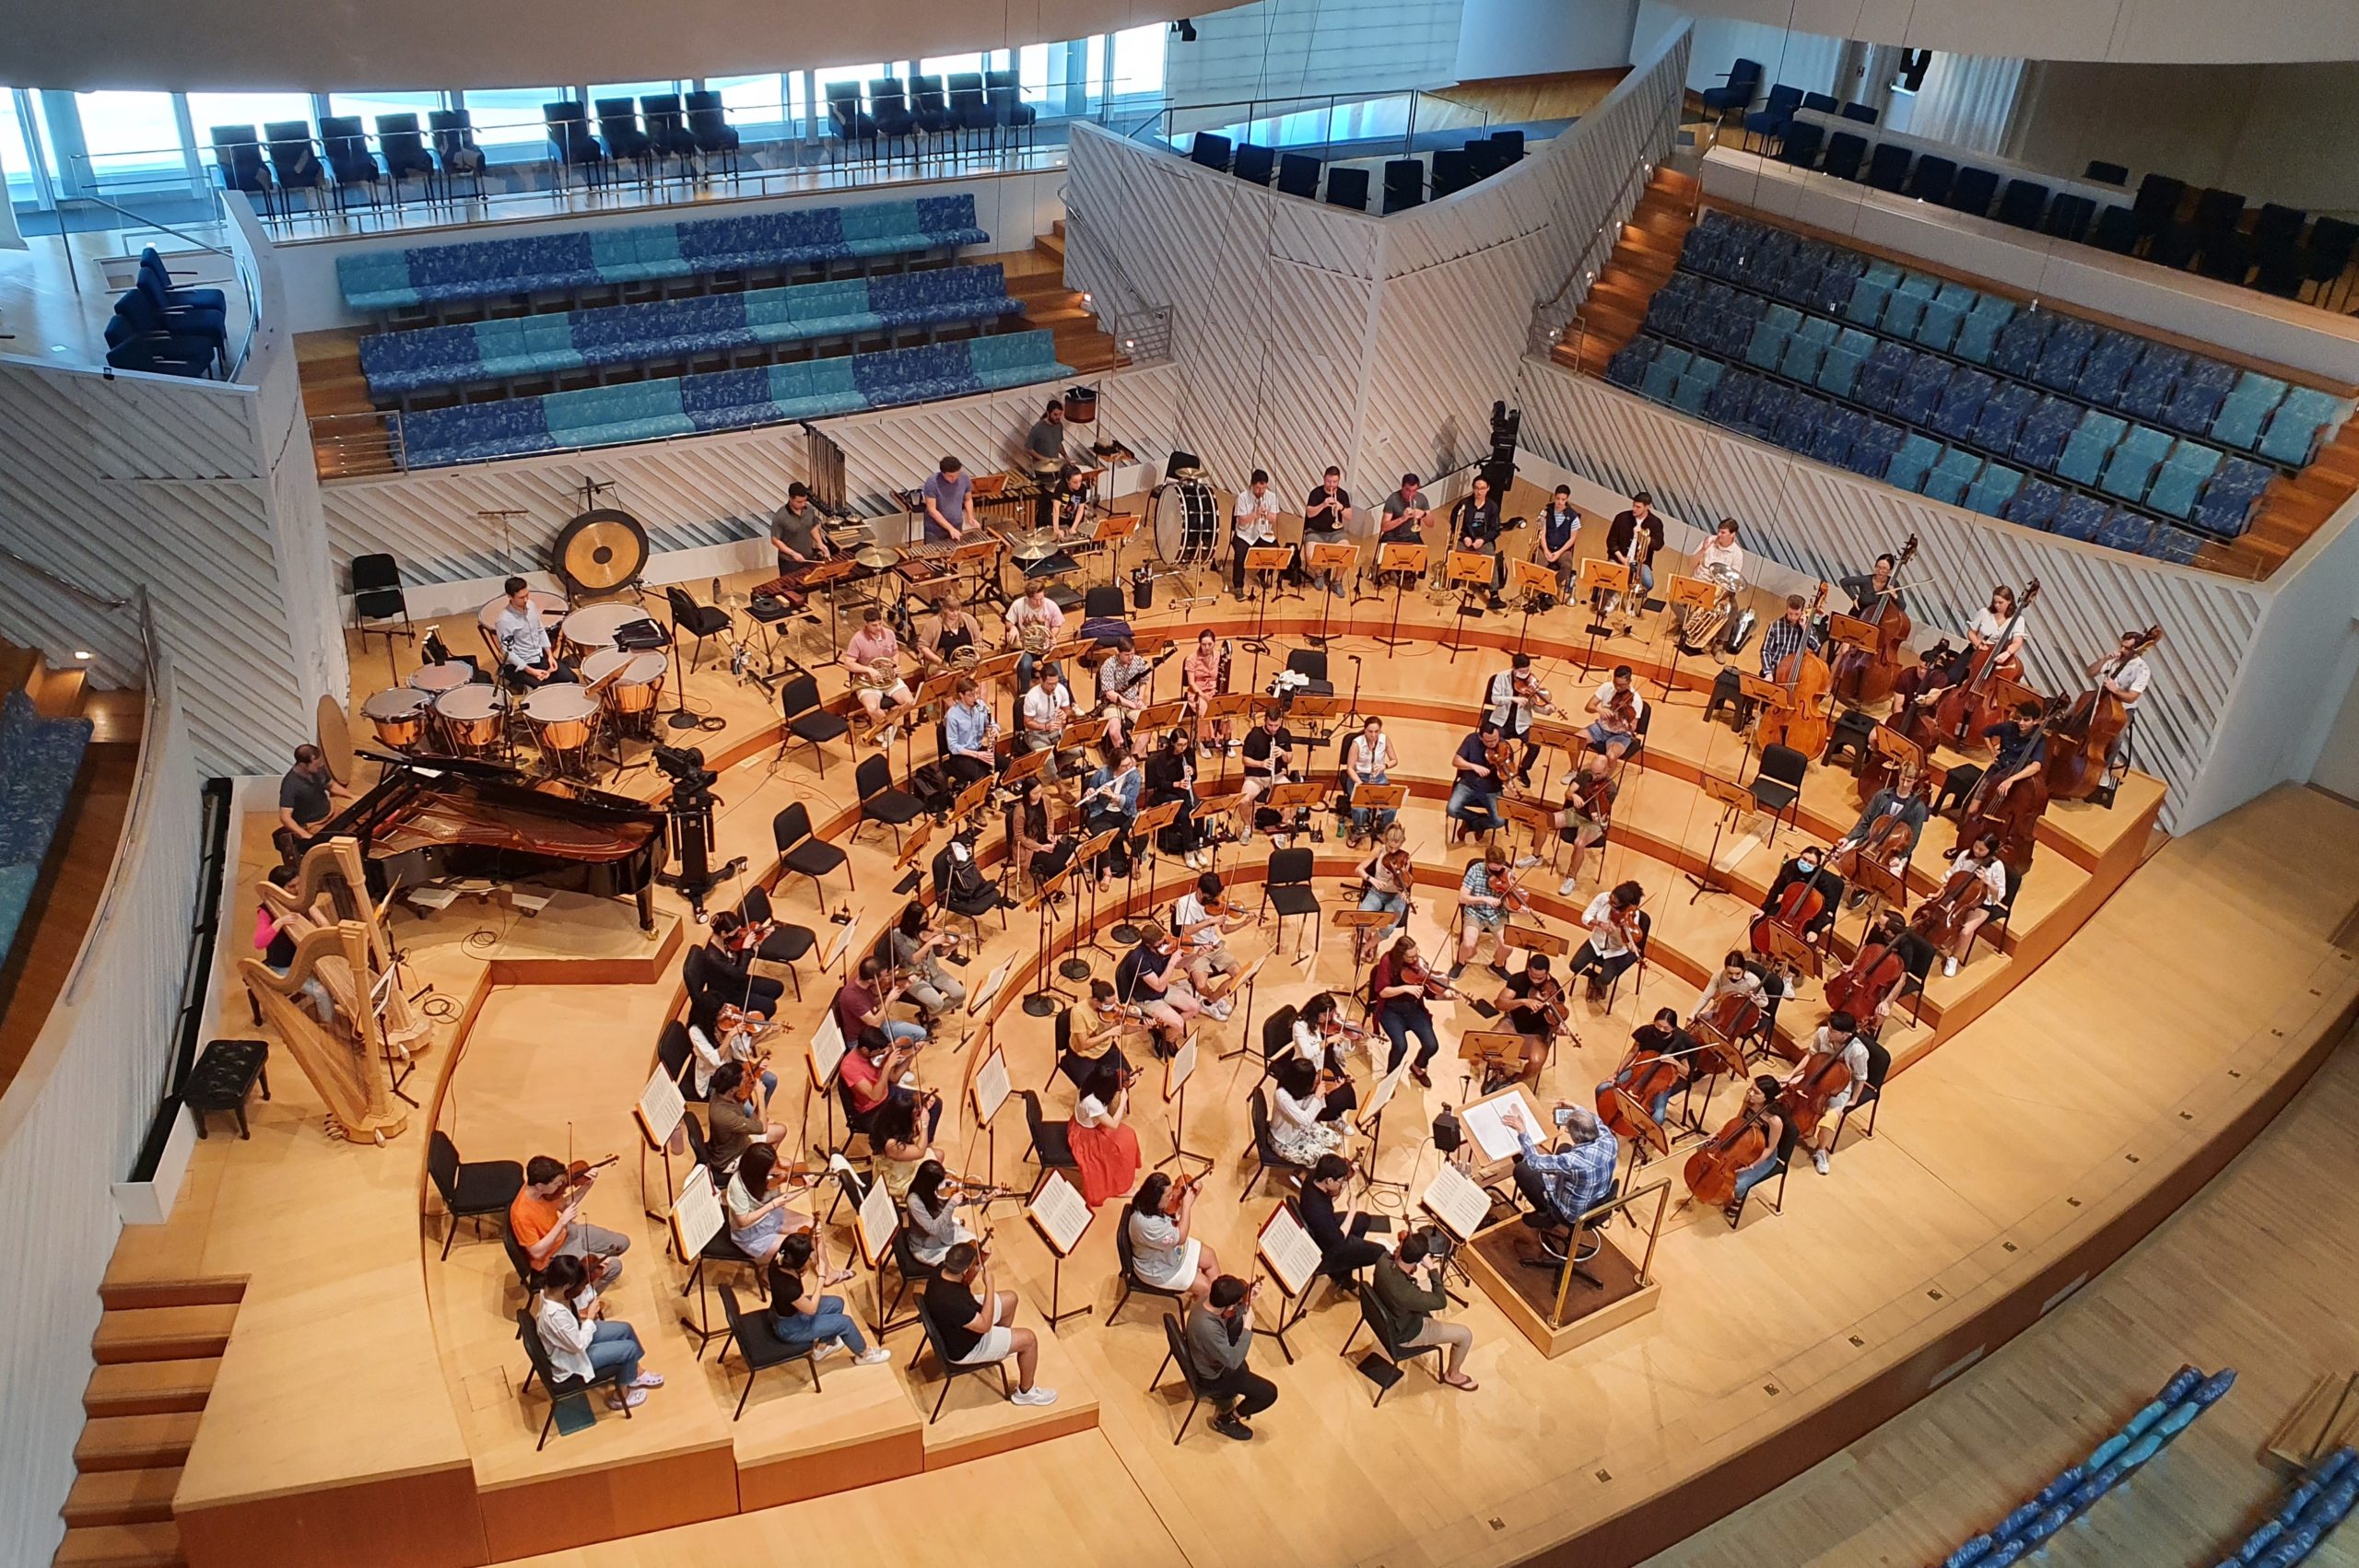
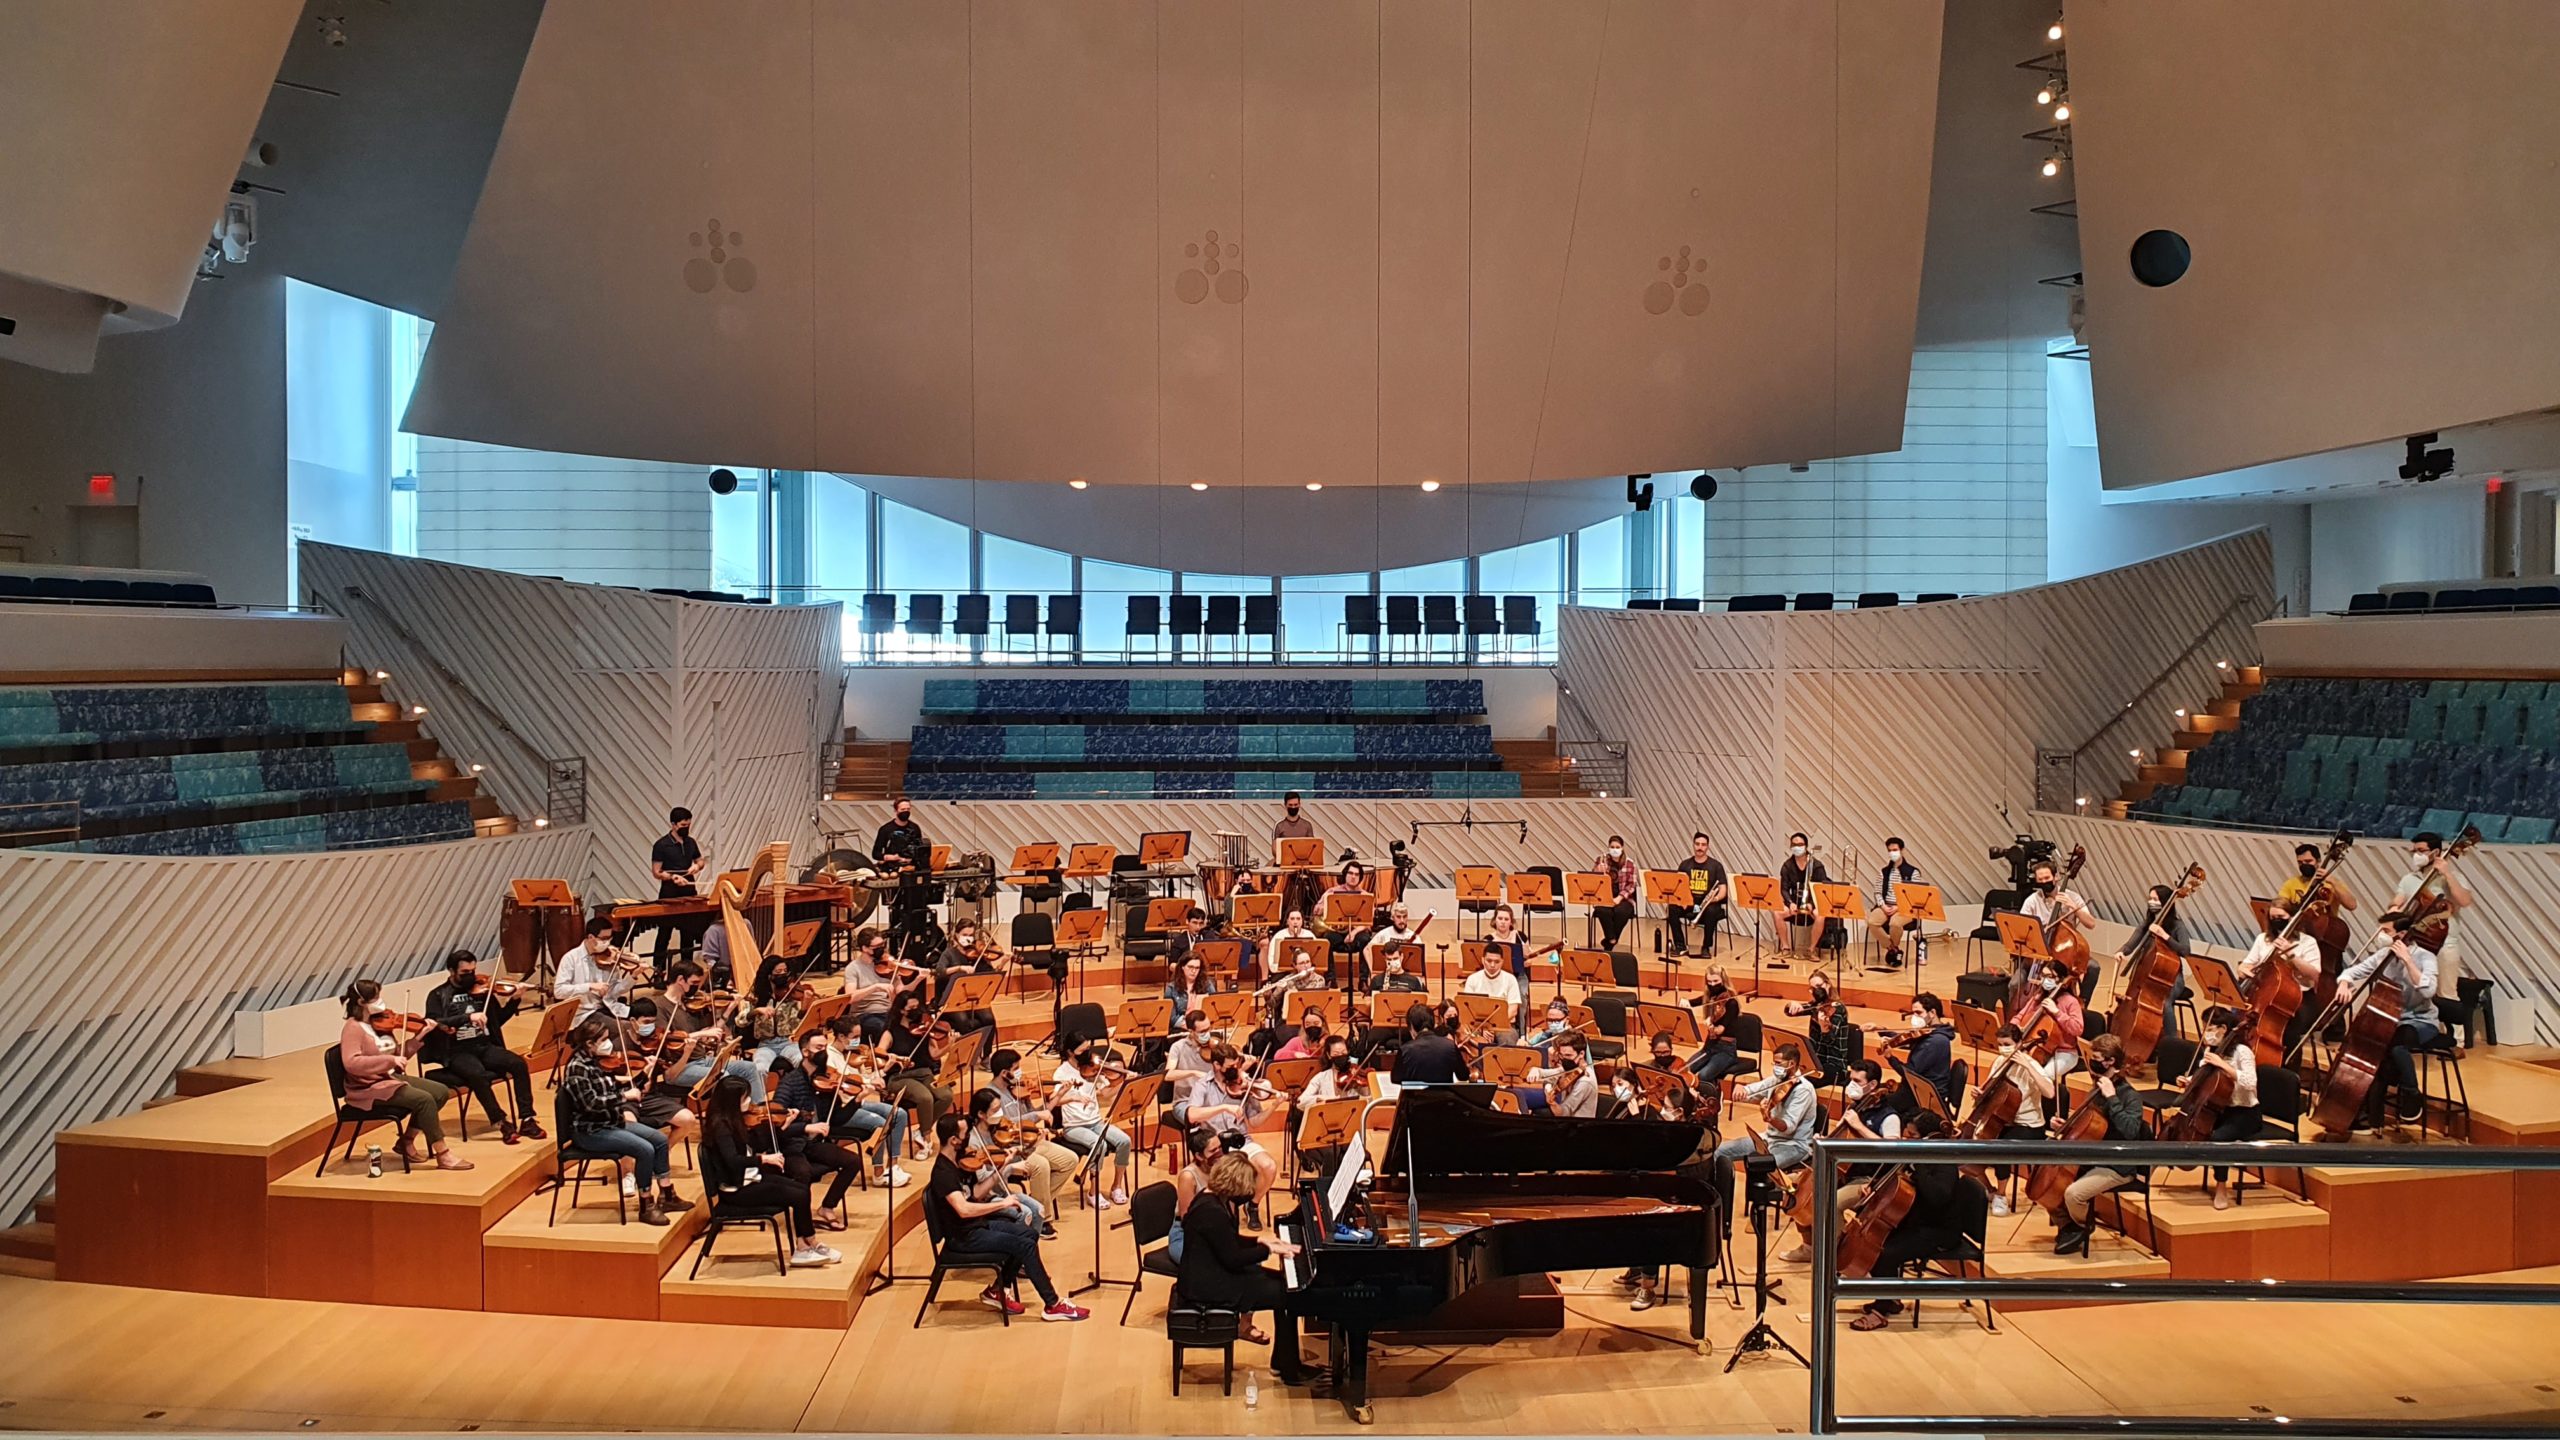
The positioning of the instruments might vary depending on the piece, the stage, and the conductor’s preference. Below are a couple of examples with two common strings setups, one with the cellos and basses on the right, and one with the second violins on the right.


Microphones and placement

Generally, an orchestra is recorded with a set of “main” microphones positioned high above the head of the conductor and the front of the orchestra, plus “spot” microphones positioned closer to certain instruments that need more detail, and often an ambient pair of microphones further away to pick up the acoustic of the space. Often microphones with quite flat frequency responses are used to capture the natural sound of the instruments. Commonly used microphones include Schoeps’ Colette series, DPA instrument mics, Neumann’s KM, TLM and M series, the AKG C414, and Sennheiser’s MKH omni/cardioid mics. Options for smaller budgets could include Line Audio, Røde, Oktava, SE, and Lauten’s LA series.

For the main omni microphone set, an AB stereo pair or a Decca Tree (or a combination of both) hanging or on a tall stand will capture a lot of the sound of the orchestra, with closer detail in the strings at the front. Two Omni microphones high on the outer front edges of the orchestra, often called “outriggers”, will pick up more of the outside strings and help to widen the image. Spot microphones in cardioid or wide cardioid could be placed on individual instruments that have solos, on pairs of players, or on groups of players. A spot mic list might commonly look like this: violins 1, violins 2, violas, cellos, double basses, flutes, oboes, clarinets, bassoons, horns (2 to 4 mics), brass (2 to 5 mics), timpani, percussion (2 to 10 mics), piano, celesta, soloist(s). A pair of Omni microphones could be placed or hung higher or further away in the hall to capture more of the hall’s natural reverb and the audience applause.

Note that depending on the acoustics of the space and the purpose of the recording, you could use very different combinations of hanging omni mics or spot mics, and you might need fewer or more microphones. The best is to use your ears and make decisions based on the sound you’re hearing!

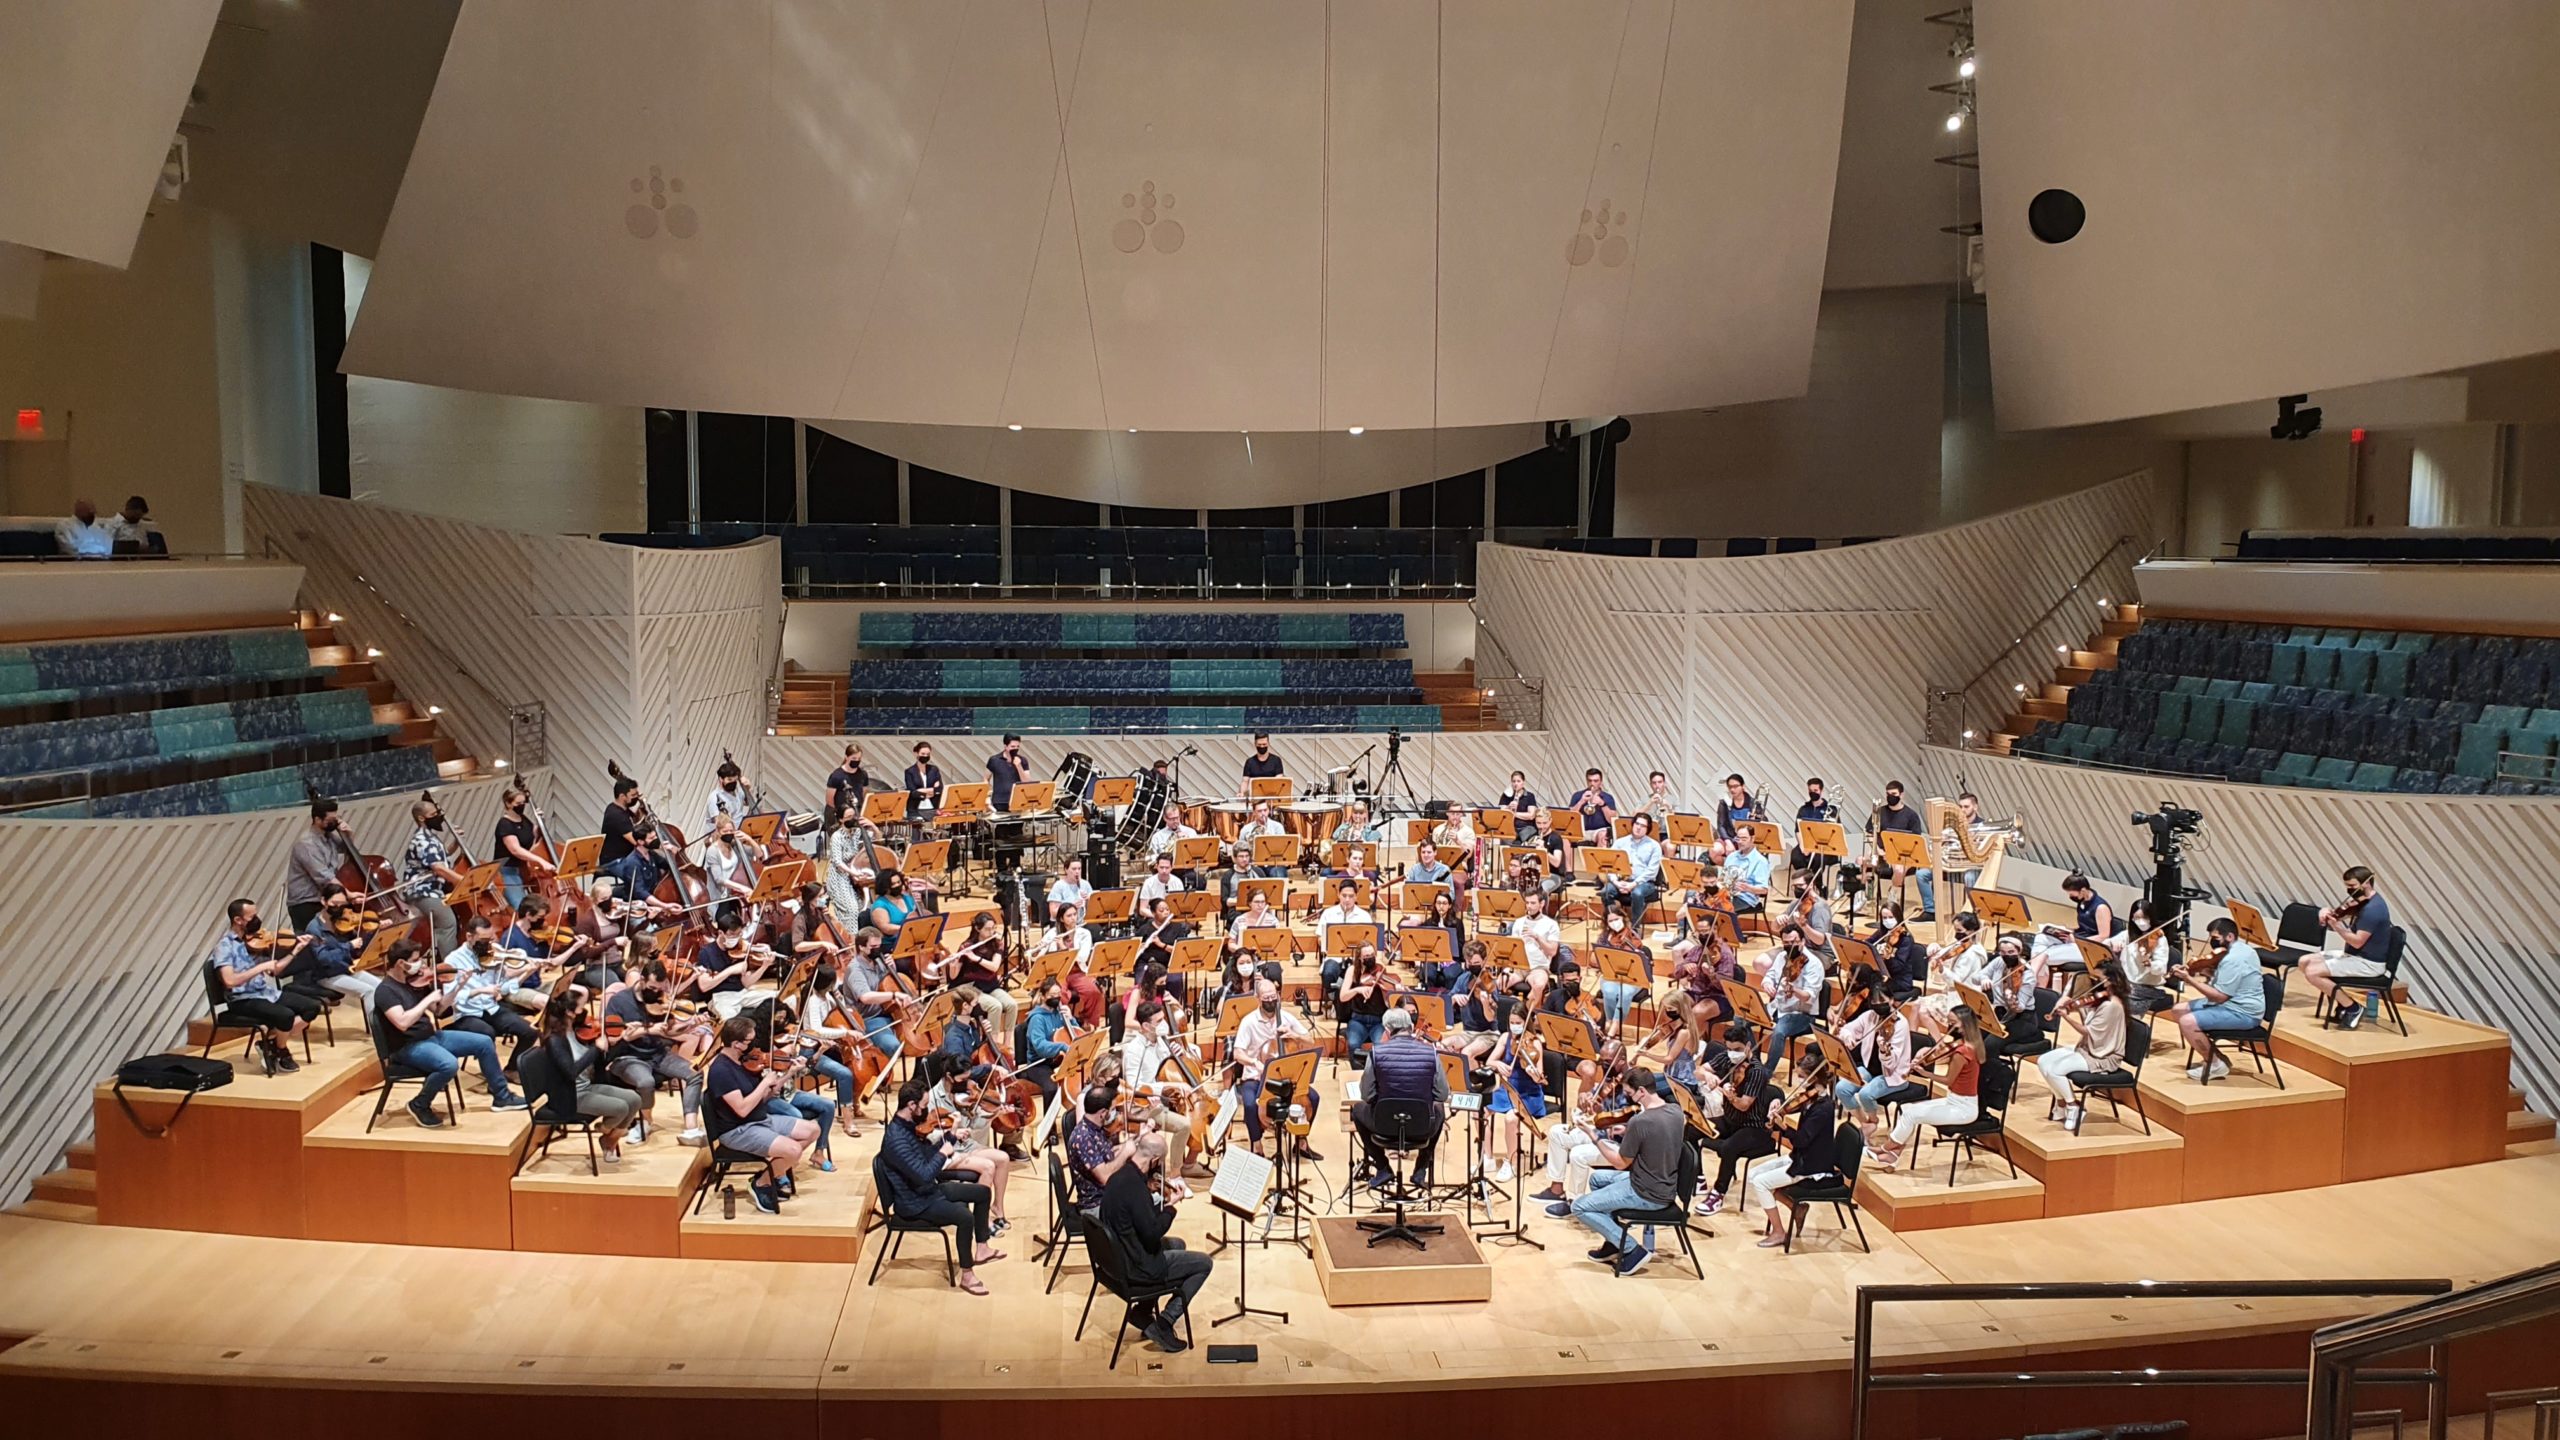
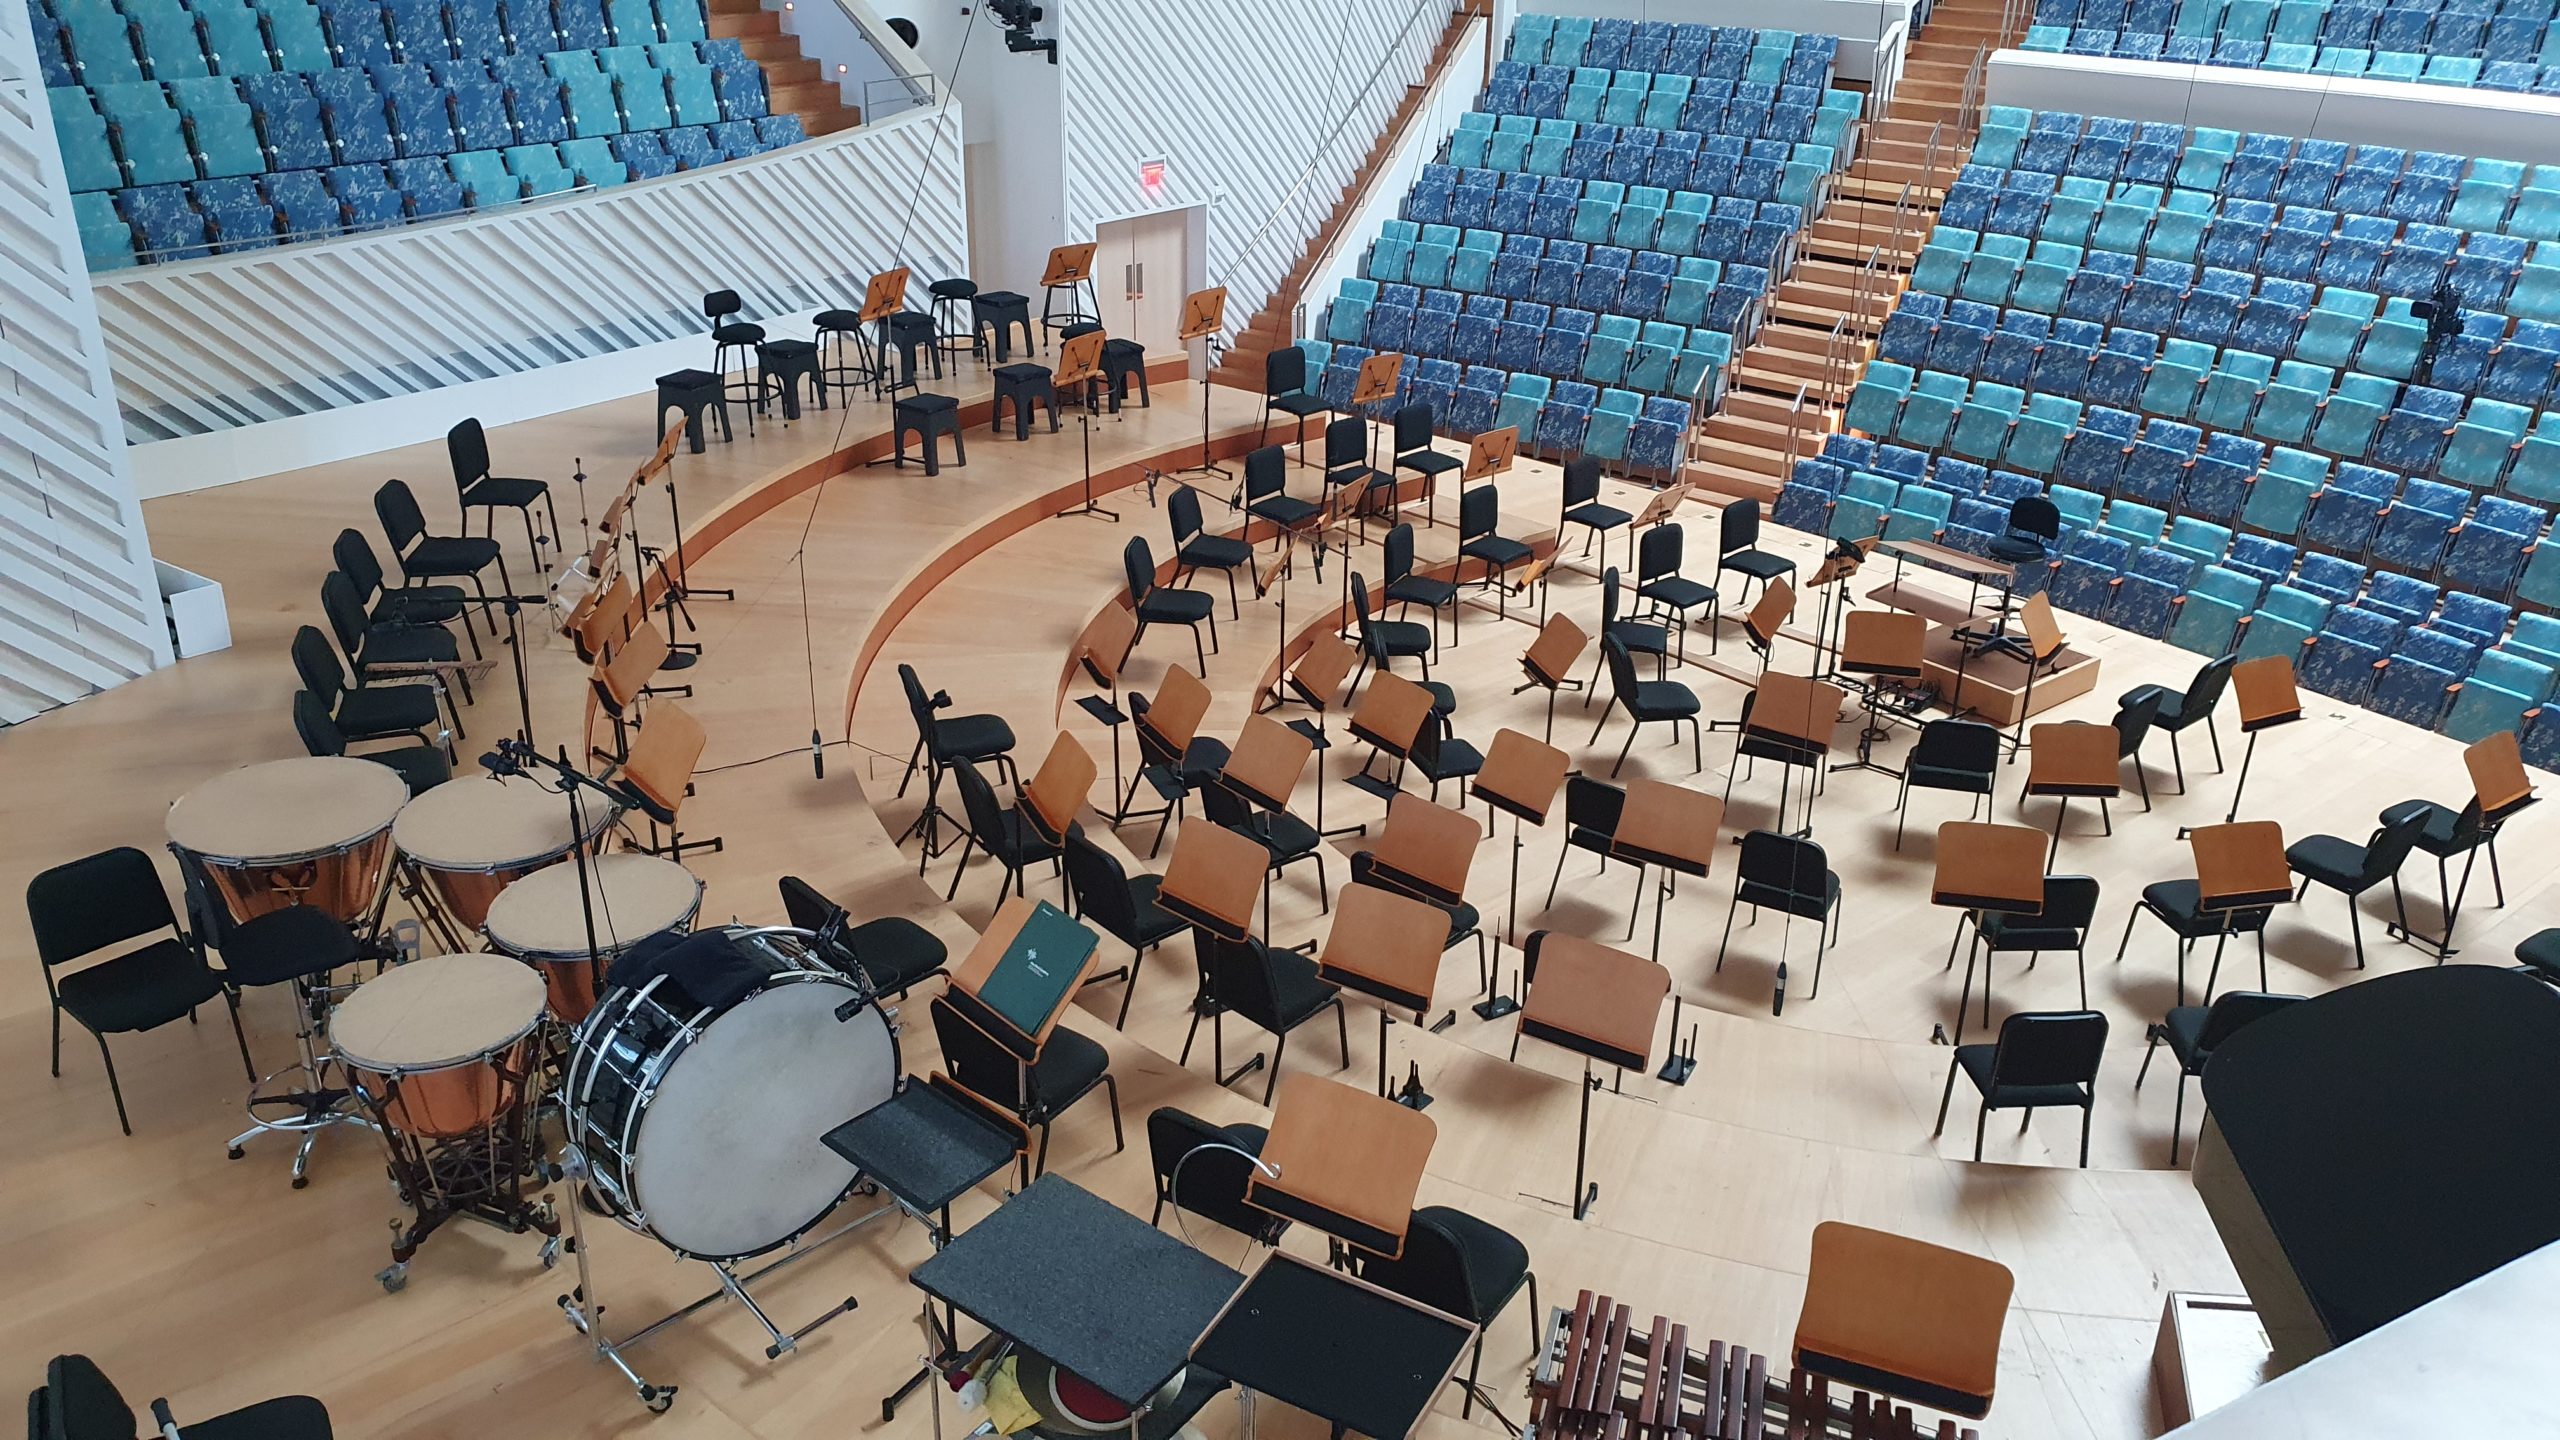
Below are examples of hanging microphones and spot microphones on stands.


Mixing

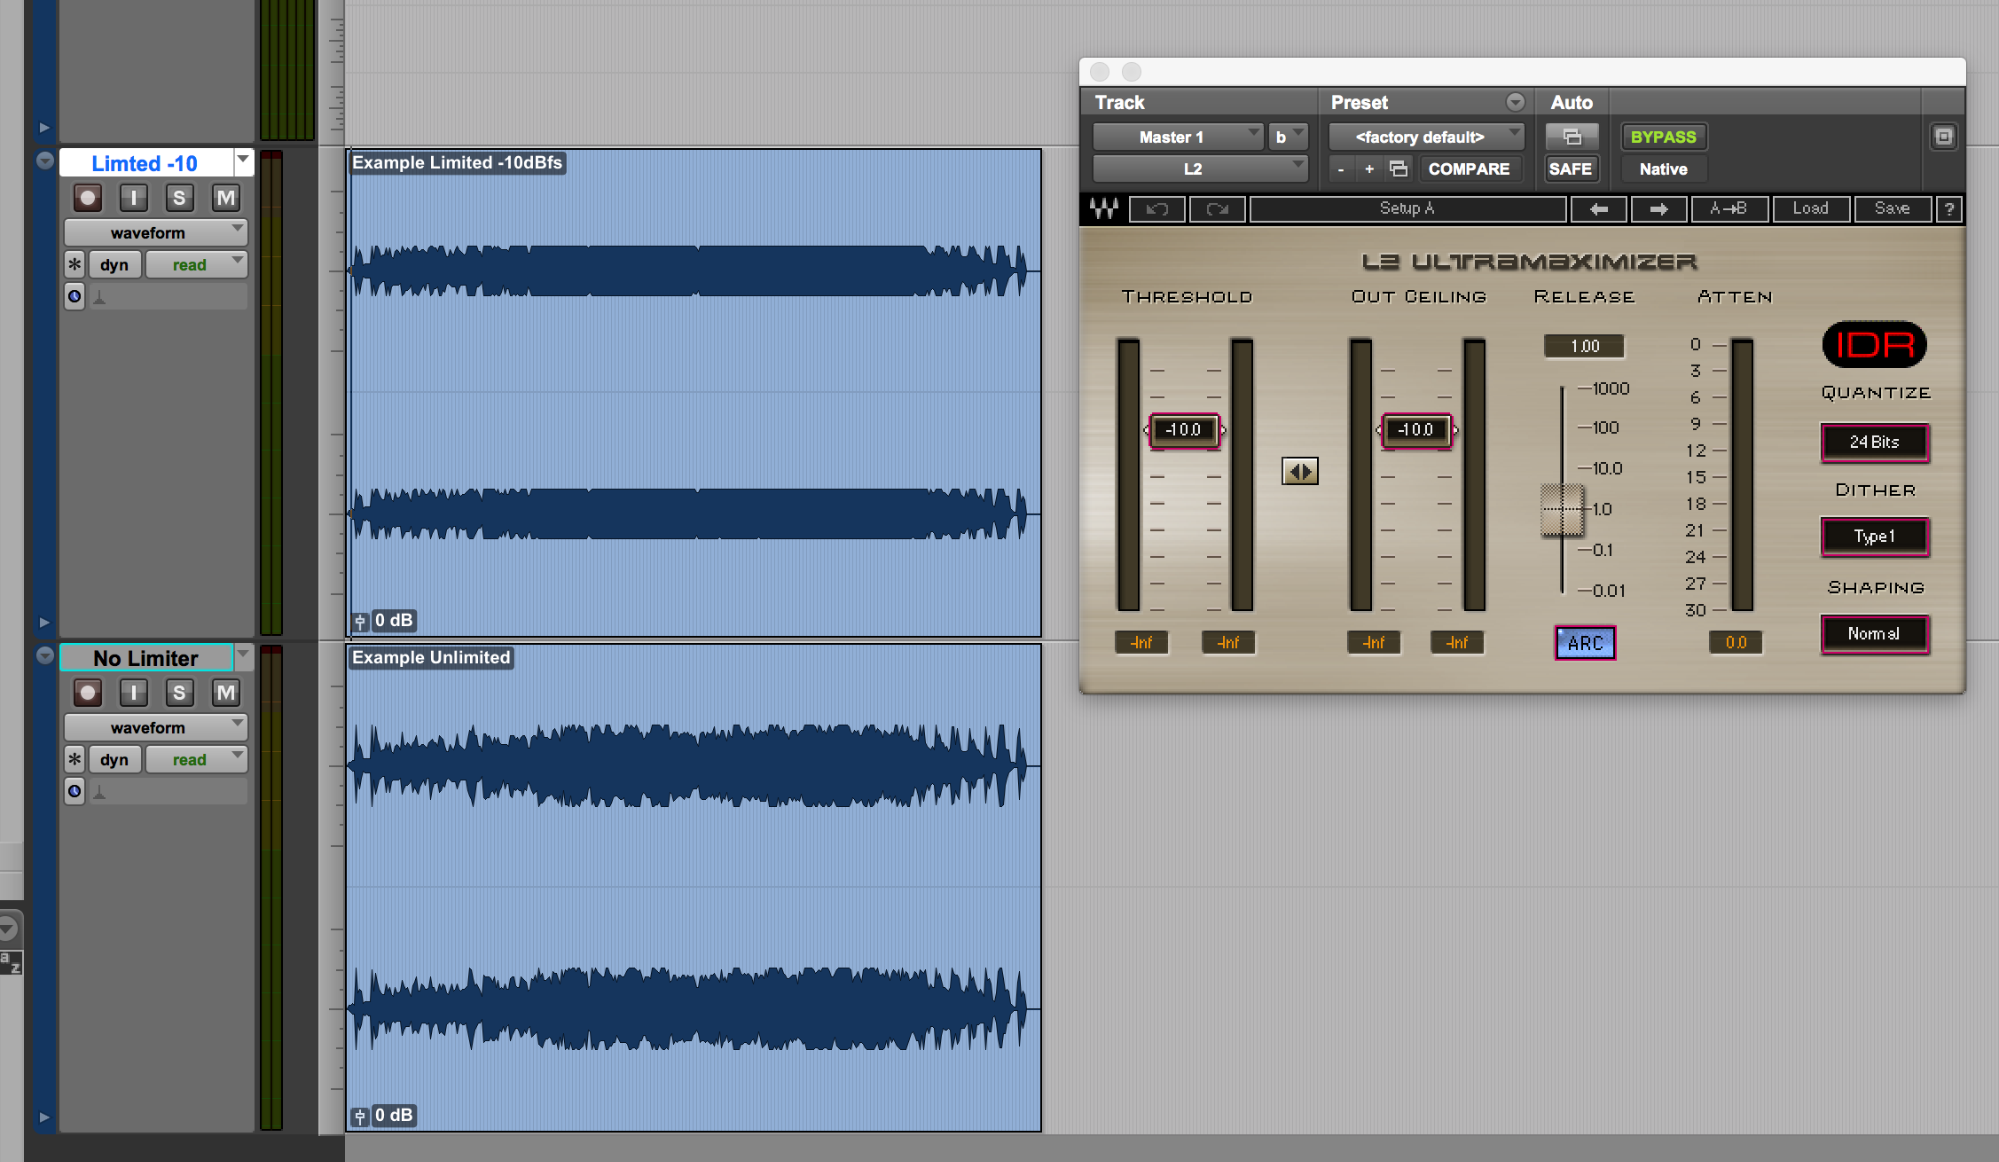
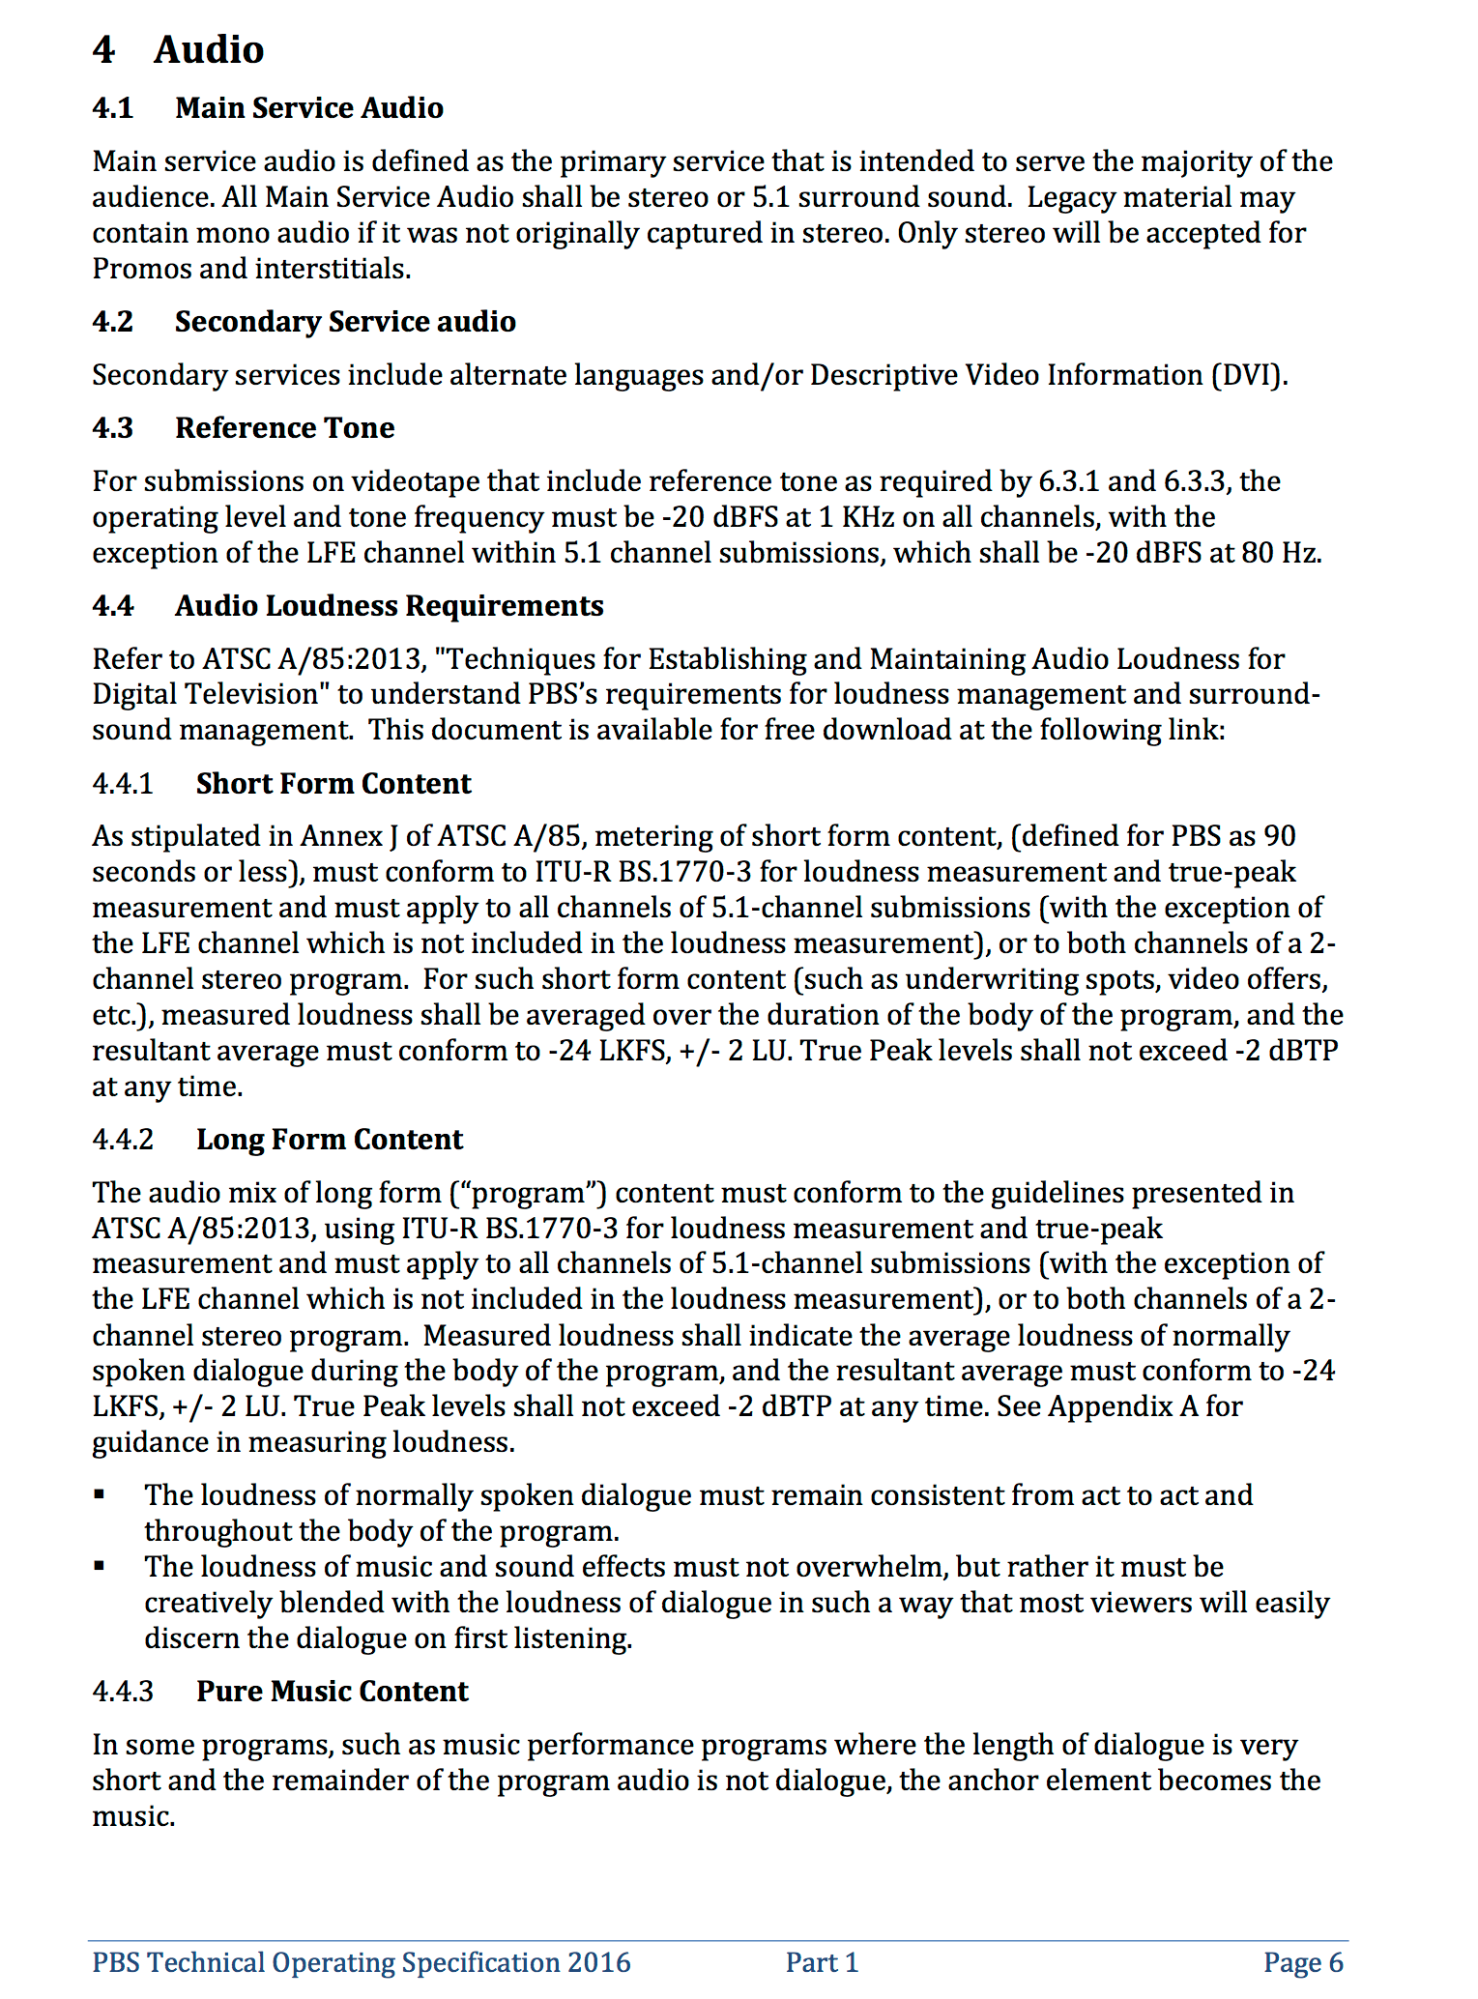
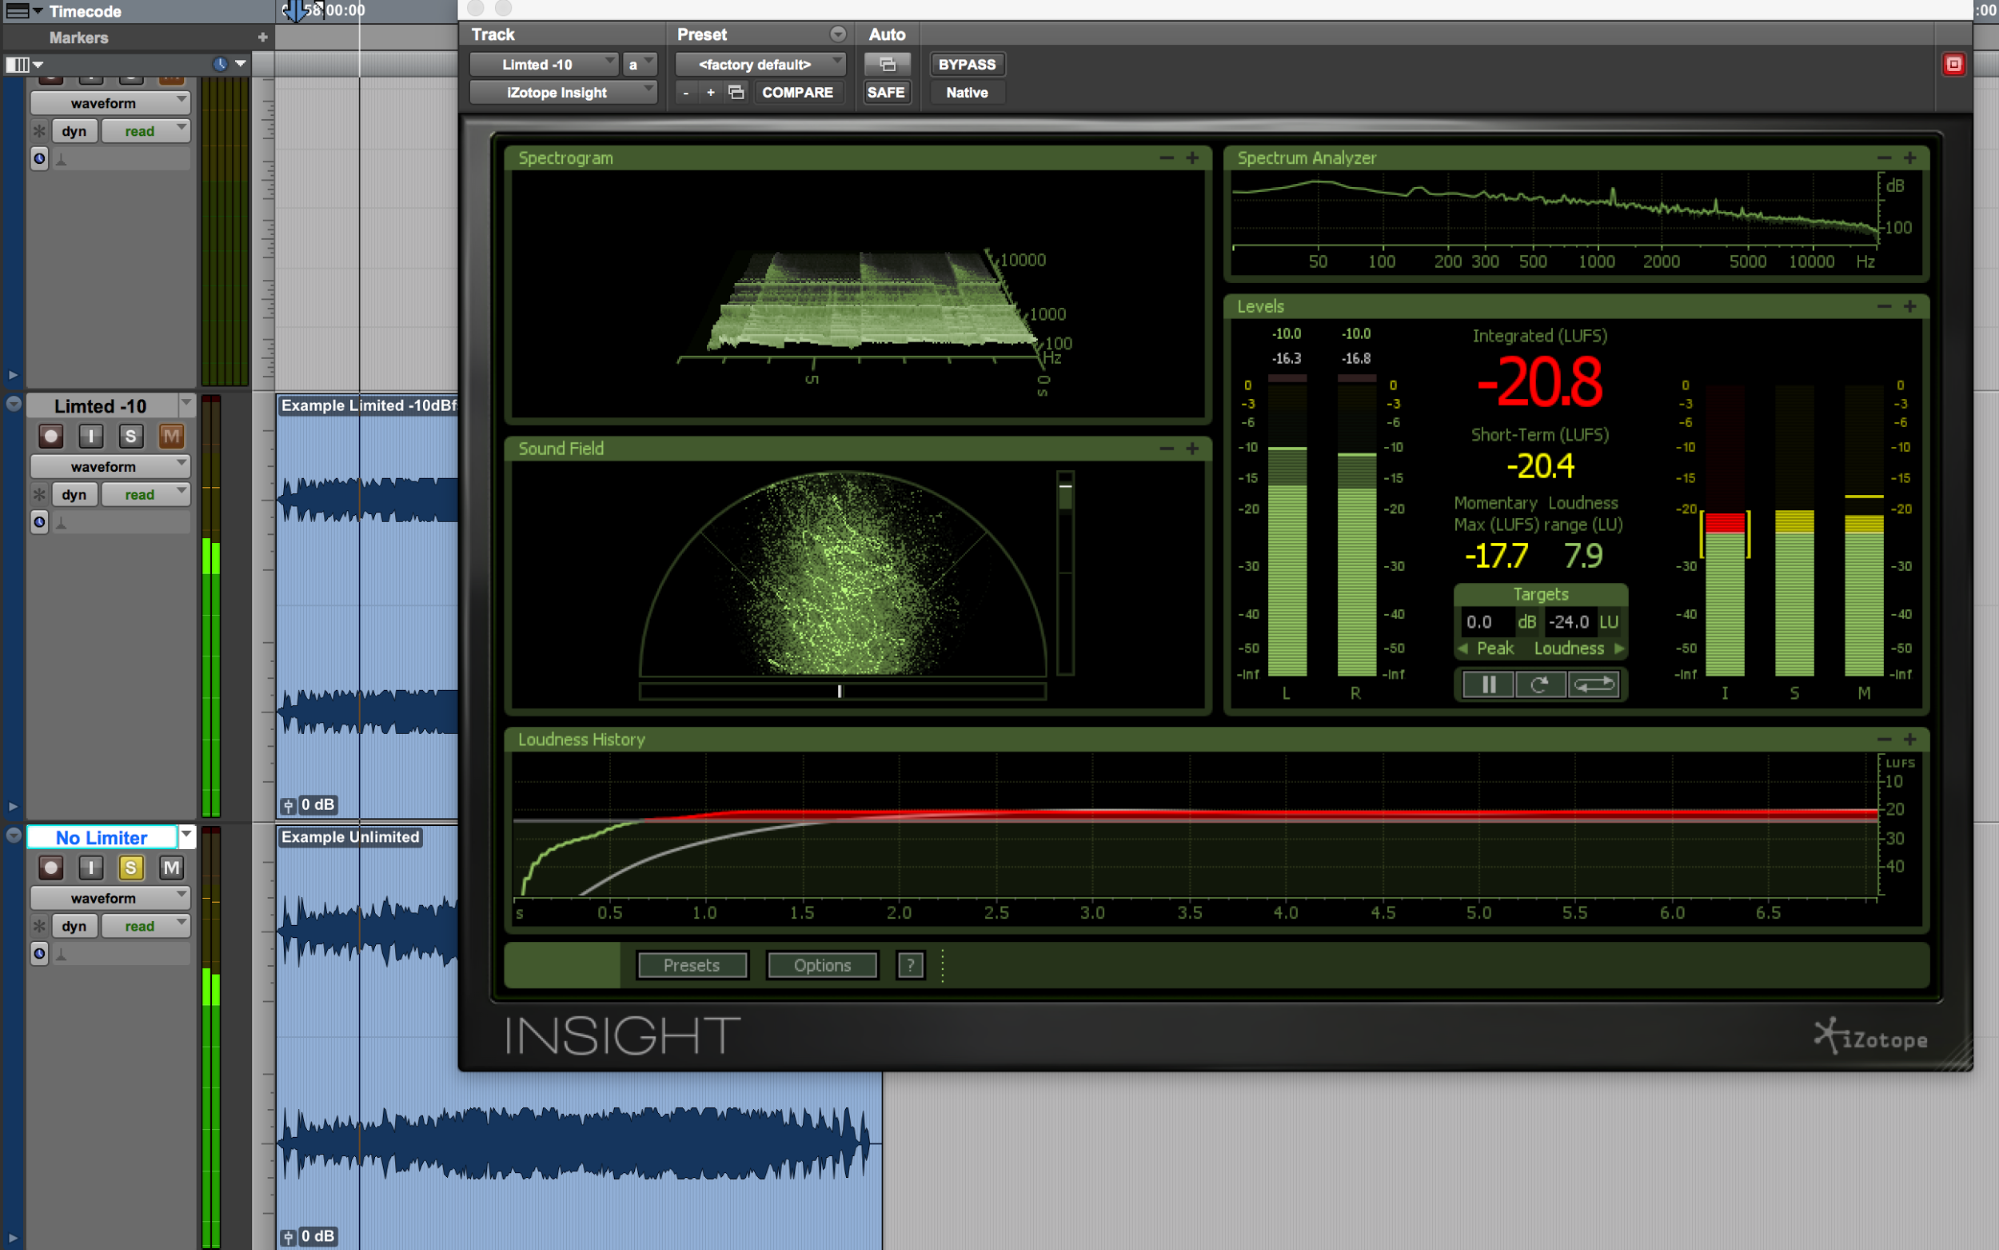
The purpose of having the main omni set, spot mics, and ambient mics is to create a good balance between the acoustic of the room and the orchestra as a whole, and the closer detailed sound of individual instruments and sections. It’s a good idea to listen to reference recordings of the pieces and to hear a rehearsal of the orchestra beforehand so you can hear the conductor’s balance of the instruments and how it sounds in the space. Compared to mixing other genres, less processing is used as you’re trying to capture and enhance the natural sound and balance of the instruments, and orchestral music has a huge dynamic range. Commonly used processing includes EQ, subtle compression on some mics, a limiter/compressor on the master channel (especially if being a live broadcast and the overall level needs to be raised), and reverb to enhance the natural acoustic. Some reverbs favoured by classical engineers are Bricasti, Nimbus, Altiverb, and Seventh Heaven. Some engineers measure the delay between the spot mics and the main mics and input it into the DAW to time align the signals – you can decide whether this improves the sound or not. If doing a live mix, following the score is useful to anticipate solo parts, melodies, and textures that would be nice to highlight by bringing up the level of those spot mics. A fader controlling all mics could be used to subtly bring up the level in sections that are extremely quiet, especially if for broadcast. If mixing in post-production, automation or clip gain can be used to enhance solos and dynamics.

Surround sound and Atmos mixes are now being explored by many orchestras and audio engineers, often with the addition of specifically placed surround mics or sometimes as “up mixes” using the existing stereo microphone setup.


Editing

Unlike many other genres of music recording, editing a classical recording is done linearly on your timeline, cutting, pasting, and moving all tracks together. For a studio recording, you’ll likely have many takes to piece together. For a concert recording, some orchestras might request that the best parts of several concerts or rehearsals are edited together. Commonly used DAWs for orchestral recording are Pyramix and Sequoia, which have features convenient for large track count recording and editing. Source-destination editing allows you to easily listen to several takes and select the best parts to send to a destination track with a separate timeline, using in and out points. When editing several takes together, it’s important to use crossfades to make edits inaudible, and make sure the tempos (speed), dynamics, and energy of the music match when they are edited together. Some conductors and musicians like to schedule a listening and editing session with the engineer after a first edit has been made, while others like to receive an audio file and send back a list of feedback and suggestions for edit changes.


Further learning

If you’d like to go deeper into orchestral and classical music recording and mixing, a great resource is the book Classical Recording: A Practical Guide in the Decca Tradition. The DPA Mic University website also has useful articles about orchestra and classical instrument recording.

Photos were taken by India Hooi.

Rocket Man

One of the things I love the most and dedicate to making live sound is the constant movement, meeting people and traveling the world… Having a call and a routine on tour where you travel a lot and pass through so many airports, ups and down, planes constantly, you have schedule changes all the time… Yes, those are some things that I like,  but for some other professions, talking about changes in schedules, flights and the world, has a much more literal meaning…

When we talk about preparing for “the show”, it fills us with excitement and adrenaline, feeling the energy of so many people gathered waiting to see a show, but this same adrenaline, other people feel it in a different way… Imagine the scene of the engineer handling the sound and key communication between space and earth, that his show is to see a dense cloud of steam along with a large explosion and discharge of many decibels emitted by the ship as it takes off into outer space, ufff, I have no words to imagine that feeling, that’s why I made contact with Alexandria Perryman, NASA Sound Engineer …

So let’s travel together to understand the sound and transmission to outer space a little bit.

Countdown T  minus  10  sec… 9, 8, 7, 6, 5, 4, 3, 2, 1,  0!!!

Recently, they televised the first private launch into space that departed from the Kennedy Space Center in Cape Canaveral, there, this Launch Platform 39 from which several ships have taken off, including Apollo 11 (which brought the human to the Moon), to this day it has been one of the main points of connection to space.

Communication between the space station crew and the on-earth support team is critical to the mission’s success. Being able to convey a verbal message in space is crucial for most astronaut activities, from doing spacewalks, conducting experiments, engaging in family conversations  and there’s something spectacular to be able to  transmit  information to all human beings on earth,

But how do you achieve this?

This entire transmission network travels to people orbiting more than 250 miles above Earth thanks to a network of communication satellites and terrestrial antennas, all of which are part of NASA’s Space Network.

A large number of tracking and data relay satellites (TDRS) form the space base network, these large appliances function as cell towers in space and are located in a geosynchronous orbit more than 22,000 miles above Earth, allowing the space station to contact one of the satellites from anywhere in its orbit. As communications satellites travel around the Earth, they remain above the same relative point on the ground as the planet rotates.

Data tracking and retransmission satellites handle real-time voice and video information! That is, if an astronaut on the space station wanted to transmit data to Mission Control at NASA’s Johnson Space Center, the first thing is to use the computer onboard the station to convert the data into a radio frequency signal, or antenna on the station transmits signal to the TDRS and then directs the signal to the “White Sands” test center where data testing and analysis are performed. Fixed phones then send the signal to Houston, and ground computer systems convert the radio signal into readable data, if Mission Control wants to send data back, the process is repeated in the opposite direction by transmitting from the test center to TDRS and from there to the space station. The amazing thing about this is that the time it takes to process this path and data conversion is a few milliseconds so there is no noticeable delay in transmission.

All this communication is vital to the knowledge and discovery of many topics such as the behavior of Earth’s orbit for astronauts to conduct experiments, providing valuable information in the fields of physics, biology, astronomy, meteorology among many others. The Space Network delivers this special and unique scientific data to Earth.

Talking to Alexandria, she says that before the Space Network existed, NASA astronauts and spacecraft could only communicate with the support team on earth when they were in sight of an antenna on the ground, this only allowed communications of just under fifteen minutes every hour and a half. Communication at the time was very slow and complicated, but today,  the Space Network provides almost continuous communications coverage every day, and that is extremely important for development and discovery in space.

In 2014, a new  “OPALS” data transmission technology was tested, and this has shown that laser communications can accelerate the flow of information between Earth and space, compared to radio signals, plus OPALS has collected a huge amount of data to advance science by sending lasers through the atmosphere. Although sound engineers are in charge of ground communication, astronauts don’t use it yet.

You knew that the Gemini 6 crew began the tradition in 1965, waking up with Jack Jones’ “Hello  Dolly”

As a sound engineer, I’d like to see what signal flow the audio engineer working on NASA uses, and this was the answer…

All signal routing and mixing is done from one of AVID’s System 5 Euphonix console and when signal or data is sent from the ground into space, it first passes to the audio console which in turn is sent to a digital signal encoder via radio frequencies that sends this same information to a decoder that is on a satellite in space so that the crew can be in communication with the ground.

As we mentioned in the beginning, Radio Frequencies are used to date because they are easier to capture in addition that they transmit much clearer and the sound. In case astronauts make deeper trips to space, then the transmission form is changed by sending signals directly to specialized satellites that send coded data between them, in this way, there is a little more delay but no sound quality is lost.

Astronauts stabilize the spacecraft to reach the international space station, observing Tremor (the dinosaur) which served as an indicator of zero gravity –


One thing we all witnessed was when astronauts Bob Behnken and Doug Hurley who traveled on the private Dragon spacecraft, arrived at the Space Station received by astronauts Chris Cassidy, Anatoly Ivanishin and Ivan Vagner, it was then that they broadcast live a few words using a wireless microphone connected directly to a camera that sent the signal to a satellite performing the signal flow as explained above, Alex behind the console doing Broadcast towards the whole floor, could feel a little lag(more than normal) but did not affect the sync between the video and the audio as well as the sound quality, they had a good show! He also laughed at me because he was happy with the basic courses he gave astronauts so he could run the audio-visual equipment in space.

I have been able to feel the thrill of operating a space mission through the words and experiences of a sound engineer who emphasizes the importance of being the bond between space and the planet, transmitting the passion, technology and discoveries that mark the future of our technological development as human beings. I don’t feel so far away from this feeling even though you literally live in another world.


For those people who are not sure which way to take or how to obtain such opportunities and jobs, on tours or in different areas, I share that in the case of Alex, I apply to a publicly-announced work through professional networks where he did not say that he would work for NASA and find out until I arrive at the place… This shows among many more examples that we should not judge but instead seek and explore when you least think about reaching these opportunities… as you prepare so that when you face them,  you are always better prepared.

I am very grateful for the talk time with Alexandria Perryman and Karrie Keyes for the great introduction.

Launching Content 

In 2019, most people can class themselves as a content creator. Whether you post pictures on Instagram, are in a band or write poetry in your spare time, you’re creating content. The more difficult part is getting people to notice (if that’s what you want to do of course).

As I have come towards the end of the BBC New Creatives scheme, myself and the team are planning how to promote the audio piece and which platforms it will sit best on. The piece is a five-minute clip of my Dad reading out his poems, snippets of family conversations, and me reading out emails and letters my Dad has written to me over the years.

I will most likely put the “podcast”/audio piece on SoundCloud, where I first started posting commentary with friends on my Dad’s poems throughout university:

https://soundcloud.com/yadroteoem

I then hope to post a relevant image of my parents on my Instagram page, along with a clip of the audio and subtitles for the dialogue. I haven’t figured out how to do this yet, but I will do! I will also post on my Facebook page that was dedicated to my tri-lingual student radio show and now is used for any media updates and opportunities through my work.

I will place a link on my website to my SoundCloud. I, unfortunately, will not be able to post on Mixcloud as the audio piece is too short. I will make sure to tag everyone that has been involved, from BBC New Creatives, Naked Productions, Tyneside Cinema, Arts Council England, and BBC Arts. I will post on LinkedIn too at some point and add to my profile.

This blog has also been such a great way to document the process! I hope to be able to continue talking about my side projects and creative endeavours. The final workshop in Newcastle for BBC New Creatives was a great way to see and listen to all the work created by different participants. It was so inspiring to see how experimental and inventive everyone had been.

I can’t wait to see the journey of all the different projects!

Check out the link here to all the projects:

https://newcreatives.co.uk/creatives

One issue has been the name of my podcast; we’re still working on that one and will have it confirmed soon hopefully!

WHERE ELSE TO FIND ME:

Tri-lingual radio show (Sobremesa): https://www.mixcloud.com/Alexandra_McLeod/

Sobremesa Facebook page: https://www.facebook.com/AlexandraSobremesa/

YouTube and Geography blog: https://alexandrasobremesa.wordpress.com/

LinkedIn: https://www.linkedin.com/in/alexandra-mcleod-79b7a8107?trk=nav_responsive_tab_profile

Post Production Audio: Broadcast Limiters and Loudness Metering

Any time you’re working on a mix that’s going to broadcast, it’s important to ask for specs. Specs are essentially a set of rules for each broadcaster, such as:

Generally there will be a “spec sheet” for each broadcaster (i.e. ABC, CBS, BBC, etc) that your client will provide when asked. Spec sheets aren’t necessarily public or available online, but some are (such as NBC Universal). Some online content providers (like Amazon), movie theater chains, and movie distributors also have specs, so it’s always good to ask.

To understand some important concepts, we’ll take a look at PBS’s most recent specs (2016), found here.

For PBS, it’s a 21-page document that includes requirements for video, audio, how to deliver, file naming, closed captioning, etc. It gets pretty detailed, but it’s a good example of what a spec sheet looks like and the types of audio requirements that come up. The information in the spec sheet will dictate some details in your session, such as track layouts for 5.1, where your limiters should be set, dialog level, bars and tones, etc. We’ll break down a few of these important elements.

PBS Technical Operating Specification 2016 – Part 1, Page 6 Sections 4.4.1, 4.4.2 – Audio Loudness Requirements

The three most important details to look for on a spec sheet are peak loudness, average loudness, and the ITU BS 1770 algorithm. These will be explained in detail below. In this case, the PBS specs are:

Peak Loudness: -2dBTP (“true peak” or 2 dB below full scale). This is your brickwall limiter on the master buss/output of the mix. In this case, it would be set to -2dB.

Average Loudness: – 24dB LKFS +/-2 LU.

ITU BS 1770 Algorithm: ITU-R BS.1770-3. This is the algorithm used to measure average loudness.

Some background on the average loudness spec:

Before 2012, there used to only be one loudness spec: peak loudness. This was a brickwall limiter placed at the end of the chain. Back then, most television networks (in North America) had a peak level of -10dBfs. From the outside (especially coming from the music world) it seems like an odd way to mix – basically you’ve got 10 dB of empty headroom that you’re not allowed to use.

As long as your mix was limited at -10dB, it would pass QC even if it was squashed and sounded horrible. That’s what was happening, though, especially with commercials that were competing to be the loudest on the air. If you remember running for the remote every commercial break because they were uncomfortably louder, that was the issue.

In the US, Congress enacted the CALM act which went into effect in 2012 and required broadcasters to reign in these differences in loudness between programs and commercials. The spec that evolved from this was average loudness level. A loudness measurement covers the length of the entire piece, whether it’s a 30 second spot or a 2 hour movie. Average loudness is measured through a loudness meter. Popular measurement plugins are Dolby Media Meters, Izotope Insight and Waves WLM.

Izotope Insight screenshot

The ITU developed an algorithm (ITU BS 1770) to calculate average loudness. The latest algorithm is 1770-4 (as of early 2017). To get technical, loudness is an LEQ reading using a K-weighting and full-scale; the designation for this reading is “dB LKFS”. In the PBS spec sheet, section 4.4.1 and 4.4.2 say mixes should use ITU BS 1770-3, which is an older algorithm. This is an important detail, though, because when you’re measuring your mix, the plugin has to be set to the correct algorithm or the reading may be off. The PBS specs were written in 2016 (before 1770-4 came out). Broadcasters update these every couple of years, especially as technology changes.

In this PBS spec, the optimal average loudness is -24dB LKFS, but there is an acceptable loudness range (LRA) above and below +/-2 LU (“Loudness Units”). Basically that means your average loudness measurement can fall on or between -26dB LKFS and -22dB LKFS, but ideally you want to mix to hit at -24dB LKFS. The measurement plugin will probably show a short term and a long term value. The short term reading may jump all over the place (including beyond your in-spec numbers). The overall (long) reading is the important one. If the overall reading is out of range, it’s out of spec, won’t pass QC and will likely be rejected for air. Or, it may hit air with an additional broadcast limiter than squashes the mix (and doesn’t sound good).

As HD television has become more popular, broadcasters have loosened up on the peak loudness range. PBS is pretty liberal with -2dBTP (or -2dBfs); some broadcasters are at -6dBfs and occasionally some are still at -10dBfs.

Below is a screenshot of a mix with a limiter at -10dBfs (you can see the compression – it doesn’t sound very good!) and the same mix without. If your average loudness reading is too hot and your mix looks like the upper, there’s a good chance that your mix (or dialog) is overcompressed!

Initially re-recording mixers thought loudness metering would be restrictive. Average loudness is measured across the entire program, so there’s still room for some dynamic range short term. Loudness specs can be a problem for certain content, though. For example, you’re mixing a show with a cheering audience that’s still being picked up as dialog by the loudness meter. Say your spec is -24dB LKFS (+/-2). You mix the show host at -24dB LKFS (in spec) but every time the audience cheers the short term measurement is -14dB LKFS. The overall loudness measurement might be -18dB LKFS – which is way out of spec! So sometimes you end up mixing dialog on the low side or bringing down an audience more than feels natural to fall in spec.

Another difficulty of mixing with a loudness spec is making adjustments when your overall measurement is out of spec. A dB of LU (the unit of measurement for average loudness) is not the same as 1dBFS (full scale). If you drop the mix 1dB by volume automation, it’s not necessarily a 1dB change in average loudness. If you’re mixing a 30 second promo and the loudness level is out of spec it’s easy to adjust and recheck. If you’re mixing a 90 minute film, it takes a bit more work to finesse and time to get a new measurement.

There’s software that will make these adjustments for you – basically you can tell the software what the specs are and it’ll make small adjustments so the mix will fall in spec. While this is a good tool to have in the toolbox, I encourage mixers to first learn how to adjust their mix by hand and ear to understand how loudness measurements and metering works.

I find in general if dialog is sitting between -10 and -20dBfs (instantaneous highs and lows) and not over-compressed, the average loudness reading should fall pretty close to -24dB LKFS. When I first started mixing to an average loudness spec, my mixes were often averaging hot (-20 to -22dB LKFS) when spec was -24. My ear had become accustomed to the sound of compressed dialog hitting a limiter on the master buss. What I’ve learned is that if you’re mixing with your dialog close to -24 dB LKFS (or -27 for film) you can bypass the master limiter and it should sound pretty seamless when you put it back in. If you’re noticing a big sound change with the limiter in, the overall reading will probably fall on the hot side.

When I start a mix, I usually dial in my dialog with a loudness meter visible. I’ll pick a scene or a character and set my channel strip (compressor, EQ, de-esser, noise reduction etc) so the dialog mix lands right on -24dB LKFS. I do this to “dial in” my ear to that loudness. It then acts as a reference, essentially.

One thing I like about mixing with a loudness spec is you don’t have to mix at 82 or 85 dB. While a room is optimally tuned for these levels, I personally don’t always listen this loud (especially if it’s just me/no client or I anticipate a long mixing day). Having a loudness meter helps when jumping between reference monitors or playing back through a television, too. I can set the TV to whatever level is comfortable and know that my mix is still in spec. When I’m mixing in an unfamiliar room, seeing the average loudness reading helps me acclimate, too.

I mix most projects to some sort of spec, even if the client says there are no specs. Indie films, I usually mix at -27dB LKFS and a limiter set to -2dBFS or -6dBFS (depending on the content). If an indie film gets picked up for distribution, the distributor may provide specs. Sometimes film festivals have specs that differ from the distributor, too. If you’ve already mixed with general specs in mind, it may not need adjusting down the road, or at least you will have a much better idea how much you’ll need to adjust to be in spec.

X