Empowering the Next Generation of Women in Audio

Join Us

New Editors: How To Find Your SFX Editorial Process?

It can be both an exciting and terrifying feeling being a new editor. On one hand, you are thrilled to start editing on a project! On the other hand, you don’t know where to begin. I interviewed a few editors on our team who know exactly how you’re feeling and can give you some insight into their editorial approach.

I thought it would be easiest for our readers to visually see a reference clip, so I had our editors answer a few questions with this fun short! I think I want a pet camel after watching this…Check it out below:

If you were editing this what would your editorial approach be/what would you tackle first?

Brad– First, I’d do all of the BG’s and ambiences. They’d give me a good base layer to go off of and help set the vibe for the rest of my edit. Once finished, I’d also have a visual aid of any new locations and potential scene changes just by looking at my background tracks.

Second, I’d go through the clip and see if there is anything I might need to record or design. For example, perhaps the camel or any other vocal elements. Maybe the cell phone/remote control beeping.
Third, once I have a good base layer of BGs, and my recording and design files ready to incorporate, I’m going to go ahead and start my edit. I don’t have any particular order of things or passes that I do since I break up my work by time, rather than category.

Tess– Whenever I start a new project I always watch the whole thing down first and then set up my time management. Since I’ll go more into detail about that in your second question, I’ll just skip those steps and get right into editorial. I usually like to work chronologically, but there are some exceptions. I find it difficult to keep animal/creature vocals sounding like they come from the same character unless I cut them all in one pass, so for this clip, I’d probably just start with the Camel vocals. After that, I’d probably design the beeps from the remote. I like to make every sound I cut completely unique to the project I’m working on (if possible) and these beeps are an easy and fun one to design. I like to use a lot of different synths on my iPad when designing beeps or sci-fi elements, so I’d likely start there. Once I design a library of beeps that sound like they could all come from the same remote, I’ll cut them in. Footsteps are another element that I’d cut all in one pass, but we’re pretty lucky here at Boom Box that Carol does an amazing job of cutting all of our foley. Once those sounds are edited in, I’d just cut chronologically. A big part of this clip is all of the stone movement, so I’d probably plan my days so that I’d cut all of that in one day, but I can go more into that in your second question.

Jacob–  If I were responsible for covering all sound effects for this clip, I would start with creating some background layers. This particular short would be very fast because they are in one location the whole time!  I often like to do this at the beginning of my day or edit, because it helps me get a sense of where the cuts are, and it helps the dry sound effects feel a bit more natural when I start adding them later. Next, I would tackle all the Foley elements, starting with footsteps and hand grabs, and rubs.  This would also be pretty quick. Then I would move on to covering all the rest of the sound effects in one pass, dividing up the length of the short by the hours I have to complete it, and setting benchmarks. I use this when editing as a way to make sure I am working at a good pace to be able to complete the editorial and have time to review it, clean things up, and do some pre-mixing afterward. In certain cases, where there is a huge amount of original design, like an episode where there are whacky unusual vehicles or space ships flying around, I might set aside an hour or two at the start to create a library of the effects I need.

Katie– I personally like to work chronologically, so naturally, I would start with the very first thing I see. If there were a recurring, design-heavy element like a spaceship or time machine, I would work on that from start to finish to save time, rather than chronologically. It would be time-consuming to design little parts of something that may evolve later in the episode. But for this short, I would start with the very first action.

Assuming this was longer and given more than a day to do, how would you go about the editorial time management wise?

Brad– I’d figure out the total run time and divide by the number of days I have to get the project done. The resulting number is how much I need to get done per day. I edit linearly so I’d start at the beginning and edit to the according to time code I need to get done for the day. I do, however, edit linearly by scene. Admittedly, since my attention span isn’t long enough to digest one large clip, and to invoke a sense of accomplishment, I will edit from beginning to end a single scene. Once that scene is done, I’ll move on to the next. This also creates neat stopping points at the end of the day. Just make sure to go back and watch the entire thing to make sure the scenes flow together well.

Tess– I always start my projects by breaking them down by day. Usually, I just divide the length of the project by the number of days I have to work on it, minus one day, to determine how much content I need to get done per day. For instance, if this clip were a 22-minute episode and I have 7 days to cut it, I would divide 22 by 6 and determine I need to complete a little over 3 and half minutes per day. If I follow that schedule perfectly then I have a full extra day to accomplish notes or rewatch my work to see if there is anything I could sweeten or clean up.

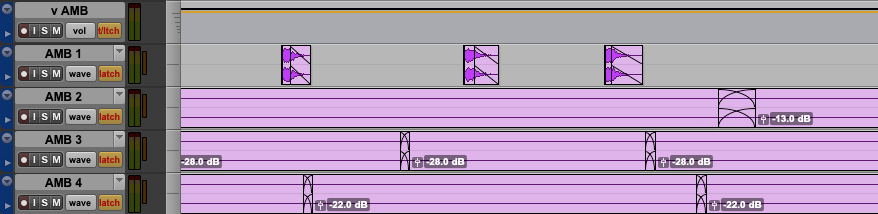
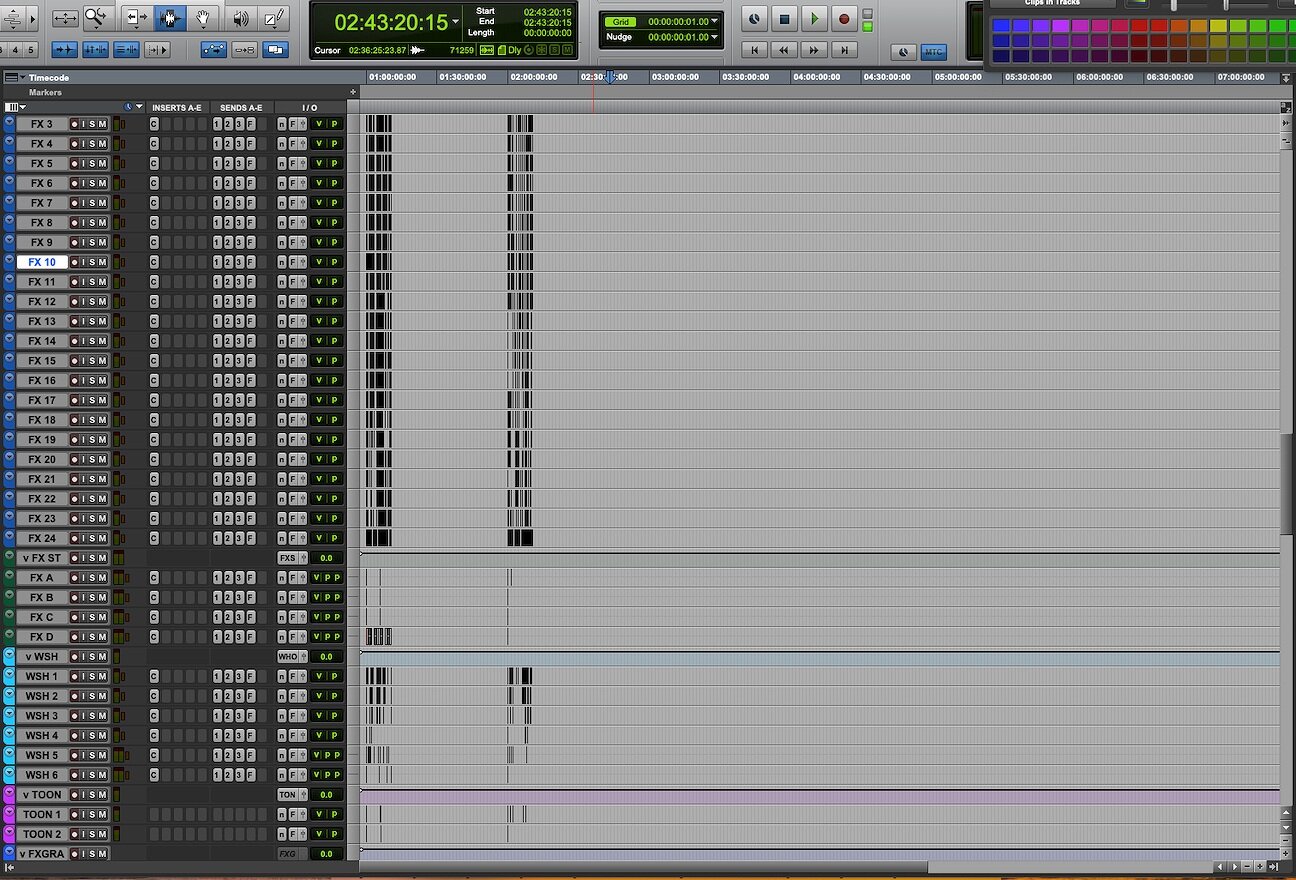
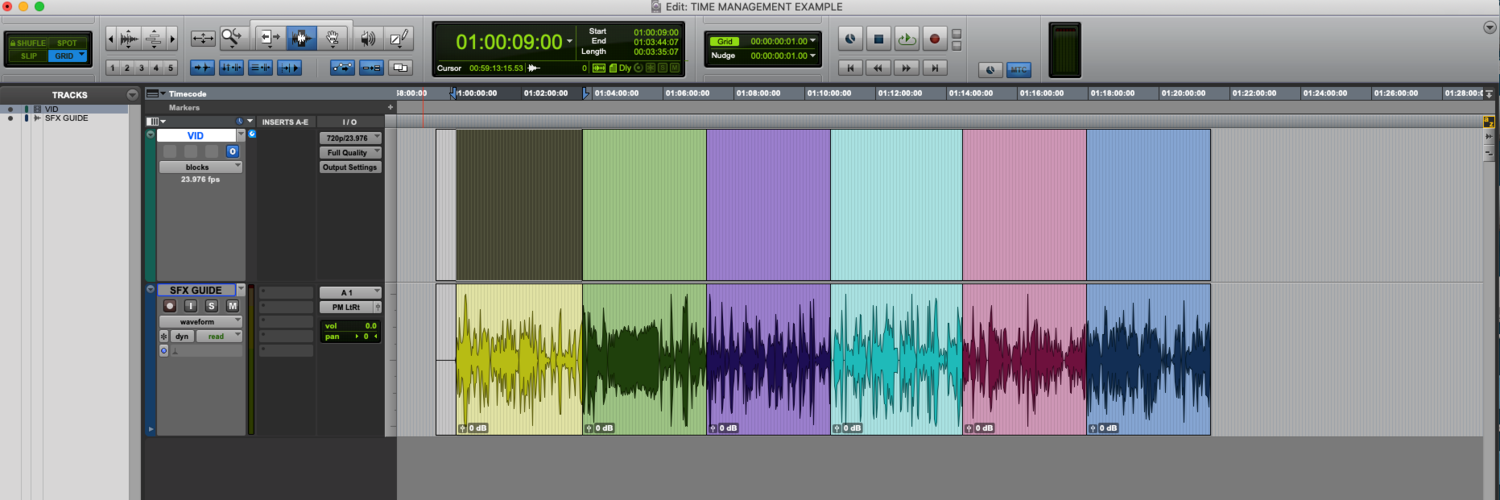
After I determine how much content I need to complete each day, I divide up the project/clip into groups of that size. I like to color-code them as well. I usually just group them chronologically, however, if there is a specific element that happens multiple times throughout the project (like the stone movement in this clip) I’ll try to divide the project so that I cut all of those similar elements on the same day. This picture is an example of what a clip looks like when I get started. Each color would be a single day’s worth of work.


Screen Shot 2020-07-08 at 5.23.03 PM.png

Jacob– For a longer piece, my strategy would be largely the same, except that I might split the foley and backgrounds over both days, doing some at the start of each day.  I stand by the strategy of chunking out the episode into days or hours, as this allows you to get a clear picture of your progress, and prevents panic moments when a deadline looms and you discover you have only cut ⅓ of the episode instead of ¾!  So for a two-day edit, I would divide the episode into 2, maybe with the second day having slightly less time. If you like to be extra precise, you can further divide each day up into chunks of what you need to complete each hour.  I always leave an extra hour or two at the end of my last day for a watch down, so I can make balance adjustments, recheck client notes, and catch any missing elements or mistakes.

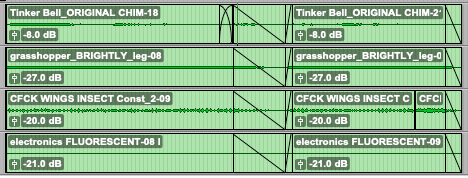
Katie– I like to estimate approximately how many minutes I need to cut per day to finish on my given deadline, and make large blank clips above that space and color them differently for each day. As I go, I turn the clips green to indicate that section is done. It’s an easy visual representation of how much is done, and an easy indicator if I am falling behind. If it’s a several-day edit, I like to give myself at least a couple of hours or even a day to comb through the episode and polish it. It’s very easy to miss obvious elements when you’re working frame by frame. I watch it back several times to make sure everything is covered. I also like to watch it back with any notes I was given to make sure they are all addressed.

What would be your advice to new sfx editors figuring out an editorial process that works for them?

Brad– Watch other editors edit. It’s how I learned what works for me and how most people learn to edit via school or internships/etc. There’s more than one way to do practically everything, and if you watch enough people do their thing the way they do it, you can pick and choose what you like from different peoples’ workflows. You create your own repertoire of tricks and methods and expand it over time.

Tess– The best advice I can give someone is to find a time management tactic that works for them. The worst thing you can do in the professional world is not complete your work thoughtfully and on time. If you aren’t sure what will work for you, try my tactic of grouping by day, or ask other professionals how they manage their time and try it their way. There are so many ways to manage your time, so just keep an open mind and find the method that works for you. Also, don’t get intimidated if 3.5 min/day seems like a lot to you at this stage in your editing career. You might have to hustle at first, but the more you edit and know your library, the faster you’ll become. On that same note, don’t be afraid to try new things in order to speed up your editing skills. When I first started at Boom Box, Jeff suggested I map my mouse buttons to the different tools in Pro Tools. At first, I was a little clumsy in getting used to switching my tools with my mouse, but in the long run, it made me so much faster.

Jacob– For newer editors, I would say it is important to figure out how fast you can really work, and allow yourself extra time. I was definitely much slower when I first started, and when I started scheduling my time and realized how much I could realistically get done, it became much easier to complete my work on time. It’s also important to understand what time of day you tend to work best and fastest. I tend to be most creative and efficient in the early morning and evening, slowing down in the middle of the day when communications can distract me and my brain needs breaks. If you can learn how you work best, you can plan to do your design work or complicated cutting when you are fresh and most likely to produce the best most interesting work.

Katie– Give yourself plenty of time when scheduling out what you’re going to need to cut each day. Don’t treat a three-minute action scene the same as a three-minute dialogue scene in the time that you give yourself. Cut just a little bit more than you need every day so at the very end you can comb through and add extra details or spend more time in areas that could use it.

As you can see, there’s no right or wrong way to approach sound effects editorial! You need to find what works best for you and you WILL figure it out as you continue to edit more and more.

If you liked this blog, you should check out these other posts that are helpful for new editors:
HOW TO CRUSH YOUR FIRST GIG AS A SOUND EDITOR
LUNCH AND LEARN: MAC KEYBOARD SHORTCUTS EVERY SOUND EDITOR SHOULD KNOW
BACKGROUNDS, AMBIENCES OR SOUND EFFECTS?
THREE BASIC SKILLS EVERY SOUND EDITOR MUST MASTER
STAY ON TRACK! FIVE TIPS FOR IMPROVING CREATIVE PRODUCTIVITY


A COLLABORATIVE POST WRITTEN BY BOOM BOX POST


Answering Your Questions: Glossary of Sound Effects

In the original post, we get a ton of questions asking what keywords should be used when trying to find very specific sounds. While a quick peruse through parts 1,2, and 3 of this series would help, I decided to relay a few of these questions to our editorial team. I’m very curious what buzzwords they will recommend. Continue reading to see if your question was answered!

Let’s start off easy

What do I write when someone quickly grabs someone’s arm?

Brad: face slap

Tess: pat

Katie: body hug, impact body, skin, smack, slap

What should I search for if I want a sound effect for grabbing a bag of chips?

Brad: cellophane

Tess: crinkle, plastic bag drop/impact

Katie: mylar, crinkle plastic, foil, crumple, junk bag

What sound would you use when someone starts to walk?

Sometimes it is easy to overthink search terms when trying to find the perfect sound effect. A lot of the time there isn’t a fancy word for the sound you’re looking for. For example, a footstep would do just fine for this request.

Brad: For this, you’d need to know the surface, but I’d start with a quick scuff or foot drag if you’re trying to highlight the sound

Tess: scuff, skid, lino squeak, basketball squeak

Katie: scuffle, scrape, dirt slide, a cement slide, gravel

What sfx do I use for quickly grabbing an elevator door to stop it from closing?

Brad: metal hollow, metal ring, metal lock, metal latch

Tess: metal hit/impact

Katie: metal duct, container hit

I need a sound for someone sitting on a bed except for the word “creak”.

Sometimes you need to get creative with the words you use when searching for a specific sound. If you are looking up “bed” and not finding anything, think of works associated with a bed or a similar material.

Brad: couch sit, couch plop, cloth hit, cloth impact, cloth movement

Tess: hinge

Katie: springs, pillow hit, cloth drop, laundry, couch

What sound would a bouncing grenade make?

Tip: Doing a quick search on youtube for a reference clip can really help spark inspiration. Listen to examples of the sound you are trying to replicate and try to deconstruct what you hear. A lot of the time there is no one specific sound and what you’re looking for requires a build of multiple sfx’s. Don’t limit yourself!

Brad: metal drop, gun drop, metal hit

Tess: tink

Katie: shell drop, bullet case, metal debris, shiny, solid

What sound would you use when someone grabs your hand and it startles you?

How do you translate emotion into sound? Sometimes trial and error is the only way to find the perfect sound effect. Let’s see what our editors came up with…

Brad: horn, violin pluck

Tess: In my head, this needs to be a build of sounds, maybe a BONK plus a TWANG, and a COWBELL. Other options are POINK, DOINK, or PLUCK

Katie: gasp, surprise, shock, emote, fear, anxiety, curiosity, inhale short

What sound does sushi make?

Context is everything. This type of sound could go in multiple directions; realistic, toony, surreal.

Brad: goop, goo, slime

Tess: splat

Katie: rice cake, squish, wet, slimy

What would I write for an angelic noise?

Brad: angel chorus

Tess: choir, ethereal

Katie: heaven, drone, symphony, gliss, harp, ascend


Sounds Like Spring

Granted, being located in SoCal really stunts all seasonal variety. But trust me! Once you’ve lived in sunny LA for a year or two, anything below 50 degrees begins to feel like the arctic. I know, it’s a bit dramatic. I myself am embarrassed to agree, especially having grown up on the east coast.

In fact, because I’m from New England—where every season is highlighted—spring holds a lot of memories for me. I can easily recall the smell of Spring and if I close my eyes I can hear a light breeze fluttering through my childhood bedroom window.

With the uneasiness of the current global climate and orders to remain at home indoors, it is easy to feel in some ways that Spring is being robbed from us. That is why this year as Spring begins to settle in and the world outside changes as I watch from my couch, I find myself reminiscing about Springs past. Memories of long sunny days filled with laughter help to remind me why it is important we social distance at this time, so that hopefully one day soon we can all reconnect in the Spring daylight. Until then, I’m enjoying the joys of Spring through my memories.

Growing up with the extremes of all four seasons, allowed me to appreciate their differences. One thing that stands out the most for me between the seasons, besides their obvious climate differences, are the sounds I associate with each one.

As an assistant sound editor at Boom Box Post, one of my duties is to handle backgrounds on the shows I assist. The other day as I was cutting BG’s for a fall-themed episode, I noted that some of the established background sound effects, such as birds and winds, had been switched out with effects of a more seasonal specific aesthetic. Yes, backgrounds are particularly notorious for being inaudible in the mix, but as they say, the devil is in the detail.

This got me thinking, what are some sounds associated with springtime?

I decided to reach out to our editors and compile a list. I thought it could make for a helpful blog post, especially since I always come across one tip in particular for aspiring editors and audio students: to start building up a personal SFX library.

So here are 10 Spring-inspired sounds, that if you have access to, you should go out and record this refreshing time of year!

Sounds like spring

Jump Rope-Pavement Chalk-Pogo Stick-Spring Birds-Bicycles-Spring Storm-Puddle Jumps-Spring Breeze-Playground Ambience-Wind Chimes

Don’t have access to the sounds listed above? That’s ok! It just means it is time to get creative. A lot of these sounds can be easily duped. Here are some tips and tricks I came up with! Some might be more successful than others, but that’s the fun of trial and error.

sidewalk-chalk-3367719_1920.jpg

Tips and Tricks:

Jump Rope: Don’t have a “real” jump rope? No problem! You can use any old rope you have lying around. If you have a long rope, try tying one end to a pole or tree for bigger more rhythmic circles.

Pogo Stick: Wait, so you’re telling me you don’t have a pogo stick lying around the house? That’s ok! What if you plucked the inside spring of a stapler? Or one of those springy door stoppers? After layering up a couple of sounds you can create yourself a custom pogo stick!

Spring Birds: With streets being quieter than ever, now is the perfect time to get outside and record the birds! Even just opening a window in my apartment to let fresh air in fills the room with their singing.

Puddles: If you aren’t blessed with any rain you might miss out on the fun of actually jumping into a puddle this spring. However, you can still recreate this sound at home. This one is pretty simple, just fill up your sink or bathtub and start splashing around. Maybe try out some different-sized bowls and cups.

Playground Ambience: Ok, so now might not be the best time to record children walla—with the world social distancing and all—but that doesn’t mean you can’t take yourself on a nice little walk to the local park. Why not reconnect with your childhood self and take flight on the swing set? You’re never too old!

Wind Chimes: Have you ever dropped or hit an aluminum water bottle by accident? I think layering up that ringing—which almost has a Tibetan bowl quality to it—could make a really cool wind chime. Sometimes I gently tap mine against the table on purpose because I find the sound soothing. I recommend playing around with different amounts of water in the bottle to change the timbre of the ring.


Common Sound Editorial Mistakes That Can Become Big Mix Problems

As a mixer, I see all kinds of issues cropping up that originated in sound editorial. And with my background in sound editorial, I’ve surely committed every one of them myself at some point. Here’s a list of some common problems we see on the mix stage. Avoiding these problems will not only make your work easier to handle and more professionally presented, but it will also hopefully save you a snarky email or comment from a mixer!


Sound Effects With Baked In Processing

As soon as you commit to an EQ, Reverb, or other processing choices with Audio Suite, your mixer’s hands are tied. Yes, you may be making a very creative choice, however, that choice can not be undone and often processed editorial simply needs to be thrown out and recut to make it mixable.

But what if you just have you present your creative vision in this way, be it for a client review or to get an idea across? In that case, your best move is to copy and mute the sound clip. Place the copy directly below the one you plan to process so it can easily be unmuted and utilized. In this case, your mixer has the option to work with the dry effect. Another alternative, if you’re dealing with EQ processing, is to use Clip Effects. Just be sure that downstream the mix stage has the proper version of Pro Tools or this information won’t be passed along.

processed clip with muted clip below.png

How about if the sound has room on it, but you didn’t put it there? I’ve gotten handclaps that sound like they were recorded in a gymnasium cut in an intimate small scene. That’s just a bad sound choice and you need to find a better one.

Stereo Sound Effects Used for Center Channel Material in Surround Or Larger Mix Formats

Sound editors, especially those that work from home, do not often cut in a surround sound environment. The result of cutting in stereo for a surround (or larger format) project, is the lack of knowledge on how things will translate.

One of my big pet peeves is when center channel material – actions happening on screen, in the middle of the frame – is cut with stereo sound effects. The result of, say, a punch or distant explosion cut in stereo when translated to the 5.1 mix is a disconnect for the listener. Ultimately, we as mixers need to go into the panning and center both channels to get the proper directionality.

Now, it’s not an impossible problem to solve when working in stereo. Just avoid cutting sound effects in stereo tracks that do not engulf the entire frame, provide ambience, or are outside of picture as a whole. Your mixer will thank you for it.

Splitting Sound Effects Build Between Food Groups

We have written extensively on the idea of using “Food Groups” in your editorial to keep things organized (see links below).

The dark side of this, however, is some editors can get carried away with these designations. The error to avoid here is to be sure anything that may need to be mixed together, stays together.

For example, if you have a series with lots of vehicles, it may seem to make sense to have a Car food group, as well as a Tires food group. The Car group would get the engine sounds and the Tires the textures, like gravel and skids. But when it comes time to mix, this extra bit of organization ends up making the job extremely difficult. If a car goes by from screen left to right, the mixer needs to pan and ramp the volume of those elements. If you group them all together in one chunk of tracks, it’s an easy move to group them. If you split them up among food groups, the mixer then has to hunt around for the proper sounds, then group across the multiple food groups. It’s simply too cumbersome. Not to mention that it takes the functionality of the VCA out of the picture. A solution, in this case, would be to simply have a Vehicle food group that encompasses all aspects of the car that could require simultaneous mixing.

Layering Random Sounds Into Food Groups

Speaking of food groups and functionality, the whole point of a food group is to be able to control everything by using one fader (VCA). That functionality also becomes void if sounds not applicable to that group are dropped in.

For example, if we have an Ambience food group with babbling brook steadys and a client wants all the “River sounds” turned down, the VCA for that food group makes it a snap. However, if an editor cuts splashes of a character swimming in that same food group, it suddenly ruins the entire concept. True, splashing is water, but that misses the entire point of the food group.

Single sounds layered in with long ambiences render the VCA useless

Single sounds layered in with long ambiences render the VCA useless

Worse yet, is when an editor simply places sounds in an already utilized food group because they ran out of room on other tracks. This only works as a solution for layout issues if you have an extra, empty food group.

Breaking Basic Rules In Order to Follow Another

There’s a basic hierarchy to rules of sound editorial. Some rules you just can’t break, plain and simple. Like crossfading two entirely different sound effects with one another. That’s a mixing nightmare, one that simply needs to be reorganized in order to successfully pull off the job. But sometimes the breaking of these rules comes with the best of intentions. I have two examples for you.

incorrect layout.png

In this case, the editor ran out of space in a food group and opted to use this crossfade, rather than break up the food group. It’s important to not only know the rules but even more important to know when to make an exception. In this case, there was the simple solution of moving this one sound into the hard SFX tracks, or simply adding a track to the food group (with permission from your supervisor or mixer), solving the issue and not creating any new ones.

Screen Shot 2021-01-26 at 1.27.30 PM.png

Here again, we have an editor with the best of intentions. An insect is on-screen moving in and out of frame from left to right. The editor thought that since the camera angle did not change, it did not warrant cutting the second chunk of sounds on a different set of tracks. Mixing this once again is impossible. As there is no time between the fading out and fading back in of the sound, there’s no magic way for the mixer to change an essential property, in this case, the panning. A proper understanding of perspective cutting would have avoided this issue.

Over Color Coding

Using colors to code your editorial is another topic we’ve covered extensively (see links below).

While color-coding your work is immensely helpful, here too lies a potential issue.

Let’s say you have a sequence in a swimming pool. There are steady water lapping sounds, swimming sounds, big splashes from jumping off the diving board. An editor may see this and think, it’s all water so I’m going to color all of these elements blue. The purpose of the color code is to delineate clips from one another to speed up the mixing process. When an editor liberally color codes their work one color, you end up with no relevant information at all. In this case, each of these categories of sounds should be colored differently from one another so that it’s obvious they are for different parts of the scene.

POOR LAYOUT FOR FUTZ MATERIALS

Materials that need special treatment, like sound effects coming from a television, need to stay clustered together within an unused food group or at the very least on the same set of tracks. I like to have my futz clusters live on the bottom-most hard sound effects tracks, color coding the regions the same to make your intentions absolutely clear. This allows the mixer to very quickly and easily highlight the cluster and set a group treatment, like EQ. Think of it as temporarily dedicating some tracks for this purpose and stair-step your work around them, being careful to not intermingle non-futz materials on those tracks for the duration of the necessary treatment, which is equally problematic.

Why go to the effort? If you sprinkle these materials throughout your editorial, it becomes a game of hunting around for the mixer to find what needs futzing. Odds are your mixer will need to stop mixing and reorganize your entire layout to fix the problem and make it mixable.

Bonus Issues

Guerrilla Recording: Be Your Own Foley Team at Home

The art of foley is an amazing magic trick that can really bring a production to life. If your project has the budget for custom foley, I would highly recommend taking advantage of skilled professionals to help bring this element of your soundtrack to life. That said, not everyone has the money and access to a professional foley team. Never fear! You can be your own foley team with incredible results. All from the comfort of your home, at little to no cost.

Why custom recordings?

There was a time of course, where everything for a soundtrack was recorded. Nowadays, sound libraries are an amazing tool at our disposal. However vast, libraries can’t necessarily fill the exact needs of every project. Or maybe you find the perfect sound but are only given one or two options to work with. Shameless plug… this is a situation we remedy by including lots of options in our own original sound libraries at boomboxlibrary.com.

Additionally, keep in mind that anything you record is entirely unique to you and your project. That’s great sound design! Of course use libraries for the nuts and bolts of any project, but pick out a few special elements to record on your own, giving yourself a completely original palette to design from.

What are some examples of props easily recorded at home?

We are humans, surrounded by junk we have collected. Put it to good use! Look around your home with your sound editor brain and start to think of things in a new way. Get creative. I find that small props (like writing with a pencil, bubble wrap, cardboard handling) are all best served with custom recordings. This allows you to control the performance, tailoring to your exact needs. After all, handling a cloth pass entirely with a library is a tedious task that could be accomplished in a fraction of the time with a live recording.

Of course, don’t limit yourself to props. Remember that small recordings can become BIG builds. With pitching and processing, the right source materials can really let your creative brain fly.

As a jumping off point, here are some great examples of what you can record at home:
– Source vocals for monsters, robots, aliens
– Stressed materials like creaking wood, rubber stretching
– Foliage movement like leaves shaking and brush movement
– Body interactions like head or beard scratching
– Specific toy props

When I worked on a series that needed mutant mushroom movement, I scoured the house for “squeaky” sounding items. Ultimately, I found that if I rubbed together layers of my wetsuit (acquired for surfing… this is Southern California after all), I got this super strange and unique sound! I was able to “perform” the wet suit to produce all kinds of different pitches.

The Low-Cost Lowdown

Here’s the thing. You can get amazing recordings these days on a smartphone. Trust me, I’ve already blogged about it. And since writing that post over three years ago (we’ve been at this a while), the tech has only gotten better. But ok, if you really want to go Pro-Am with your home recordings, you can purchase a portable recorder. That’s a tool you’ll not only have for home recording but one you can keep in your day bag to have on hand any time the sound design muse comes calling. A worthy investment.

We could do an entire post on portable recorders (and probably will). For now, however, I polled our team (all very experienced guerrilla recordists) and they suggested the following listed in price from highest to lowest:

The Setup

You’ve got your phone or your recorder, now it’s time to set up your recording space. Of course, the quieter the better so try and avoid recording near shared walls, doors or windows. To keep your recordings free from room reflections (the sound bouncing off the walls) you want to record in as “dead” a space as possible. In fancy studios, this is achieved with dampening measures; padded walls, high-end sound diffusers and traps. So what space does the average home have that is isolated and pre-treated to be dead sounding? The answer is in your closet. All of the hanging clothes in a typical closet provide tons of free sound absorption, and the doors provide isolation. If your closet doesn’t have a light, or the light is noisy, get yourself a headlamp. Trust me on this, I’ve done it. A lot. And in some very small closets. Realistically all you need room for is yourself (cramped if necessary, as we suffer for our art), your recorder, your props, and if necessary a playback screen. Which brings me to my next point…

Picture Playback and Recording

If you want to record in sync with picture playback, I’ve got a hack for that as well. Save your video file somewhere you can access it on your phone or tablet; I like google drive. Voila, instant playback device. Mute the sound, and start playing back with ample lead time. Start the recorder and then verbally count down by the second along with the timecode prior to your performance. This will give future you a reference point for syncing up your recordings in Pro Tools later on. A few seconds worth should be enough to lock it in. Before you wrap up, always remember to record a few seconds of room tone so you have it for potential de-noising later on.

Final Tips

Guerrilla home records aren’t perfect, but they can come pretty close. With the ability to custom record as close by as your nearest closet, you have the ability to unleash your creativity at virtually no cost.


WRITTEN BY JEFF SHIFFMAN, CO-OWNER OF BOOM BOX POST


Lunch and Learn: Phasing

The latest gear and hottest plugins are regularly trendy topics of discussion in the sound community. But for this week’s blog post, I’m going old-school and throwing it all the way back to good ol’ PHASING! (Hold for applause)

Now, I bet you are thinking to yourself, “What is phasing exactly?” or perhaps “How does it apply in the real world?”, and most importantly “Do I even need to know this?!” Well, you’re about to find out…

WHAT IS PHASING?

Phasing is timing differences when combining identical audio signals and is usually the result of delay between multiple signals. Phasing can have a noticeable effect on the sound quality of your audio, and it comes up in all kinds of productions like recording, sampling, and live shows. Phasing has the potential to leave your tracks sounding thin and “not quite right”. However, you can also use phasing to your advantage, and you can utilize it in a handful of interesting ways!

WHEN IS PHASING BAD?

The most common scenario where phasing can be a nuisance is when it comes to phase cancellation. In the real world, we hardly ever hear pure sine waves, but to make understanding phase cancellation easy, I am going to use sine waves as an example.

The basic description of phase cancellation is when you have the waves of two or more signals out of phase with each other. When the wave on one signal is at its peak, the other is simultaneously in a trough. Because the peaks and troughs are out of sync, they work against each other rather than supporting each other. The frequencies are cancelled out and, acoustically, it causes a weak sound.

In Phase

In Phase

Out of Phase

Out of Phase

The place you’ll most likely to run into the nuisance of phasing is in a recording environment, especially one with multiple microphones. For the sake of example, I’m going to focus our attention on recording a drum kit. Consider even a single snare drum, miced from both above and below. Since the top and bottom heads of the drum are usually moving in opposing motions, the two mics can record signals that are directly out of phase. Now factor in a mic on the bass drum, hi-hat, and multiple overheads, and you have a set up ripe for phase issues.

When recording with multiple mics, a quick and easy solution is the 3:1 Rule of Mic Placement. When using two microphones to record a source, try placing the second mic three times the distance from the first mic, as the first mic is from the source. So if the first mic is one foot from a source, the second mic should be placed three feet from the second mic. Using this simple 3:1 rule can minimize phase problems created by the time delay between mics.

Sometimes, the problem doesn’t show itself until you’re mixing. In that case, you can usually pull the tracks up in your DAW, zoom in close on their waveforms, and slightly nudge one track just a bit. You’d be amazed what a difference just moving a track by one or two milliseconds can make. Check out this detailed video tutorial to learn how to align waveforms in Protools:


There are also some very effective phase alignment plug-ins on the market that can clean things up. You can check out ones that I find helpful below:

Waves InPhase captures audio enabling users to time-align clips quickly with a phase correlation meter making it easier to use. InPhase does exactly what it says it does, but some skill is required to get the most out of it as the controls are comprehensive.

Eventide Precision Time Align can be used with mono and stereo formats and includes phase invert and control over volume. There is also a neat distance control, meaning users can enter actual measurements in feet or meters.

You can also try inverting phase using Protools built-in invert. This plugin’s only purpose is to invert audio waveforms. You can find it built into your Protools Audio Suite.

You can see in the examples below a before and after of the waveforms. The first picture the waveforms are in phase. In the second image, the bottom track’s waveforms have been inverted:

Screen Shot 2020-11-03 at 11.39.10 AM.png
Screen Shot 2020-11-03 at 11.39.38 AM.png

WHEN CAN PHASING BE USED TO YOUR ADVANTAGE?

Aside from fixing phase issues, you can occasionally use phasing to your advantage! There are a handful of fun audio tricks out there to try, but here are two that, although simple, I think are pretty neat!

The “Out Of Speaker” Trick
This trick is incredibly simple — All you need to do is invert the phase of either the left or right channel of a stereo file! On speakers, the sound will appear to come from somewhere outside the speakers and envelop the listener. However, there are a couple of downsides to this trick. First, it only works on speakers and is most pronounced only when the listener is centered in the speaker’s “sweet spot”. You will not have the same effect if wearing headphones. The second downside is that if your stereo track is summed to mono, it will completely disappear due to the left and right channel cancelling each other out……which is the perfect segway to my next phasing trick!

Phase Cancellation Tricks
The first example is if you have a film or television mix and you want to create an M&E only track. If you have the isolated dialogue track, you can invert it and play it against your full mix. The inverted dialogue track will cancel out the dialogue in the full mix, and you will be left with a mix that includes only your music and effects. The second example is similar but with a music mix. If you ever want to make an instrumental track from a full mix, you can take the isolated vocals and invert. When played against the full mix, you’ll be left with an instrumental track!


WRITTEN BY BRAD MEYER

SUPERVISING SOUND EDITOR, BOOM BOX POST

If you liked this blog you should also check out:
LUNCH AND LEARN: HOVER VEHICLE DESIGN
CREATING ALIEN VOCALS
FAULT BY UNFILTERED AUDIO: USING A SPECTRAL SHIFTER FOR SOUND DESIGN


The Lowdown On Mixing – Re-recording mixer Jacob Cook

DIALOGUE

When we mix an episode of animated TV, we always start with the dialogue. I usually start by setting reverbs for each scene, then mix the dialogue line by line to get it in spec and sounding natural throughout the show. Any panning, extra processing or additional reverb is also added at this time. The dialogue serves as the anchor for the rest of the mix, so it’s very important to get this locked in before adding any other elements!

MUSIC

Next, we add in the music and ride the levels throughout the show. I’ll dip it for dialogue when necessary and boost it to help keep the momentum and add excitement.

BACKGROUNDS/AMBIENCES

Then, I’ll mute the music again and mix the backgrounds and ambiences. By mixing these without the music we ensure the scene will sound natural when the music isn’t playing. Then I turn the music back on and foley is next, meaning footsteps, hand pats and movement tracks. Like music and backgrounds, the levels will vary show to show and client to client depending on preference. I’ll set an overall level and ride faders when needed throughout the show, adding panning when necessary.

SOUND EFFECTS

Lastly, I bring in the rest of the hard sound effects.  These are organized into food groups such as mono effects, stereo effects, whooshes, toon, etc (shown in the photo below). Again, how these are mixed varies show to show. This is an oversimplification of the process, but this is the basic sequence I follow.  I usually wrap up with a few watch downs in 5.1 and stereo to make adjustments and take one last look at mix notes from the client.

Screen+Shot+2020-09-16+at+3.13.46+PM.jpg

What do you look for in a good mix?

It is important that the mix supports the style of the show. Something with a lot of action should feel exciting and have a dynamic mix. An educational preschool show needs a mix that will help direct the viewer’s focus correctly and highlight the information being presented. I also think a good mix supports the story and doesn’t distract the audience. It is important that the sound is helping support the narrative and storytelling style.

Do you have any technical/creative prerequisites you think would be helpful for a mixer?

You definitely need to be an expert in Pro Tools. Understanding all of the ins and outs of writing automation through all the various parameters is essential. A strong basis as an editor is a good start here, but it helps to push into the mixing workflow and familiarize yourself with things like preview mode, latch prime in stop, surround panning, VCAs, grouping and plug-in automation. The best way to learn about these is get your hands dirty. Read the manual or some tutorials and start mixing.  You will quickly learn where you can speed things up and the benefits of the different automation modes.

Creatively, the best thing you can do to prepare is to watch a pro work and learn how they approach each mix. I learned all of my mixing skills and techniques from watching Boom Box Owners Kate and Jeff mix and adopting their methods. Once I understood what they were doing and why I worked to get faster and developed my own techniques and style!

Referencing other shows and films is also a great way to get ideas and help your mixing improve. Critically listening to a mix on TV or in a theater can really surprise you, and I would recommend paying close attention to how the music and sound effects levels change throughout a film.

What do you wish you would’ve known before becoming a mixer?

Probably that it’s OK to not be able to hear EVERYTHING all of the time. It took me a while to really understand this, and it’s definitely fundamental.  It’s important that the mix doesn’t sound cluttered through the whole show with an abundance of unnecessary sound. Editors cut for complete coverage, but as a mixer, it is your entire job to decide what sounds or music are most important for the audience to hear at each moment, and not overwhelm them with sounds that don’t support the story the filmmaker is telling in a scene.

Also Latch Prime in Stop, which lets you write automation without playing back. When I first started mixing I probably wasted a lot of time writing panning and volume automation in real-time that could have easily been done in a half a second when stopped.

What would you say the hardest obstacle is when it comes to mixing?

As I mentioned in the previous answer, the hardest obstacle is determining where to direct the viewer’s attention and how best to accomplish that. It can be extra challenging when you consider how much time, effort and creativity went into each sonic piece. The sound effects editor may have spent all day creating an amazing glowing steady for the magic orb in the background, but if the characters are having an important story conversation, it is not the time to feature those sound effects. You may really love the cello melody in this particular scene, but you know the audience needs to notice the distant explosions that draw the character’s attention off-screen. You make hundreds of these types of decisions during a mix and learning which direction to take things can really make or break the final product.


Hopefully, Jacob’s insight gives you a better understanding of mixing! If you enjoyed this post, you should also check out Jeff’s mixing post about the technical side of mixing:

DEMYSTIFYING THE TECHNICAL SIDE OF MIXING

WRITTEN BY JACOB COOK – RE-RECORDING MIXER, BOOM BOX POST


Building a Library From Home

A COLLABORATIVE POST BY TESS FOURNIER – SUPERVISING SOUND EDITOR, BOOM BOX POST

As a sound editor, having a well-rounded library is very important. Some of you might be lucky enough to have a library provided to you by your company and others might be wondering where the heck you even start. There are plenty of great libraries out there on the web that you can purchase or download for free with no effort of recording at all but there are also going to be things that you will need to record yourself. A good place to start is by recording small handheld props. Recently we came across needing these types of recordings for a new series. Check out some helpful tips below!

For this blog, I’d like to specifically use the veggies/fruits I recorded as our focus. The main benefit of recording food is being able to snack while you’re doing it. Am I right?

IMG_0211.jpg

You can’t tell me that picture doesn’t make you a little hungry! Alright, let’s break these recordings down into four primary points:

Recording Quality

There are many things to take into consideration when recording sound effects such as your meters, how far you are from the microphone, the noises happening in the room you are recording, etc. To get an in-depth look on some tips for recording, please check out this blog Jacob did! In my case, it was really hot the day I recorded these veggies, but I turned my A/C off for the sake of the recording! I also unplugged my refrigerator because it was making too much noise. Maybe sweating while recording will make you feel like you are working harder too!

Variety

Make sure you have a good amount of variety with whatever you’re recording. You don’t want to get to the editing stage of the records and wish that you had more variations and have to go back to step one and record again. For these veggie records, not only did I get a lot of different foods to prep, I also tried to make sure how I cut them was varied; short, long, sawing motion, ripping, etc.

IMG_0205.jpg

Save the Extras

I didn’t intend on recording and labeling knife-downs and carrots dropping, but they were a by-product of my main recording. Rather than just deleting them, I cleaned and labeled those as well because you never know when they’ll come in handy!

Clean and Properly Label

Lucky for you, Jacob loves to write blogs about recording sound effects! So, check out this blog he did to see how to edit these files. If you are too lazy to click the link, I will give you a short rundown:

Clean up the recordings as best you can by getting rid of background noise/etc. Cut out any excess you don’t need (like me picking up a new potato to record or coughing, etc between takes). Put like sounds together (sawing cuts should be one file, ripping, another, etc). Label properly – for these I labeled them with the type of food, how they were handled/cut (cut, rip, saw, etc).

Recording sound effects can be both fun and stressful at times. My best advice is to make sure you are having a good time and come into it prepared. Start brainstorming ideas and make a list of things to record and then get at them all at once! I’d say it is better to record too much than not enough. Make sure to record PLENTY of food….so you won’t be hungry for the other recordings.

You can read the original blog and more from Boom Box Post Here


Sounds Like Summer

June 20th officially marked the first day of summer, which means we are practically halfway through the year! Somehow the never-ending 2020 is managing to pass by in the blink of an eye. I’m still trying to wrap my head around the fact that we have been in quarantine for nearly 4 months now. I guess time flies when you’re stuck inside! Luckily, the world is slowly beginning to reopen just in time for us to enjoy the sunshine.

With the changing of the seasons comes a whole new world of sound. So, let’s discuss some key summertime sounds to keep an ear out for and record to bulk up your SFX library this time of year!

Sounds Like Summer:

  • Beach AMB – seagulls, waves, sandy wind gusts
  • Fireworks
  • Campfire
  • Summer Crickets
  • Water Activities – sprinklers, water balloons, water guns
  • Lawnmower
  • Ice Cream Truck
  • Air Conditioning
  • Slurpee Slurps
  • Badminton/Volleyball

Tips and Tricks:

Fireworks: Most towns have a celebratory firework display every 4th of July. Click here to check out a helpful blog post written by Boom Box Post-co-owner Jeff Shiffan about recording sound effects with your phone. In the post, Jeff uses fireworks as an example! Who knows, maybe you’ll also get some cool crowd reaction walla. I know I’m definitely that person who OOH’s and AHH’s way too loud at a good firework show.

Badminton/Volleyball: If you can get your hands on a badminton or tennis racket, quickly swing the racket back and forth to produce different swish/wipe SFX’s. These types of sounds are really handy to have in your library—especially when working in animation.

Ice Cream Truck: Does the ice cream truck not visit your neighborhood? That’s ok, you can make your own! Did you know the iconic music played by ice cream trucks across the world is public domain? The melody is from the folk song “Turkey in the Straw”. Download yourself a clip of the tune and throw it into a plugin like Doppler by waves. Make sure to check out these two blog posts (The Doppler Effect, Creating Motion In Sound Design Using Pitch) for tips on how to create the perfect “by”!

Slurpee Slurps: When I think of summer, I think of night drives with my friends to the local gas station for slurpees. Who doesn’t need a good straw slurp SFX in their library? I feel like it would come in handy more than you would imagine. Any tumbler and straw will do the trick! Although, if you can get your hands on a slurpee I recommend the Coca-Cola or banana flavor.

A COLLABORATIVE POST WITH Boom Box Post


X