
Live Digital Audio in Plain English Part 1
Digitizing the audio
Digital audio is nothing new, but there is still a lot of misunderstanding and confusion about how it really works, and how to fix it when things go wrong. If you’ve ever tried to find out more about digital audio topics, you will know that there are a lot of dry, complicated, and frankly, boring articles out there, seemingly written by automatons. I’m going to spend the next few posts tackling the fundamental ideas, specifically as they relate to live audio (rather than recording, which seems to have been covered a lot more), in plain English. For the sake of clarity and brevity, some things may be oversimplified or a bit wrong. If unsure, consult the internet, your local library, or a pedantic friend.
So, how does audio become digital in the first place? The analogue signal travels from the source (e.g., a mic) into the desk or its stagebox, where it gets turned into a series of 1s and 0s by an analogue-digital converter (AD converter or ADC). AD converters work by taking lots of snapshots (called samples) of the waveform in very quick succession to build up a digital reconstruction of it: a method known as pulse-code modulation (PCM. Don’t worry about remembering all these terms; it’s just useful to understand the whole process. In over ten years of live gigs, I’ve never heard anyone discuss PCM, and I’ve heard some pretty nerdy conversations). Two factors control how accurate that reconstruction will be: sample rate and bit depth.
Sample rate is the rate at which the samples are taken! Not surprisingly, the more samples per second, the smaller the gap between them (sample interval) and the less information that is lost. Think of it like frame rate in film – a low sample rate is like a jerky, stop-motion video, high sample rate is like 48 frames per second fancy Peter Jackson stuff.
Bit depth is the number of bits (piece of information encoded in binary for electronic use – so a 0 or a 1) in each sample. 8 bits make a byte, and samples are set to capture the same number of bytes each time. They record the amplitude of the signal – more bits mean there are more discrete amplitudes that it can be recorded as (See figure 1), so the resolution of the soundwave becomes clearer. Bits are like pixels on a screen – low bit depth is similar to blocky, unclear footage, high bit depth is like high definition where you can see every detail. Back in the early days of computer games, there wasn’t much available memory in the cartridges, so all the sound was recorded in 8-bit. The low-resolution audio matched the pixelated video.
Figure 1: Bit depth vs. sample rate. Time is represented on the x-axis, amplitude on the y-axis. Source: https://www.horusmusic.global/music-formats-explained/ Original source unknown.
Looking at figure 1, it’s clear that the longer the bit depth and the higher the sample rate, the closer you can get to the original waveform. Realistically you can’t take an infinite number of infinitely detailed samples every second – even very high values of each produce an unmanageable amount of data to process, and costs too much to be practical. The Nyquist-Shannon theorem states that to reproduce a waveform accurately for a given bandwidth you need to take more than twice as many samples per second as the highest frequency that you are converting. If you take fewer samples than the highest frequency, an entire wavelength could happen between samples but wouldn’t be recorded. With between as many and twice as many, you still wouldn’t collect enough data about that waveform to differentiate it from all other frequencies, as is shown in figure 2.
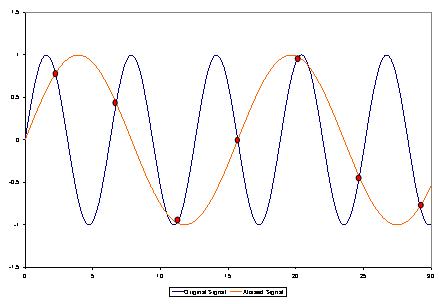
Figure 2: Aliasing. If a waveform isn’t sampled often enough, it can be confused with other, lower frequency, ones.Source: Eboomer84 via Wikimedia Commons https://commons.wikimedia.org/wiki/File:Aliasing.JPG
For music, we usually assume the bandwidth is the range of human hearing: roughly 20Hz-20kHz. Twice that range is just under 40kHz, but the Sony corporation figured out that 44.1kHz synced up nicely with the video recording equipment they already had while leaving a nice margin for error, so it became the standard for recording film audio and CDs. Later 48kHz was adopted because it worked well with new digital video recording gear, and could reproduce even higher frequencies. Most digital mixing desks work on 48kHz or 96kHz.

Moiré patterns like this, or the weird lines when you take a photo of a screen, can be caused by the visual equivalent of aliasing. We have more in common with the video department than we might like to admit. Credit: “angry aliasing in a webgl fragment shader” by Adam Smith on flickr. https://creativecommons.org/licenses/
Why bother with 96kHz? No one can hear 48kHz, so what’s the point in sampling enough to cover it? It isn’t strictly necessary, but there are a few reasons to do it anyway. Firstly there’s the argument that, much like when choosing a speaker’s frequency range, frequencies above the limit of human hearing can still affect the overall waveform, and so ignoring them can change the resulting sound. Secondly, in digital sampling, higher frequencies can have a real and detrimental effect called aliasing. In figure 2 you can see that the AD converter would not be able to tell whether the points it’s recorded belong to a very high-frequency waveform or a lower one. It has been told what bandwidth to expect to see, so it will assume that waveform is the lower one, within the defined bandwidth. This causes it to be artificially added to the digital audio, making it sound… just not quite right. AD converters use low pass filters, called anti-aliasing filters, to get rid of these high frequencies but they aren’t perfect; they aren’t like a brick wall stopping everything above 20kHz (or whatever they’re set to) getting through, they have a sloping response just like other filters. Increasing the sample rate can clarify which waveform is which and take the pressure off the anti-aliasing filter, moving the highest frequency that can be accurately recognised higher than that slope. Thirdly, AD converters use complex mathematical formulae to take an educated guess at filling in the blanks between samples, known as quantisation. The more samples you have, the smaller the blanks that need to be filled and the more accurate that quantisation can be.
Increasing the bit depth also greatly reduces quantisation errors. Quantisation is basically rounding to the nearest amplitude point to smooth off the ‘pixelated’ waveform – more bits mean more options to find as close a point to the real value as possible. When this process is inaccurate, the guesswork introduces noise that isn’t present in the original signal. Increasing the bit depth reduces that guesswork, increasing the ‘signal to quantisation noise ratio.’ 24 bit, which is common in live digital audio, can give you over 120dB of dynamic range because it significantly lowers that quantisation noise floor, and so can give your true signal more space and reduce the likelihood of it clipping.
As ever, your sound will only be as good as the weakest link in the chain. You might never notice the differences between these options in a live setting as a lot of live gear is not sensitive enough to show them. This might be why there is so much more discussion about them in relation to studios. However, it helps to know what processes are at work, especially when it comes to troubleshooting, which I’ll cover in a future post.
 Beth O’Leary is a freelance live sound engineer and tech-based in Sheffield, England. While studying for her degree in zoology, she got distracted working for her university’s volunteer entertainments society and ended up in the music industry instead of wildlife conservation. Over the last ten years, she has done everything from pushing boxes in tiny clubs to touring arenas and spends a lot of her life in muddy fields working on most of the major festivals in the UK. She has a particular passion for flying PA, the black magic that is RF, travel, and good coffee.